
:max_bytes(150000):strip_icc():format(webp)/GettyImages-642250032-010d3026f565420eac9ac098bced6278.jpg)
Updated The Mechanics Behind Anime Translations Insights Into Adaptation and Localization for 2024
The Mechanics Behind Anime Translations: Insights Into Adaptation and Localization
All about Anime Dubbing

Shanoon Cox
Mar 27, 2024• Proven solutions
Anime might have been originated from Japan, but today it has become a worldwide phenomenon with millions of fans out there. Since most of the anime series are in Japanese, they are dubbed in different languages for their global audience. Though, anime dubbing is an art in itself as it takes a lot of effort to provide a seamless entertainment experience to others. In this post, I’m going to make you familiar with the process that goes behind anime dubbing and how you can master it in no time.

- Part 1: What is the Art of Anime Dubbing?
- Part 2: Why is Voicing Important in an Anime?
- Part 3: What is the Process of Anime Dubbing?
- Part 4: Is Anime Dubbing Enjoyable or Painful?
- Part 5: Anime Dubbing Tips for Beginners
What is the Art of Anime Dubbing?

http://animeyourway.blogspot.com/
There are tons of anime out there, but most of them are originally made in Japanese. To make them appealing to an international audience, the concepts of dubbing and subbing are implemented. In subbing, we simply add subtitles to the scene by placing its strip at the bottom, which is comparatively easier.
On the other hand, Anime dubbing is a more complex process in which the original soundtrack in Japanese is first removed from the video. Now, a script is designed for the other language (like English) in which the video has to be dubbed. Afterward, voiceover artists would match the dialogues with the original pace of the video to attain flawless dubbing results. Now, the audience of the second language can also watch the anime with the dubbed soundtrack instead of the Japanese.
In some cases, even after dubbing, subtitles are also added in post-production to get better results.
Why is Voicing Important in an Anime?

Anime is an art-form and hence, it is should be treated creatively when transitioning into different cultures. The first generation of anime traces to the 1910s in Japan while they became mainstream with Astro Boy that was a hit not only in Japan but in the US as well. Needless to say, the anime industry has grown drastically with over $17 billion worth worldwide.
That’s why it has become more important than ever to focus on anime dubbing and make the content appealing to a vast audience. Too many times, while dubbing, the original nature of a character is lost due to the improper voice transition. Sometimes, there are edits in the script to match the pace of the scene that ends up changing the meaning drastically.
Therefore, to make sure the true essence of the anime is maintained, the concept of voice interpretation is implemented. In this, voiceover artists are taught about their characters and their nature. Instead of bringing their own flair while recording, they are encouraged to voice their characters instead.
What is the Process of Anime Dubbing?
Now when you know the importance of anime dubbing, let’s get to know about the process in detail. Although the overall process can be implemented differently in various countries and studios, the following steps are mostly followed by professionals.
Step 1: Transitioning and Translation
This is the foundation of anime dubbing as it helps us in scriptwriting and voiceover. Firstly, the anime is studied by the team, which includes native Japanese experts. For instance, if the anime is about Japanese history or its pop culture, then an expert from the related field is asked to join.
Furthermore, all the dialogues are transcribed and further translated by professionals. To make sure that no cultural norms are lost in the process, a group of people is invited to work on this. If the anime is about pop culture, then it can be a bit tough since some dialogues might lose the original meaning in the translation.
Step 2: Scripting and Adaptation
A mere translation of the anime is not enough as it is needed to fit the scene and should have a flawless transition. For this, scriptwriters take the translated document (for instance, Japanese to English translated version) and start developing a script for that. They will watch the scene simultaneously and would work with voiceover artists as well. In this way, we can avoid any delay or rapid movement between the picture and voiceover audio.
- The new dialogues should be spoken in the same way so that the original speech and the voiceover should be matched.
- A lot of sentences have to be reconstructed entirely since Japanese grammar is pretty different than English. Sometimes, a single word in Japanese might mean a whole sentence in English. This means we need to write the script while matching the pace of the scene and keeping the meaning intact (which can be pretty challenging).
- Scriptwriters need to focus on the way a sentence is delivered and conveyed. If you are not careful, then you will lose out on certain nuances.
- To get an ideal script, you might need to watch the anime and deliver your dialogues back-and-forth. Writers are encouraged to be more adaptive and keep the cultural knowledge of their audience in mind as well.
- If the anime is deeply rooted in Japanese cultural norms that you know your audience won’t understand, then you can abandon it while still being faithful to the original material. For instance, Shin-chan had too many Japanese norms and thus it was re-written in English to include more local terms.
Step 3: Recording and Finishing
After completing the scriptwriting, recording artists work on it to give it a final touch. Although it is recommended for all recording artists to do their voice work together for a seamless amalgamation, sometimes they record their dialogues separately as well.
The recording artists are encouraged to do their bit of research and are made familiar with the anime. During the recording process, artists focus on the “matching flap” movement, which means their dialogues should match with the movement of their character’s lips. For this, they can fasten or slow their speed of dialogue delivery or add bits and pieces in between to give it a personal character.
While it is not possible to be entirely accurate and match the pace, artists try their best by looking at the video while delivering their dialogues. Some mistakes and flubs are bound to happen in the process, but that is what makes anime dubbing so hilarious and creative.
Is Anime Dubbing Enjoyable or Painful?
This is something that a lot of anime fans would like to ask voiceover professionals. Well, it would be subjective and depend on the anime as well as the professionals working on it.
In most of the cases, the process is pretty enjoyable if the artists and writers are fans of anime. Yes, the process can be a bit tedious, but that is the demand of this challenging profession altogether.
Michael Lindsay, who was widely appreciated for his work in the Marmalade Boy, admits how tough the job can be. It requires a lot of rework and the voiceover artists need to go back-and-forth to get the right pace.
Olivia Venegas, who has been a part of the anime dubbing industry for over a decade, admits how the process has changed. Now, production houses are more focused on creating a “localized” version of the anime that their audience can understand instead of keeping it rigid to their original material.
Overall, the change in the anime dubbing process and the presence of better technology has certainly made it more fun and less painful.
Anime Dubbing Tips for Beginners
If you are just starting your career in anime dubbing and would like to improve your work, then consider these expert tips.
- To start with, do your bit of research and make sure you understand the Japanese culture. If the anime is about history or a cultural phenomenon, then get to know about it so that you won’t miss any nuance.
- If you are a voiceover artist, then sit with the scriptwriter during the translation and writing process. This will help you understand their writing process and you can also give suggestions regarding voiceover.
- Focus on your speech and the pace while recording every word. At times, we are needed to eat some words or have to stretch them to match with the movement of the character’s lips.
- Try not to be overdramatic and don’t “act” too much while recording. Consider anime characters as real humans with organic feelings. If you over-do it, then it can become funny and take away the gravity of the scene.
- Apart from your usual research, also watch the body language of your characters and their expressions. You can try to take the same posture and position while delivering any dialogue for a better anime dubbing experience.
- Most importantly, let the transition be more organic and feel free to make some creative choices to own the character. Remember, your aim is to be the character and not let the character become you.
- Lastly, keep in mind your audience while dubbing and make sure that they should relate to the nuances and cultural slangs you have included. While it is suggested to stick to the source material, you can bend it keeping the mindset of your target audience.
That’s a wrap, everyone! I’m sure that after reading this guide, you would be able to know more about anime dubbing and the effort that goes behind it. Although it is a complicated and tiresome process, some new-age tools and applications have made it better. If you are also just starting, then make sure you follow the above-listed tips and be familiar with the available tools. This will help you become a pro and you can certainly level-up your skills with time.
Shanoon Cox
Shanoon Cox is a writer and a lover of all things video.
Follow @Shanoon Cox
Shanoon Cox
Mar 27, 2024• Proven solutions
Anime might have been originated from Japan, but today it has become a worldwide phenomenon with millions of fans out there. Since most of the anime series are in Japanese, they are dubbed in different languages for their global audience. Though, anime dubbing is an art in itself as it takes a lot of effort to provide a seamless entertainment experience to others. In this post, I’m going to make you familiar with the process that goes behind anime dubbing and how you can master it in no time.
- Part 1: What is the Art of Anime Dubbing?
- Part 2: Why is Voicing Important in an Anime?
- Part 3: What is the Process of Anime Dubbing?
- Part 4: Is Anime Dubbing Enjoyable or Painful?
- Part 5: Anime Dubbing Tips for Beginners
What is the Art of Anime Dubbing?
http://animeyourway.blogspot.com/
There are tons of anime out there, but most of them are originally made in Japanese. To make them appealing to an international audience, the concepts of dubbing and subbing are implemented. In subbing, we simply add subtitles to the scene by placing its strip at the bottom, which is comparatively easier.
On the other hand, Anime dubbing is a more complex process in which the original soundtrack in Japanese is first removed from the video. Now, a script is designed for the other language (like English) in which the video has to be dubbed. Afterward, voiceover artists would match the dialogues with the original pace of the video to attain flawless dubbing results. Now, the audience of the second language can also watch the anime with the dubbed soundtrack instead of the Japanese.
In some cases, even after dubbing, subtitles are also added in post-production to get better results.
Why is Voicing Important in an Anime?
Anime is an art-form and hence, it is should be treated creatively when transitioning into different cultures. The first generation of anime traces to the 1910s in Japan while they became mainstream with Astro Boy that was a hit not only in Japan but in the US as well. Needless to say, the anime industry has grown drastically with over $17 billion worth worldwide.
That’s why it has become more important than ever to focus on anime dubbing and make the content appealing to a vast audience. Too many times, while dubbing, the original nature of a character is lost due to the improper voice transition. Sometimes, there are edits in the script to match the pace of the scene that ends up changing the meaning drastically.
Therefore, to make sure the true essence of the anime is maintained, the concept of voice interpretation is implemented. In this, voiceover artists are taught about their characters and their nature. Instead of bringing their own flair while recording, they are encouraged to voice their characters instead.
What is the Process of Anime Dubbing?
Now when you know the importance of anime dubbing, let’s get to know about the process in detail. Although the overall process can be implemented differently in various countries and studios, the following steps are mostly followed by professionals.
Step 1: Transitioning and Translation
This is the foundation of anime dubbing as it helps us in scriptwriting and voiceover. Firstly, the anime is studied by the team, which includes native Japanese experts. For instance, if the anime is about Japanese history or its pop culture, then an expert from the related field is asked to join.
Furthermore, all the dialogues are transcribed and further translated by professionals. To make sure that no cultural norms are lost in the process, a group of people is invited to work on this. If the anime is about pop culture, then it can be a bit tough since some dialogues might lose the original meaning in the translation.
Step 2: Scripting and Adaptation
A mere translation of the anime is not enough as it is needed to fit the scene and should have a flawless transition. For this, scriptwriters take the translated document (for instance, Japanese to English translated version) and start developing a script for that. They will watch the scene simultaneously and would work with voiceover artists as well. In this way, we can avoid any delay or rapid movement between the picture and voiceover audio.
- The new dialogues should be spoken in the same way so that the original speech and the voiceover should be matched.
- A lot of sentences have to be reconstructed entirely since Japanese grammar is pretty different than English. Sometimes, a single word in Japanese might mean a whole sentence in English. This means we need to write the script while matching the pace of the scene and keeping the meaning intact (which can be pretty challenging).
- Scriptwriters need to focus on the way a sentence is delivered and conveyed. If you are not careful, then you will lose out on certain nuances.
- To get an ideal script, you might need to watch the anime and deliver your dialogues back-and-forth. Writers are encouraged to be more adaptive and keep the cultural knowledge of their audience in mind as well.
- If the anime is deeply rooted in Japanese cultural norms that you know your audience won’t understand, then you can abandon it while still being faithful to the original material. For instance, Shin-chan had too many Japanese norms and thus it was re-written in English to include more local terms.
Step 3: Recording and Finishing
After completing the scriptwriting, recording artists work on it to give it a final touch. Although it is recommended for all recording artists to do their voice work together for a seamless amalgamation, sometimes they record their dialogues separately as well.
The recording artists are encouraged to do their bit of research and are made familiar with the anime. During the recording process, artists focus on the “matching flap” movement, which means their dialogues should match with the movement of their character’s lips. For this, they can fasten or slow their speed of dialogue delivery or add bits and pieces in between to give it a personal character.
While it is not possible to be entirely accurate and match the pace, artists try their best by looking at the video while delivering their dialogues. Some mistakes and flubs are bound to happen in the process, but that is what makes anime dubbing so hilarious and creative.
Is Anime Dubbing Enjoyable or Painful?
This is something that a lot of anime fans would like to ask voiceover professionals. Well, it would be subjective and depend on the anime as well as the professionals working on it.
In most of the cases, the process is pretty enjoyable if the artists and writers are fans of anime. Yes, the process can be a bit tedious, but that is the demand of this challenging profession altogether.
Michael Lindsay, who was widely appreciated for his work in the Marmalade Boy, admits how tough the job can be. It requires a lot of rework and the voiceover artists need to go back-and-forth to get the right pace.
Olivia Venegas, who has been a part of the anime dubbing industry for over a decade, admits how the process has changed. Now, production houses are more focused on creating a “localized” version of the anime that their audience can understand instead of keeping it rigid to their original material.
Overall, the change in the anime dubbing process and the presence of better technology has certainly made it more fun and less painful.
Anime Dubbing Tips for Beginners
If you are just starting your career in anime dubbing and would like to improve your work, then consider these expert tips.
- To start with, do your bit of research and make sure you understand the Japanese culture. If the anime is about history or a cultural phenomenon, then get to know about it so that you won’t miss any nuance.
- If you are a voiceover artist, then sit with the scriptwriter during the translation and writing process. This will help you understand their writing process and you can also give suggestions regarding voiceover.
- Focus on your speech and the pace while recording every word. At times, we are needed to eat some words or have to stretch them to match with the movement of the character’s lips.
- Try not to be overdramatic and don’t “act” too much while recording. Consider anime characters as real humans with organic feelings. If you over-do it, then it can become funny and take away the gravity of the scene.
- Apart from your usual research, also watch the body language of your characters and their expressions. You can try to take the same posture and position while delivering any dialogue for a better anime dubbing experience.
- Most importantly, let the transition be more organic and feel free to make some creative choices to own the character. Remember, your aim is to be the character and not let the character become you.
- Lastly, keep in mind your audience while dubbing and make sure that they should relate to the nuances and cultural slangs you have included. While it is suggested to stick to the source material, you can bend it keeping the mindset of your target audience.
That’s a wrap, everyone! I’m sure that after reading this guide, you would be able to know more about anime dubbing and the effort that goes behind it. Although it is a complicated and tiresome process, some new-age tools and applications have made it better. If you are also just starting, then make sure you follow the above-listed tips and be familiar with the available tools. This will help you become a pro and you can certainly level-up your skills with time.
Shanoon Cox
Shanoon Cox is a writer and a lover of all things video.
Follow @Shanoon Cox
“Audiovisual Mastery on a Budget: The Ultimate List of Free Audio Mixers “
Top 10 Best Audio Mixer Software for FREE

Benjamin Arango
Mar 27, 2024• Proven solutions
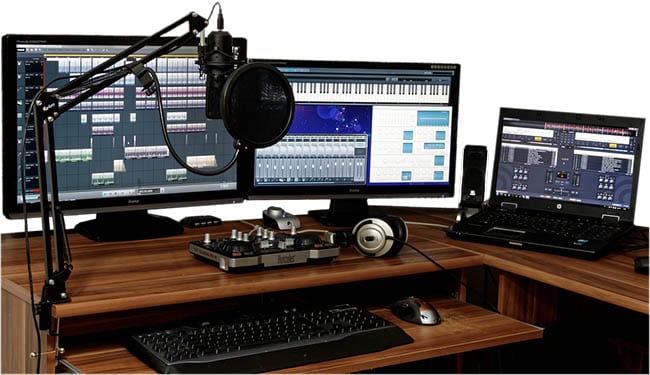
You may be a musician who wants to record their music, or just a person wanting to develop his custom ringtone. In either case, a physical or virtual audio mixer is required, whether it be analog or a dedicated audio mixer software.
But you need to have some technical knowledge to make optimal use and funk up your music/sound.
Here we are to give you the knowledge you need and some amazing audio mixer software that could be perfect for you. So buckle up, and get ready to level up the harmoniousness of your creativity!
You will Learn :
- Part 1. 10 Best Sound/Audio Mixer Software - [Video Guide]
- Part 2. All You Know About Audio Mixer
- Part 3. What to Consider While Choosing an Audio Mixer Software?
- Part 4. Basic Audio Mixer Settings You Should Know
- Part 5. Why Audio Mixer Software?
Part 1. 10 Best Sound/Audio Mixer Software
Whether you are pursuing a music career, making a video for a movie clip, or merely creating some hard-core beats for fun, you’ll be needing good sound mixing software.
Selecting an audio mixer software perfect for your requirements and available resources is not an easy task.
Some of them are for free while some charge for it, some offer limited features. At the same time, some are specific to a certain operating system, the options and availabilities are endless, and choosing among them is a hell of a daunting task.
But no need to stress out because we are here to take your burden on our shoulders and help you choose exactly what you want! So sit back and relax!
| 1 - Wondershare Filmora | 2 - Adobe Audition |
|---|---|
| 3 - Logic Pro X | 4 - Audacity |
| 5 - Reaper | 6 - Fl Studio |
| 7 - SoundAtion | 8 - HyaWave |
| 9 - Twisted Wave Online | 10 - Bear Audio Tool |
1. Wondershare Filmora
Filmora Audio Mixer is professional in audio mixing and video editing. This is used for mixing, balancing, and combining different sounds, and audio signals, sources like microphones, instruments, and synthesizers, or previously recorded audio.


Pros
- Imports audio file in the original format and mix the audio with built-in tools.
- Split, rearrange, and apply remix effects on added audio clips.
- Auto remix music to change audio length with high quality.
- Export audio files in MP3, FLAC, M4A, OGG, etc…
- Audio sync option while editing.
- Audio ducking features to lowers the background volume.
Audio formats support: all (import/export and audio/video) file formats.
Compatibility: Windows 7 to windows 10 sound mixer and mac OS.
Price: free and paid.
If you are facing any trouble regarding audio mixing through an audio mixer software, then here’s a video tutorial for Filmora software.
You can download it for free and follow the video guide step by step. Check the below video:
2. Adobe Audition

It is primarily designed for professional users having several features like multi-track editing and mixing, Auto Ducking, clip editing.
Pros:
- Availability of a vast range of features.
- Attractive user interface.
- Good for video sounds or voice-over editing overall, including sound mixing.
Cons:
- A little too complex for a newbie to understand.
- Not good enough for music productions.
- This software is subscription-based.
Audio formats support: MP3, WMA, WAV, AIFF, AC-3, PCM, AIFC, and more.
Compatibility: Mac OS, Windows.
Price: free and paid for both.
3. Logic Pro X

This software is suitable for both professional users and beginners. It combines all the basic and advanced features, including Flex Time, automatic time matching of different tracks, Flex Pitch, arpeggiator, etc.
Pros
- Works wonderfully on Mac.
- Rich Featured software and several plugins.
- Singular notes control.
- Tutorial easily available.
Cons:
- Mac only.
- Expensive.
Audio formats support: WAV, AIFF, CAF, PCM, ALAC, MP3, and more.
Compatibility: macOS.
Price: Paid
4. Audacity

A free, open-source, and features rich software perfect for both professional and beginner users. Its offers multiple effects and tolls like analysis, envelope, time-shift tools, etc.
Pros
- Free.
- Cross-platform.
- Easy to use.
- Features for beginner and pro-level, both.
- Online community available for help.
Cons:
- Not very appealing UI.
- May face crashes on Mac.
Audio formats support: MP3, MP4, AIFF, PCM, WMA, AC3, AMR, and more.
Compatibility: Linux, Windows, and macOS.
Price : free.

Filmora Audio Mixer
Wondershare Filmora - Audio Mixer
• Easily mix audio, sound, music or song as your need
• Edit audio files like denoise, crop, audio ducking, audio auto synchronization, etc…
• Cross-platform supported - (Windows, Mac, iOS, Android)
Mix Your Audio Now Mix Your Audio Now Mix Your Audio Now Learn More >
5. Reaper

This is one of the few software facilities with a bunch of features at such an affordable price. It has multiple tracks, multichannel support, real-time, non-destructive effect application, pitch-shifting, and time-shifting features.
Pros
- Feature-rich.
- More affordable than other audio mixer software.
- Detailed tutorials are available online.
Cons:
- Not very appealing UI as of LPX or Audition.
- Not suitable for beginners.
Audio formats support ACID, AIFF, MP3, MPEG WMV, and more.
Compatibility: Linux, Windows, and macOS.
Price: free and paid.
6. Fl Studio
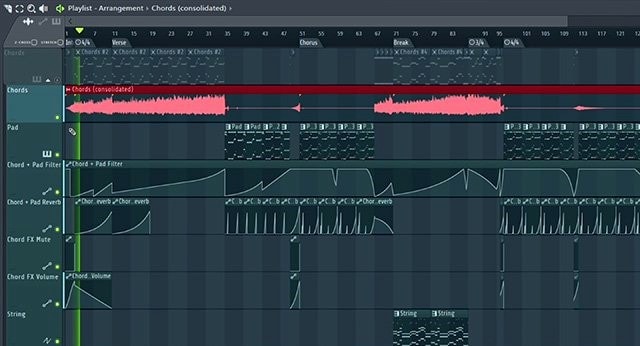
It is one of the top-notch software used for sound mixer and editing purposes. It supports pitch shifting, time stretching and multi-track recording, 80 plugins, VST standards, delay compensation, etc.
Pros
- Comes with abundant Features.
- Works great for music productions.
- Supports 3rd party plugin.
Cons:
- Not very appealing UI.
- May be intimidating for beginners.
Audio formats support: AIFF, DS, MP3, OGG, WAV and more.
Compatibility : Windows and macOS.
Price: free and paid.
7. SoundAtion
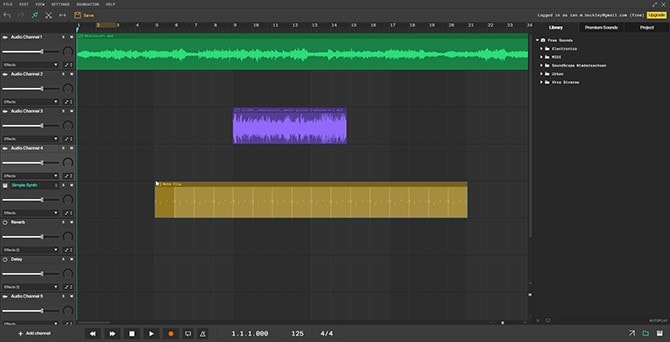
It is a browser-based software that facilitates non-destructive Multi-track audio editing, dynamic mixing, several effects selection, and EQ across multiple tracks.
Pros
- Free digital audio Workstation (DAW).
- Works wonderfully for sound effects, podcasting, and general-purpose sound task.
- Supports 3rd party plugin.
Cons:
- Automation not featured in a free trial.
- Limited audio quality in a trial version.
Audio Formats Support: MP3 and WAV.
Compatibility: any operating system.
Price : free and paid.
8. HyaWave
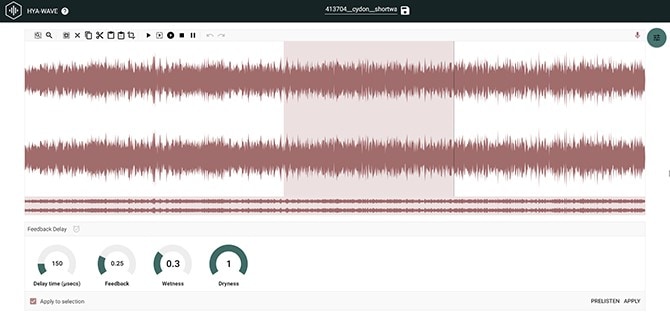
It offers functions like cutting with an online audio cutter, paste and trim audio, and supports 18 filters, effects, and publication through URL and social media with the minimalistic user interface.
Pros
- Easy and simple user interface.
- Audio filter customization.
- Has a built-in audio player, recorder, and editor.
Audio formats support: MP3, WAV, and more.
Compatibility : any operating system.
Price : free.
9. Twisted Wave Online

It is an online software almost equally compatible with many paid sound mixer and editing tools. It also supports uncompressed audio recording, VST effects, and several core effects.
Pros
- Cloud storage of edited audio, saving the disk space.
- Sampling rate conversation.
- Online and free.
Cons:
- Upload file in mono in a trial version.
- Supports 5 minutes audio clip in a trial version.
Audio formats support : MP3.
Compatibility: any operating system.
Price: free and paid.
10. Bear Audio Tool
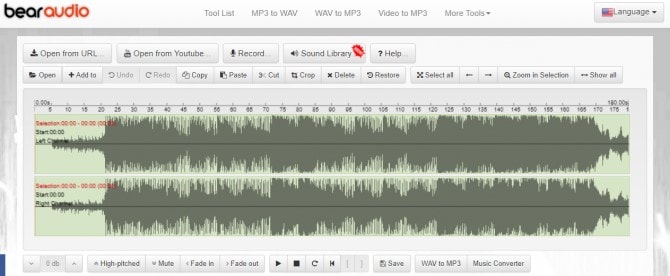
This is online browser-based software that can edit the files from our local storage, and you don’t have to upload the audio to their server. It can cut, apply effects, trim, etc. It has ample own music library, effects and import options.
Pros
- Copyright-free.
- Import audio directly from URL or social media domains.
- Features rich.
Cons:
- Not suitable for very advanced usage.
Audio formats support : MP3, OGG, WAV, WMA, M4R and OGG.
Compatibility : any operating system.
Price: free and paid.
Part 2. All You Know About Audio Mixer
[1] What is an audio mixer?
An audio mixer is used for several significant purposes. It is known with several names. Whether a mixing desk, soundboard, mixing board, audio mixer, or mixing console, all have a coherent purpose. The sole purpose of an audio mixer is to manage either the live or recorded event.
As the name suggests, audio mixing is the process of mixing multiple sounds and consolidating them into one or more channels.
This process is performed in a way that manipulates or enhances the dynamics, source’s volume level, panoramic position, and frequency content. The end moto of this creative and aesthetic treatment is to present the audio appealing to the listeners.
[2] What does an audio mixer do?
As mentioned above, the primary function of an audio mixer is to mix more than one audio signal and combine them into one or more output signals.
As an example, you may think of an audio mixing engineer, let’s say, orchestra conductor, who ensures that all the segregated sound sources mix into one harmonious soundtrack.
For this, they will use an audio mixer for filtering and optimizing sound by level adjusting, developing monitor feeds, using equalization and effects for sound enhancement.
This process is performed by a mixing engineer who operates either a digital audio workstation or a mixing console .
[3] What is audio mixing used for?
Audio mixing can be used in many fields, and it’s very common in our daily life, such as:
- 1. Music
- 2. Live sound
- 3. Film
- 4. Television
Filmora Audio Mixer
Wondershare Filmora - Audio Mixer
• Easily mix audio, sound, music or song as your need
• Edit audio files like denoise, crop, audio ducking, audio auto synchronization, etc…
• Cross-platform supported - (Windows, Mac, iOS, Android)
Mix Your Audio Now Mix Your Audio Now Mix Your Audio Now Learn More >
Part 3. What to consider while choosing an audio mixer software?
Before starting off with the audio mixing activity itself, one must be able to determine which audio mixer software is best for them with respect to their availability of resources or usability. Here are some of the factors to consider while opting for an audio mixer software:
- Check whether the software is paid or free.
- Check whether the limited features offered in a trial/free audio mixer software are enough to satisfy all your needs.
- Choose the paid or the free one depending on the extent of audio mixing quality you want.
- Look for an easy user interface.
- Look for software compatibility with your existing operating system.
- Check for the availability of tutorials related to the use of audio mixer software that you want to opt for better guidance.
- Look for the basic or advanced functions support in the audio mixer software that you choose depending upon your usability.
- Whether the software is available online or you need to install the version.
Part 4. Basic audio mixer settings you should know
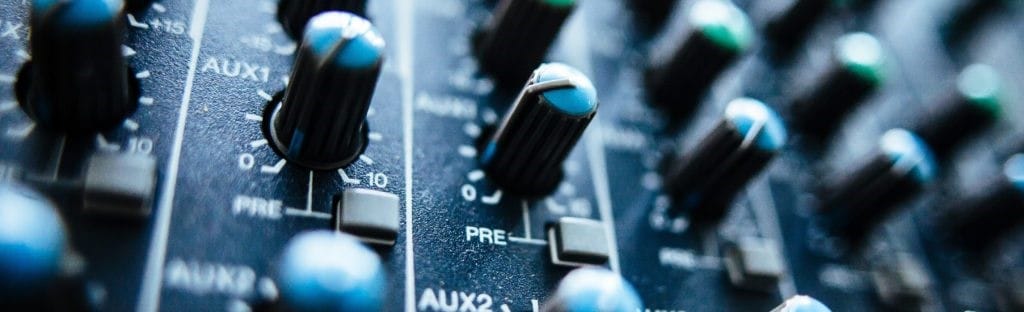
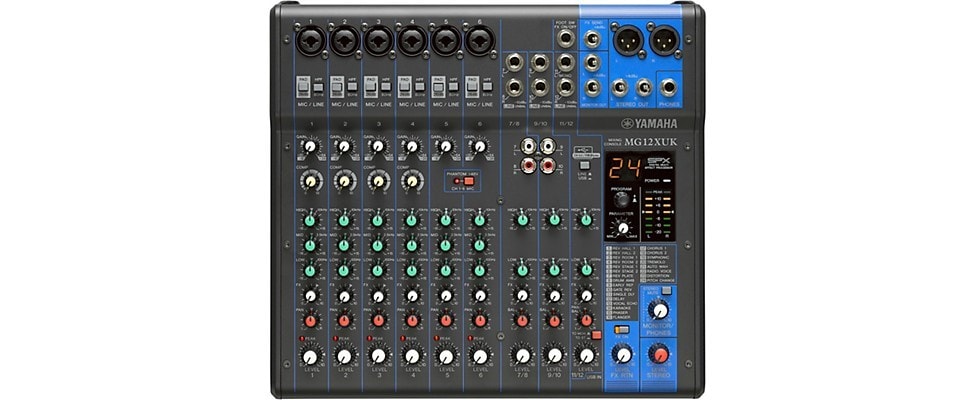
It is necessary to know at least somewhat about the fundamental terminologies to decipher the specifications and features of an audio mixer. Here you’ll get to know what it takes to be able to distinguish among different audio mixers and their respective software.
Channel:
It is a signal path. Channels are made to accept microphones, preamps, amplifiers, and signal processors. A mixer with several channels integrated with it allows several things to be integrated and routed through it.
Channel Strip:
It is a cluster of controls and circuits that works together on a specified mixing channel to manipulate the audio that passes through it. Some of which includes the following:
Input jack:
It is the jack where any external instrument, like guitar, microphone etc., integrates with the mixer. The noise and interface are minimized to maximum extent by balancing the XLR inputs. A quarter-inch TRS connector or RCA are connected to other inputs.
Microphone preamp:
It produces weak mic signals by the raise of line-level strength for processing.
Equalization:
Often abbreviated as “EQ”, is used to adjust the frequency response of a signal.
Dynamics:
This process is used to perform grating and compressing.
Routing:
It directs the incoming signals to external devices or mixer circuitry.
Fader:
Its fundamental objective is to control the inputs and outputs of a channel.
Meter:
Kind of a gauge or interface that presents the channel output.
I/O:
I/O is abbreviated as inputs/outputs on a mixer in this regards. The number and category of I/O will depend on the use of a mixer.
Now, let’s understand the scenario of live mixing.
Such a mixer is needed which is enough to handle the outputs needed to connect the mains, microphones, other devices that connect to it and monitor speakers. The devices that are a part of a recording process or signal chain must also be included while calculating I/O for studio mixers.
Such inputs/outputs include headphones, effects processors, monitor speakers, signal processors and other instruments as well that uses direct injection (DI) boxes to connect to the mixer.
Buses:
It can be understood as a circuit intersection where the outputs from different channels meet. The signal channels are routed to a specific bus or set of busses. The main mixer output to a recorder or a speaker by the master mix bus.
Auxiliary buses, often known as aux buses or aux sends, are usually fed by the channel’s volume controls with which they are connected and then send those signals through their own output jacks. This is called as post-fader sends which are used to send the mixes of monitor speakers, signals to headphones or effects processors.
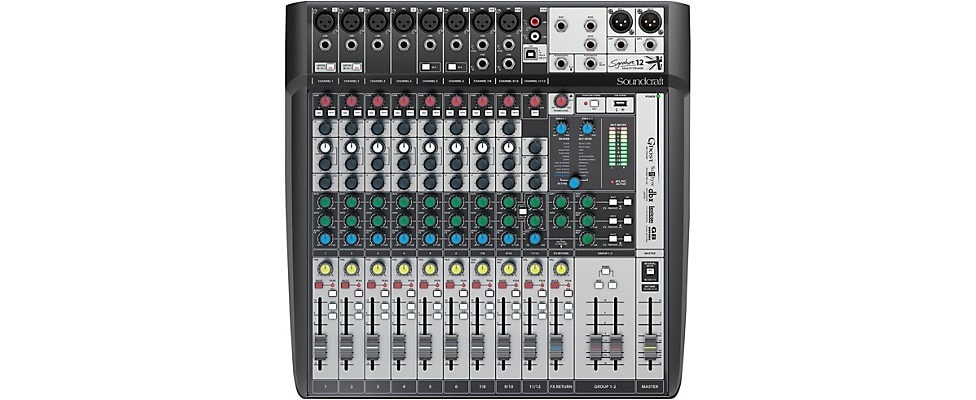
Groups:
Several channels in a mixer often offer a group function that allows one to simultaneously process and control various channels. Its works are similar to that of sub-mixer that shares the coherent signal routing and processing and provides the ease in controlling master bus since a single fader is used to control all the channels.
Inserts:
External and add-on sound processors, such as equalizers and compressors, are connected with the help of a channel insert.
Direct Output:
These feed mixer’s preamplifiers output to recording systems and external sound interfaces.
Cue System:
Cue systems allow listening on the specified channels without affecting the mixer’s output. This usually allows the signal to listen either before fading manipulation or after.
Part 5. Why audio mixer software?
In the early days, analog audio mixers were the only option available to perform sounding mixing. But the rise of the era of the 21st century brings more opportunities for easy and optimized audio mixing by sound mixer software.
All you need is a configured laptop, audio mixer software, and merely a control surface to jump into this world while being within the budget!
This audio mixer software is easily available to do everything or even more than what a physical mixer could have done. Several sound mixer applications are available to start with basic sound mixing using your smartphones or even tablets.
For the sake of recording, software-based mixers allow easy integration with the virtual instruments, drum loops, samples, and several other additions in your productions. The use of advanced MIDI functions with a digital audio workstation (DAW) lets you enlighten with a whole new world of possibilities to elevate your sounds/music to the next level.
Final verdict: Have you decided on your audio mixer software?
The usability and optimality of a sound mixer online software depend solely on the extent of application, available resources, and OS compatibility.
But, it can be said without a doubt that Wondershare Filmora is the most user-friendly, with immense flexibility in terms of uses and compatibility. Its broad-scale usability and promising results make it outshine the most among other audio mixing software.
Benjamin Arango
Benjamin Arango is a writer and a lover of all things video.
Follow @Benjamin Arango
Benjamin Arango
Mar 27, 2024• Proven solutions
You may be a musician who wants to record their music, or just a person wanting to develop his custom ringtone. In either case, a physical or virtual audio mixer is required, whether it be analog or a dedicated audio mixer software.
But you need to have some technical knowledge to make optimal use and funk up your music/sound.
Here we are to give you the knowledge you need and some amazing audio mixer software that could be perfect for you. So buckle up, and get ready to level up the harmoniousness of your creativity!
You will Learn :
- Part 1. 10 Best Sound/Audio Mixer Software - [Video Guide]
- Part 2. All You Know About Audio Mixer
- Part 3. What to Consider While Choosing an Audio Mixer Software?
- Part 4. Basic Audio Mixer Settings You Should Know
- Part 5. Why Audio Mixer Software?
Part 1. 10 Best Sound/Audio Mixer Software
Whether you are pursuing a music career, making a video for a movie clip, or merely creating some hard-core beats for fun, you’ll be needing good sound mixing software.
Selecting an audio mixer software perfect for your requirements and available resources is not an easy task.
Some of them are for free while some charge for it, some offer limited features. At the same time, some are specific to a certain operating system, the options and availabilities are endless, and choosing among them is a hell of a daunting task.
But no need to stress out because we are here to take your burden on our shoulders and help you choose exactly what you want! So sit back and relax!
| 1 - Wondershare Filmora | 2 - Adobe Audition |
|---|---|
| 3 - Logic Pro X | 4 - Audacity |
| 5 - Reaper | 6 - Fl Studio |
| 7 - SoundAtion | 8 - HyaWave |
| 9 - Twisted Wave Online | 10 - Bear Audio Tool |
1. Wondershare Filmora
Filmora Audio Mixer is professional in audio mixing and video editing. This is used for mixing, balancing, and combining different sounds, and audio signals, sources like microphones, instruments, and synthesizers, or previously recorded audio.
Pros
- Imports audio file in the original format and mix the audio with built-in tools.
- Split, rearrange, and apply remix effects on added audio clips.
- Auto remix music to change audio length with high quality.
- Export audio files in MP3, FLAC, M4A, OGG, etc…
- Audio sync option while editing.
- Audio ducking features to lowers the background volume.
Audio formats support: all (import/export and audio/video) file formats.
Compatibility: Windows 7 to windows 10 sound mixer and mac OS.
Price: free and paid.
If you are facing any trouble regarding audio mixing through an audio mixer software, then here’s a video tutorial for Filmora software.
You can download it for free and follow the video guide step by step. Check the below video:
2. Adobe Audition
It is primarily designed for professional users having several features like multi-track editing and mixing, Auto Ducking, clip editing.
Pros:
- Availability of a vast range of features.
- Attractive user interface.
- Good for video sounds or voice-over editing overall, including sound mixing.
Cons:
- A little too complex for a newbie to understand.
- Not good enough for music productions.
- This software is subscription-based.
Audio formats support: MP3, WMA, WAV, AIFF, AC-3, PCM, AIFC, and more.
Compatibility: Mac OS, Windows.
Price: free and paid for both.
3. Logic Pro X
This software is suitable for both professional users and beginners. It combines all the basic and advanced features, including Flex Time, automatic time matching of different tracks, Flex Pitch, arpeggiator, etc.
Pros
- Works wonderfully on Mac.
- Rich Featured software and several plugins.
- Singular notes control.
- Tutorial easily available.
Cons:
- Mac only.
- Expensive.
Audio formats support: WAV, AIFF, CAF, PCM, ALAC, MP3, and more.
Compatibility: macOS.
Price: Paid
4. Audacity
A free, open-source, and features rich software perfect for both professional and beginner users. Its offers multiple effects and tolls like analysis, envelope, time-shift tools, etc.
Pros
- Free.
- Cross-platform.
- Easy to use.
- Features for beginner and pro-level, both.
- Online community available for help.
Cons:
- Not very appealing UI.
- May face crashes on Mac.
Audio formats support: MP3, MP4, AIFF, PCM, WMA, AC3, AMR, and more.
Compatibility: Linux, Windows, and macOS.
Price : free.
Filmora Audio Mixer
Wondershare Filmora - Audio Mixer
• Easily mix audio, sound, music or song as your need
• Edit audio files like denoise, crop, audio ducking, audio auto synchronization, etc…
• Cross-platform supported - (Windows, Mac, iOS, Android)
Mix Your Audio Now Mix Your Audio Now Mix Your Audio Now Learn More >
5. Reaper
This is one of the few software facilities with a bunch of features at such an affordable price. It has multiple tracks, multichannel support, real-time, non-destructive effect application, pitch-shifting, and time-shifting features.
Pros
- Feature-rich.
- More affordable than other audio mixer software.
- Detailed tutorials are available online.
Cons:
- Not very appealing UI as of LPX or Audition.
- Not suitable for beginners.
Audio formats support ACID, AIFF, MP3, MPEG WMV, and more.
Compatibility: Linux, Windows, and macOS.
Price: free and paid.
6. Fl Studio
It is one of the top-notch software used for sound mixer and editing purposes. It supports pitch shifting, time stretching and multi-track recording, 80 plugins, VST standards, delay compensation, etc.
Pros
- Comes with abundant Features.
- Works great for music productions.
- Supports 3rd party plugin.
Cons:
- Not very appealing UI.
- May be intimidating for beginners.
Audio formats support: AIFF, DS, MP3, OGG, WAV and more.
Compatibility : Windows and macOS.
Price: free and paid.
7. SoundAtion
It is a browser-based software that facilitates non-destructive Multi-track audio editing, dynamic mixing, several effects selection, and EQ across multiple tracks.
Pros
- Free digital audio Workstation (DAW).
- Works wonderfully for sound effects, podcasting, and general-purpose sound task.
- Supports 3rd party plugin.
Cons:
- Automation not featured in a free trial.
- Limited audio quality in a trial version.
Audio Formats Support: MP3 and WAV.
Compatibility: any operating system.
Price : free and paid.
8. HyaWave
It offers functions like cutting with an online audio cutter, paste and trim audio, and supports 18 filters, effects, and publication through URL and social media with the minimalistic user interface.
Pros
- Easy and simple user interface.
- Audio filter customization.
- Has a built-in audio player, recorder, and editor.
Audio formats support: MP3, WAV, and more.
Compatibility : any operating system.
Price : free.
9. Twisted Wave Online
It is an online software almost equally compatible with many paid sound mixer and editing tools. It also supports uncompressed audio recording, VST effects, and several core effects.
Pros
- Cloud storage of edited audio, saving the disk space.
- Sampling rate conversation.
- Online and free.
Cons:
- Upload file in mono in a trial version.
- Supports 5 minutes audio clip in a trial version.
Audio formats support : MP3.
Compatibility: any operating system.
Price: free and paid.
10. Bear Audio Tool
This is online browser-based software that can edit the files from our local storage, and you don’t have to upload the audio to their server. It can cut, apply effects, trim, etc. It has ample own music library, effects and import options.
Pros
- Copyright-free.
- Import audio directly from URL or social media domains.
- Features rich.
Cons:
- Not suitable for very advanced usage.
Audio formats support : MP3, OGG, WAV, WMA, M4R and OGG.
Compatibility : any operating system.
Price: free and paid.
Part 2. All You Know About Audio Mixer
[1] What is an audio mixer?
An audio mixer is used for several significant purposes. It is known with several names. Whether a mixing desk, soundboard, mixing board, audio mixer, or mixing console, all have a coherent purpose. The sole purpose of an audio mixer is to manage either the live or recorded event.
As the name suggests, audio mixing is the process of mixing multiple sounds and consolidating them into one or more channels.
This process is performed in a way that manipulates or enhances the dynamics, source’s volume level, panoramic position, and frequency content. The end moto of this creative and aesthetic treatment is to present the audio appealing to the listeners.
[2] What does an audio mixer do?
As mentioned above, the primary function of an audio mixer is to mix more than one audio signal and combine them into one or more output signals.
As an example, you may think of an audio mixing engineer, let’s say, orchestra conductor, who ensures that all the segregated sound sources mix into one harmonious soundtrack.
For this, they will use an audio mixer for filtering and optimizing sound by level adjusting, developing monitor feeds, using equalization and effects for sound enhancement.
This process is performed by a mixing engineer who operates either a digital audio workstation or a mixing console .
[3] What is audio mixing used for?
Audio mixing can be used in many fields, and it’s very common in our daily life, such as:
- 1. Music
- 2. Live sound
- 3. Film
- 4. Television
Filmora Audio Mixer
Wondershare Filmora - Audio Mixer
• Easily mix audio, sound, music or song as your need
• Edit audio files like denoise, crop, audio ducking, audio auto synchronization, etc…
• Cross-platform supported - (Windows, Mac, iOS, Android)
Mix Your Audio Now Mix Your Audio Now Mix Your Audio Now Learn More >
Part 3. What to consider while choosing an audio mixer software?
Before starting off with the audio mixing activity itself, one must be able to determine which audio mixer software is best for them with respect to their availability of resources or usability. Here are some of the factors to consider while opting for an audio mixer software:
- Check whether the software is paid or free.
- Check whether the limited features offered in a trial/free audio mixer software are enough to satisfy all your needs.
- Choose the paid or the free one depending on the extent of audio mixing quality you want.
- Look for an easy user interface.
- Look for software compatibility with your existing operating system.
- Check for the availability of tutorials related to the use of audio mixer software that you want to opt for better guidance.
- Look for the basic or advanced functions support in the audio mixer software that you choose depending upon your usability.
- Whether the software is available online or you need to install the version.
Part 4. Basic audio mixer settings you should know
It is necessary to know at least somewhat about the fundamental terminologies to decipher the specifications and features of an audio mixer. Here you’ll get to know what it takes to be able to distinguish among different audio mixers and their respective software.
Channel:
It is a signal path. Channels are made to accept microphones, preamps, amplifiers, and signal processors. A mixer with several channels integrated with it allows several things to be integrated and routed through it.
Channel Strip:
It is a cluster of controls and circuits that works together on a specified mixing channel to manipulate the audio that passes through it. Some of which includes the following:
Input jack:
It is the jack where any external instrument, like guitar, microphone etc., integrates with the mixer. The noise and interface are minimized to maximum extent by balancing the XLR inputs. A quarter-inch TRS connector or RCA are connected to other inputs.
Microphone preamp:
It produces weak mic signals by the raise of line-level strength for processing.
Equalization:
Often abbreviated as “EQ”, is used to adjust the frequency response of a signal.
Dynamics:
This process is used to perform grating and compressing.
Routing:
It directs the incoming signals to external devices or mixer circuitry.
Fader:
Its fundamental objective is to control the inputs and outputs of a channel.
Meter:
Kind of a gauge or interface that presents the channel output.
I/O:
I/O is abbreviated as inputs/outputs on a mixer in this regards. The number and category of I/O will depend on the use of a mixer.
Now, let’s understand the scenario of live mixing.
Such a mixer is needed which is enough to handle the outputs needed to connect the mains, microphones, other devices that connect to it and monitor speakers. The devices that are a part of a recording process or signal chain must also be included while calculating I/O for studio mixers.
Such inputs/outputs include headphones, effects processors, monitor speakers, signal processors and other instruments as well that uses direct injection (DI) boxes to connect to the mixer.
Buses:
It can be understood as a circuit intersection where the outputs from different channels meet. The signal channels are routed to a specific bus or set of busses. The main mixer output to a recorder or a speaker by the master mix bus.
Auxiliary buses, often known as aux buses or aux sends, are usually fed by the channel’s volume controls with which they are connected and then send those signals through their own output jacks. This is called as post-fader sends which are used to send the mixes of monitor speakers, signals to headphones or effects processors.
Groups:
Several channels in a mixer often offer a group function that allows one to simultaneously process and control various channels. Its works are similar to that of sub-mixer that shares the coherent signal routing and processing and provides the ease in controlling master bus since a single fader is used to control all the channels.
Inserts:
External and add-on sound processors, such as equalizers and compressors, are connected with the help of a channel insert.
Direct Output:
These feed mixer’s preamplifiers output to recording systems and external sound interfaces.
Cue System:
Cue systems allow listening on the specified channels without affecting the mixer’s output. This usually allows the signal to listen either before fading manipulation or after.
Part 5. Why audio mixer software?
In the early days, analog audio mixers were the only option available to perform sounding mixing. But the rise of the era of the 21st century brings more opportunities for easy and optimized audio mixing by sound mixer software.
All you need is a configured laptop, audio mixer software, and merely a control surface to jump into this world while being within the budget!
This audio mixer software is easily available to do everything or even more than what a physical mixer could have done. Several sound mixer applications are available to start with basic sound mixing using your smartphones or even tablets.
For the sake of recording, software-based mixers allow easy integration with the virtual instruments, drum loops, samples, and several other additions in your productions. The use of advanced MIDI functions with a digital audio workstation (DAW) lets you enlighten with a whole new world of possibilities to elevate your sounds/music to the next level.
Final verdict: Have you decided on your audio mixer software?
The usability and optimality of a sound mixer online software depend solely on the extent of application, available resources, and OS compatibility.
But, it can be said without a doubt that Wondershare Filmora is the most user-friendly, with immense flexibility in terms of uses and compatibility. Its broad-scale usability and promising results make it outshine the most among other audio mixing software.
Benjamin Arango
Benjamin Arango is a writer and a lover of all things video.
Follow @Benjamin Arango
Top 8 Best DAW for Hip Hop Music Production
Top 8 Best DAW for Hip Hop Music Production
Benjamin Arango
Mar 27, 2024• Proven solutions
A fully-function DAW software, also known as Digital Audio Workstation, is the essential tool in a music producer’s arsenal. Whether you’re starting your career with your first song or have finally got that break you were looking for, a DAW software will help you handle different elements of music production, including composing, mixing, mastering, etc.
While there are dozens of DAW tools to choose from, it is essential to pick the right one, especially if you’re planning to produce a hip-hop track. Unlike other genres, hip-hop is everything about playing the right beat at the right time. So, it becomes quite essential that you have the best DAW for hip-hop that’ll allow you to master your track perfectly.
To help you in the journey, we’ve put together a list of 8 of the best hip-hop DAWs you can use to mix and master a hip-hop track.
Best Dawfor Hip Hop
1. FL Studio
Image-line’s FL studio is hands-down, the best audio workstation out there. For several years, it has been the go-to tool for music producers across the globe, especially to master hip-hop and EDM tracks.
Being the most popular hip-hop DAW, Image-line always puts in the work to add new features and make it easier for artists to compose their tracks. Thanks to its free upgrade policy, you’ll have access to all the future upgrades for free. The tool is perfect for people who are looking forward to sailing their music careers towards the professional world.
Pros
- Perfect for Hip-Hop & EDM Genres
- Free Upgrades
Cons
- Sluggish User-Interface
- Steep Learning Curve for Beginners

2. Logic Pro
Logic Pro is Apple’s contribution to the world of Digital Audio Workstations. It’s probably the best option if you’re looking for a straightforward DAW for mixing hip-hop tracks on your Macbook.
Having hundreds of built-in plugins, it becomes quite easy to add different audio effects to your track. Moreover, you can use these plugins to take your sound mixing to the next level by adjusting pitch and time for different recordings.
In a nutshell, Logic Pro is one of the most optimal choices for Mac users and a complete value for money.
Pros
- Easy to Manage Workflow
- A variety of built-in plugins
Cons
- Being produced by Apple, Logic Pro is a Mac-only DAW
- Working on large projects can become a bit hectic due to too many windows
3. Cakewalk
If you have just stepped into the world of music production and don’t want to make any investments, Cakewalk is the best DAW for hip-hop you can install on your system. Since 2018, the software has been made free for everyone after it got acquired by BandLab.
Although it might not have advanced features like other professional audio workstations, Cakewalk can help you understand the basics of music composition. With an easy-to-use interface, Cakewalk completely justifies its name. If you’re a beginner, working with this audio station would be a complete cakewalk for sure.
Pros
- Advanced Pro Channel Modules
- Perfect for Novice Music Composers
Cons
- Only Available for Windows
- You’ll have to install BandLab Assistant to Operate Cakewalk

4. Bitwig Studio
Bitwig Studio is yet another professional DAW for composing hip-hop tracks. Bitwig was launched back in 2015, which makes it the modern-day audio station for music composition and mixing.
A modular interface makes it easier to customize the software as per your requirements. Moreover, it offers dozens of user-friendly tools for audio mixing and sound-recording, making it easier to connect different instruments and record sounds.
Pros
- Easy Learning Curve
- Modular Interface
Cons
- Too much resemblance to Ableton Live
- Frequent UI crashes

5. Steinberg Cubase
Cubase has been the best hip-hop DAW in the market ever since digital music production became a reality. Despite being one of the oldest digital audio workstations, Steinberg Cubase has everything you’ll need to compose and mix a hip-hop track.
Recently, the company released Steinberg Cubase version 10, which focuses on automation over everything. With several built-in plugins, you can expect a quick workflow. Also, Cubase offers a user-friendly interface, making it easier to navigate through different features.
Pros
- Quick Workflow
- The latest version includes several bundled plugins
Cons
- The “traditional” design may seem a bit underwhelming for modern-day composer
- Cubase lacks a few features that several modern DAWs offer.

6. Acoustica
Acoustica is a cross-platform hip-hop DAW that can be used on Mac as well as Windows systems. However, cross-platform compatibility is not the reason why you should pick Acoustica. The tool offers several features that make it a reliable tool for composing hip-hop tracks. Spectral editing and multi-channel support are such few features that’ll help you compose the entire track in a hassle-free manner.
Pros
- Easy User Interface
- Advanced functionalities
Cons
- You can only record one track at a time
- Works only with Mac OS X 10.11 and later

7. PreSonus
Presonus can be considered an underdog in the world of hip-hop DAW, which has now started to pick up the pace and match the performance of high-end audio workstations like FL Studio. In the latest version, Presonus offers a variety of features like Harmonic Editing that’ll make your music production a hassle-free task. The latest version also majorly focuses on enhancing the workflow.
Pros
- Easy Workflow
- Perfect for Moderate Audio Mixing
Cons
- The single-window interface can be annoying
- Now Suitable for large projects

8. Mixcraft Pro Studio
There are only a few digital audio workstations that offer a beginner-friendly interface. Fortunately, Acoustica Mixcraft Pro is one of them. With its sleek design, it’ll become quite easier to start composing your tracks, even if it’s your first time working on a DAW. The software also offers a decent amount of plugins that’ll help you add professional-touch to your tracks.
Pros
- Perfect for Beginners
- Enough Built-In plugins to start with music production
Cons
- Fewer software upgrades
- Not an ideal tool for advanced projects

Conclusion
We understand that choosing the best DAW for hip-hop can be a bit hectic, especially when you’re looking forward to starting a career as a professional. The truth is, picking the right tool depends on what you want to achieve. So, analyze your requirements and use the above list to pick the right software accordingly.
Benjamin Arango
Benjamin Arango is a writer and a lover of all things video.
Follow @Benjamin Arango
Benjamin Arango
Mar 27, 2024• Proven solutions
A fully-function DAW software, also known as Digital Audio Workstation, is the essential tool in a music producer’s arsenal. Whether you’re starting your career with your first song or have finally got that break you were looking for, a DAW software will help you handle different elements of music production, including composing, mixing, mastering, etc.
While there are dozens of DAW tools to choose from, it is essential to pick the right one, especially if you’re planning to produce a hip-hop track. Unlike other genres, hip-hop is everything about playing the right beat at the right time. So, it becomes quite essential that you have the best DAW for hip-hop that’ll allow you to master your track perfectly.
To help you in the journey, we’ve put together a list of 8 of the best hip-hop DAWs you can use to mix and master a hip-hop track.
Best Dawfor Hip Hop
1. FL Studio
Image-line’s FL studio is hands-down, the best audio workstation out there. For several years, it has been the go-to tool for music producers across the globe, especially to master hip-hop and EDM tracks.
Being the most popular hip-hop DAW, Image-line always puts in the work to add new features and make it easier for artists to compose their tracks. Thanks to its free upgrade policy, you’ll have access to all the future upgrades for free. The tool is perfect for people who are looking forward to sailing their music careers towards the professional world.
Pros
- Perfect for Hip-Hop & EDM Genres
- Free Upgrades
Cons
- Sluggish User-Interface
- Steep Learning Curve for Beginners
2. Logic Pro
Logic Pro is Apple’s contribution to the world of Digital Audio Workstations. It’s probably the best option if you’re looking for a straightforward DAW for mixing hip-hop tracks on your Macbook.
Having hundreds of built-in plugins, it becomes quite easy to add different audio effects to your track. Moreover, you can use these plugins to take your sound mixing to the next level by adjusting pitch and time for different recordings.
In a nutshell, Logic Pro is one of the most optimal choices for Mac users and a complete value for money.
Pros
- Easy to Manage Workflow
- A variety of built-in plugins
Cons
- Being produced by Apple, Logic Pro is a Mac-only DAW
- Working on large projects can become a bit hectic due to too many windows
3. Cakewalk
If you have just stepped into the world of music production and don’t want to make any investments, Cakewalk is the best DAW for hip-hop you can install on your system. Since 2018, the software has been made free for everyone after it got acquired by BandLab.
Although it might not have advanced features like other professional audio workstations, Cakewalk can help you understand the basics of music composition. With an easy-to-use interface, Cakewalk completely justifies its name. If you’re a beginner, working with this audio station would be a complete cakewalk for sure.
Pros
- Advanced Pro Channel Modules
- Perfect for Novice Music Composers
Cons
- Only Available for Windows
- You’ll have to install BandLab Assistant to Operate Cakewalk
4. Bitwig Studio
Bitwig Studio is yet another professional DAW for composing hip-hop tracks. Bitwig was launched back in 2015, which makes it the modern-day audio station for music composition and mixing.
A modular interface makes it easier to customize the software as per your requirements. Moreover, it offers dozens of user-friendly tools for audio mixing and sound-recording, making it easier to connect different instruments and record sounds.
Pros
- Easy Learning Curve
- Modular Interface
Cons
- Too much resemblance to Ableton Live
- Frequent UI crashes
5. Steinberg Cubase
Cubase has been the best hip-hop DAW in the market ever since digital music production became a reality. Despite being one of the oldest digital audio workstations, Steinberg Cubase has everything you’ll need to compose and mix a hip-hop track.
Recently, the company released Steinberg Cubase version 10, which focuses on automation over everything. With several built-in plugins, you can expect a quick workflow. Also, Cubase offers a user-friendly interface, making it easier to navigate through different features.
Pros
- Quick Workflow
- The latest version includes several bundled plugins
Cons
- The “traditional” design may seem a bit underwhelming for modern-day composer
- Cubase lacks a few features that several modern DAWs offer.
6. Acoustica
Acoustica is a cross-platform hip-hop DAW that can be used on Mac as well as Windows systems. However, cross-platform compatibility is not the reason why you should pick Acoustica. The tool offers several features that make it a reliable tool for composing hip-hop tracks. Spectral editing and multi-channel support are such few features that’ll help you compose the entire track in a hassle-free manner.
Pros
- Easy User Interface
- Advanced functionalities
Cons
- You can only record one track at a time
- Works only with Mac OS X 10.11 and later
7. PreSonus
Presonus can be considered an underdog in the world of hip-hop DAW, which has now started to pick up the pace and match the performance of high-end audio workstations like FL Studio. In the latest version, Presonus offers a variety of features like Harmonic Editing that’ll make your music production a hassle-free task. The latest version also majorly focuses on enhancing the workflow.
Pros
- Easy Workflow
- Perfect for Moderate Audio Mixing
Cons
- The single-window interface can be annoying
- Now Suitable for large projects
8. Mixcraft Pro Studio
There are only a few digital audio workstations that offer a beginner-friendly interface. Fortunately, Acoustica Mixcraft Pro is one of them. With its sleek design, it’ll become quite easier to start composing your tracks, even if it’s your first time working on a DAW. The software also offers a decent amount of plugins that’ll help you add professional-touch to your tracks.
Pros
- Perfect for Beginners
- Enough Built-In plugins to start with music production
Cons
- Fewer software upgrades
- Not an ideal tool for advanced projects
Conclusion
We understand that choosing the best DAW for hip-hop can be a bit hectic, especially when you’re looking forward to starting a career as a professional. The truth is, picking the right tool depends on what you want to achieve. So, analyze your requirements and use the above list to pick the right software accordingly.
Benjamin Arango
Benjamin Arango is a writer and a lover of all things video.
Follow @Benjamin Arango
Also read:
- New 2024 Approved AMR Audio Workshop In-Depth Tutorials for Full AMR File Transformation
- Updated In-Depth Analysis of Sound Purification with Adobe Audition Tools
- 2024 Approved Add Soundtrack Segment to iMovie Project Layout
- New Essential List The Ultimate Collection of Licensed Chuckle Tunes for 2024
- New How Can You Choose the Best Sound Editor for 2024
- Updated Beginners Guide to Separating Chorus Pieces with Advanced Tools for 2024
- Updated In 2024, The Complete Guide to Saving Call Transcripts From Google Voice on Mobile and Laptop Devices
- Updated Learn How to Record Your Calls with Google Voice for 2024
- Sonic Ambiance for Catching Up on the Latest News for 2024
- Updated 2024 Approved The Art of Auditory Engineering Fine-Tuning Speed and Pitch with Adobe Rush
- Updated In 2024, 10 Best Voice Recorder for PC
- New Discover Gaseous Release Audio Representation for 2024
- Updated In 2024, Introduction to LexiEdit A Starters Guide for Novice Editors
- Updated The Ultimate Guide to Separating Audio Tracks in Adobe Premiere Pro for 2024
- Removing Background Music and Sounds From New AVI Files for 2024
- Updated Enhancing Aural Experiences Implementing Progressive Volume Changes Today for 2024
- In 2024, How to Mute Audio From Video
- In 2024, Hunt for Amusing Sound Layers and Tones
- Echoes Equalized Advanced Methods to Normalize Audio Quality in Film and Broadcast
- Updated Enhancing Recordings with Autotune on Audacity Detailed Instructions Ready to Go for 2024
- New In 2024, Pinnacle Advice for Creating Stellar Music Videos
- New Expert Online Sound Calibration Services for 2024
- Updated In 2024, Analyzing the Expression of Dog Anger Through Auditory Cues
- Updated Advanced Audio File Adapter Free Conversion of High-End MPA Sounds to Universal MP3 Format (2023 Version) for 2024
- New 2024 Approved Expert Guide Extracting Silence From Video Files on Windows 10 Without Spending a Penny
- 2024 Approved How to Remove Sound From iPhone Video? Easy Guide
- Updated Orchestrating Artificial Intelligence Spotlight on Future Musical Innovators for 2024
- New Navigating to the Pinnacle 5 Leading Audio Mixers for Mac Users
- New In 2024, 8 Best Cartoon Sound Effects You Can Download
- New Best Online Sanctuaries for Serene Minds and Stress Reduction
- Top 10 Podcasting Audio to Text Transcription Software
- New Expert Tips for Seamless Audio Overlay on Videos Using Filmora for 2024
- New 2024 Approved The Art of Easing Audio Levels Keyframe Control in Filmora for Mac Users
- Updated 2024 Approved How to Slow Down A Song without Changing Pitch?
- Updated Perfect Pitches Made Simple Installing and Utilizing Autotune with Audacity
- 2024 Approved Leading Edge MP3 Sync Service at No Cost
- New Best Beat Sync Video Editing Apps for 2024
- New Zoom Vocal Personalization A List of Top 6 Techniques for Humor-Enhanced Public Speaking
- 2024 Approved Ultimate Audio Enhancer Eliminate Unwanted Soundtracks
- The Ultimate Guide Accessing High-Quality Audio Without Costs
- The Essential Software Catalog for Isolating Audio From Videos As
- The Art of Audio Zoning Implementing Ducking Effects for Clear Soundscapes
- Simplified Approach to Sound Wave Suppression with Audacity for 2024
- Updated Exploring the Best Places to Get Bell Ringing Sounds for 2024
- In 2024, 8 Best Voice Recognition Software for Windows, Mac and Online
- Updated Cutting-Edge Audio Tricks for a Polished iMovie Experience
- New Clearer Sounds, Cleaner Listening Approaches to Dismiss Environmental Hiss and Hum
- Updated Master FCPX Top Tutorials and Resources for 2024
- 6 Ways to Change Spotify Location On Your Vivo V29e | Dr.fone
- New Buggy FCPX? Try This A Comprehensive Reset Guide for Troubleshooting for 2024
- How to Fix when Apple Account Locked On Apple iPhone 8?
- Updated 2024 Approved Top Subtitle Editors for Mac Alternatives to Subtitle Edit
- In 2024, How to Lock Apps on Vivo S18 to Protect Your Individual Information
- 2 Ways to Monitor Google Pixel 8 Pro Activity | Dr.fone
- 4 solution to get rid of pokemon fail to detect location On Samsung Galaxy S24 | Dr.fone
- In 2024, 7 Top Ways To Resolve Apple ID Not Active Issue For Apple iPhone 15 Pro | Dr.fone
- Unlock Your Device iCloud DNS Bypass Explained and Tested, Plus Easy Alternatives On Apple iPhone 14 Pro Max
- Title: Updated The Mechanics Behind Anime Translations Insights Into Adaptation and Localization for 2024
- Author: Paul
- Created at : 2024-05-05 06:06:14
- Updated at : 2024-05-06 06:06:14
- Link: https://voice-adjusting.techidaily.com/updated-the-mechanics-behind-anime-translations-insights-into-adaptation-and-localization-for-2024/
- License: This work is licensed under CC BY-NC-SA 4.0.
