
:max_bytes(150000):strip_icc():format(webp)/GettyImages-1369568023-c596ac8d6b5a4f3682bda2fa0feb12bd.jpg)
Updated Hunting Down Vintage-Inspired Brushstroke Audio Assets
Hunting Down Vintage-Inspired Brushstroke Audio Assets
Versatile Video Editor - Wondershare Filmora
An easy yet powerful editor
Numerous effects to choose from
Detailed tutorials provided by the official channel
Editing the videos is an art and you require creative skills to obtain outstanding results. There is a wide range of applications are available in the digital space to enhance the video content for better outcomes. You can add special audio tracks to your video like brush sound effects, chimes, bell rings and many more adds to the list. You can find optimal ways to download the desired sound effects into your system drive and use them while editing your media files using a sophisticated program.
In this article, you will learn about the unique ways in creating the best sound effects for your needs. Quickly surf the below content and learn about it in detail. Here, study about an outstanding video editor too that brings miraculous changes to your media file.

In this article
01 [Unique ways to create brush sound effect](#Part 1)
02 [The Sophisticated Video Editor with in-built Audio Effects ](#Part 2)
Part 1 Unique ways to create brush sound effect
In this section, find the different ways to create and download the brush sounds to fulfil your needs while editing your memorable captures for special occasions. You could have come across ample ways to perform it. Try the reliable method to obtain quality results.
Method 1: Record the sound manually
Take a brush without any paint and create a scrubbing sound. Then, capture the audio in your recorder and transfer it to your system drive for future use. This method is a manual one and you can try with different types of brushes to create an interesting audio file.
Method 2: Cut from YouTube
The next reliable way is to surf the brush sound effects at the YouTube space and edit the video as per your needs. You can either cut or crop the specific clippings and save them on your computer for future use.
Method 3: Use free downloading websites
Another method is to step into the free download websites and choose the desired brush sounds from the list. Then, save them in your system effortlessly. Here are a few web pages that offer awesome collections of brush sound effects for your needs.
● Story Blocks
On this platform, you can download royalty-free music for your needs. Use the search option to figure out the desired audio effects and make effortless downloads in no time.

● Pikbest
Here is another interesting webpage that offers mind-blowing brush effect sound for your needs. There are 89 brush sound effects available on this platform for quick downloads.

Part 2 The Sophisticated Video Editor with in-built Audio Effects
The Filmora is an excellent video editor application that comprises built-in audio for editing purposes. You can include desired audios with the uploaded files and add value to your media file. Here, you can find a wide range of sound effects to make your video interactive. This video editor helps in building meaningful media files for your needs. There are huge collections of filters, transitions, audios, and special effects to create an impactful video for the audience. Based on the theme, you can choose the desired built-in modules from this environment.
The simple user-friendly interface of this program triggers you to go for it without any hesitation. The Filmora stands unique with its outstanding working timeline and the in-built extra features in the libraries to bring desired effects on the videos. Insertion of the sound effects and special filters are simple with this environment. By tapping the relevant options on the window, you can enable the required effects on your file. It takes just a few minutes to complete the entire video edit process.
The remarkable features of the Filmora application
- Effortlessly import the media files into its working timeline despite its file sizes
- Add special effects and desired audios to the imported videos in no time
- The working space is simple and you can work on it comfortably without any complaints.
- After completing the edits, you can quickly export to any desired storage space as per your comfort.
- There is a preview option to witness the edited content before making the export action.
These are the functionalities of the Filmora tool and you can discover many more options hidden in this application after making the download. Quickly install this app and witness the changes you can create with your video files using all the built-in files at Filmora.
The stepwise instructions to include the sound effects to the videos using the Filmora application
Step 1 Import the videos
Go to the official website of Filmora and download the correct version of this tool according to your system OS. Install it and launch the program. Then, add the desired videos from a local drive or virtual storage by tapping the ‘Import Media Files’ option from the Filmora working interface.

Step 2 Insert the audios
Click the ‘Audios’ menu from the menu bar and select ‘Sound Effects’ from the left panel of the screen. Then, choose the desired sound effects from the expanded items in the right pane. After completing the including operation, make a preview of it before exporting the file.

Step 3 Export the edited videos
Finally, after you had completed all the edits to your videos like adding special filters, and transitions, you can store the edited video by exporting it to desired storage space. Quickly access those files when you want to engage the audience. Share them on the social walls to excite your friends and followers.

These are the quick steps of inserting the audios in the videos files to make them interactive to the viewers. Discover many editing options at Filmora and build better media files for your needs. This application meets the requirements of both the newbie and professional users.
Wondershare Filmora
Get started easily with Filmora’s powerful performance, intuitive interface, and countless effects!
Try It Free Try It Free Try It Free Learn More >

AI Portrait – The best feature of Wondershare Filmora for gameplay editing
The AI Portrait is a new add-on in Wondershare Filmora. It can easily remove video backgrounds without using a green screen or chroma key, allowing you to add borders, glitch effects, pixelated, noise, or segmentation video effects.

Conclusion
Therefore, this content had given you insights about where to find the brush sound effects precisely on various platforms. Choose Filmora if you want to add exciting sound effects for your media files. It helps you to edit the videos beyond imagination and unleash your creative skills in no time. Connect with this app to explore efficient ways to make the best out of the videos. Stay tuned for more interesting facts on enhancing the content of the video using incredible applications at the digital interface.
Editing the videos is an art and you require creative skills to obtain outstanding results. There is a wide range of applications are available in the digital space to enhance the video content for better outcomes. You can add special audio tracks to your video like brush sound effects, chimes, bell rings and many more adds to the list. You can find optimal ways to download the desired sound effects into your system drive and use them while editing your media files using a sophisticated program.
In this article, you will learn about the unique ways in creating the best sound effects for your needs. Quickly surf the below content and learn about it in detail. Here, study about an outstanding video editor too that brings miraculous changes to your media file.
In this article
01 [Unique ways to create brush sound effect](#Part 1)
02 [The Sophisticated Video Editor with in-built Audio Effects ](#Part 2)
Part 1 Unique ways to create brush sound effect
In this section, find the different ways to create and download the brush sounds to fulfil your needs while editing your memorable captures for special occasions. You could have come across ample ways to perform it. Try the reliable method to obtain quality results.
Method 1: Record the sound manually
Take a brush without any paint and create a scrubbing sound. Then, capture the audio in your recorder and transfer it to your system drive for future use. This method is a manual one and you can try with different types of brushes to create an interesting audio file.
Method 2: Cut from YouTube
The next reliable way is to surf the brush sound effects at the YouTube space and edit the video as per your needs. You can either cut or crop the specific clippings and save them on your computer for future use.
Method 3: Use free downloading websites
Another method is to step into the free download websites and choose the desired brush sounds from the list. Then, save them in your system effortlessly. Here are a few web pages that offer awesome collections of brush sound effects for your needs.
● Story Blocks
On this platform, you can download royalty-free music for your needs. Use the search option to figure out the desired audio effects and make effortless downloads in no time.
● Pikbest
Here is another interesting webpage that offers mind-blowing brush effect sound for your needs. There are 89 brush sound effects available on this platform for quick downloads.
Part 2 The Sophisticated Video Editor with in-built Audio Effects
The Filmora is an excellent video editor application that comprises built-in audio for editing purposes. You can include desired audios with the uploaded files and add value to your media file. Here, you can find a wide range of sound effects to make your video interactive. This video editor helps in building meaningful media files for your needs. There are huge collections of filters, transitions, audios, and special effects to create an impactful video for the audience. Based on the theme, you can choose the desired built-in modules from this environment.
The simple user-friendly interface of this program triggers you to go for it without any hesitation. The Filmora stands unique with its outstanding working timeline and the in-built extra features in the libraries to bring desired effects on the videos. Insertion of the sound effects and special filters are simple with this environment. By tapping the relevant options on the window, you can enable the required effects on your file. It takes just a few minutes to complete the entire video edit process.
The remarkable features of the Filmora application
- Effortlessly import the media files into its working timeline despite its file sizes
- Add special effects and desired audios to the imported videos in no time
- The working space is simple and you can work on it comfortably without any complaints.
- After completing the edits, you can quickly export to any desired storage space as per your comfort.
- There is a preview option to witness the edited content before making the export action.
These are the functionalities of the Filmora tool and you can discover many more options hidden in this application after making the download. Quickly install this app and witness the changes you can create with your video files using all the built-in files at Filmora.
The stepwise instructions to include the sound effects to the videos using the Filmora application
Step 1 Import the videos
Go to the official website of Filmora and download the correct version of this tool according to your system OS. Install it and launch the program. Then, add the desired videos from a local drive or virtual storage by tapping the ‘Import Media Files’ option from the Filmora working interface.
Step 2 Insert the audios
Click the ‘Audios’ menu from the menu bar and select ‘Sound Effects’ from the left panel of the screen. Then, choose the desired sound effects from the expanded items in the right pane. After completing the including operation, make a preview of it before exporting the file.
Step 3 Export the edited videos
Finally, after you had completed all the edits to your videos like adding special filters, and transitions, you can store the edited video by exporting it to desired storage space. Quickly access those files when you want to engage the audience. Share them on the social walls to excite your friends and followers.
These are the quick steps of inserting the audios in the videos files to make them interactive to the viewers. Discover many editing options at Filmora and build better media files for your needs. This application meets the requirements of both the newbie and professional users.
Wondershare Filmora
Get started easily with Filmora’s powerful performance, intuitive interface, and countless effects!
Try It Free Try It Free Try It Free Learn More >
AI Portrait – The best feature of Wondershare Filmora for gameplay editing
The AI Portrait is a new add-on in Wondershare Filmora. It can easily remove video backgrounds without using a green screen or chroma key, allowing you to add borders, glitch effects, pixelated, noise, or segmentation video effects.
Conclusion
Therefore, this content had given you insights about where to find the brush sound effects precisely on various platforms. Choose Filmora if you want to add exciting sound effects for your media files. It helps you to edit the videos beyond imagination and unleash your creative skills in no time. Connect with this app to explore efficient ways to make the best out of the videos. Stay tuned for more interesting facts on enhancing the content of the video using incredible applications at the digital interface.
“2023 Compilation of Top Free Music Software: Produce, Edit & Record with Zero Cost [Windows and macOS]”
13 Free Music Production Software for Windows/Mac/Online

Benjamin Arango
Mar 27, 2024• Proven solutions
13 Free Music Production Software for Windows/Mac/Online
Technology advances have spread through all fields of human activity, including music recording and development. The invention of music development tools has made it simpler for people engaged in the creation of music in one form or another.
Numerous applications for music development are on the market, and some are meant for musicians, and others are for educators and teachers. There is also a need to direct prospective customers to the right free music production software.
A comprehensive analysis of some of the best music development tools has been conducted to help you make the correct decision while you’re ready to purchase the app. This comprehensive Music Production Software Guide will provide solutions to many of your unanswered questions relating to the purchase of music production software.
- Part 1: Free Music Production Software for Windows
- Part 2: Free Music Production Software for Mac
- Part 3: Free Music Production Software Online
Part 1: Free Music Production Software for Windows
1. Audacity
The system for music development is not complete without an audio editor. Audacity is the best free music creation software available on the market. Audacity is open-source and extensive and provides a wide range of tools and effects for performing all audio editing and recording activities. It is created by a community of volunteers and provides regular notifications almost every month. It’s lightweight, safe, and intuitive enough to be used by novice music makers.
Pros
- It is open-source
- It can load VST plugins
Cons
- Only 32-bit plugins are allowed
- Limited features
2. Ardour
Ardour is a highly integrated program of music production that allows users to record and edit on Mac, Linux, and Windows operating systems. Ardour Music Production Software was created by integrating the efforts of the world’s skilled team, such as recording technicians, programmers, and musicians. Such experienced technicians make their concerted and thorough efforts to build the program. Ardour is one of the few applications in music production that respects honesty. The accessibility of this program allows app developers to concentrate on functionality that matters to consumers rather than to construct compelling apps for advertising purposes. This is a system that should be celebrated for its user-focused functionality.
Pros
- It has excellent user-friendliness
- It is available on Mac, Linux, and Windows
Cons
- It lacks a few integral features
- It is difficult to operate for people new to audio editing

3. Tracktion T7
The people at Tracktion seem to have reached a reasonably canny business model by launching older DAW versions for free and without anything removed.
The convention appears to make it possible to access the edition without charge of two iterations before the new one. You will not be provided with all new functionality, but you will receive an update every time the company updates its flagship DAW, which it does nearly every year.
The growing section is adjustable to match the workflow, and the bottom panel adjusts so that any parameters anywhere on the screen can be seen.
Pros
- It features an unlimited number of audio and MIDI tracks
- It is able to host multiple plugin formats
Cons
- It doesn’t provide all the features at once
- It does not support many plugins
4. LMMS
LMMS is a fully free music production software for windows for music development. It is an open-source and also a project platform for the community. LMMS is a cross-platform device app. It makes it easier to manufacture beats, particularly when many music production professionals have to manufacture quality music with their computers.
Thanks to the powerful sample, beat and melody design, mixing and synthetic sound processes, and many other features, the LMMS music production software provides high-quality audio output. The product also features playback tools, plugins, and samples to produce powerful, high-quality sound.
Pros
- It is compatible with Linux, Windows, and Mac
- Hydrogen project files and MIDI can be imported easily for editing
Cons
- It eats a lot of memory and requires a high-end device to support it
- Some users complained that understanding its working is difficult

5. Cakewalk
This is an exciting app for music production to purchase. It is a fantastic tech to invest in music production. Cakewalk Sonar Artist Software is one of Cakewalk Sonar Artist ‘s great productions. Cakewalk is known for an excellent GUI, an excellent mixing console, an excellent commercial radio system, and limitless MIDI tracks.
A good device to use as part of your instruments for the development of music is the Cakewalk Sonar Artist Music Production program. It stands out as a program packed with excellent features amongst its counterparts. And the app is unmatched in the area of apps.
Pros
- You can share music compilation directly to social media
- You can easily add effects to your tracks
Cons
- It is priced, very high
- One window interface makes it hectic

6. Music Maker by Magix
This app is a special program for sound engineers, skilled musicians, and accomplished music producers, developed by US Magix Entertainment. It offers an excellent forum for creative music development in music production professionals.
In reality, the software for music production is excellent software for the Music Maker by Magix. In the field of music post-production and music mastering, mixing and arrangement, recording, and more, the software achieved remarkable breakthroughs. Thanks to the successful combination of a technical device and highly flexible workflow, the Music Maker by Magix has achieved this groundbreaking success.
With creative algorithm and superb plugin effects, the Music Maker by Magix program enables music manufacturers to develop their ideas in line with the highest quality in this industry.
Pros
- It is great for EDM producers
Cons
- It is not suitable for newbies
- The GUI feels a bit cluttered
Part 2: Free Music Production Software for Mac
7. Garageband
This is a music development studio app that is designed to function on Mac. It is a great free music production software for Mac. This software has a full sound collection, which includes virtual instruments, voice, and guitar preset.
GarageBand is a well-known app for music development and is an excellent tool for music beginners. Many people have chosen GarageBand because it does not match the ease and ease of use for recording purposes in particular.
The user-friendly interface makes you easy to create music with a more unobstructed view of what you’re recording. Apps from GarageBand captured the attention of others because of their ease-to-use and user-friendliness.
Pros
- The software offers some nicely packaged preset for vocal and guitar recording
- Productive workflow
Cons
- It has limited plugins
- It is only supported for Mac platforms

8. Ableton Live
The Ableton Live 10 Suite is a dynamic and comprehensive program for the creation and performance of musical recordings.
An essential feature of this software is that it allows you to work on your time-based workflow without affecting the live session. This means that the software gives you a rare chance to get involved with the workflow without stopping live performance.
The Multitrack Recording Technology of Ableton Live10 Suite allows music producers to adjust the speed and pacing of any audio during the recording. To make these adjustments, you don’t have to pause the recording. This is one of the striking characteristics which makes this product a good option for all.
Pros
- Adjusting the speed and pace of audio is a delight
- Sophisticated MIDI/audio routing capabilities
Cons
- It has a traditional design
- Not enough updates to fix the buggy features

9. Boom 3D
Boom 3D for Mac & Windows is an award-winning pro sound improvement software designed to play your media content on any and all of your devices, phones, or streaming services with amazing 3D effects. No costly headphones or sound boosters will be needed to make your music feel like it! Designed in a new immersive 3D surround sound technology, Boom 3D redefines how people listen to music, watch films, or play games with some headphones on their devices. 3D sound provides the option to check the LFE (subwoofer), and the audio intensity of each Virtual 3D Surround audio system speaker.
Pros
- It comes with loads of content
- Audio quality can be enhanced
Cons
- The design is not suitable for everybody
- It does not have a Linux version
10. Mixxx
For beginners, Mixxx is just another great device. This is also one of the best free music production software downloads for your music. This software supports all Mac, Windows, and Linux platforms.
The application provides you with a DJ-mixing environment and supports all standard formats such as Mp3 and many other formats.
Pros
- It is a great app for beginners
- Supported by Mac, Windows, and Linux
Cons
- It doesn’t support many plugins
- GUI isn’t that great

Part 3: Free Music Production Software Online
11. Soundation
Soundation is a platform that provides free music production software online only capabilities. The free version and three paid versions are offered. You can use this to build your tracks unless you have the resources to do so if you need a web-based music maker and editor.
If you pay, even after you have made your music, you can always cancel. Remember first to save them to your hard drive. If you need paid characteristics, pay for the monthly plan again through PayPal, and you have to use it for a month.
Pros
- Great SSL-modelled mixer
- You can use its devices as a plugin
Cons
- It works only online

12. Audiotool
Audiotool is a popular app for music production hosted online and can be used without installation from inside your browser. It uses a cloud-based network to store all your music and files wherever you are. It is also confirmed that you will share music and tracks directly with YouTube, SoundCloud, and Facebook on its own publishing site. They have premium releases from Loopmasters and some fantastic online VSTs, for example, Heisenberg, Machiniste, Bassline, and Beatbox 8 & 9.
Pros
- No installation needed
- You can directly share it to your social media
Cons
- It works only online
- No upgrades

13. Soundtrap
Soundtrap is not only an online music studio but a training site for students and instructors. The STEAM Curriculum is an online learning resource that helps students to follow music and podcasts, incorporated into the Web app. As we mentioned earlier, in addition to the online Web App, you can also use it on different devices, share it with other users, and work in innovative projects for your music.
The interface is simple, easy to use, and easy to understand. It is simply an instrument for innovation; you don’t have to learn how to apply VST or any other technical elements to music creation. You can also record your MIDI instruments directly from your machine or device’s mic.
Pros
- It provides a great platform for teachers to teach their students
- It is very easy to use
Cons
- It only has a limited number of plugins
- It cannot be used professionally

Conclusion
If you make music on a computer, the most important resource in your artistic arsenal is your DAW; in your home recording system, you ‘re probably going to have the MIDI keyboard, audio interface, studio monitor speakers, and maybe a microphone or two. But your program is at the core of it all. Not everyone can afford expensive DAWs, but one must not worry as free music production software are present to aid us.
It is important to have a DAW with which you are pleased and, perhaps more importantly, a DAW, which allows you to turn your ideas into music as quickly and painlessly as possible. So make sure you choose the best one for you according to your needs. Hopefully, this guide will aid you!


Benjamin Arango
Benjamin Arango is a writer and a lover of all things video.
Follow @Benjamin Arango
Benjamin Arango
Mar 27, 2024• Proven solutions
13 Free Music Production Software for Windows/Mac/Online
Technology advances have spread through all fields of human activity, including music recording and development. The invention of music development tools has made it simpler for people engaged in the creation of music in one form or another.
Numerous applications for music development are on the market, and some are meant for musicians, and others are for educators and teachers. There is also a need to direct prospective customers to the right free music production software.
A comprehensive analysis of some of the best music development tools has been conducted to help you make the correct decision while you’re ready to purchase the app. This comprehensive Music Production Software Guide will provide solutions to many of your unanswered questions relating to the purchase of music production software.
- Part 1: Free Music Production Software for Windows
- Part 2: Free Music Production Software for Mac
- Part 3: Free Music Production Software Online
Part 1: Free Music Production Software for Windows
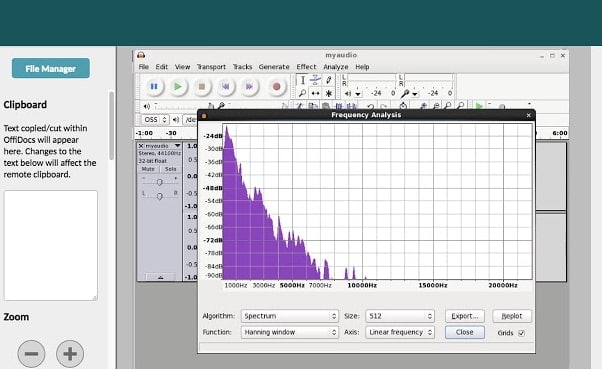
1. Audacity
The system for music development is not complete without an audio editor. Audacity is the best free music creation software available on the market. Audacity is open-source and extensive and provides a wide range of tools and effects for performing all audio editing and recording activities. It is created by a community of volunteers and provides regular notifications almost every month. It’s lightweight, safe, and intuitive enough to be used by novice music makers.
Pros
- It is open-source
- It can load VST plugins
Cons
- Only 32-bit plugins are allowed
- Limited features
2. Ardour
Ardour is a highly integrated program of music production that allows users to record and edit on Mac, Linux, and Windows operating systems. Ardour Music Production Software was created by integrating the efforts of the world’s skilled team, such as recording technicians, programmers, and musicians. Such experienced technicians make their concerted and thorough efforts to build the program. Ardour is one of the few applications in music production that respects honesty. The accessibility of this program allows app developers to concentrate on functionality that matters to consumers rather than to construct compelling apps for advertising purposes. This is a system that should be celebrated for its user-focused functionality.
Pros
- It has excellent user-friendliness
- It is available on Mac, Linux, and Windows
Cons
- It lacks a few integral features
- It is difficult to operate for people new to audio editing
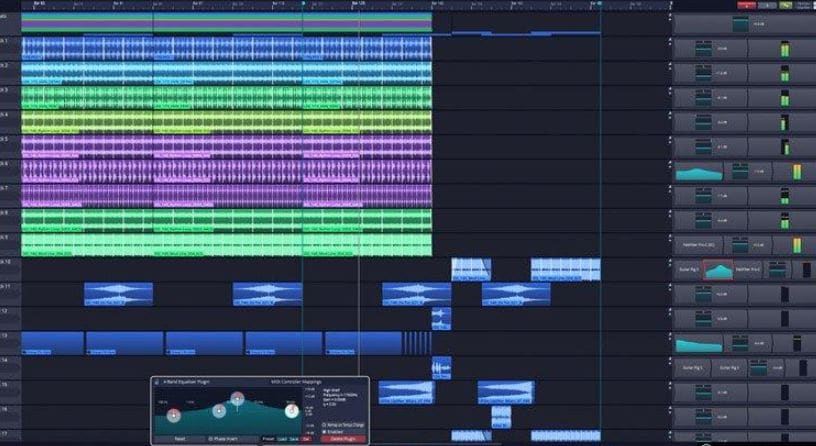
3. Tracktion T7
The people at Tracktion seem to have reached a reasonably canny business model by launching older DAW versions for free and without anything removed.
The convention appears to make it possible to access the edition without charge of two iterations before the new one. You will not be provided with all new functionality, but you will receive an update every time the company updates its flagship DAW, which it does nearly every year.
The growing section is adjustable to match the workflow, and the bottom panel adjusts so that any parameters anywhere on the screen can be seen.
Pros
- It features an unlimited number of audio and MIDI tracks
- It is able to host multiple plugin formats
Cons
- It doesn’t provide all the features at once
- It does not support many plugins
4. LMMS
LMMS is a fully free music production software for windows for music development. It is an open-source and also a project platform for the community. LMMS is a cross-platform device app. It makes it easier to manufacture beats, particularly when many music production professionals have to manufacture quality music with their computers.
Thanks to the powerful sample, beat and melody design, mixing and synthetic sound processes, and many other features, the LMMS music production software provides high-quality audio output. The product also features playback tools, plugins, and samples to produce powerful, high-quality sound.
Pros
- It is compatible with Linux, Windows, and Mac
- Hydrogen project files and MIDI can be imported easily for editing
Cons
- It eats a lot of memory and requires a high-end device to support it
- Some users complained that understanding its working is difficult
5. Cakewalk
This is an exciting app for music production to purchase. It is a fantastic tech to invest in music production. Cakewalk Sonar Artist Software is one of Cakewalk Sonar Artist ‘s great productions. Cakewalk is known for an excellent GUI, an excellent mixing console, an excellent commercial radio system, and limitless MIDI tracks.
A good device to use as part of your instruments for the development of music is the Cakewalk Sonar Artist Music Production program. It stands out as a program packed with excellent features amongst its counterparts. And the app is unmatched in the area of apps.
Pros
- You can share music compilation directly to social media
- You can easily add effects to your tracks
Cons
- It is priced, very high
- One window interface makes it hectic
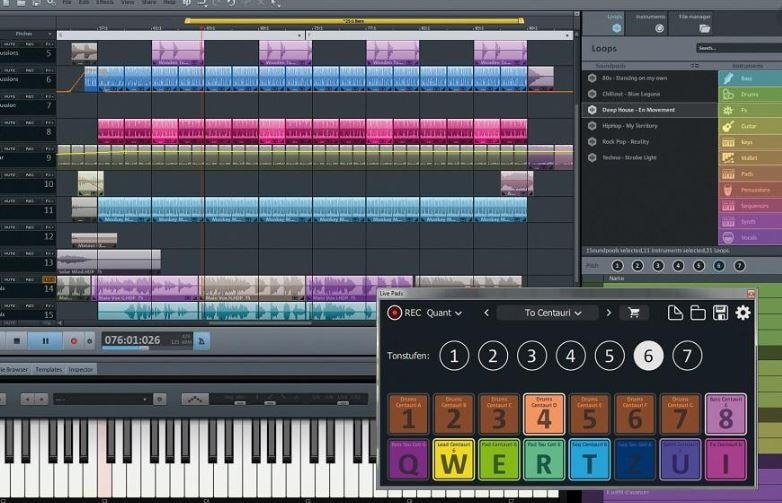
6. Music Maker by Magix
This app is a special program for sound engineers, skilled musicians, and accomplished music producers, developed by US Magix Entertainment. It offers an excellent forum for creative music development in music production professionals.
In reality, the software for music production is excellent software for the Music Maker by Magix. In the field of music post-production and music mastering, mixing and arrangement, recording, and more, the software achieved remarkable breakthroughs. Thanks to the successful combination of a technical device and highly flexible workflow, the Music Maker by Magix has achieved this groundbreaking success.
With creative algorithm and superb plugin effects, the Music Maker by Magix program enables music manufacturers to develop their ideas in line with the highest quality in this industry.
Pros
- It is great for EDM producers
Cons
- It is not suitable for newbies
- The GUI feels a bit cluttered
Part 2: Free Music Production Software for Mac
7. Garageband
This is a music development studio app that is designed to function on Mac. It is a great free music production software for Mac. This software has a full sound collection, which includes virtual instruments, voice, and guitar preset.
GarageBand is a well-known app for music development and is an excellent tool for music beginners. Many people have chosen GarageBand because it does not match the ease and ease of use for recording purposes in particular.
The user-friendly interface makes you easy to create music with a more unobstructed view of what you’re recording. Apps from GarageBand captured the attention of others because of their ease-to-use and user-friendliness.
Pros
- The software offers some nicely packaged preset for vocal and guitar recording
- Productive workflow
Cons
- It has limited plugins
- It is only supported for Mac platforms
8. Ableton Live
The Ableton Live 10 Suite is a dynamic and comprehensive program for the creation and performance of musical recordings.
An essential feature of this software is that it allows you to work on your time-based workflow without affecting the live session. This means that the software gives you a rare chance to get involved with the workflow without stopping live performance.
The Multitrack Recording Technology of Ableton Live10 Suite allows music producers to adjust the speed and pacing of any audio during the recording. To make these adjustments, you don’t have to pause the recording. This is one of the striking characteristics which makes this product a good option for all.
Pros
- Adjusting the speed and pace of audio is a delight
- Sophisticated MIDI/audio routing capabilities
Cons
- It has a traditional design
- Not enough updates to fix the buggy features
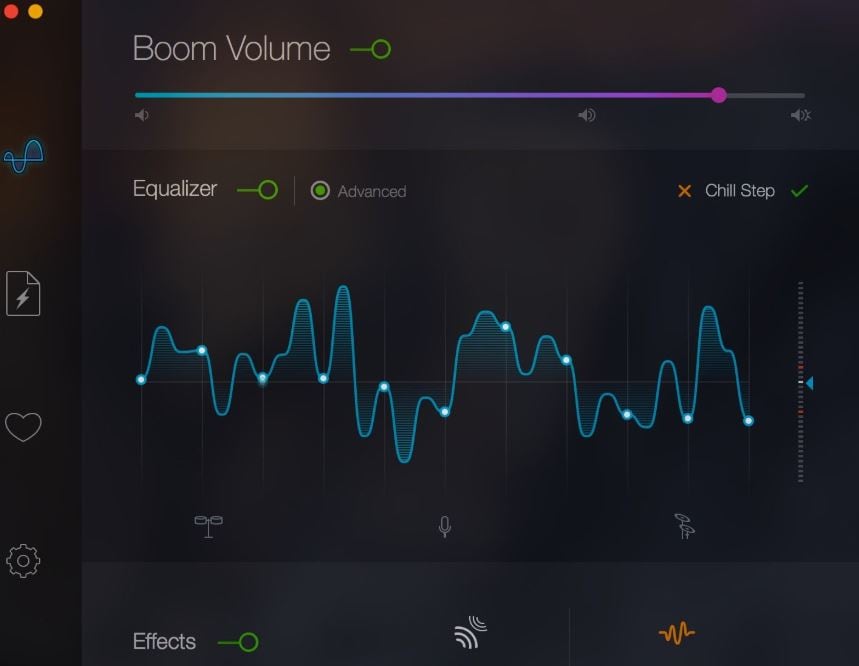
9. Boom 3D
Boom 3D for Mac & Windows is an award-winning pro sound improvement software designed to play your media content on any and all of your devices, phones, or streaming services with amazing 3D effects. No costly headphones or sound boosters will be needed to make your music feel like it! Designed in a new immersive 3D surround sound technology, Boom 3D redefines how people listen to music, watch films, or play games with some headphones on their devices. 3D sound provides the option to check the LFE (subwoofer), and the audio intensity of each Virtual 3D Surround audio system speaker.
Pros
- It comes with loads of content
- Audio quality can be enhanced
Cons
- The design is not suitable for everybody
- It does not have a Linux version
10. Mixxx
For beginners, Mixxx is just another great device. This is also one of the best free music production software downloads for your music. This software supports all Mac, Windows, and Linux platforms.
The application provides you with a DJ-mixing environment and supports all standard formats such as Mp3 and many other formats.
Pros
- It is a great app for beginners
- Supported by Mac, Windows, and Linux
Cons
- It doesn’t support many plugins
- GUI isn’t that great
Part 3: Free Music Production Software Online
11. Soundation
Soundation is a platform that provides free music production software online only capabilities. The free version and three paid versions are offered. You can use this to build your tracks unless you have the resources to do so if you need a web-based music maker and editor.
If you pay, even after you have made your music, you can always cancel. Remember first to save them to your hard drive. If you need paid characteristics, pay for the monthly plan again through PayPal, and you have to use it for a month.
Pros
- Great SSL-modelled mixer
- You can use its devices as a plugin
Cons
- It works only online
12. Audiotool
Audiotool is a popular app for music production hosted online and can be used without installation from inside your browser. It uses a cloud-based network to store all your music and files wherever you are. It is also confirmed that you will share music and tracks directly with YouTube, SoundCloud, and Facebook on its own publishing site. They have premium releases from Loopmasters and some fantastic online VSTs, for example, Heisenberg, Machiniste, Bassline, and Beatbox 8 & 9.
Pros
- No installation needed
- You can directly share it to your social media
Cons
- It works only online
- No upgrades
13. Soundtrap
Soundtrap is not only an online music studio but a training site for students and instructors. The STEAM Curriculum is an online learning resource that helps students to follow music and podcasts, incorporated into the Web app. As we mentioned earlier, in addition to the online Web App, you can also use it on different devices, share it with other users, and work in innovative projects for your music.
The interface is simple, easy to use, and easy to understand. It is simply an instrument for innovation; you don’t have to learn how to apply VST or any other technical elements to music creation. You can also record your MIDI instruments directly from your machine or device’s mic.
Pros
- It provides a great platform for teachers to teach their students
- It is very easy to use
Cons
- It only has a limited number of plugins
- It cannot be used professionally
Conclusion
If you make music on a computer, the most important resource in your artistic arsenal is your DAW; in your home recording system, you ‘re probably going to have the MIDI keyboard, audio interface, studio monitor speakers, and maybe a microphone or two. But your program is at the core of it all. Not everyone can afford expensive DAWs, but one must not worry as free music production software are present to aid us.
It is important to have a DAW with which you are pleased and, perhaps more importantly, a DAW, which allows you to turn your ideas into music as quickly and painlessly as possible. So make sure you choose the best one for you according to your needs. Hopefully, this guide will aid you!
Benjamin Arango
Benjamin Arango is a writer and a lover of all things video.
Follow @Benjamin Arango
Benjamin Arango
Mar 27, 2024• Proven solutions
13 Free Music Production Software for Windows/Mac/Online
Technology advances have spread through all fields of human activity, including music recording and development. The invention of music development tools has made it simpler for people engaged in the creation of music in one form or another.
Numerous applications for music development are on the market, and some are meant for musicians, and others are for educators and teachers. There is also a need to direct prospective customers to the right free music production software.
A comprehensive analysis of some of the best music development tools has been conducted to help you make the correct decision while you’re ready to purchase the app. This comprehensive Music Production Software Guide will provide solutions to many of your unanswered questions relating to the purchase of music production software.
- Part 1: Free Music Production Software for Windows
- Part 2: Free Music Production Software for Mac
- Part 3: Free Music Production Software Online
Part 1: Free Music Production Software for Windows
1. Audacity
The system for music development is not complete without an audio editor. Audacity is the best free music creation software available on the market. Audacity is open-source and extensive and provides a wide range of tools and effects for performing all audio editing and recording activities. It is created by a community of volunteers and provides regular notifications almost every month. It’s lightweight, safe, and intuitive enough to be used by novice music makers.
Pros
- It is open-source
- It can load VST plugins
Cons
- Only 32-bit plugins are allowed
- Limited features
2. Ardour
Ardour is a highly integrated program of music production that allows users to record and edit on Mac, Linux, and Windows operating systems. Ardour Music Production Software was created by integrating the efforts of the world’s skilled team, such as recording technicians, programmers, and musicians. Such experienced technicians make their concerted and thorough efforts to build the program. Ardour is one of the few applications in music production that respects honesty. The accessibility of this program allows app developers to concentrate on functionality that matters to consumers rather than to construct compelling apps for advertising purposes. This is a system that should be celebrated for its user-focused functionality.
Pros
- It has excellent user-friendliness
- It is available on Mac, Linux, and Windows
Cons
- It lacks a few integral features
- It is difficult to operate for people new to audio editing
3. Tracktion T7
The people at Tracktion seem to have reached a reasonably canny business model by launching older DAW versions for free and without anything removed.
The convention appears to make it possible to access the edition without charge of two iterations before the new one. You will not be provided with all new functionality, but you will receive an update every time the company updates its flagship DAW, which it does nearly every year.
The growing section is adjustable to match the workflow, and the bottom panel adjusts so that any parameters anywhere on the screen can be seen.
Pros
- It features an unlimited number of audio and MIDI tracks
- It is able to host multiple plugin formats
Cons
- It doesn’t provide all the features at once
- It does not support many plugins
4. LMMS
LMMS is a fully free music production software for windows for music development. It is an open-source and also a project platform for the community. LMMS is a cross-platform device app. It makes it easier to manufacture beats, particularly when many music production professionals have to manufacture quality music with their computers.
Thanks to the powerful sample, beat and melody design, mixing and synthetic sound processes, and many other features, the LMMS music production software provides high-quality audio output. The product also features playback tools, plugins, and samples to produce powerful, high-quality sound.
Pros
- It is compatible with Linux, Windows, and Mac
- Hydrogen project files and MIDI can be imported easily for editing
Cons
- It eats a lot of memory and requires a high-end device to support it
- Some users complained that understanding its working is difficult
5. Cakewalk
This is an exciting app for music production to purchase. It is a fantastic tech to invest in music production. Cakewalk Sonar Artist Software is one of Cakewalk Sonar Artist ‘s great productions. Cakewalk is known for an excellent GUI, an excellent mixing console, an excellent commercial radio system, and limitless MIDI tracks.
A good device to use as part of your instruments for the development of music is the Cakewalk Sonar Artist Music Production program. It stands out as a program packed with excellent features amongst its counterparts. And the app is unmatched in the area of apps.
Pros
- You can share music compilation directly to social media
- You can easily add effects to your tracks
Cons
- It is priced, very high
- One window interface makes it hectic
6. Music Maker by Magix
This app is a special program for sound engineers, skilled musicians, and accomplished music producers, developed by US Magix Entertainment. It offers an excellent forum for creative music development in music production professionals.
In reality, the software for music production is excellent software for the Music Maker by Magix. In the field of music post-production and music mastering, mixing and arrangement, recording, and more, the software achieved remarkable breakthroughs. Thanks to the successful combination of a technical device and highly flexible workflow, the Music Maker by Magix has achieved this groundbreaking success.
With creative algorithm and superb plugin effects, the Music Maker by Magix program enables music manufacturers to develop their ideas in line with the highest quality in this industry.
Pros
- It is great for EDM producers
Cons
- It is not suitable for newbies
- The GUI feels a bit cluttered
Part 2: Free Music Production Software for Mac
7. Garageband
This is a music development studio app that is designed to function on Mac. It is a great free music production software for Mac. This software has a full sound collection, which includes virtual instruments, voice, and guitar preset.
GarageBand is a well-known app for music development and is an excellent tool for music beginners. Many people have chosen GarageBand because it does not match the ease and ease of use for recording purposes in particular.
The user-friendly interface makes you easy to create music with a more unobstructed view of what you’re recording. Apps from GarageBand captured the attention of others because of their ease-to-use and user-friendliness.
Pros
- The software offers some nicely packaged preset for vocal and guitar recording
- Productive workflow
Cons
- It has limited plugins
- It is only supported for Mac platforms
8. Ableton Live
The Ableton Live 10 Suite is a dynamic and comprehensive program for the creation and performance of musical recordings.
An essential feature of this software is that it allows you to work on your time-based workflow without affecting the live session. This means that the software gives you a rare chance to get involved with the workflow without stopping live performance.
The Multitrack Recording Technology of Ableton Live10 Suite allows music producers to adjust the speed and pacing of any audio during the recording. To make these adjustments, you don’t have to pause the recording. This is one of the striking characteristics which makes this product a good option for all.
Pros
- Adjusting the speed and pace of audio is a delight
- Sophisticated MIDI/audio routing capabilities
Cons
- It has a traditional design
- Not enough updates to fix the buggy features
9. Boom 3D
Boom 3D for Mac & Windows is an award-winning pro sound improvement software designed to play your media content on any and all of your devices, phones, or streaming services with amazing 3D effects. No costly headphones or sound boosters will be needed to make your music feel like it! Designed in a new immersive 3D surround sound technology, Boom 3D redefines how people listen to music, watch films, or play games with some headphones on their devices. 3D sound provides the option to check the LFE (subwoofer), and the audio intensity of each Virtual 3D Surround audio system speaker.
Pros
- It comes with loads of content
- Audio quality can be enhanced
Cons
- The design is not suitable for everybody
- It does not have a Linux version
10. Mixxx
For beginners, Mixxx is just another great device. This is also one of the best free music production software downloads for your music. This software supports all Mac, Windows, and Linux platforms.
The application provides you with a DJ-mixing environment and supports all standard formats such as Mp3 and many other formats.
Pros
- It is a great app for beginners
- Supported by Mac, Windows, and Linux
Cons
- It doesn’t support many plugins
- GUI isn’t that great
Part 3: Free Music Production Software Online
11. Soundation
Soundation is a platform that provides free music production software online only capabilities. The free version and three paid versions are offered. You can use this to build your tracks unless you have the resources to do so if you need a web-based music maker and editor.
If you pay, even after you have made your music, you can always cancel. Remember first to save them to your hard drive. If you need paid characteristics, pay for the monthly plan again through PayPal, and you have to use it for a month.
Pros
- Great SSL-modelled mixer
- You can use its devices as a plugin
Cons
- It works only online
12. Audiotool
Audiotool is a popular app for music production hosted online and can be used without installation from inside your browser. It uses a cloud-based network to store all your music and files wherever you are. It is also confirmed that you will share music and tracks directly with YouTube, SoundCloud, and Facebook on its own publishing site. They have premium releases from Loopmasters and some fantastic online VSTs, for example, Heisenberg, Machiniste, Bassline, and Beatbox 8 & 9.
Pros
- No installation needed
- You can directly share it to your social media
Cons
- It works only online
- No upgrades
13. Soundtrap
Soundtrap is not only an online music studio but a training site for students and instructors. The STEAM Curriculum is an online learning resource that helps students to follow music and podcasts, incorporated into the Web app. As we mentioned earlier, in addition to the online Web App, you can also use it on different devices, share it with other users, and work in innovative projects for your music.
The interface is simple, easy to use, and easy to understand. It is simply an instrument for innovation; you don’t have to learn how to apply VST or any other technical elements to music creation. You can also record your MIDI instruments directly from your machine or device’s mic.
Pros
- It provides a great platform for teachers to teach their students
- It is very easy to use
Cons
- It only has a limited number of plugins
- It cannot be used professionally
Conclusion
If you make music on a computer, the most important resource in your artistic arsenal is your DAW; in your home recording system, you ‘re probably going to have the MIDI keyboard, audio interface, studio monitor speakers, and maybe a microphone or two. But your program is at the core of it all. Not everyone can afford expensive DAWs, but one must not worry as free music production software are present to aid us.
It is important to have a DAW with which you are pleased and, perhaps more importantly, a DAW, which allows you to turn your ideas into music as quickly and painlessly as possible. So make sure you choose the best one for you according to your needs. Hopefully, this guide will aid you!
Benjamin Arango
Benjamin Arango is a writer and a lover of all things video.
Follow @Benjamin Arango
Precision Audio Editing: A Step-by-Step Method to Free Your Video From Distorted Sounds
Create High-Quality Video - Wondershare Filmora
An easy and powerful YouTube video editor
Numerous video and audio effects to choose from
Detailed tutorials are provided by the official channel
Whether you are in the business of shooting or editing, noisy or distorted footage is among the most frustrating roadblocks you’ll ever encounter in your workflow. The magic of filmmaking lies after the scenes in post-production. You can remove distortion from audio using various methods.
In this article
01 What Is Distortion in Audio?
02 The Difference Between Noise and Distortion
03 How to Remove Distortion From Audio for Your Video
What Is Distortion in Audio?
You have probably heard the term distortion and would like to know what it is. Distortion is a common term in music production.
Although the term is simple, there is more than meets the eye. Distortion is defined as the change or deformation of an audio waveform that results in the production of an audio output that is different from the input. Distortion can occur at a single point or multiple points in a specific signal chain.
While there are many types of audio distortion, the most common one is clipping. It occurs when an audio signal is amplified beyond the maximum allowed unit in both analog and digital systems.
A signal is distorted when an output does not record the same signal as the input. The issue can occur due to amplifier clipping, faulty equipment, overloading of a sound source, production of hot signals, and pushing speakers beyond their limit.
In the past, people perceived distortion as a bad thing. Today, however, some kinds of distortions are considered beneficial because of their positive effect on the sound. Sound engineers apply plugins, outboard gear, and other techniques to add pleasing distortions to audios. The distortions work by adding unique elements to audios, thus improving sounds in many instances.
The Difference Between Noise and Distortion
Noise and distortion can sound very similar and hard to tell apart. However, the two are different phenomena with unique characteristics. Noise is an undesired disturbance that sounds white or pink and creates an even-tempered sound wave. On the other hand, distortion is the alteration of a waveform, where some parts are amplified while others are attenuated, leading to an uneven distribution of energy among frequencies. Let’s look at the differences between noise and distortion.
1. Where It Appears in a Signal
Noise appears randomly throughout the signal, while distortion seems at the same frequency. One example of noise is an audio hiss that can be heard when no other sounds are present. An example of distortion is a sine wave with a flat top and bottom combined with different amplitudes.
2. How It Affects Signals
Noise is random and can appear when signals are quiet. Distortion is affected by the input signal and can be altered by adding or removing signal frequencies.
How It’s Measured
You can measure distortion by using an oscilloscope to display the input signal’s waveform over time. The oscilloscope measures energy distribution among different frequencies, while you can measure noise with a spectrum analyzer by displaying an audio signal’s magnitude and frequency content over time.
Despite their differences, noise and distortion are both unwanted sounds. When they are present in a signal, they can degrade its quality. For this reason, it is essential to understand the differences between them to assess signs and produce better results accurately.
How to Remove Distortion From Audio for Your Video
You can use several different methods to remove audio distortion in your video. They include:
Method 1: Use an Online Audio Distortion Tool
You can use an online distortion tool to fix this problem. One of the popular tools for removing distortion from audio is Audacity. Available for Linux, macOS, Windows, and other Unix-like operating systems, Audacity is a FOSS (free and open-source digital audio editor software). It is also a recording application software, and you can use the program for varying tasks, including conversing audio files, removing audio distortion, adding effects, and mixing audio clips.
Keeping this in mind, let’s look at how to remove distortion from audio using Audacity.
- The first step is opening the file. To do this, drag and drop the audio file into Audacity.
- Next, you need to select the distorted area before clicking on Effect. Once you have done this, click on the Noise Reduction option.

- Doing this will open the Noise reduction window.
- Go to the Noise Profile and click on it; this will allow Audacity to know what it should filter out.

- Now, select the whole audio before reopening the Noise Reduction Window. Set the values as you see necessary.
- Check the audio by clicking Preview. If you are satisfied with the results, click OK.
- Be sure to apply the filter again if your audio is still distorted. Avoid doing it excessively, as the audio could be degraded. In turn, this can lead to the voice sounding robotic and tinny.
Method 2: Software Solutions - Adobe Audition
You can remove distortion from audio using specialized audio editing software. One of the professional audio tools that you can use to fix audio distortion is Adobe Audition; this software allows you to carve out any unwanted sound for impressive results.
These steps below will allow you to remove distortion from audio with Adobe Audition.
- Double click on the track to access the Waveform.
- Go to Window, and then select the Amplitude Statistics option.
- A new window will open. Now, hit the Scan button in the left corner. The software will then scan the audio.

- Check the section written Possibly Clipped Samples.

- Head over to Effects>Diagnostics> DeClipper.

- In the Preset section, select the Restore Heavily Clipped option.

- Next, hit the Settings button, and adjust the Tolerance.

- Hit the Scan button again, and you’ll see all the problems in your audio.
- Click Repair all to fix your distorted audio.

- Alternatively, you could head to Effects Rack and click on Filter and EQ, then FFT Filter.

- Put the Preset option to Default settings. Take out a few of the frequencies where your audio is distorted.

Method 3: Video Editing Tools like VSDC
When it comes to removing distortion from audio, you can use video editing tools to fix this problem. VSDC is one of the non-linear editing applications that people use to remove audio distortion.
Follow the steps below to learn how to remove distortion from audio using VSDC.
- Upload your footage to VSDC and right-click on it.
- Select the Audio effects option, then choose Filters. Click on Gate.

- You will see the Properties window. Here, you will find all the parameters that you need to fix your audio problems, including distortion.

The Gate filter allows users to control how fast and when the gate opens and what sort of sounds can get in.
- Threshold: This is the level of the decibel at which the gate opens. Set it based on the loudness of the audio distortion.
- Attack: This parameter defines how fast the gate will open. Essentially, the higher the attack value, the slower the gate opens. /li>
- Knee: With this parameter, you can control the response of the compressor to the signal that’s crossing the threshold. That means you can apply compression with a delay or instantly.
- Make-up gain: This increases the signal level after it has been processed.
- Ratio: This value controls compression applied to the distortion. It defines how quieter the distortion will be after gating.
- Reduction: This parameter defines the level of signal reduction will be.
- Release: This value defines how fast the gate will close after opening. You can change the Release parameter to suit your preferences.
Method 4:Normalize Your Audio with Filmora Audio Equalizer
Filmora is a video editing software that you can use to shoot, edit, and share clips with other people. It provides an easy-to-use interface that has made it one of the most popular choices for independent filmmakers. Filmora also offers audio equalizer effects designed for professional sound designers who want to work on projects with their voice-over recordings.
You can normalize your audio with Filmora by following the three simple steps below:
Step 1. Open Filmora and Import your file
First, open up Filmora and open your audio file. It can be any format you have except MOV from Apple devices like iPhone or iPad. Then, select the Media tab on the top of Filmora’s main window to import your media file.
Step 2. Adjust the Levels
Next, click the Levels option on Filmora’s left panel, where you will find three options: Gain, Equalize, and Normalizer. You can use this to adjust your audio level to be loud enough without being too loud. The normalizer helps you ensure that your audio is at a consistent level throughout the recording. You can use it both for music or voice-over recordings.

Step 3. Export Your File
Finally, you may export it when you have made the necessary adjustments to your audio file. Just click the File tab in Filmora’s main window and select Export. Many options are available for exporting your media file, including an output profile setting where you may choose MP4, AVI, or WMV and upload to Facebook, Youtube, and Vimeo.
For Win 7 or later (64-bit)
For macOS 10.12 or later
Conclusion
● Normalizing your audio file is not a complicated process, but it does require some technical knowledge. However, your audio will sound excellent and professional if you follow the steps above. You can use Filmora’s audio equalizer effects to normalize your video.
Whether you are in the business of shooting or editing, noisy or distorted footage is among the most frustrating roadblocks you’ll ever encounter in your workflow. The magic of filmmaking lies after the scenes in post-production. You can remove distortion from audio using various methods.
In this article
01 What Is Distortion in Audio?
02 The Difference Between Noise and Distortion
03 How to Remove Distortion From Audio for Your Video
What Is Distortion in Audio?
You have probably heard the term distortion and would like to know what it is. Distortion is a common term in music production.
Although the term is simple, there is more than meets the eye. Distortion is defined as the change or deformation of an audio waveform that results in the production of an audio output that is different from the input. Distortion can occur at a single point or multiple points in a specific signal chain.
While there are many types of audio distortion, the most common one is clipping. It occurs when an audio signal is amplified beyond the maximum allowed unit in both analog and digital systems.
A signal is distorted when an output does not record the same signal as the input. The issue can occur due to amplifier clipping, faulty equipment, overloading of a sound source, production of hot signals, and pushing speakers beyond their limit.
In the past, people perceived distortion as a bad thing. Today, however, some kinds of distortions are considered beneficial because of their positive effect on the sound. Sound engineers apply plugins, outboard gear, and other techniques to add pleasing distortions to audios. The distortions work by adding unique elements to audios, thus improving sounds in many instances.
The Difference Between Noise and Distortion
Noise and distortion can sound very similar and hard to tell apart. However, the two are different phenomena with unique characteristics. Noise is an undesired disturbance that sounds white or pink and creates an even-tempered sound wave. On the other hand, distortion is the alteration of a waveform, where some parts are amplified while others are attenuated, leading to an uneven distribution of energy among frequencies. Let’s look at the differences between noise and distortion.
1. Where It Appears in a Signal
Noise appears randomly throughout the signal, while distortion seems at the same frequency. One example of noise is an audio hiss that can be heard when no other sounds are present. An example of distortion is a sine wave with a flat top and bottom combined with different amplitudes.
2. How It Affects Signals
Noise is random and can appear when signals are quiet. Distortion is affected by the input signal and can be altered by adding or removing signal frequencies.
How It’s Measured
You can measure distortion by using an oscilloscope to display the input signal’s waveform over time. The oscilloscope measures energy distribution among different frequencies, while you can measure noise with a spectrum analyzer by displaying an audio signal’s magnitude and frequency content over time.
Despite their differences, noise and distortion are both unwanted sounds. When they are present in a signal, they can degrade its quality. For this reason, it is essential to understand the differences between them to assess signs and produce better results accurately.
How to Remove Distortion From Audio for Your Video
You can use several different methods to remove audio distortion in your video. They include:
Method 1: Use an Online Audio Distortion Tool
You can use an online distortion tool to fix this problem. One of the popular tools for removing distortion from audio is Audacity. Available for Linux, macOS, Windows, and other Unix-like operating systems, Audacity is a FOSS (free and open-source digital audio editor software). It is also a recording application software, and you can use the program for varying tasks, including conversing audio files, removing audio distortion, adding effects, and mixing audio clips.
Keeping this in mind, let’s look at how to remove distortion from audio using Audacity.
- The first step is opening the file. To do this, drag and drop the audio file into Audacity.
- Next, you need to select the distorted area before clicking on Effect. Once you have done this, click on the Noise Reduction option.
- Doing this will open the Noise reduction window.
- Go to the Noise Profile and click on it; this will allow Audacity to know what it should filter out.
- Now, select the whole audio before reopening the Noise Reduction Window. Set the values as you see necessary.
- Check the audio by clicking Preview. If you are satisfied with the results, click OK.
- Be sure to apply the filter again if your audio is still distorted. Avoid doing it excessively, as the audio could be degraded. In turn, this can lead to the voice sounding robotic and tinny.
Method 2: Software Solutions - Adobe Audition
You can remove distortion from audio using specialized audio editing software. One of the professional audio tools that you can use to fix audio distortion is Adobe Audition; this software allows you to carve out any unwanted sound for impressive results.
These steps below will allow you to remove distortion from audio with Adobe Audition.
- Double click on the track to access the Waveform.
- Go to Window, and then select the Amplitude Statistics option.
- A new window will open. Now, hit the Scan button in the left corner. The software will then scan the audio.
- Check the section written Possibly Clipped Samples.
- Head over to Effects>Diagnostics> DeClipper.
- In the Preset section, select the Restore Heavily Clipped option.
- Next, hit the Settings button, and adjust the Tolerance.
- Hit the Scan button again, and you’ll see all the problems in your audio.
- Click Repair all to fix your distorted audio.
- Alternatively, you could head to Effects Rack and click on Filter and EQ, then FFT Filter.
- Put the Preset option to Default settings. Take out a few of the frequencies where your audio is distorted.
Method 3: Video Editing Tools like VSDC
When it comes to removing distortion from audio, you can use video editing tools to fix this problem. VSDC is one of the non-linear editing applications that people use to remove audio distortion.
Follow the steps below to learn how to remove distortion from audio using VSDC.
- Upload your footage to VSDC and right-click on it.
- Select the Audio effects option, then choose Filters. Click on Gate.
- You will see the Properties window. Here, you will find all the parameters that you need to fix your audio problems, including distortion.
The Gate filter allows users to control how fast and when the gate opens and what sort of sounds can get in.
- Threshold: This is the level of the decibel at which the gate opens. Set it based on the loudness of the audio distortion.
- Attack: This parameter defines how fast the gate will open. Essentially, the higher the attack value, the slower the gate opens. /li>
- Knee: With this parameter, you can control the response of the compressor to the signal that’s crossing the threshold. That means you can apply compression with a delay or instantly.
- Make-up gain: This increases the signal level after it has been processed.
- Ratio: This value controls compression applied to the distortion. It defines how quieter the distortion will be after gating.
- Reduction: This parameter defines the level of signal reduction will be.
- Release: This value defines how fast the gate will close after opening. You can change the Release parameter to suit your preferences.
Method 4:Normalize Your Audio with Filmora Audio Equalizer
Filmora is a video editing software that you can use to shoot, edit, and share clips with other people. It provides an easy-to-use interface that has made it one of the most popular choices for independent filmmakers. Filmora also offers audio equalizer effects designed for professional sound designers who want to work on projects with their voice-over recordings.
You can normalize your audio with Filmora by following the three simple steps below:
Step 1. Open Filmora and Import your file
First, open up Filmora and open your audio file. It can be any format you have except MOV from Apple devices like iPhone or iPad. Then, select the Media tab on the top of Filmora’s main window to import your media file.
Step 2. Adjust the Levels
Next, click the Levels option on Filmora’s left panel, where you will find three options: Gain, Equalize, and Normalizer. You can use this to adjust your audio level to be loud enough without being too loud. The normalizer helps you ensure that your audio is at a consistent level throughout the recording. You can use it both for music or voice-over recordings.
Step 3. Export Your File
Finally, you may export it when you have made the necessary adjustments to your audio file. Just click the File tab in Filmora’s main window and select Export. Many options are available for exporting your media file, including an output profile setting where you may choose MP4, AVI, or WMV and upload to Facebook, Youtube, and Vimeo.
For Win 7 or later (64-bit)
For macOS 10.12 or later
Conclusion
● Normalizing your audio file is not a complicated process, but it does require some technical knowledge. However, your audio will sound excellent and professional if you follow the steps above. You can use Filmora’s audio equalizer effects to normalize your video.
Also read:
- Updated Crafting an Immersive Gaming Environment A Guide to Incorporating Music Into KineMaster for 2024
- 2024 Approved How to Add Photos to Audio
- How to Lower Volume of the Media Files for 2024
- Updated In 2024, Locate Spooky Noise Sounds
- Updated In 2024, What Is DAW (Digital Audio Workstation) -Myth Solved
- New Where Can I Find Game Sound Effects?
- Updated Top Linux Audio Editor Free & Paid
- Updated In 2024, Advanced Techniques in Final Cut Pro Embedding Waveform Diagrams with Live Audio Animation
- Updated 2024 Approved Expert Techniques for Crafting Complex Audio Edits with Keyframes in Premiere Pro, Mac Edition
- Guide to Accessing Impactful Percussive Audio Elements
- Updated Most Trending Free Digital Repositories for Guitar Mood Melodies and Images for 2024
- Updated In 2024, Exploring Online Resources for Listening to Birds Melodies as MP3s
- Elevate Your Online Communication The Best Skype Voice Changing Technologies
- New 2024 Approved Elite Audio Engineers Choice Premium Voice Alteration Tools for Windows and macOS Platforms
- 2024 Approved Top List Looking for The Best App for Removing Background Noise
- Updated Top Picks for High-Quality Outdoor Audio Archives
- New 2024 Approved How To Replace the Audio Track in a Video Step by Step
- New 2024 Approved 10 Leading Alternatives for Interacting and Networking in Cyberspace
- Updated Cutting Through the Clutter A Step-by-Step Approach to Clearing Background Noise in Audio Using Filmora Tutorials for 2024
- 2024 Approved Locate the Wolf Whistle Ambiance
- Updated Transforming Speech The 11 Leading Tools for Personalized Voice Adjustment As
- New In 2024, 6 Ways to Convert Video to Audio for FREE
- The Fundamentals of Podcast Production An Introduction to Basic Editing Techniques
- New 2024 Approved WhatsApp Status Designers Top Rated Apps
- Ultimate Guide from iPhone 13 mini iCloud Activation Lock Bypass
- In 2024, How to Intercept Text Messages on Lava Yuva 3 | Dr.fone
- Solutions to Spy on Samsung Galaxy S23 Ultra with and without jailbreak | Dr.fone
- Overview of the Best Oppo Reno 10 Pro+ 5G Screen Mirroring App | Dr.fone
- New Maximizing Engagement with Optimal Social Media Aspect Ratios for 2024
- In 2024, Why does the pokemon go battle league not available On Lava Blaze Pro 5G | Dr.fone
- Recover Apple iPhone 11 Pro Max Data From iOS iTunes Backup | Dr.fone
- Best Ways on How to Unlock/Bypass/Swipe/Remove Huawei Nova Y91 Fingerprint Lock
- How to Exit Android Factory Mode On Vivo V27 Pro? | Dr.fone
- Updated 10 Blockbuster Films Edited with Final Cut Pro
- Updated The Beginners Roadmap to Stop Motion Animation and Its Alternatives for 2024
- In 2024, Taking Lower Thirds to the Next Level in Final Cut Pro X
- New How to Record and Edit an Animoji or Memoji Karaoke Music Video, In 2024
- In 2024, A Perfect Guide To Remove or Disable Google Smart Lock On Samsung Galaxy S23 Ultra
- How To Activate and Use Life360 Ghost Mode On Oppo Reno 10 Pro 5G | Dr.fone
- This Article Presents a Guide to Using the Keyframe Feature for Creating Competent Films with Detailed Instructions and Filmoras Grow and Win Program Contest for 2024
- How to Track Vivo Y78 5G Location without Installing Software? | Dr.fone
- How and Where to Find a Shiny Stone Pokémon For Honor 80 Pro Straight Screen Edition? | Dr.fone
- Undelete lost call logs from Oppo Find X6 Pro
- How to Detect and Remove Spyware on Vivo Y100i? | Dr.fone
- Updated In 2024, From Beginner to Pro The Definitive Wav Converter Tutorial
- How to unlock iPhone XS Max screen lock without losing data?
- Title: Updated Hunting Down Vintage-Inspired Brushstroke Audio Assets
- Author: Paul
- Created at : 2024-05-20 01:48:22
- Updated at : 2024-05-21 01:48:22
- Link: https://voice-adjusting.techidaily.com/updated-hunting-down-vintage-inspired-brushstroke-audio-assets/
- License: This work is licensed under CC BY-NC-SA 4.0.
