:max_bytes(150000):strip_icc():format(webp)/cq5dam.web.1280.1280-3-5c2a5dc746e0fb0001d115f0.jpeg)
Updated How to Change Audio Speed Easily?

How to Change Audio Speed Easily?
If you have a music file, and you notice that it is a bit slow or fast, making the entire ambiance kind of dull or overly exciting respectively, you can change audio speed to get the track right as per your mood. However, when you make any such adjustments, some unwanted effects can be experienced, such as format limitations while exporting, changes in the pitch of the sound, etc.
That said, here, you will learn how to change audio speed with the least adverse effects using some of the most popular and highly recommended tools.
How to Change Audio Speed in Filmora
Being a lightweight and less resource-intensive post-production tool, Filmora is admired by several professionals across the globe and is many times preferred over other editing programs like Adobe Premiere Pro and Final Cut Pro X. Easy-to-understand UI and large-sized, clearly visible options and buttons are what make Filmora extremely popular among those who are new to the industry and don’t have a computer with a powerful processor, gigantic memory, and enormous GPU.
For Win 7 or later (64-bit)
For macOS 10.12 or later
You can follow the steps given below to learn how to change audio speed with Wondershare Filmora:
Step 1: Import Audio and Add to Filmora Timeline
Launch Filmora on your Windows or Mac computer, make sure that the Media icon is selected from the standard toolbar at the top, click the + icon in the Media (also referred to as Library here) window (on Mac) or anywhere in the Media window itself (on Windows) from the upper-left corner of the interface, and import the audio file that you want to manage the playback speed of. Next, drag the media file from the Library to the timeline.

Step 2: Increase or Decrease Audio Speed
Ensure that the audio track is selected in the timeline. Click the Speedometer icon from the timeline toolbar at the upper section, hover mouse to the Slow option from the menu, and click your preferred value form the submenu to reduce the sound speed. Likewise, hover the mouse to the Fast option, and choose a value from the submenu to increase it.

Note: Usually, the audio pitch wouldn’t change as long as you pick the values anywhere between 0.5x and 5x. However, if you select any option beyond this range, you may experience variations in the pitch according the value you selected.
Step 3: Set Custom Speed or Reverse the Audio
Click the Speedometer icon from above the timeline, and click Custom Speed from the menu. Use the slider to slow down (move to the left) or speed up (move to the right) the audio on the Custom Speed box. Alternatively, you can manually enter your preferred value in the available field for granular control. In addition, you can also check the Reverse Speed box to reverse the audio if need be.

Step 4: Export the Output
Click EXPORT from the top-center area of the interface, go to the Local tab on the Export box that opens next, select your preferred audio format from the Format list in the left, make necessary customizations from the right pane, and click EXPORT from the bottom-right corner of the box to export the audio with the modified speed.

How to Change the Speed of Audio with Video in Filmora
The process to change audio speed that also has a video is identical to what is explained in the previous section. The only additional step required in this case is separating the audio track from that of video.
You can learn how to get this done by following the instructions given below:
Step 1: Import File to Media Window and then Add to Timeline
Use the method explained in Step 1 of the previous section to import a file to Filmora, drag the media to the timeline, and click MATCH TO MEDIA when the Project Setting box appears and prompts for confirmation. Note: Except for the Project Setting box, the rest of the process for adding audio and video files to the timeline is the same.
Step 2: Separate Audio from Video
Select and then right-click the video track with audio in the timeline, and click Detach Audio from the context menu.

Step 3: Adjust the Audio Speed
After the audio is detached, you can select the audio track and follow the method explained in the previous section to adjust its speed as needed. As for the video, you can use the trimming and cropping options to adjust its duration and size and export the entire project as explained in Step 4 of the previous section. Note: To export the project as video, all you need to do is, choose a video format like MP4 or something similar to that when on the Export box.
How to Change Audio Speed without Changing Pitch in Audacity for Free
One of the most downloaded, used, and admired applications, Audacity, is an open-source and free audio editing software available for Windows, Mac, and Linux computers in both x32 and x64 variants. The software has all the professionals’ tools for basic to advanced sound editing to produce industry-standard outputs.
You can follow the steps given below to learn how to change audio speed with Audacity without changing the pitch of the sound:
- Launch Audacity
- Click File
- Go to Import > Audio

- Import the audio you want to speed up or slow down
- Press Ctrl + A on the keyboard to select the whole audio track
- Go to the Effect menu
- Click Change Tempo

- In the Percent Change field, enter a value with or without minus (-) to reduce or increase the tempo of the audio respectively.

- Click OK
- Go to file> Export
- Select your preferred option from the submenu to export the modified audio as needed
Note: Changing the tempo usually doesn’t change the pitch of the audio up to some extent. However, you can expect some variations in the pitch if the new tempo value is too high or too low.
Conclusion
You may want to slow down or speed up audio if the existing one is not up to the mark, and you wish to manage the ambiance with the help of the music track either while playing a video or when merely a soundtrack is to be played during some event. In either case, the best tool for all your needs is Wondershare Filmora, and if you are looking for a program dedicated to audio only, Audacity is something worth trying.
Versatile Video Editor - Wondershare Filmora
An easy yet powerful editor
Numerous effects to choose from
Detailed tutorials provided by the official channel
For Win 7 or later (64-bit)
For macOS 10.12 or later
You can follow the steps given below to learn how to change audio speed with Wondershare Filmora:
Step 1: Import Audio and Add to Filmora Timeline
Launch Filmora on your Windows or Mac computer, make sure that the Media icon is selected from the standard toolbar at the top, click the + icon in the Media (also referred to as Library here) window (on Mac) or anywhere in the Media window itself (on Windows) from the upper-left corner of the interface, and import the audio file that you want to manage the playback speed of. Next, drag the media file from the Library to the timeline.

Step 2: Increase or Decrease Audio Speed
Ensure that the audio track is selected in the timeline. Click the Speedometer icon from the timeline toolbar at the upper section, hover mouse to the Slow option from the menu, and click your preferred value form the submenu to reduce the sound speed. Likewise, hover the mouse to the Fast option, and choose a value from the submenu to increase it.

Note: Usually, the audio pitch wouldn’t change as long as you pick the values anywhere between 0.5x and 5x. However, if you select any option beyond this range, you may experience variations in the pitch according the value you selected.
Step 3: Set Custom Speed or Reverse the Audio
Click the Speedometer icon from above the timeline, and click Custom Speed from the menu. Use the slider to slow down (move to the left) or speed up (move to the right) the audio on the Custom Speed box. Alternatively, you can manually enter your preferred value in the available field for granular control. In addition, you can also check the Reverse Speed box to reverse the audio if need be.

Step 4: Export the Output
Click EXPORT from the top-center area of the interface, go to the Local tab on the Export box that opens next, select your preferred audio format from the Format list in the left, make necessary customizations from the right pane, and click EXPORT from the bottom-right corner of the box to export the audio with the modified speed.

How to Change the Speed of Audio with Video in Filmora
The process to change audio speed that also has a video is identical to what is explained in the previous section. The only additional step required in this case is separating the audio track from that of video.
You can learn how to get this done by following the instructions given below:
Step 1: Import File to Media Window and then Add to Timeline
Use the method explained in Step 1 of the previous section to import a file to Filmora, drag the media to the timeline, and click MATCH TO MEDIA when the Project Setting box appears and prompts for confirmation. Note: Except for the Project Setting box, the rest of the process for adding audio and video files to the timeline is the same.
Step 2: Separate Audio from Video
Select and then right-click the video track with audio in the timeline, and click Detach Audio from the context menu.

Step 3: Adjust the Audio Speed
After the audio is detached, you can select the audio track and follow the method explained in the previous section to adjust its speed as needed. As for the video, you can use the trimming and cropping options to adjust its duration and size and export the entire project as explained in Step 4 of the previous section. Note: To export the project as video, all you need to do is, choose a video format like MP4 or something similar to that when on the Export box.
How to Change Audio Speed without Changing Pitch in Audacity for Free
One of the most downloaded, used, and admired applications, Audacity, is an open-source and free audio editing software available for Windows, Mac, and Linux computers in both x32 and x64 variants. The software has all the professionals’ tools for basic to advanced sound editing to produce industry-standard outputs.
You can follow the steps given below to learn how to change audio speed with Audacity without changing the pitch of the sound:
- Launch Audacity
- Click File
- Go to Import > Audio

- Import the audio you want to speed up or slow down
- Press Ctrl + A on the keyboard to select the whole audio track
- Go to the Effect menu
- Click Change Tempo

- In the Percent Change field, enter a value with or without minus (-) to reduce or increase the tempo of the audio respectively.

- Click OK
- Go to file> Export
- Select your preferred option from the submenu to export the modified audio as needed
Note: Changing the tempo usually doesn’t change the pitch of the audio up to some extent. However, you can expect some variations in the pitch if the new tempo value is too high or too low.
Conclusion
You may want to slow down or speed up audio if the existing one is not up to the mark, and you wish to manage the ambiance with the help of the music track either while playing a video or when merely a soundtrack is to be played during some event. In either case, the best tool for all your needs is Wondershare Filmora, and if you are looking for a program dedicated to audio only, Audacity is something worth trying.
Versatile Video Editor - Wondershare Filmora
An easy yet powerful editor
Numerous effects to choose from
Detailed tutorials provided by the official channel
For Win 7 or later (64-bit)
For macOS 10.12 or later
You can follow the steps given below to learn how to change audio speed with Wondershare Filmora:
Step 1: Import Audio and Add to Filmora Timeline
Launch Filmora on your Windows or Mac computer, make sure that the Media icon is selected from the standard toolbar at the top, click the + icon in the Media (also referred to as Library here) window (on Mac) or anywhere in the Media window itself (on Windows) from the upper-left corner of the interface, and import the audio file that you want to manage the playback speed of. Next, drag the media file from the Library to the timeline.

Step 2: Increase or Decrease Audio Speed
Ensure that the audio track is selected in the timeline. Click the Speedometer icon from the timeline toolbar at the upper section, hover mouse to the Slow option from the menu, and click your preferred value form the submenu to reduce the sound speed. Likewise, hover the mouse to the Fast option, and choose a value from the submenu to increase it.

Note: Usually, the audio pitch wouldn’t change as long as you pick the values anywhere between 0.5x and 5x. However, if you select any option beyond this range, you may experience variations in the pitch according the value you selected.
Step 3: Set Custom Speed or Reverse the Audio
Click the Speedometer icon from above the timeline, and click Custom Speed from the menu. Use the slider to slow down (move to the left) or speed up (move to the right) the audio on the Custom Speed box. Alternatively, you can manually enter your preferred value in the available field for granular control. In addition, you can also check the Reverse Speed box to reverse the audio if need be.

Step 4: Export the Output
Click EXPORT from the top-center area of the interface, go to the Local tab on the Export box that opens next, select your preferred audio format from the Format list in the left, make necessary customizations from the right pane, and click EXPORT from the bottom-right corner of the box to export the audio with the modified speed.

How to Change the Speed of Audio with Video in Filmora
The process to change audio speed that also has a video is identical to what is explained in the previous section. The only additional step required in this case is separating the audio track from that of video.
You can learn how to get this done by following the instructions given below:
Step 1: Import File to Media Window and then Add to Timeline
Use the method explained in Step 1 of the previous section to import a file to Filmora, drag the media to the timeline, and click MATCH TO MEDIA when the Project Setting box appears and prompts for confirmation. Note: Except for the Project Setting box, the rest of the process for adding audio and video files to the timeline is the same.
Step 2: Separate Audio from Video
Select and then right-click the video track with audio in the timeline, and click Detach Audio from the context menu.

Step 3: Adjust the Audio Speed
After the audio is detached, you can select the audio track and follow the method explained in the previous section to adjust its speed as needed. As for the video, you can use the trimming and cropping options to adjust its duration and size and export the entire project as explained in Step 4 of the previous section. Note: To export the project as video, all you need to do is, choose a video format like MP4 or something similar to that when on the Export box.
How to Change Audio Speed without Changing Pitch in Audacity for Free
One of the most downloaded, used, and admired applications, Audacity, is an open-source and free audio editing software available for Windows, Mac, and Linux computers in both x32 and x64 variants. The software has all the professionals’ tools for basic to advanced sound editing to produce industry-standard outputs.
You can follow the steps given below to learn how to change audio speed with Audacity without changing the pitch of the sound:
- Launch Audacity
- Click File
- Go to Import > Audio

- Import the audio you want to speed up or slow down
- Press Ctrl + A on the keyboard to select the whole audio track
- Go to the Effect menu
- Click Change Tempo

- In the Percent Change field, enter a value with or without minus (-) to reduce or increase the tempo of the audio respectively.

- Click OK
- Go to file> Export
- Select your preferred option from the submenu to export the modified audio as needed
Note: Changing the tempo usually doesn’t change the pitch of the audio up to some extent. However, you can expect some variations in the pitch if the new tempo value is too high or too low.
Conclusion
You may want to slow down or speed up audio if the existing one is not up to the mark, and you wish to manage the ambiance with the help of the music track either while playing a video or when merely a soundtrack is to be played during some event. In either case, the best tool for all your needs is Wondershare Filmora, and if you are looking for a program dedicated to audio only, Audacity is something worth trying.
Versatile Video Editor - Wondershare Filmora
An easy yet powerful editor
Numerous effects to choose from
Detailed tutorials provided by the official channel
For Win 7 or later (64-bit)
For macOS 10.12 or later
You can follow the steps given below to learn how to change audio speed with Wondershare Filmora:
Step 1: Import Audio and Add to Filmora Timeline
Launch Filmora on your Windows or Mac computer, make sure that the Media icon is selected from the standard toolbar at the top, click the + icon in the Media (also referred to as Library here) window (on Mac) or anywhere in the Media window itself (on Windows) from the upper-left corner of the interface, and import the audio file that you want to manage the playback speed of. Next, drag the media file from the Library to the timeline.

Step 2: Increase or Decrease Audio Speed
Ensure that the audio track is selected in the timeline. Click the Speedometer icon from the timeline toolbar at the upper section, hover mouse to the Slow option from the menu, and click your preferred value form the submenu to reduce the sound speed. Likewise, hover the mouse to the Fast option, and choose a value from the submenu to increase it.

Note: Usually, the audio pitch wouldn’t change as long as you pick the values anywhere between 0.5x and 5x. However, if you select any option beyond this range, you may experience variations in the pitch according the value you selected.
Step 3: Set Custom Speed or Reverse the Audio
Click the Speedometer icon from above the timeline, and click Custom Speed from the menu. Use the slider to slow down (move to the left) or speed up (move to the right) the audio on the Custom Speed box. Alternatively, you can manually enter your preferred value in the available field for granular control. In addition, you can also check the Reverse Speed box to reverse the audio if need be.

Step 4: Export the Output
Click EXPORT from the top-center area of the interface, go to the Local tab on the Export box that opens next, select your preferred audio format from the Format list in the left, make necessary customizations from the right pane, and click EXPORT from the bottom-right corner of the box to export the audio with the modified speed.

How to Change the Speed of Audio with Video in Filmora
The process to change audio speed that also has a video is identical to what is explained in the previous section. The only additional step required in this case is separating the audio track from that of video.
You can learn how to get this done by following the instructions given below:
Step 1: Import File to Media Window and then Add to Timeline
Use the method explained in Step 1 of the previous section to import a file to Filmora, drag the media to the timeline, and click MATCH TO MEDIA when the Project Setting box appears and prompts for confirmation. Note: Except for the Project Setting box, the rest of the process for adding audio and video files to the timeline is the same.
Step 2: Separate Audio from Video
Select and then right-click the video track with audio in the timeline, and click Detach Audio from the context menu.

Step 3: Adjust the Audio Speed
After the audio is detached, you can select the audio track and follow the method explained in the previous section to adjust its speed as needed. As for the video, you can use the trimming and cropping options to adjust its duration and size and export the entire project as explained in Step 4 of the previous section. Note: To export the project as video, all you need to do is, choose a video format like MP4 or something similar to that when on the Export box.
How to Change Audio Speed without Changing Pitch in Audacity for Free
One of the most downloaded, used, and admired applications, Audacity, is an open-source and free audio editing software available for Windows, Mac, and Linux computers in both x32 and x64 variants. The software has all the professionals’ tools for basic to advanced sound editing to produce industry-standard outputs.
You can follow the steps given below to learn how to change audio speed with Audacity without changing the pitch of the sound:
- Launch Audacity
- Click File
- Go to Import > Audio

- Import the audio you want to speed up or slow down
- Press Ctrl + A on the keyboard to select the whole audio track
- Go to the Effect menu
- Click Change Tempo

- In the Percent Change field, enter a value with or without minus (-) to reduce or increase the tempo of the audio respectively.

- Click OK
- Go to file> Export
- Select your preferred option from the submenu to export the modified audio as needed
Note: Changing the tempo usually doesn’t change the pitch of the audio up to some extent. However, you can expect some variations in the pitch if the new tempo value is too high or too low.
Conclusion
You may want to slow down or speed up audio if the existing one is not up to the mark, and you wish to manage the ambiance with the help of the music track either while playing a video or when merely a soundtrack is to be played during some event. In either case, the best tool for all your needs is Wondershare Filmora, and if you are looking for a program dedicated to audio only, Audacity is something worth trying.
Versatile Video Editor - Wondershare Filmora
An easy yet powerful editor
Numerous effects to choose from
Detailed tutorials provided by the official channel
Preserving Sound Integrity: Altering Audio Tones in Audacity
You may raise or lower the pitch of a pre-recorded song. Likewise, you may apply the pitch-changing effect in real-time sound recording. Change in pitch affects your noise in certain ways. For instance, it can help you sound younger. Similarly, it can convert the male voice into a female voice. Another notable use of the pitch-changing technique is that you can produce sounds like cartoons. So, changing pitch can add a unique touch to your voice. You can also change pitch when recording in Audacity. The following article covers details about the Audacity change pitch feature. Let’s get started.
In this article
01 What is pitch, and how does it work?
02 How to Change Pitch in Audacity?
Part 1: What is pitch, and how does it work?
Not all sounds are the same. Some vary in terms of amplitude, which makes them loud or quiet. In contrast, others vary in terms of pitch, which makes them high or low. Pitch is used to differentiate between the acute and flat notes in a sound wave. High-pitched sounds are likely to be shrilling, whereas the lower-pitched will be bassy. Pitch depends upon the frequency of the sound waves producing them. In short, notes at a higher frequency are high-pitched.
On the contrary, notes at lower frequencies are low-pitched. Changing a pitch of noise from low to high or vice versa is an art. Thus, sound recording and editing applications like Audacity come with the in-built effect that enables you to change the pitch of a sound.
Part 2: How to Change Pitch in Audacity?
Sound editing is becoming increasingly popular in music and other relevant industries. Several applications offer sound editing tools to serve the needs of the people. Pitch-changing is one of the common tools that people look for in sound editors.
Audacity is one of the notable software that allows users to change the pitch of the voice. It comes with an Audacity pitch shift mechanism to facilitate users. So, if you are editing sound in Audacity, changing the pitch is just a matter of a few clicks. Are you still wondering how you can apply the Audacity change pitch technique when editing? Here’s how you can do it in simple steps.
Step 1: Select the audio portion
Launch Audacity and add sound recordings you want to edit. Click on the timeline and drag to select the portion of the sound.
Note: Only the portion whose pitch you want to change.

Step 2: Open Effect menu
Click on the Effect tab at the top right of the screen next to Generate. Select Pitch Change from the drop-down menu.
Note: You can also make other changes, such as Change Speed and Change Tempo option will let you alter the speed of the sound. So, the pitch can also be altered using this process.

Step 3: Adjust pitch
Drag the slider to alter the pitch of the sound and press the OK button to apply changes.
Note: To increase pitch, slide towards the right. Similarly, slide towards the left to a lower pitch. In addition, the pitch can also be changed by configuring From and To parameters.

Bonus Section: How to Adjust Sound Louder in Audacity?
Volume in an audio file may or may not be ideal for use. Sometimes, the sound is too loud or low. Audacity can help you in such a situation. So, if you are editing sound recordings in Audacity, you can also fix the volume of the sound. The good thing to note is that you can adjust the sound in both directions, which implies you can easily amplify or reduce the volume in these open-source applications. Are you interested in knowing about the volume adjustment process in Audacity? If yes, we have summarized the process in simple steps. Let’s take a look.
Step 1: Add an audio file
Launch the software and click on File. Select Open and select the desired audio.
Note: It is not recommended to change the volume through the playback volume knob at the top right corner of the screen, as this will only increase the volume in your device. However, the actual volume of the audio will remain unchanged.

Step 2: Increase/Decrease audio gain
Change the gain of the audio at the left-hand side of the screen. Move the slider to adjust the volume to the desired level.

Note: Alternatively, you may also increase or increase the volume through the amplification process. To use this method, select the audio portion, access Effect, and tap Amplify. Tick allow clipping box and move the slider to set the volume of the sound.
Conclusion
There are high chances of audio sound not being in the required pitch or volume. Plus, you may also need to change the sound characteristics of an audio file for specific use. So, if this is the case, the Audacity change pitch technique is all you need to learn. Thus, we have summarized the process of changing pitch and volume in a step-by-step guide in this article. Hopefully, all your concerns will have been addressed.
02 How to Change Pitch in Audacity?
Part 1: What is pitch, and how does it work?
Not all sounds are the same. Some vary in terms of amplitude, which makes them loud or quiet. In contrast, others vary in terms of pitch, which makes them high or low. Pitch is used to differentiate between the acute and flat notes in a sound wave. High-pitched sounds are likely to be shrilling, whereas the lower-pitched will be bassy. Pitch depends upon the frequency of the sound waves producing them. In short, notes at a higher frequency are high-pitched.
On the contrary, notes at lower frequencies are low-pitched. Changing a pitch of noise from low to high or vice versa is an art. Thus, sound recording and editing applications like Audacity come with the in-built effect that enables you to change the pitch of a sound.
Part 2: How to Change Pitch in Audacity?
Sound editing is becoming increasingly popular in music and other relevant industries. Several applications offer sound editing tools to serve the needs of the people. Pitch-changing is one of the common tools that people look for in sound editors.
Audacity is one of the notable software that allows users to change the pitch of the voice. It comes with an Audacity pitch shift mechanism to facilitate users. So, if you are editing sound in Audacity, changing the pitch is just a matter of a few clicks. Are you still wondering how you can apply the Audacity change pitch technique when editing? Here’s how you can do it in simple steps.
Step 1: Select the audio portion
Launch Audacity and add sound recordings you want to edit. Click on the timeline and drag to select the portion of the sound.
Note: Only the portion whose pitch you want to change.

Step 2: Open Effect menu
Click on the Effect tab at the top right of the screen next to Generate. Select Pitch Change from the drop-down menu.
Note: You can also make other changes, such as Change Speed and Change Tempo option will let you alter the speed of the sound. So, the pitch can also be altered using this process.

Step 3: Adjust pitch
Drag the slider to alter the pitch of the sound and press the OK button to apply changes.
Note: To increase pitch, slide towards the right. Similarly, slide towards the left to a lower pitch. In addition, the pitch can also be changed by configuring From and To parameters.

Bonus Section: How to Adjust Sound Louder in Audacity?
Volume in an audio file may or may not be ideal for use. Sometimes, the sound is too loud or low. Audacity can help you in such a situation. So, if you are editing sound recordings in Audacity, you can also fix the volume of the sound. The good thing to note is that you can adjust the sound in both directions, which implies you can easily amplify or reduce the volume in these open-source applications. Are you interested in knowing about the volume adjustment process in Audacity? If yes, we have summarized the process in simple steps. Let’s take a look.
Step 1: Add an audio file
Launch the software and click on File. Select Open and select the desired audio.
Note: It is not recommended to change the volume through the playback volume knob at the top right corner of the screen, as this will only increase the volume in your device. However, the actual volume of the audio will remain unchanged.

Step 2: Increase/Decrease audio gain
Change the gain of the audio at the left-hand side of the screen. Move the slider to adjust the volume to the desired level.

Note: Alternatively, you may also increase or increase the volume through the amplification process. To use this method, select the audio portion, access Effect, and tap Amplify. Tick allow clipping box and move the slider to set the volume of the sound.
Conclusion
There are high chances of audio sound not being in the required pitch or volume. Plus, you may also need to change the sound characteristics of an audio file for specific use. So, if this is the case, the Audacity change pitch technique is all you need to learn. Thus, we have summarized the process of changing pitch and volume in a step-by-step guide in this article. Hopefully, all your concerns will have been addressed.
02 How to Change Pitch in Audacity?
Part 1: What is pitch, and how does it work?
Not all sounds are the same. Some vary in terms of amplitude, which makes them loud or quiet. In contrast, others vary in terms of pitch, which makes them high or low. Pitch is used to differentiate between the acute and flat notes in a sound wave. High-pitched sounds are likely to be shrilling, whereas the lower-pitched will be bassy. Pitch depends upon the frequency of the sound waves producing them. In short, notes at a higher frequency are high-pitched.
On the contrary, notes at lower frequencies are low-pitched. Changing a pitch of noise from low to high or vice versa is an art. Thus, sound recording and editing applications like Audacity come with the in-built effect that enables you to change the pitch of a sound.
Part 2: How to Change Pitch in Audacity?
Sound editing is becoming increasingly popular in music and other relevant industries. Several applications offer sound editing tools to serve the needs of the people. Pitch-changing is one of the common tools that people look for in sound editors.
Audacity is one of the notable software that allows users to change the pitch of the voice. It comes with an Audacity pitch shift mechanism to facilitate users. So, if you are editing sound in Audacity, changing the pitch is just a matter of a few clicks. Are you still wondering how you can apply the Audacity change pitch technique when editing? Here’s how you can do it in simple steps.
Step 1: Select the audio portion
Launch Audacity and add sound recordings you want to edit. Click on the timeline and drag to select the portion of the sound.
Note: Only the portion whose pitch you want to change.

Step 2: Open Effect menu
Click on the Effect tab at the top right of the screen next to Generate. Select Pitch Change from the drop-down menu.
Note: You can also make other changes, such as Change Speed and Change Tempo option will let you alter the speed of the sound. So, the pitch can also be altered using this process.

Step 3: Adjust pitch
Drag the slider to alter the pitch of the sound and press the OK button to apply changes.
Note: To increase pitch, slide towards the right. Similarly, slide towards the left to a lower pitch. In addition, the pitch can also be changed by configuring From and To parameters.

Bonus Section: How to Adjust Sound Louder in Audacity?
Volume in an audio file may or may not be ideal for use. Sometimes, the sound is too loud or low. Audacity can help you in such a situation. So, if you are editing sound recordings in Audacity, you can also fix the volume of the sound. The good thing to note is that you can adjust the sound in both directions, which implies you can easily amplify or reduce the volume in these open-source applications. Are you interested in knowing about the volume adjustment process in Audacity? If yes, we have summarized the process in simple steps. Let’s take a look.
Step 1: Add an audio file
Launch the software and click on File. Select Open and select the desired audio.
Note: It is not recommended to change the volume through the playback volume knob at the top right corner of the screen, as this will only increase the volume in your device. However, the actual volume of the audio will remain unchanged.

Step 2: Increase/Decrease audio gain
Change the gain of the audio at the left-hand side of the screen. Move the slider to adjust the volume to the desired level.

Note: Alternatively, you may also increase or increase the volume through the amplification process. To use this method, select the audio portion, access Effect, and tap Amplify. Tick allow clipping box and move the slider to set the volume of the sound.
Conclusion
There are high chances of audio sound not being in the required pitch or volume. Plus, you may also need to change the sound characteristics of an audio file for specific use. So, if this is the case, the Audacity change pitch technique is all you need to learn. Thus, we have summarized the process of changing pitch and volume in a step-by-step guide in this article. Hopefully, all your concerns will have been addressed.
02 How to Change Pitch in Audacity?
Part 1: What is pitch, and how does it work?
Not all sounds are the same. Some vary in terms of amplitude, which makes them loud or quiet. In contrast, others vary in terms of pitch, which makes them high or low. Pitch is used to differentiate between the acute and flat notes in a sound wave. High-pitched sounds are likely to be shrilling, whereas the lower-pitched will be bassy. Pitch depends upon the frequency of the sound waves producing them. In short, notes at a higher frequency are high-pitched.
On the contrary, notes at lower frequencies are low-pitched. Changing a pitch of noise from low to high or vice versa is an art. Thus, sound recording and editing applications like Audacity come with the in-built effect that enables you to change the pitch of a sound.
Part 2: How to Change Pitch in Audacity?
Sound editing is becoming increasingly popular in music and other relevant industries. Several applications offer sound editing tools to serve the needs of the people. Pitch-changing is one of the common tools that people look for in sound editors.
Audacity is one of the notable software that allows users to change the pitch of the voice. It comes with an Audacity pitch shift mechanism to facilitate users. So, if you are editing sound in Audacity, changing the pitch is just a matter of a few clicks. Are you still wondering how you can apply the Audacity change pitch technique when editing? Here’s how you can do it in simple steps.
Step 1: Select the audio portion
Launch Audacity and add sound recordings you want to edit. Click on the timeline and drag to select the portion of the sound.
Note: Only the portion whose pitch you want to change.

Step 2: Open Effect menu
Click on the Effect tab at the top right of the screen next to Generate. Select Pitch Change from the drop-down menu.
Note: You can also make other changes, such as Change Speed and Change Tempo option will let you alter the speed of the sound. So, the pitch can also be altered using this process.

Step 3: Adjust pitch
Drag the slider to alter the pitch of the sound and press the OK button to apply changes.
Note: To increase pitch, slide towards the right. Similarly, slide towards the left to a lower pitch. In addition, the pitch can also be changed by configuring From and To parameters.

Bonus Section: How to Adjust Sound Louder in Audacity?
Volume in an audio file may or may not be ideal for use. Sometimes, the sound is too loud or low. Audacity can help you in such a situation. So, if you are editing sound recordings in Audacity, you can also fix the volume of the sound. The good thing to note is that you can adjust the sound in both directions, which implies you can easily amplify or reduce the volume in these open-source applications. Are you interested in knowing about the volume adjustment process in Audacity? If yes, we have summarized the process in simple steps. Let’s take a look.
Step 1: Add an audio file
Launch the software and click on File. Select Open and select the desired audio.
Note: It is not recommended to change the volume through the playback volume knob at the top right corner of the screen, as this will only increase the volume in your device. However, the actual volume of the audio will remain unchanged.

Step 2: Increase/Decrease audio gain
Change the gain of the audio at the left-hand side of the screen. Move the slider to adjust the volume to the desired level.

Note: Alternatively, you may also increase or increase the volume through the amplification process. To use this method, select the audio portion, access Effect, and tap Amplify. Tick allow clipping box and move the slider to set the volume of the sound.
Conclusion
There are high chances of audio sound not being in the required pitch or volume. Plus, you may also need to change the sound characteristics of an audio file for specific use. So, if this is the case, the Audacity change pitch technique is all you need to learn. Thus, we have summarized the process of changing pitch and volume in a step-by-step guide in this article. Hopefully, all your concerns will have been addressed.
Guide to Acquiring Realistic Bell Noise Samples
Versatile Video Editor - Wondershare Filmora
An easy yet powerful editor
Numerous effects to choose from
Detailed tutorials provided by the official channel
Chiming into a perfect sound effect is quite challenging as any mistake in this might flop the impact of the sound. It will be a lot of pressure to take a responsibility of matching the perfect bell sound and its effect to bring the right music. Here we will help you to know where you can find the best bell sound effects. Reading this article will give you an idea of where to get the bell sound effects and where to download them from.
In this article
01 [Ways to Download Various Sound Effects](#Part 1)
02 [Use Filmora to Add Sound Effects in Your Video](#Part 2)
Part 1 Ways to Download Various Sound Effects
There are many ways to download or get various sound effects including bell sound effects. With overwhelming sites offering the options to download free bell sound effects for your videos, you might still have to take lot of measures to select the best effect that suits your video. With various types of Chimes ranging from hourly intervals, and generic bells – there are sites that provides free downloading effects suitable for different purposes. These sounds on the sites have been recorded professionally and thus you will not be finding any noises or other disturbing effects while you are matching them with your videos.
Here are some of the ways where you can download all kinds of sound effects that are free to use.
1. Download from Some YouTube Video
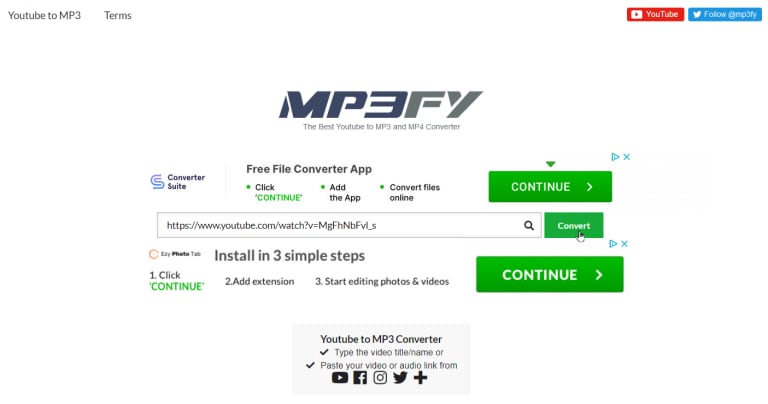
As YouTube doesn’t allow downloading videos directly to your device all the time unless the video owner allow it, you need to use third party websites that allows users to convert YouTube videos into MP3 files. MP3FY is an awesome website that will allow you to download the audio part of the YouTube video that you want to download. Here is how you can do it.
Step 1: First you need to visit MP3FY website from your computer browser.
Step 2: Next you need to copy the video link from YouTube and paste the link into the box.
Step 3: Then click on the Convert button and click Confirm after that so that you can verify the video.
Step 4: Finally you need to click on the Download MP3 button to Save the MP3 file to your computer, where you can play it in your favorite music player or simply use it to add into any video of your choice.
Another way to download audio from YouTube video is by converting a video to MP3 directly from YouTube. Here is how.
Step 1: First you need to add the letters fy between youtube and .com in the URL for the YouTube video you want to convert.
Step 2: This will take you to the MP3FY website, where you need to follow the same steps like before to convert and download the MP3 file.
2. Make Bell Sound Effect by Yourself
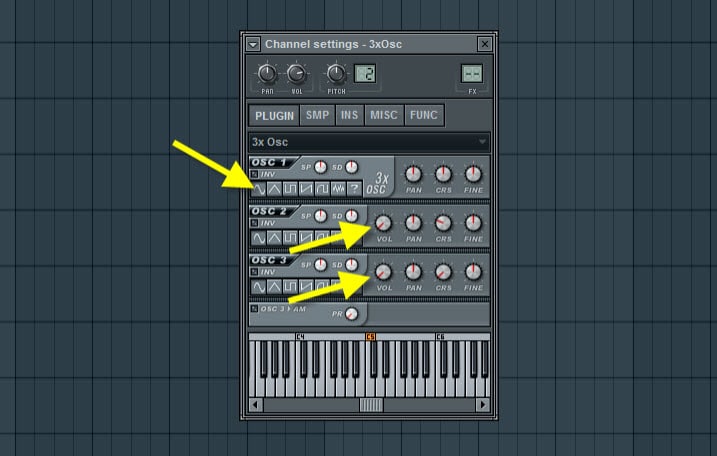
If you have FL Studio and 3xOSC plugin then you can easily create bell sounds mp3 effect by yourself. The process is a bit technical but we’ll get you through this process step by step.
Step 1: First you need to load 3xOsc to your FL Studio project and choose Sine Wave as the shape for the Oscillator 1. Also, for this process, we’ll only need ONE oscillator so disable the Osc 2 & Osc 3 by turning their volume levels to 0%.
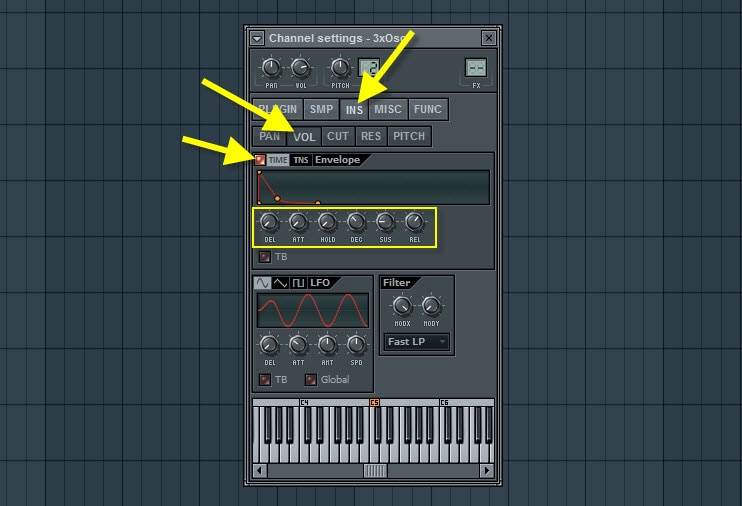
Step 2: Next you need to navigate to the “Instrument Properties (INS)” tab and from there select “VOL” subtab (volume envelope) and click on the “Use envelope” button to enable it. Then you need to edit the envelope curve to look like below image (short Attack time, quite low Sustain level and semi-long Release time is the key here).
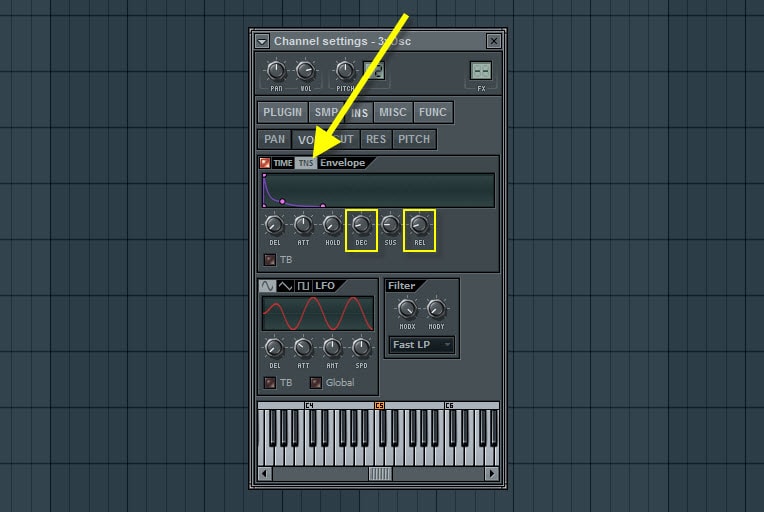
Step 3: Next, you need to click on the “TNS” button (Tension) to edit the envelope line shapes a bit. We need to lower the tension level of Decay to add sharper “drop” from the Decay to Sustain. This will make the bell sound sharper for you. Also lower the tension level between Sustain and Release so that it doesn’t let the long Release to be too dominant
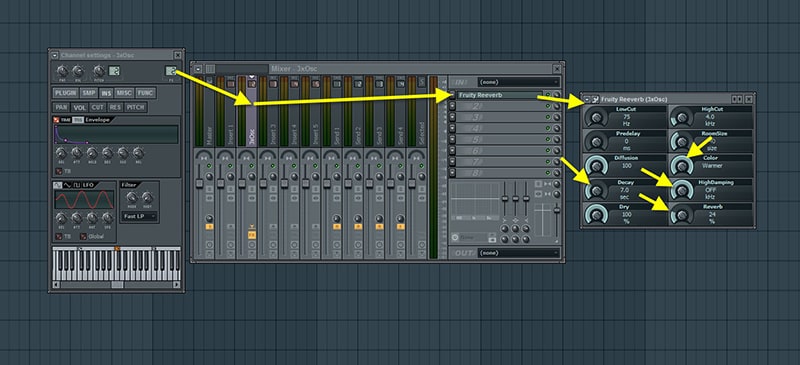
Step 4: Finally, you need to add that spacious depth and color to the sound via Fruity Reeverb. So, you can assign the 3xOsc to a free mixer track and drop a Fruity Reeverb to its effect slot. You need to set it like – “Color to Warmer (all the way to right – to make the reverb sound less metallic), Decay to 7 sec (long Decay time is the key here to make the bell sound huge and atmospheric), HighDamping to OFF and Reverb level to 24%”.
3.Zapsplat
Here in this site, you can find almost more than 200 bell sound effects ranging from small bells to long sound bell sound effects. The site offers loads of other generic bells that can be used that are available in various formats.
4.Orange Free Sounds
If you wanted to enjoy free bell sound effects for your video, this is the right site where you can find numerous sound effects that are available free for you. With various range of bell sound effects including small bell, church bell toning, elevator bell sound effects, bell ringing sound effects, and other related ones are available that can be matched with your video effects.

5.A Sound Effect
Here is another site where you can get amazing bell sound effects with clear and high-quality audios. These sound effects are tuned to the lovely musical notes and are recorded by experts so you will not find any flaws. The files once downloaded can be used directly as these are trimmed and attached in easy format to use in videos. The files are available in almost all the format to help you download them as per your video.

6.FreeSFX
If you can’t find suitable bell sound for your video, you will surely find it in this site. The FreeSFX site have a great collection of free bell sound effects of all ranges and they don’t just stop with this. They update the site with new bell sounds often and so you can make your videos with these latest ones uploaded on the site.
Part 2 Use Filmora to Add Sound Effects in Your Video
The Filmora is the best editor enabling you to enjoy the music along with your video with the incorporation of its powerful features. You can edit the audio detaching it separately from the video. As it is an easy-to-use tool that makes flawless blending of audio and video, you can now relish the best music and video in single file.
Features
- The audio mixer feature helps user to edit audio files separately.
- Various effects including audio fade in and out helps to adjust the background audio easily.
- Enhances the video clarity adding the stunning effects and it has the huge collection of audios.
- Contains royal free music collections and sound effects.
Guide to Add Sound Effects to Video with Filmora
Step 1: Go to the Filmora official website, install wonder share Filmora and lunch it. Once it’s launched, you will find a tab just below the menu bar, tap media, and click import. After this, there will be a drop-down where you can click on import media files and choose the video file. Repeat the process to pick the desired background music. You can also use build-in music tracks to add music to your video by selecting the Music tab.
For Win 7 or later (64-bit)
For macOS 10.12 or later

Step 2: Now you can navigate over the video you imported to Filmora, then tap on the sign ‘+’on it alternatively; you can drag down to the timeline the media file.
Step 3: Now edit your music by double-tapping the audio from the timeline. It will display the audio panel at the top of the screen. You can use it to set the desired equalizer, manage pitch volume and speed. You can also use the forum to fade in or fade out.

Step 4: Finally, you can now export the video that has made the desired changes by clicking ‘export’ on the toolbar to export the video. You can now save the exported in the desired format and remember to rename it directly.
Wondershare Filmora
Get started easily with Filmora’s powerful performance, intuitive interface, and countless effects!
Try It Free Try It Free Try It Free Learn More >

Conclusion
If you are looking for the merging of audio to video, then you don’t have to be panic. All you need to do is to add some background music to video using Filmora tools. In this you are free to choose any bell music to match your video file online without much trouble or looking for an expert to get this done for you. With the above rich features, Filmora software enhances your video by merging audio.
Chiming into a perfect sound effect is quite challenging as any mistake in this might flop the impact of the sound. It will be a lot of pressure to take a responsibility of matching the perfect bell sound and its effect to bring the right music. Here we will help you to know where you can find the best bell sound effects. Reading this article will give you an idea of where to get the bell sound effects and where to download them from.
In this article
01 [Ways to Download Various Sound Effects](#Part 1)
02 [Use Filmora to Add Sound Effects in Your Video](#Part 2)
Part 1 Ways to Download Various Sound Effects
There are many ways to download or get various sound effects including bell sound effects. With overwhelming sites offering the options to download free bell sound effects for your videos, you might still have to take lot of measures to select the best effect that suits your video. With various types of Chimes ranging from hourly intervals, and generic bells – there are sites that provides free downloading effects suitable for different purposes. These sounds on the sites have been recorded professionally and thus you will not be finding any noises or other disturbing effects while you are matching them with your videos.
Here are some of the ways where you can download all kinds of sound effects that are free to use.
1. Download from Some YouTube Video
As YouTube doesn’t allow downloading videos directly to your device all the time unless the video owner allow it, you need to use third party websites that allows users to convert YouTube videos into MP3 files. MP3FY is an awesome website that will allow you to download the audio part of the YouTube video that you want to download. Here is how you can do it.
Step 1: First you need to visit MP3FY website from your computer browser.
Step 2: Next you need to copy the video link from YouTube and paste the link into the box.
Step 3: Then click on the Convert button and click Confirm after that so that you can verify the video.
Step 4: Finally you need to click on the Download MP3 button to Save the MP3 file to your computer, where you can play it in your favorite music player or simply use it to add into any video of your choice.

Another way to download audio from YouTube video is by converting a video to MP3 directly from YouTube. Here is how.
Step 1: First you need to add the letters fy between youtube and .com in the URL for the YouTube video you want to convert.
Step 2: This will take you to the MP3FY website, where you need to follow the same steps like before to convert and download the MP3 file.
2. Make Bell Sound Effect by Yourself
If you have FL Studio and 3xOSC plugin then you can easily create bell sounds mp3 effect by yourself. The process is a bit technical but we’ll get you through this process step by step.
Step 1: First you need to load 3xOsc to your FL Studio project and choose Sine Wave as the shape for the Oscillator 1. Also, for this process, we’ll only need ONE oscillator so disable the Osc 2 & Osc 3 by turning their volume levels to 0%.

Step 2: Next you need to navigate to the “Instrument Properties (INS)” tab and from there select “VOL” subtab (volume envelope) and click on the “Use envelope” button to enable it. Then you need to edit the envelope curve to look like below image (short Attack time, quite low Sustain level and semi-long Release time is the key here).

Step 3: Next, you need to click on the “TNS” button (Tension) to edit the envelope line shapes a bit. We need to lower the tension level of Decay to add sharper “drop” from the Decay to Sustain. This will make the bell sound sharper for you. Also lower the tension level between Sustain and Release so that it doesn’t let the long Release to be too dominant

Step 4: Finally, you need to add that spacious depth and color to the sound via Fruity Reeverb. So, you can assign the 3xOsc to a free mixer track and drop a Fruity Reeverb to its effect slot. You need to set it like – “Color to Warmer (all the way to right – to make the reverb sound less metallic), Decay to 7 sec (long Decay time is the key here to make the bell sound huge and atmospheric), HighDamping to OFF and Reverb level to 24%”.

3.Zapsplat
Here in this site, you can find almost more than 200 bell sound effects ranging from small bells to long sound bell sound effects. The site offers loads of other generic bells that can be used that are available in various formats.
4.Orange Free Sounds
If you wanted to enjoy free bell sound effects for your video, this is the right site where you can find numerous sound effects that are available free for you. With various range of bell sound effects including small bell, church bell toning, elevator bell sound effects, bell ringing sound effects, and other related ones are available that can be matched with your video effects.

5.A Sound Effect
Here is another site where you can get amazing bell sound effects with clear and high-quality audios. These sound effects are tuned to the lovely musical notes and are recorded by experts so you will not find any flaws. The files once downloaded can be used directly as these are trimmed and attached in easy format to use in videos. The files are available in almost all the format to help you download them as per your video.

6.FreeSFX
If you can’t find suitable bell sound for your video, you will surely find it in this site. The FreeSFX site have a great collection of free bell sound effects of all ranges and they don’t just stop with this. They update the site with new bell sounds often and so you can make your videos with these latest ones uploaded on the site.
Part 2 Use Filmora to Add Sound Effects in Your Video
The Filmora is the best editor enabling you to enjoy the music along with your video with the incorporation of its powerful features. You can edit the audio detaching it separately from the video. As it is an easy-to-use tool that makes flawless blending of audio and video, you can now relish the best music and video in single file.
Features
- The audio mixer feature helps user to edit audio files separately.
- Various effects including audio fade in and out helps to adjust the background audio easily.
- Enhances the video clarity adding the stunning effects and it has the huge collection of audios.
- Contains royal free music collections and sound effects.
Guide to Add Sound Effects to Video with Filmora
Step 1: Go to the Filmora official website, install wonder share Filmora and lunch it. Once it’s launched, you will find a tab just below the menu bar, tap media, and click import. After this, there will be a drop-down where you can click on import media files and choose the video file. Repeat the process to pick the desired background music. You can also use build-in music tracks to add music to your video by selecting the Music tab.
For Win 7 or later (64-bit)
For macOS 10.12 or later

Step 2: Now you can navigate over the video you imported to Filmora, then tap on the sign ‘+’on it alternatively; you can drag down to the timeline the media file.
Step 3: Now edit your music by double-tapping the audio from the timeline. It will display the audio panel at the top of the screen. You can use it to set the desired equalizer, manage pitch volume and speed. You can also use the forum to fade in or fade out.

Step 4: Finally, you can now export the video that has made the desired changes by clicking ‘export’ on the toolbar to export the video. You can now save the exported in the desired format and remember to rename it directly.
Wondershare Filmora
Get started easily with Filmora’s powerful performance, intuitive interface, and countless effects!
Try It Free Try It Free Try It Free Learn More >

Conclusion
If you are looking for the merging of audio to video, then you don’t have to be panic. All you need to do is to add some background music to video using Filmora tools. In this you are free to choose any bell music to match your video file online without much trouble or looking for an expert to get this done for you. With the above rich features, Filmora software enhances your video by merging audio.
Chiming into a perfect sound effect is quite challenging as any mistake in this might flop the impact of the sound. It will be a lot of pressure to take a responsibility of matching the perfect bell sound and its effect to bring the right music. Here we will help you to know where you can find the best bell sound effects. Reading this article will give you an idea of where to get the bell sound effects and where to download them from.
In this article
01 [Ways to Download Various Sound Effects](#Part 1)
02 [Use Filmora to Add Sound Effects in Your Video](#Part 2)
Part 1 Ways to Download Various Sound Effects
There are many ways to download or get various sound effects including bell sound effects. With overwhelming sites offering the options to download free bell sound effects for your videos, you might still have to take lot of measures to select the best effect that suits your video. With various types of Chimes ranging from hourly intervals, and generic bells – there are sites that provides free downloading effects suitable for different purposes. These sounds on the sites have been recorded professionally and thus you will not be finding any noises or other disturbing effects while you are matching them with your videos.
Here are some of the ways where you can download all kinds of sound effects that are free to use.
1. Download from Some YouTube Video
As YouTube doesn’t allow downloading videos directly to your device all the time unless the video owner allow it, you need to use third party websites that allows users to convert YouTube videos into MP3 files. MP3FY is an awesome website that will allow you to download the audio part of the YouTube video that you want to download. Here is how you can do it.
Step 1: First you need to visit MP3FY website from your computer browser.
Step 2: Next you need to copy the video link from YouTube and paste the link into the box.
Step 3: Then click on the Convert button and click Confirm after that so that you can verify the video.
Step 4: Finally you need to click on the Download MP3 button to Save the MP3 file to your computer, where you can play it in your favorite music player or simply use it to add into any video of your choice.

Another way to download audio from YouTube video is by converting a video to MP3 directly from YouTube. Here is how.
Step 1: First you need to add the letters fy between youtube and .com in the URL for the YouTube video you want to convert.
Step 2: This will take you to the MP3FY website, where you need to follow the same steps like before to convert and download the MP3 file.
2. Make Bell Sound Effect by Yourself
If you have FL Studio and 3xOSC plugin then you can easily create bell sounds mp3 effect by yourself. The process is a bit technical but we’ll get you through this process step by step.
Step 1: First you need to load 3xOsc to your FL Studio project and choose Sine Wave as the shape for the Oscillator 1. Also, for this process, we’ll only need ONE oscillator so disable the Osc 2 & Osc 3 by turning their volume levels to 0%.

Step 2: Next you need to navigate to the “Instrument Properties (INS)” tab and from there select “VOL” subtab (volume envelope) and click on the “Use envelope” button to enable it. Then you need to edit the envelope curve to look like below image (short Attack time, quite low Sustain level and semi-long Release time is the key here).

Step 3: Next, you need to click on the “TNS” button (Tension) to edit the envelope line shapes a bit. We need to lower the tension level of Decay to add sharper “drop” from the Decay to Sustain. This will make the bell sound sharper for you. Also lower the tension level between Sustain and Release so that it doesn’t let the long Release to be too dominant

Step 4: Finally, you need to add that spacious depth and color to the sound via Fruity Reeverb. So, you can assign the 3xOsc to a free mixer track and drop a Fruity Reeverb to its effect slot. You need to set it like – “Color to Warmer (all the way to right – to make the reverb sound less metallic), Decay to 7 sec (long Decay time is the key here to make the bell sound huge and atmospheric), HighDamping to OFF and Reverb level to 24%”.

3.Zapsplat
Here in this site, you can find almost more than 200 bell sound effects ranging from small bells to long sound bell sound effects. The site offers loads of other generic bells that can be used that are available in various formats.
4.Orange Free Sounds
If you wanted to enjoy free bell sound effects for your video, this is the right site where you can find numerous sound effects that are available free for you. With various range of bell sound effects including small bell, church bell toning, elevator bell sound effects, bell ringing sound effects, and other related ones are available that can be matched with your video effects.

5.A Sound Effect
Here is another site where you can get amazing bell sound effects with clear and high-quality audios. These sound effects are tuned to the lovely musical notes and are recorded by experts so you will not find any flaws. The files once downloaded can be used directly as these are trimmed and attached in easy format to use in videos. The files are available in almost all the format to help you download them as per your video.

6.FreeSFX
If you can’t find suitable bell sound for your video, you will surely find it in this site. The FreeSFX site have a great collection of free bell sound effects of all ranges and they don’t just stop with this. They update the site with new bell sounds often and so you can make your videos with these latest ones uploaded on the site.
Part 2 Use Filmora to Add Sound Effects in Your Video
The Filmora is the best editor enabling you to enjoy the music along with your video with the incorporation of its powerful features. You can edit the audio detaching it separately from the video. As it is an easy-to-use tool that makes flawless blending of audio and video, you can now relish the best music and video in single file.
Features
- The audio mixer feature helps user to edit audio files separately.
- Various effects including audio fade in and out helps to adjust the background audio easily.
- Enhances the video clarity adding the stunning effects and it has the huge collection of audios.
- Contains royal free music collections and sound effects.
Guide to Add Sound Effects to Video with Filmora
Step 1: Go to the Filmora official website, install wonder share Filmora and lunch it. Once it’s launched, you will find a tab just below the menu bar, tap media, and click import. After this, there will be a drop-down where you can click on import media files and choose the video file. Repeat the process to pick the desired background music. You can also use build-in music tracks to add music to your video by selecting the Music tab.
For Win 7 or later (64-bit)
For macOS 10.12 or later

Step 2: Now you can navigate over the video you imported to Filmora, then tap on the sign ‘+’on it alternatively; you can drag down to the timeline the media file.
Step 3: Now edit your music by double-tapping the audio from the timeline. It will display the audio panel at the top of the screen. You can use it to set the desired equalizer, manage pitch volume and speed. You can also use the forum to fade in or fade out.

Step 4: Finally, you can now export the video that has made the desired changes by clicking ‘export’ on the toolbar to export the video. You can now save the exported in the desired format and remember to rename it directly.
Wondershare Filmora
Get started easily with Filmora’s powerful performance, intuitive interface, and countless effects!
Try It Free Try It Free Try It Free Learn More >

Conclusion
If you are looking for the merging of audio to video, then you don’t have to be panic. All you need to do is to add some background music to video using Filmora tools. In this you are free to choose any bell music to match your video file online without much trouble or looking for an expert to get this done for you. With the above rich features, Filmora software enhances your video by merging audio.
Chiming into a perfect sound effect is quite challenging as any mistake in this might flop the impact of the sound. It will be a lot of pressure to take a responsibility of matching the perfect bell sound and its effect to bring the right music. Here we will help you to know where you can find the best bell sound effects. Reading this article will give you an idea of where to get the bell sound effects and where to download them from.
In this article
01 [Ways to Download Various Sound Effects](#Part 1)
02 [Use Filmora to Add Sound Effects in Your Video](#Part 2)
Part 1 Ways to Download Various Sound Effects
There are many ways to download or get various sound effects including bell sound effects. With overwhelming sites offering the options to download free bell sound effects for your videos, you might still have to take lot of measures to select the best effect that suits your video. With various types of Chimes ranging from hourly intervals, and generic bells – there are sites that provides free downloading effects suitable for different purposes. These sounds on the sites have been recorded professionally and thus you will not be finding any noises or other disturbing effects while you are matching them with your videos.
Here are some of the ways where you can download all kinds of sound effects that are free to use.
1. Download from Some YouTube Video
As YouTube doesn’t allow downloading videos directly to your device all the time unless the video owner allow it, you need to use third party websites that allows users to convert YouTube videos into MP3 files. MP3FY is an awesome website that will allow you to download the audio part of the YouTube video that you want to download. Here is how you can do it.
Step 1: First you need to visit MP3FY website from your computer browser.
Step 2: Next you need to copy the video link from YouTube and paste the link into the box.
Step 3: Then click on the Convert button and click Confirm after that so that you can verify the video.
Step 4: Finally you need to click on the Download MP3 button to Save the MP3 file to your computer, where you can play it in your favorite music player or simply use it to add into any video of your choice.

Another way to download audio from YouTube video is by converting a video to MP3 directly from YouTube. Here is how.
Step 1: First you need to add the letters fy between youtube and .com in the URL for the YouTube video you want to convert.
Step 2: This will take you to the MP3FY website, where you need to follow the same steps like before to convert and download the MP3 file.
2. Make Bell Sound Effect by Yourself
If you have FL Studio and 3xOSC plugin then you can easily create bell sounds mp3 effect by yourself. The process is a bit technical but we’ll get you through this process step by step.
Step 1: First you need to load 3xOsc to your FL Studio project and choose Sine Wave as the shape for the Oscillator 1. Also, for this process, we’ll only need ONE oscillator so disable the Osc 2 & Osc 3 by turning their volume levels to 0%.

Step 2: Next you need to navigate to the “Instrument Properties (INS)” tab and from there select “VOL” subtab (volume envelope) and click on the “Use envelope” button to enable it. Then you need to edit the envelope curve to look like below image (short Attack time, quite low Sustain level and semi-long Release time is the key here).

Step 3: Next, you need to click on the “TNS” button (Tension) to edit the envelope line shapes a bit. We need to lower the tension level of Decay to add sharper “drop” from the Decay to Sustain. This will make the bell sound sharper for you. Also lower the tension level between Sustain and Release so that it doesn’t let the long Release to be too dominant

Step 4: Finally, you need to add that spacious depth and color to the sound via Fruity Reeverb. So, you can assign the 3xOsc to a free mixer track and drop a Fruity Reeverb to its effect slot. You need to set it like – “Color to Warmer (all the way to right – to make the reverb sound less metallic), Decay to 7 sec (long Decay time is the key here to make the bell sound huge and atmospheric), HighDamping to OFF and Reverb level to 24%”.

3.Zapsplat
Here in this site, you can find almost more than 200 bell sound effects ranging from small bells to long sound bell sound effects. The site offers loads of other generic bells that can be used that are available in various formats.
4.Orange Free Sounds
If you wanted to enjoy free bell sound effects for your video, this is the right site where you can find numerous sound effects that are available free for you. With various range of bell sound effects including small bell, church bell toning, elevator bell sound effects, bell ringing sound effects, and other related ones are available that can be matched with your video effects.

5.A Sound Effect
Here is another site where you can get amazing bell sound effects with clear and high-quality audios. These sound effects are tuned to the lovely musical notes and are recorded by experts so you will not find any flaws. The files once downloaded can be used directly as these are trimmed and attached in easy format to use in videos. The files are available in almost all the format to help you download them as per your video.

6.FreeSFX
If you can’t find suitable bell sound for your video, you will surely find it in this site. The FreeSFX site have a great collection of free bell sound effects of all ranges and they don’t just stop with this. They update the site with new bell sounds often and so you can make your videos with these latest ones uploaded on the site.
Part 2 Use Filmora to Add Sound Effects in Your Video
The Filmora is the best editor enabling you to enjoy the music along with your video with the incorporation of its powerful features. You can edit the audio detaching it separately from the video. As it is an easy-to-use tool that makes flawless blending of audio and video, you can now relish the best music and video in single file.
Features
- The audio mixer feature helps user to edit audio files separately.
- Various effects including audio fade in and out helps to adjust the background audio easily.
- Enhances the video clarity adding the stunning effects and it has the huge collection of audios.
- Contains royal free music collections and sound effects.
Guide to Add Sound Effects to Video with Filmora
Step 1: Go to the Filmora official website, install wonder share Filmora and lunch it. Once it’s launched, you will find a tab just below the menu bar, tap media, and click import. After this, there will be a drop-down where you can click on import media files and choose the video file. Repeat the process to pick the desired background music. You can also use build-in music tracks to add music to your video by selecting the Music tab.
For Win 7 or later (64-bit)
For macOS 10.12 or later

Step 2: Now you can navigate over the video you imported to Filmora, then tap on the sign ‘+’on it alternatively; you can drag down to the timeline the media file.
Step 3: Now edit your music by double-tapping the audio from the timeline. It will display the audio panel at the top of the screen. You can use it to set the desired equalizer, manage pitch volume and speed. You can also use the forum to fade in or fade out.

Step 4: Finally, you can now export the video that has made the desired changes by clicking ‘export’ on the toolbar to export the video. You can now save the exported in the desired format and remember to rename it directly.
Wondershare Filmora
Get started easily with Filmora’s powerful performance, intuitive interface, and countless effects!
Try It Free Try It Free Try It Free Learn More >

Conclusion
If you are looking for the merging of audio to video, then you don’t have to be panic. All you need to do is to add some background music to video using Filmora tools. In this you are free to choose any bell music to match your video file online without much trouble or looking for an expert to get this done for you. With the above rich features, Filmora software enhances your video by merging audio.
Also read:
- Updated In 2024, Essential Audio Enhancements for Podcasts Top Sources of Sound Effects
- Updated 2024 Approved The Complete Guide to Cost-Free Sound Capture Using Audacitys Tools
- New Live Audio Capture Techniques for Todays Streaming Platforms
- New 2024 Approved Combine Audio with Motion Graphics on Windows Platform
- 2024 Approved Adobe Audio Editor Adobe Audition Features, Reviews & Tutorial
- New The Ultimate Guide 10 Superior Sound Recording Programs
- Updated 2024 Approved Innovative Methodologies for Embedding Musicality Within Instagram TV Experiences
- Expert Tips for Gradually Diminishing Audio Volume
- In 2024, Best Free and Cheap MP3 Editor for Mac
- New In 2024, Meet Your Voice in Many Forms A Deep Dive Into Electronic Sound Transformers
- Updated 2024 Approved Mastering the Tools of Lexis Audio Editor Professional Features and Educational Content
- New In 2024, Audio Precision Step-by-Step Guide to Muting Unnecessary Sounds in After Effects
- Updated Unveiling the Most Reliable Websites for Precision MP3 Tagging and Organizing for 2024
- Updated In 2024, Uncovering Theaters of Distress Acquiring Scream Effects for Media Projects
- New Exploring the Finest Free Streaming Services A Top 10 List for iPhone & Android Users
- 2024 Approved Resource Hub for Finding Digital Audio Recordings of Cats
- Updated In 2024, The Six Simple Strategies for Free Film-to-Sounds Transformation (Ahead ).
- New 2024 Approved Ultimate Guided Audio Level Adjustment Software
- New MP4 to Mono Separating Sound From Video
- New Zero-Noise Videos How to Extract Audio-Free MP4/MKV/AVI/MOV Files
- Updated In 2024, The Complete Pexels Primer Knowledge Essential for Graphic Designers and Marketers
- 2024 Approved Precision in Perception Advanced Techniques for Taming Tangled Sounds
- New Enhancing Your Gaming Experience Incorporating Audio with KineMaster
- Pure Visuals Techniques for Removing Video Soundtracks (Latest Edition)
- New The Ultimate Guide to Top Audio Extraction Tools in Videos
- New 2024 Approved Auditory Augmentation of Photo Projects A Comprehensive Guide
- Syncing Audio-Visual Elements Modern Approaches to Creating Unified Media Experiences for 2024
- New In 2024, The Essentials of Silent Segment Creation Leveraging Audio Duck in PowerDirector to Quiet Music During Transitions
- New Upgrading Your QuickTime Videos Integrating High-Quality Soundtracks
- How to Change Volume in Media Files
- New Virtual Birdsongs Library Download for 2024
- 2024 Approved Integrating Audio Elements Within Mixed Media Videos
- In 2024, Achieving Balanced Video Audios Four Essential Techniques
- In 2024, Full Guide on Mirroring Your ZTE Nubia Flip 5G to Your PC/Mac | Dr.fone
- Updated How to Edit Memoji on Android and iPhone
- In 2024, Learn to Merge Clips in DaVinci Resolve Simple Steps
- New 2024 Approved Kapwing Essentials Adding Slow Motion Effects to Your Videos
- Vivo Y200e 5G Screen Unresponsive? Heres How to Fix It | Dr.fone
- Fix Cant Take Screenshot Due to Security Policy on Nokia C12 Pro | Dr.fone
- 2024 Approved Top-Rated Video Contrast Editors
- New In 2024, Stop Motion in the Cloud Era A Comprehensive Software Roundup
- In 2024, How to Screen Mirroring Honor Play 7T? | Dr.fone
- New Top Video Editing Apps for Smartphones IPhone and Android for 2024
- Can't play MP4 files on Motorola Defy 2
- Three Solutions to Hard Reset Vivo Y78 5G? | Dr.fone
- How To Transfer WhatsApp From iPhone 6 Plus to other iPhone devices? | Dr.fone
- In 2024, Bypassing Google Account With vnROM Bypass For Samsung Galaxy M54 5G
- In 2024, Pokemon Go No GPS Signal? Heres Every Possible Solution On Oppo Reno 10 Pro 5G | Dr.fone
- 6 Solutions to Fix Error 505 in Google Play Store on Vivo Y78+ | Dr.fone
- How to Transfer Text Messages from Oppo Reno 11F 5G to New Phone | Dr.fone
- How to Change Video Thumbnail on Google Drive for 2024
- How to Bypass Android Lock Screen Using Emergency Call On Samsung Galaxy A15 4G?
- Easily Unlock Your Samsung Galaxy S23 Device SIM
- Error Solved Excel 2003 file is not in recognizable format | Stellar
- In 2024, How to Track a Lost Xiaomi Redmi A2 for Free? | Dr.fone
- Updated Get Noticed on YouTube Thumbnail Size, Design, and Optimization Techniques for 2024
- In 2024, iPhone Is Disabled? Here Is The Way To Unlock Disabled Apple iPhone SE
- New 2024 Approved Final Cut Pro Essentials Designing and Editing a Professional Slideshow
- Title: Updated How to Change Audio Speed Easily?
- Author: Paul
- Created at : 2024-05-20 01:48:19
- Updated at : 2024-05-21 01:48:19
- Link: https://voice-adjusting.techidaily.com/updated-how-to-change-audio-speed-easily/
- License: This work is licensed under CC BY-NC-SA 4.0.

