
:max_bytes(150000):strip_icc():format(webp)/how-to-turn-on-microphone-on-an-android-phone-5184530-372d01459baa44978ef72242d007992a.jpg)
Updated Enhance Your PC Audio No-Cost Methods to Amplify Sound on Windows Systems
Enhance Your PC Audio: No-Cost Methods to Amplify Sound on Windows Systems
3 Easy Ways to Booster/Increase Volume on Windows for Free

Shanoon Cox
Mar 27, 2024• Proven solutions
Most computers have attached speakers, which present adequate sound levels for listening to your favorite music on your screen. However, there are instances when it seems that the volume levels aren’t enough. I know how it feels when you play your favorite playlists and can’t listen to them at the pitch you want. There are many possibilities to increase volume on your windows without speakers.
There are many methods for raising the default sound levels on Windows. You can control and booster volume and the audio quality on your device sometimes through some of the built-in settings and most of the time with a third-party app that may increase it by 500%.
Here in this article is a discussion about how to help boost volume as desired on your computer.
- Method 1: Boost volume by Native Windows Volume Booster
- Method 2: Boost sound by Equalizer APO Application
- Method 3: Increase volume by Chrome Volume Booster Plugin
- Bonus Tip: Edit your audio with Wondershare Filmora
Method 1: Boost volume by Native Windows Volume Booster
Most users ignore sound and video settings within Windows without ensuring that the volume is set to a satisfactory level and the display quality is accurate. Windows has an equalizer, which you can use to improve the audio quality. The Windows 10 equalizer focuses on the critical techniques for modifying audio properties like balance and volume and can help you boost volume.
1. Click the Control Panel by typing Control at the Windows Run prompt to have the equalizer settings. Click Hardware and Sound under the Sound when the Control Panel appears. This will bring up a dialogue box with a list of all of your computer’s audio hardware.

2. The default setting for spatial Sound is to switch it off. You can, therefore, have some options for allowing spatial Sound based on your audio hardware and the software you’ve enabled. For example, in the picture below, there is a feature called Windows Sonic for Headphones.

3. Pick the Bass Boost (or any of your profiles) and hit the Settings key to make adjustments. This enables Windows to display a dialogue box to adjust the raised level for each Frequency individually.

4. To get to the Windows Video Playback settings, click the Settings, then Apps, then Video Playback, choose automatic processing to enhance video playback.

5. Some more settings will be accessed via this screen that helps to change the HD color settings if your PC allows it. A preview window enables you to see how your choices would affect the final result.

Method 2: Boost sound by Equalizer APO Application
Equalizer APO Application is an excellent graphic equalizer for Windows that can be used to boost volume. With VST plugin support and unlimited filters, this application is easy to use.
1. From the start, the menu clicks in the Equalizer APO or configuration Editor.

2. Apply the Equalizer at the given arrow part.

3. The arrow mentioned in the below picture can change booster sound. The sound wave will shift, and the maximum will come out; just split it with an equalizer, so it’s probably best to lower the boost to avoid cutting.

4. Better insert the limiter at the end of the Equalizer; this may avoid clipping. Hit the plus icon, then click plugins/VST plugin.

5. The VST container will be inserted at the end of the process.

6. Hit upon the file option.

7. Click the VST file when the VST preview window opens (extension .dll). VST 2 is the only format that is supported. Because there is no connection feature, you must use VST with the same number of items as Equalizer APO. Now VST can be loaded.

8. Now click on the “Open Panel“ tab.

9. The user interface is visible now. Kindly remember that, unlike DAW, the setting may not be applied until you hit the “OK“ or “Apply“ buttons. If “Apply automatically“ is selected, the settings will be displayed instantly, just as in DAW.

Method 3: Increase volume by Chrome Volume Booster Plugin
Another effective way to increase volume without any hassle is by using the Chrome extension. For this purpose, the Volume Master extension serves to boost volume without affecting audio quality. This extension can increase volume up to 600%. By using this, you can booster the volume of individual tabs. Plus, Volume Master is super easy to use.
With a simple slider, the usability and convenience of this extension are impressive. Through this, you can enhance, reduce, or increase the volume of a specific tab without affecting the default web browser or system volume settings.
There are three steps to increase volume by using the chrome booster volume plugin.
1. First, open Google Chrome, then move to Chrome Web Store. By searching the Volume Master here, you will be directed to the link which will open the extension page. Here hit the Add to Chrome button.

2. A dialogue box will appear. When requested, click the Add Extension button to confirm.

3. Click on the extension icon in the right top corner after adding the extension. Now set the volume how much you want it to be boosted as shown in the mentioned slider.

Bonus Tip: Edit your audio with Wondershare Filmora
Wondershare Filmora is a comprehensive all-in-one video editor. It can be used with ease by beginners and professionals alike. Filmora comes loaded with one-click editing features such as motion tracking, color match, silence detection, and much more.
With Filmora, you can add cinematic effects to your videos and enhance their audio quality or increase volume.
1. Download, install and launch Filmora. Click on File, and then tap on Import Media Files. Now, import your media and drag it to the timeline.

2. Right-click the video file on the timeline, select the Adjust Audio option.

3. You will get the advanced audio settings in Filmora. You can easily change the volume and pitch, fade in and out the audio, and select the equalizer mode for your file, etc.

3. Finally, click on Export, adjust the output parameters and save the file locally or share to social media.

Conclusion
Sound isn’t something you think about very much, but your Windows can also give you many ways to boost the volume to the highest capacity. This article covered how to boost sound within the windows via different platforms. I hope you can now experience a clear, loud sound and make use of all of your speakers when playing music, browsing the internet, or binge-watching Netflix or Prime Video.
Now, you can increase sound and enhance your listening experience without any hassle. You can also use Wondershare Filmora, a powerful video editor, to boost volume and edit your videos.
Shanoon Cox
Shanoon Cox is a writer and a lover of all things video.
Follow @Shanoon Cox
Shanoon Cox
Mar 27, 2024• Proven solutions
Most computers have attached speakers, which present adequate sound levels for listening to your favorite music on your screen. However, there are instances when it seems that the volume levels aren’t enough. I know how it feels when you play your favorite playlists and can’t listen to them at the pitch you want. There are many possibilities to increase volume on your windows without speakers.
There are many methods for raising the default sound levels on Windows. You can control and booster volume and the audio quality on your device sometimes through some of the built-in settings and most of the time with a third-party app that may increase it by 500%.
Here in this article is a discussion about how to help boost volume as desired on your computer.
- Method 1: Boost volume by Native Windows Volume Booster
- Method 2: Boost sound by Equalizer APO Application
- Method 3: Increase volume by Chrome Volume Booster Plugin
- Bonus Tip: Edit your audio with Wondershare Filmora
Method 1: Boost volume by Native Windows Volume Booster
Most users ignore sound and video settings within Windows without ensuring that the volume is set to a satisfactory level and the display quality is accurate. Windows has an equalizer, which you can use to improve the audio quality. The Windows 10 equalizer focuses on the critical techniques for modifying audio properties like balance and volume and can help you boost volume.
1. Click the Control Panel by typing Control at the Windows Run prompt to have the equalizer settings. Click Hardware and Sound under the Sound when the Control Panel appears. This will bring up a dialogue box with a list of all of your computer’s audio hardware.
2. The default setting for spatial Sound is to switch it off. You can, therefore, have some options for allowing spatial Sound based on your audio hardware and the software you’ve enabled. For example, in the picture below, there is a feature called Windows Sonic for Headphones.
3. Pick the Bass Boost (or any of your profiles) and hit the Settings key to make adjustments. This enables Windows to display a dialogue box to adjust the raised level for each Frequency individually.
4. To get to the Windows Video Playback settings, click the Settings, then Apps, then Video Playback, choose automatic processing to enhance video playback.
5. Some more settings will be accessed via this screen that helps to change the HD color settings if your PC allows it. A preview window enables you to see how your choices would affect the final result.
Method 2: Boost sound by Equalizer APO Application
Equalizer APO Application is an excellent graphic equalizer for Windows that can be used to boost volume. With VST plugin support and unlimited filters, this application is easy to use.
1. From the start, the menu clicks in the Equalizer APO or configuration Editor.
2. Apply the Equalizer at the given arrow part.
3. The arrow mentioned in the below picture can change booster sound. The sound wave will shift, and the maximum will come out; just split it with an equalizer, so it’s probably best to lower the boost to avoid cutting.
4. Better insert the limiter at the end of the Equalizer; this may avoid clipping. Hit the plus icon, then click plugins/VST plugin.
5. The VST container will be inserted at the end of the process.
6. Hit upon the file option.
7. Click the VST file when the VST preview window opens (extension .dll). VST 2 is the only format that is supported. Because there is no connection feature, you must use VST with the same number of items as Equalizer APO. Now VST can be loaded.
8. Now click on the “Open Panel“ tab.
9. The user interface is visible now. Kindly remember that, unlike DAW, the setting may not be applied until you hit the “OK“ or “Apply“ buttons. If “Apply automatically“ is selected, the settings will be displayed instantly, just as in DAW.
Method 3: Increase volume by Chrome Volume Booster Plugin
Another effective way to increase volume without any hassle is by using the Chrome extension. For this purpose, the Volume Master extension serves to boost volume without affecting audio quality. This extension can increase volume up to 600%. By using this, you can booster the volume of individual tabs. Plus, Volume Master is super easy to use.
With a simple slider, the usability and convenience of this extension are impressive. Through this, you can enhance, reduce, or increase the volume of a specific tab without affecting the default web browser or system volume settings.
There are three steps to increase volume by using the chrome booster volume plugin.
1. First, open Google Chrome, then move to Chrome Web Store. By searching the Volume Master here, you will be directed to the link which will open the extension page. Here hit the Add to Chrome button.
2. A dialogue box will appear. When requested, click the Add Extension button to confirm.
3. Click on the extension icon in the right top corner after adding the extension. Now set the volume how much you want it to be boosted as shown in the mentioned slider.
Bonus Tip: Edit your audio with Wondershare Filmora
Wondershare Filmora is a comprehensive all-in-one video editor. It can be used with ease by beginners and professionals alike. Filmora comes loaded with one-click editing features such as motion tracking, color match, silence detection, and much more.
With Filmora, you can add cinematic effects to your videos and enhance their audio quality or increase volume.
1. Download, install and launch Filmora. Click on File, and then tap on Import Media Files. Now, import your media and drag it to the timeline.
2. Right-click the video file on the timeline, select the Adjust Audio option.
3. You will get the advanced audio settings in Filmora. You can easily change the volume and pitch, fade in and out the audio, and select the equalizer mode for your file, etc.
3. Finally, click on Export, adjust the output parameters and save the file locally or share to social media.
Conclusion
Sound isn’t something you think about very much, but your Windows can also give you many ways to boost the volume to the highest capacity. This article covered how to boost sound within the windows via different platforms. I hope you can now experience a clear, loud sound and make use of all of your speakers when playing music, browsing the internet, or binge-watching Netflix or Prime Video.
Now, you can increase sound and enhance your listening experience without any hassle. You can also use Wondershare Filmora, a powerful video editor, to boost volume and edit your videos.
Shanoon Cox
Shanoon Cox is a writer and a lover of all things video.
Follow @Shanoon Cox
The Ultimate Playbook for Fine-Tuning Video Soundtracks [Including Tips for Modern Platforms]
How to Adjust Audio Volume in Videos [4 Ways]
Shanoon Cox
Mar 27, 2024• Proven solutions
Some of the greatest film directors of all time have used sound to make the scenes in their movies more dramatic, romantic or to build suspense. The importance of sound for the overall quality of a video is often overlooked by young filmmakers, as they tend to dedicate all of their attention to the visual part of their projects.
The fact of the matter is that even a minor error in the video’s soundtrack can distract the viewer and ruin a video completely. That’s why, in this article, we are going to show you four different methods of adjusting the audio volume in Filmora.
To increse the volume of your video, click here.
Four Ways of Adjusting Audio Volume in Filmora
The audio clips often have different volume levels, so in order to create a balanced soundtrack, you have to adjust the volume of each audio track you intend to use in your projects. Filmora offers several different ways to adjust the volume of audio files quickly and effortlessly. Here’s how you can increase or decrease the volume of the audio clips in Filmora.
Download Filmora and watch the video below to get a full knowledge abtou adjusting volume!


1. Changing the Audio Volume of Entire Track
This is probably the easiest and fastest way to adjust the volume of a video or an audio file in Filmora. After you import the file into a project you just have to add it to a certain position on the timeline. You can do this by simply dragging and dropping the file at the location on the timeline where you want the file to be placed. Click on the Add Track menu that is located in the upper left corner of the timeline and select the Big option from the Adjust Track Height submenu.
Enlarging the video and audio tracks will enable you to see the audio volume line that is displayed over all clips that contain sound you add to the timeline. Click on the line and drag it upwards if you would like to increase the volume or drag it downwards if you want to decrease the volume of an audio or a video file.
2. Applying the Fade In and Fade Out Effects to Change the Audio Volume Partially
Once you add an audio clip to an audio track on Filmora’s timeline, you can adjust its volume from the Audio Editing panel. Double-clicking on an audio file will bring up the Audio Editing panel that contains Fade In and Fade Out sliders. Both sliders are going to be set to zero by default, so you just have to drag each of them to the right in order to create the Fade In or Fade Out effect.
Filmora also lets you create the Fade In and Fade Out effect directly from the timeline, as you just have to hover the mouse over an audio file and drag the Fade In or Fade Out markers to set the duration of the effect for that particular file.
3. Using the Volume Slider to Change the Audio Volume
On the left side of the Audio Editing panel that can be accessed by double clicking on an audio file, you will be able to see the volume slider. Its value is going to be set to 0 dB by default and you just have to drag it upward or downward in order to adjust the audio volume. As you drag the slider the new audio volume value is going to be displayed in a box below the slider. The left/right balance value can be adjusted by dragging the knob that is located above the volume slider in either direction. Alternatively, you can insert a new numerical value in the box below the knob. If the displayed value is 0 dB, then the left and right channels are balanced, while the value of -100 dB means that all the sound goes through the left channel and if the displayed value is 100 dB all the sound will go through the right channel.

4. Adding Keyframes to Adjust the Audio Volume
Once you add an audio file to the timeline you can adjust its volume by adding keyframes to it. Place the playhead to the exact spot in the audio file where you want to add the first keyframe and then double click on the file to bring up the Audio Editing panel. Click on the Add Volume Keyframes icon and use the volume slider to adjust the volume at the position of the first keyframe.

Simply move the playhead and change the value on the volume slider to add new keyframes to the audio file. This method of adjusting audio volume enables you to set different volume values for different parts of an audio file.
Still not solved? Try this audio guide of Filmora to settle all the audio problems.
Conclusion
Having complete control over the volume of all audio files you use in your projects is important for so many different reasons. Filmora offers four easy ways to adjust the audio volume so you can focus on more important tasks. Which method of adjusting the audio volume in Filmora do you like to use the most? Leave a comment and let us know.
Shanoon Cox
Shanoon Cox is a writer and a lover of all things video.
Follow @Shanoon Cox
Shanoon Cox
Mar 27, 2024• Proven solutions
Some of the greatest film directors of all time have used sound to make the scenes in their movies more dramatic, romantic or to build suspense. The importance of sound for the overall quality of a video is often overlooked by young filmmakers, as they tend to dedicate all of their attention to the visual part of their projects.
The fact of the matter is that even a minor error in the video’s soundtrack can distract the viewer and ruin a video completely. That’s why, in this article, we are going to show you four different methods of adjusting the audio volume in Filmora.
To increse the volume of your video, click here.
Four Ways of Adjusting Audio Volume in Filmora
The audio clips often have different volume levels, so in order to create a balanced soundtrack, you have to adjust the volume of each audio track you intend to use in your projects. Filmora offers several different ways to adjust the volume of audio files quickly and effortlessly. Here’s how you can increase or decrease the volume of the audio clips in Filmora.
Download Filmora and watch the video below to get a full knowledge abtou adjusting volume!
1. Changing the Audio Volume of Entire Track
This is probably the easiest and fastest way to adjust the volume of a video or an audio file in Filmora. After you import the file into a project you just have to add it to a certain position on the timeline. You can do this by simply dragging and dropping the file at the location on the timeline where you want the file to be placed. Click on the Add Track menu that is located in the upper left corner of the timeline and select the Big option from the Adjust Track Height submenu.
Enlarging the video and audio tracks will enable you to see the audio volume line that is displayed over all clips that contain sound you add to the timeline. Click on the line and drag it upwards if you would like to increase the volume or drag it downwards if you want to decrease the volume of an audio or a video file.
2. Applying the Fade In and Fade Out Effects to Change the Audio Volume Partially
Once you add an audio clip to an audio track on Filmora’s timeline, you can adjust its volume from the Audio Editing panel. Double-clicking on an audio file will bring up the Audio Editing panel that contains Fade In and Fade Out sliders. Both sliders are going to be set to zero by default, so you just have to drag each of them to the right in order to create the Fade In or Fade Out effect.
Filmora also lets you create the Fade In and Fade Out effect directly from the timeline, as you just have to hover the mouse over an audio file and drag the Fade In or Fade Out markers to set the duration of the effect for that particular file.
3. Using the Volume Slider to Change the Audio Volume
On the left side of the Audio Editing panel that can be accessed by double clicking on an audio file, you will be able to see the volume slider. Its value is going to be set to 0 dB by default and you just have to drag it upward or downward in order to adjust the audio volume. As you drag the slider the new audio volume value is going to be displayed in a box below the slider. The left/right balance value can be adjusted by dragging the knob that is located above the volume slider in either direction. Alternatively, you can insert a new numerical value in the box below the knob. If the displayed value is 0 dB, then the left and right channels are balanced, while the value of -100 dB means that all the sound goes through the left channel and if the displayed value is 100 dB all the sound will go through the right channel.
4. Adding Keyframes to Adjust the Audio Volume
Once you add an audio file to the timeline you can adjust its volume by adding keyframes to it. Place the playhead to the exact spot in the audio file where you want to add the first keyframe and then double click on the file to bring up the Audio Editing panel. Click on the Add Volume Keyframes icon and use the volume slider to adjust the volume at the position of the first keyframe.
Simply move the playhead and change the value on the volume slider to add new keyframes to the audio file. This method of adjusting audio volume enables you to set different volume values for different parts of an audio file.
Still not solved? Try this audio guide of Filmora to settle all the audio problems.
Conclusion
Having complete control over the volume of all audio files you use in your projects is important for so many different reasons. Filmora offers four easy ways to adjust the audio volume so you can focus on more important tasks. Which method of adjusting the audio volume in Filmora do you like to use the most? Leave a comment and let us know.
Shanoon Cox
Shanoon Cox is a writer and a lover of all things video.
Follow @Shanoon Cox
Advanced 10 Software Suites for Males Aiming at Female-Like Voices: Transforming Tones with Power
If you’ve been searching for the best android and iOS voice-changing apps around the internet, you’re on the right spot. Voice-changing applications are always fun. They’re handy when you’re pulling a prank on a friend, or you want some amazing effects to test your voice. Thus, we provide you with all the best male to female voice changer apps in the list below.
Record & Edit Voice Fast before Changing Voice
Before changing your voice from male to female, I suggest you edit your voice first. Filmora is an easy-to-use yet powerful video editor helping you quickly edit voice no matter your voice or the audio extracted from videos. Explore Filmora’s audio editing features and get ready for changing voice!
For Win 7 or later (64-bit)
For macOS 10.12 or later


Part 1: Changing Voice Online for Free with Media.io

If you want to change voice without downloading and installing any app on your mobile phone, you can try some online solutions. Media.io is an all-in-one online video toolkit that allows you to edit, convert and compress video, audio and image files easily. The online voice changer from Media.io can transform your voice to a male voice, female voice, child voice, robot voice, and Donald Duck voice. If you wish to have voice filters, you won’t have any problems in the future with the Media.io voice changer.

This online voice changer works best on the Chrome browser, so you can utilize it whether using a Windows, Mac, Linux, or Chromebook device. As a result, you can deceive your family or friends by speaking in another people’s voice rather than your own. Doesn’t that sound like fun?
![]()
A cross-platform for making videos anywhere for all creators

Why your video editing isn’t good enough? How about some creative inspo?
- 100 Million+ Users
- 150+ Countries and Regions
- 4 Million+ Social Media Followers
- 5 Million+ Stock Media for Use
* Secure Download

Part 2: Best Male to Female Voice Changer Apps for iPhone and Android
- Girls Voice Changer
- Voice Changer Voice Recorder Editor & Effect
- VoiceFX
- Voice Changer
- Voice Changer - Audio effects
- Magic Call App
- Voice Changer and Sound Recorder
- Super Voice Editor
- Voice Changer with Effects
- Voice Changer - Girls Voice changer Male to Female
1. Girls Voice Changer
Available for: Android, iOS
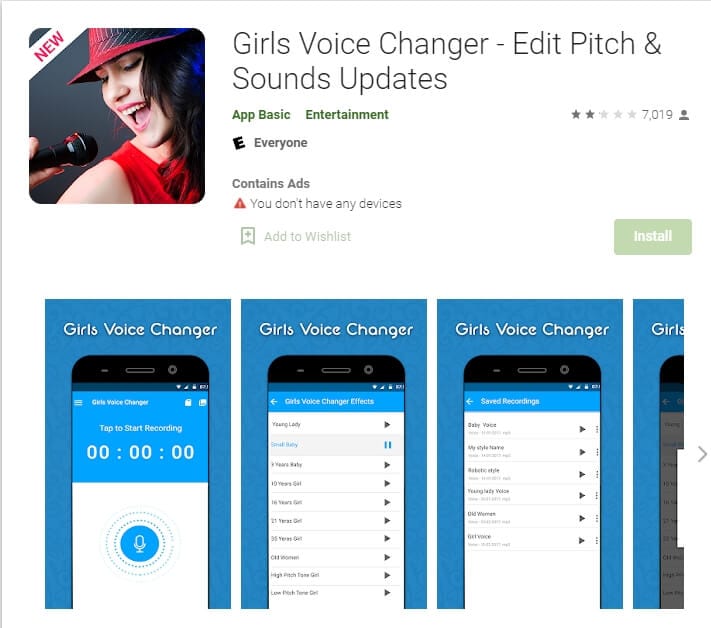
This girl voice changer app is highly portable and easy for any user to use comfortably. It is specifically more popular for changing male voice to female and for pitch adjustments. It’s completely free, so download on your android if you have a storage of about 8MB ready, and start using it!
This male-to-female voice changer app has several options in the library. Though the pitch adjustments are easy to make, some users have informed a lack of performance on very high-pitched settings. However, the smoothness of an android application also depends on how much space is readily available in the device. So next time you’re bored at a part, you have the perfect partner!
2. Voice Changer Voice Recorder Editor & Effect
Available for: Android
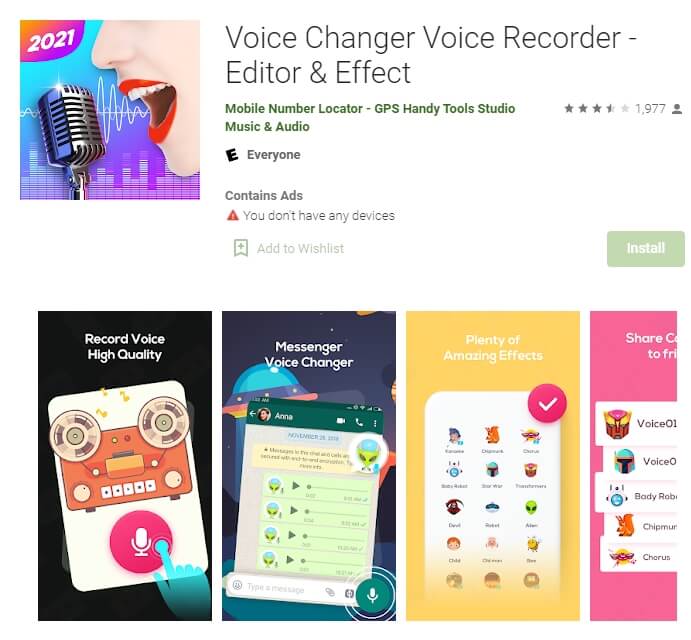
This voice changer application is for multi-purpose. Yes, you can use it as a girl voice changer smoothly and with ease. But apart from male to female voice changing, The “voice changer - voice editor application” can also be used to autotune your voice.
Now autotune is a big feature that every singer uses to make their voices tuned perfectly. With this app, you can also do the same to record your music or have fun while you are bored. The application is pretty to use and can be used as a girl voice changer not only for entertainment but also if you’re practicing. Many people who wish to seek a career in background voices might find this useful.
3. VoiceFX
Available for: Android

The VoiceFX application is filled with a lot of exciting options and features. If you are looking for an app that is more than just a male-to-female voice changer app, the voice fx is highly recommended.
You can also convert your voice into a robot or even an animal from male to female voice. Yes, you read it right. You can turn your manly voice into any of the fictional cartoons you want. This one’s a very easy and efficient way of filming a video with added effects or developing a mini-game with different voice characters. If you haven’t forgotten, there was a very big trend of converting famous music into chipmunk voices. With this app, you can convert your favorite songs into a chipmunk addition song without any problem.
4. Voice Changer
Available for: Android

The voice changer is a very famous male-to-female voice changer app. With over 10 million downloads on the google play store, the voice changer is highly recommended for users who have fun changing their voices from male to female. Compared to other voice changer applications, The Voice changer app has a very elegant and sleek design that makes it very easy to use.
Apart from the male to female voice change option, There are more than 50 other options that you can enjoy. Furthermore, you can share your creations with your friends through Bluetooth or other social media.
5. Voice Changer - Audio effects
Available for: Android

There are a lot of girl voice changer applications on the google play store. But not all of them are up to the mark. The Voice changer - audio effects is another highly recommended voice changer application.
The Voice Changer - Audio effects have a lot of other things to offer as well. Converting your voice from a male to a female has never been easier. Not only can you convert your voice into a girl, but you can also modify it. Furthermore, you can talk to your friends on the phone while you use the voice changer application. Moreover, the voices of animals and robots can also be an alternative to the female voice if you ever get bored of it.
6. Magic Call App
Available for: Android

The magic call is a real-time voice changer app that you can use for changing your voice during a call specifically. It is a really fun app which you can use with your friends to prank even your family!
This is a perfect option for people looking for a real-time girl voice changer app. The main purpose of this application is real-time calls. The magic call is ideal specifically for a male-to-female voice modification. And you can operate this application easily in call durations.
All you have to do is open the voice changer app and dial your call. Apart from Female voice, you can also convert your voice into a cartoon or an animal.
7. Voice Changer and Sound Recorder
Available for: iOS

If you are an iPhone user, then you must know that finding a voice changer on the apple store is like digging a diamond from the ground.
The Voice changer and sound recorder application is found exclusively on the apple store for people who love girl voice changer apps. It is a live call voice changer app, which means converting your voice from a male to a female in between the call. Furthermore, you can even add background voices such as traffic and echo to make your call even funnier. If you are looking for an excuse to get off from your call, then this application has got your back.
8. Super Voice Editor
Available for: Android
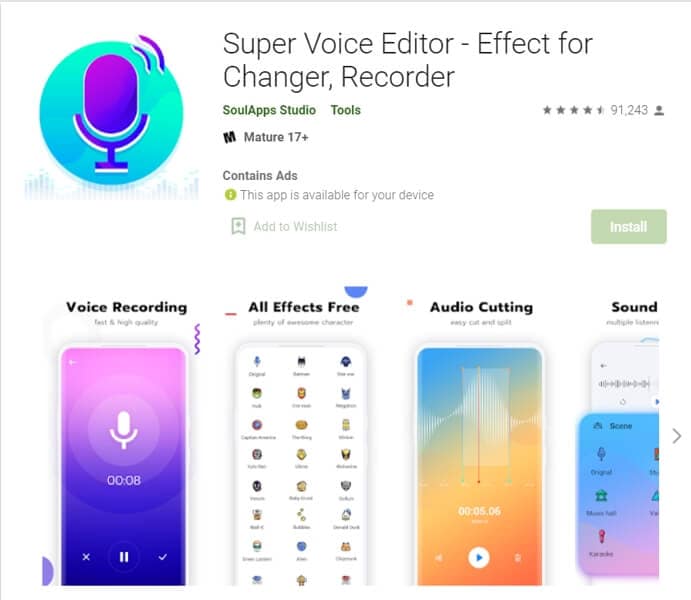
This one is a fun application for people searching for a voice changer app male to female. Not only can you record the audio that you edit, but also use it in real-time! Amazing right? Super voice editor enables you to add effects to your voice while you’re on a call as well. This feature means, next time you’re pulling a prank on the birthday boy, he won’t ever know! Sound like the wonder woman or dexter from his laboratory. The Super-Voice editor is perfect for kids playing in the house and even teenagers looking for something interesting. The SoulApps studio has made it easy for you to sound like your dream faces on the screen. With an MP3 cutter and Ringtone maker, this girl voice changer app is pure creativity.
9. Voice Changer with Effects
Available for: Android

Our list of girl voice changers, Voice changer with effects, is a very practical application that we highly recommend to our users.
With over 50 million downloads on google play, Voice changer with effects is highly suited for anyone looking for more than just a male-to-female voice changer. It has over 40 plus options such as helium, chipmunk, zombie, alien, and many more. With this application, you can even import a favorite audio clip of yours, and then you can easily convert it into a voice you like. If you want to modify your ringtone to an audio clip you just converted, then there is no better application than this one.
10. Voice Changer - Girls Voice changer Male to Female
Available for: Android

If you are looking for a girl voice changer app solely, this application perfectly fits you. The application is specifically designed only to change your voice from a male to a female. Although this application does provide options apart from female voice conversions, those features don’t function ideally. However, if you want a girl voice changer, you won’t have any trouble.
You can use this application while you are on a call. Hence, you can fool your family or friends by using a girl voice instead of your own. We recommend this as an average application that would fit your needs sufficiently.
In conclusion, you have now gone through the list of the perfect options for your android or iOS. Therefore, now you must be ready to choose the best girl voice changer app. So head on to your play store and search for your favorite app right now!
For Win 7 or later (64-bit)
For macOS 10.12 or later
Part 1: Changing Voice Online for Free with Media.io
If you want to change voice without downloading and installing any app on your mobile phone, you can try some online solutions. Media.io is an all-in-one online video toolkit that allows you to edit, convert and compress video, audio and image files easily. The online voice changer from Media.io can transform your voice to a male voice, female voice, child voice, robot voice, and Donald Duck voice. If you wish to have voice filters, you won’t have any problems in the future with the Media.io voice changer.
This online voice changer works best on the Chrome browser, so you can utilize it whether using a Windows, Mac, Linux, or Chromebook device. As a result, you can deceive your family or friends by speaking in another people’s voice rather than your own. Doesn’t that sound like fun?
![]()
A cross-platform for making videos anywhere for all creators
Why your video editing isn’t good enough? How about some creative inspo?
- 100 Million+ Users
- 150+ Countries and Regions
- 4 Million+ Social Media Followers
- 5 Million+ Stock Media for Use
* Secure Download
Part 2: Best Male to Female Voice Changer Apps for iPhone and Android
- Girls Voice Changer
- Voice Changer Voice Recorder Editor & Effect
- VoiceFX
- Voice Changer
- Voice Changer - Audio effects
- Magic Call App
- Voice Changer and Sound Recorder
- Super Voice Editor
- Voice Changer with Effects
- Voice Changer - Girls Voice changer Male to Female
1. Girls Voice Changer
Available for: Android, iOS
This girl voice changer app is highly portable and easy for any user to use comfortably. It is specifically more popular for changing male voice to female and for pitch adjustments. It’s completely free, so download on your android if you have a storage of about 8MB ready, and start using it!
This male-to-female voice changer app has several options in the library. Though the pitch adjustments are easy to make, some users have informed a lack of performance on very high-pitched settings. However, the smoothness of an android application also depends on how much space is readily available in the device. So next time you’re bored at a part, you have the perfect partner!
2. Voice Changer Voice Recorder Editor & Effect
Available for: Android
This voice changer application is for multi-purpose. Yes, you can use it as a girl voice changer smoothly and with ease. But apart from male to female voice changing, The “voice changer - voice editor application” can also be used to autotune your voice.
Now autotune is a big feature that every singer uses to make their voices tuned perfectly. With this app, you can also do the same to record your music or have fun while you are bored. The application is pretty to use and can be used as a girl voice changer not only for entertainment but also if you’re practicing. Many people who wish to seek a career in background voices might find this useful.
3. VoiceFX
Available for: Android
The VoiceFX application is filled with a lot of exciting options and features. If you are looking for an app that is more than just a male-to-female voice changer app, the voice fx is highly recommended.
You can also convert your voice into a robot or even an animal from male to female voice. Yes, you read it right. You can turn your manly voice into any of the fictional cartoons you want. This one’s a very easy and efficient way of filming a video with added effects or developing a mini-game with different voice characters. If you haven’t forgotten, there was a very big trend of converting famous music into chipmunk voices. With this app, you can convert your favorite songs into a chipmunk addition song without any problem.
4. Voice Changer
Available for: Android
The voice changer is a very famous male-to-female voice changer app. With over 10 million downloads on the google play store, the voice changer is highly recommended for users who have fun changing their voices from male to female. Compared to other voice changer applications, The Voice changer app has a very elegant and sleek design that makes it very easy to use.
Apart from the male to female voice change option, There are more than 50 other options that you can enjoy. Furthermore, you can share your creations with your friends through Bluetooth or other social media.
5. Voice Changer - Audio effects
Available for: Android
There are a lot of girl voice changer applications on the google play store. But not all of them are up to the mark. The Voice changer - audio effects is another highly recommended voice changer application.
The Voice Changer - Audio effects have a lot of other things to offer as well. Converting your voice from a male to a female has never been easier. Not only can you convert your voice into a girl, but you can also modify it. Furthermore, you can talk to your friends on the phone while you use the voice changer application. Moreover, the voices of animals and robots can also be an alternative to the female voice if you ever get bored of it.
6. Magic Call App
Available for: Android
The magic call is a real-time voice changer app that you can use for changing your voice during a call specifically. It is a really fun app which you can use with your friends to prank even your family!
This is a perfect option for people looking for a real-time girl voice changer app. The main purpose of this application is real-time calls. The magic call is ideal specifically for a male-to-female voice modification. And you can operate this application easily in call durations.
All you have to do is open the voice changer app and dial your call. Apart from Female voice, you can also convert your voice into a cartoon or an animal.
7. Voice Changer and Sound Recorder
Available for: iOS
If you are an iPhone user, then you must know that finding a voice changer on the apple store is like digging a diamond from the ground.
The Voice changer and sound recorder application is found exclusively on the apple store for people who love girl voice changer apps. It is a live call voice changer app, which means converting your voice from a male to a female in between the call. Furthermore, you can even add background voices such as traffic and echo to make your call even funnier. If you are looking for an excuse to get off from your call, then this application has got your back.
8. Super Voice Editor
Available for: Android
This one is a fun application for people searching for a voice changer app male to female. Not only can you record the audio that you edit, but also use it in real-time! Amazing right? Super voice editor enables you to add effects to your voice while you’re on a call as well. This feature means, next time you’re pulling a prank on the birthday boy, he won’t ever know! Sound like the wonder woman or dexter from his laboratory. The Super-Voice editor is perfect for kids playing in the house and even teenagers looking for something interesting. The SoulApps studio has made it easy for you to sound like your dream faces on the screen. With an MP3 cutter and Ringtone maker, this girl voice changer app is pure creativity.
9. Voice Changer with Effects
Available for: Android
Our list of girl voice changers, Voice changer with effects, is a very practical application that we highly recommend to our users.
With over 50 million downloads on google play, Voice changer with effects is highly suited for anyone looking for more than just a male-to-female voice changer. It has over 40 plus options such as helium, chipmunk, zombie, alien, and many more. With this application, you can even import a favorite audio clip of yours, and then you can easily convert it into a voice you like. If you want to modify your ringtone to an audio clip you just converted, then there is no better application than this one.
10. Voice Changer - Girls Voice changer Male to Female
Available for: Android
If you are looking for a girl voice changer app solely, this application perfectly fits you. The application is specifically designed only to change your voice from a male to a female. Although this application does provide options apart from female voice conversions, those features don’t function ideally. However, if you want a girl voice changer, you won’t have any trouble.
You can use this application while you are on a call. Hence, you can fool your family or friends by using a girl voice instead of your own. We recommend this as an average application that would fit your needs sufficiently.
In conclusion, you have now gone through the list of the perfect options for your android or iOS. Therefore, now you must be ready to choose the best girl voice changer app. So head on to your play store and search for your favorite app right now!
Also read:
- Updated Advanced Editing Strategies Employing PowerDirectors Audio Duck Feature for Seamless Volume Adjustments
- In 2024, Audio Removal Guide for MP4 Files
- In 2024, The Ultimate List 10 Best Free and Paid Audio Editors for Professional Sound Designers
- New Virtual Error Sounds Library 2023 – Complimentary Access and Downloads for 2024
- Updated In 2024, Mastering Audio Integration Combining Sounds for Your Videography Project
- Updated The 10 Best MP3 to Text File Transcription Aids at Zero Cost - Accommodating with ExpressSlide Pro Integration for 2024
- Updated Avoiding Audible Distractions Silencing Audio in Current AVI Updates
- In 2024, The Premier List Masterful MP3 Shredders
- New In 2024, Cheapest Mac Music Format Editor with Unlimited Trials
- 2024 Approved A Comedians Guide to the Best Free, Royalty-Free Background Music Sources
- Updated 2024 Approved Beyond the Script Delving Into the World of Anime Dubbing and Its Impact
- New 2024 Approved Cutting-Edge Free Voice Synthesis Tools From Simple Text Commands
- Updated In 2024, CoherenceCore The Innovative Approach to Synchronized Sound Design in Adobe Premiere Pro 2023
- Mastering AI-Powered Vocal Replication Two Techniques for Authenticity for 2024
- New Crafting Immersive Podcast Episodes A Comprehensive Directory of Sound FX Providers
- New Clearing the Microphone Effective Strategies for Cutting Out Vocals Using Audacitys Spectrum Analyzer
- Updated 2024 Approved Full Spectrum Insight Into Nero AudioWaveEditor
- Crafting Crystal-Clear Soundscape The Ultimate How To for Filtering Out Background Noise in Audio Production
- New VoiceTransformation Plus A Comprehensive Introduction for iPhone Users
- Updated 2024 Approved Installation & Uninstallation of Audacity on Chrome OS Explained Simply
- In 2024, The Art of Infusing Audio Harmonies with Visual Narratives at Zero Expense
- 2024 Approved Securing Purity in Recordings The Art of Removing Hum and Hissing Sounds
- 2024 Approved Step-by-Step Eliminating Sound From Modern AVI Format (AVI 2023)
- Updated The Easy-Path to Crafting Your Audio Book A Detailed Tutorial
- Updated Discovering the Best Vocal Enhancement Tools An Examination & Comparison for 2024
- New Revolutionary MP3 File Management Toolkit Windows & Mac Edition, Leading the Industry for 2024
- In 2024, Unleashing Your Creative Potential The Comprehensive Guide to Volume Automation and Ducking with Adobe Premiere Pro (Mac Edition)
- In 2024, The Essential Guide to Volume Manipulation in Audacity
- In 2024, How Do You Unlock your Apple iPhone 15 Pro? Learn All 4 Methods | Dr.fone
- New How to Stop Animation From Looping in Unity
- How To Restore Missing Contacts Files from Pixel Fold.
- In 2024, How To Unlock a Xiaomi 14 Easily?
- 2024 Approved Best AI YouTube Script Writers and The Ultimate Guide
- How To Stream Anything From Samsung Galaxy F14 5G to Apple TV | Dr.fone
- How to Remove an AirTag from Your Apple ID Account From Apple iPhone 15 Plus?
- How to Downgrade iPhone 7 to the Previous iOS/iPadOS Version? | Dr.fone
- 2024 Approved No-Cost 4K Video Conversion Top Picks
- In 2024, How to Unlock iPhone 11 Pro Passcode without iTunes without Knowing Passcode?
- Updated Revolutionize Your Videos Best Quality Improvement Tools for 2024
- In 2024, Hassle-Free Ways to Remove FRP Lock on Xiaomi Redmi 12 5G Phones with/without a PC
- Why Your WhatsApp Live Location is Not Updating and How to Fix on your Poco X5 | Dr.fone
- New In 2024, Blur Faces or Objects in Videos Best Apps for iOS and Android
- In 2024, Best 3 Nokia XR21 Emulator for Mac to Run Your Wanted Android Apps | Dr.fone
- New In 2024, How To Use CapCut Translate to Transform Video Content
- In 2024, Two Ways to Track My Boyfriends HTC U23 Pro without Him Knowing | Dr.fone
- Updated 8 Essential Video Metadata Editors for Mac Users (Updated 2023) for 2024
- A Perfect Guide To Remove or Disable Google Smart Lock On Infinix Zero 30 5G
- In 2024, Top 6 Apps/Services to Trace Any OnePlus 11R Location By Mobile Number | Dr.fone
- Title: Updated Enhance Your PC Audio No-Cost Methods to Amplify Sound on Windows Systems
- Author: Paul
- Created at : 2024-05-20 01:48:06
- Updated at : 2024-05-21 01:48:06
- Link: https://voice-adjusting.techidaily.com/updated-enhance-your-pc-audio-no-cost-methods-to-amplify-sound-on-windows-systems/
- License: This work is licensed under CC BY-NC-SA 4.0.
