
:max_bytes(150000):strip_icc():format(webp)/how-to-set-up-a-ps5-5088641-1bcc6bca24cd460bb2b276fdeb6cb830.jpg)
Updated 2024 Approved The Essential Guide to REAPER Tools & Techniques for New Users
“The Essential Guide to REAPER: Tools & Techniques for New Users”
DAW stands for Digital Audio Workstation. It is where you can record, edit, mix or even master your music. You always need good DAW software to help you with the job to produce music or live recording musicians.
A good DAW software must have a multi-track audio recording , virtual instruments, MIDI sequencer, excellent mixing capabilities, and plug-in processor hosting. The software is found for all major operating systems such as Linux , Windows, and Mac. If you want to learn more about DAW, then stay with us. The article will discuss in detail REAPER Recording Software.
In this article
01 What Is REAPER Recording Software?
02 How to Download and Install REAPER Software?
03 Tutorial for Using REAPER Recording Software
Part 1. What Is REAPER Recording Software?
Recording software like REAPER records computer audio is used to produce music, edit it, transform, and customize your music. With REAPER Recording Software , you can record multi-layer audio and MIDI in various formats. REAPER has the easiest interface that allows you to drag and drop to import, split, move and do many other tasks.

This is just one feature of REAPER that sounds very interesting. In this section, we will talk about more of its features.
1. Record and Edit
You can easily record the audio and (MIDI) Musical Instrumental Digital Interface with REAPER recording software. It lets you edit and customize everything. You can record and edit things limitlessly. When it comes to recording, it’s not at all difficult for REAPER software to record various instruments or vocals.
2. Mixing
Initially, the mixer might seem inflexible, but in reality, REAPER has a lot to offer you. It has great automated capabilities for instrument and effect parameters. It doesn’t matter if you are working because you can still bounce or freeze tracks while working.
The mixer is very flexible. With REAPERs mixer, you just have to drag and drop your recordings so that you can create tracks, and also, you can customize the arrangements by moving the portions.
3. Interface
While looking at the interface, you might question yourself about how to use its interface. Some people love to learn about new things, such as the REAPER Recording Software. Whereas, some people seem least interested because the half-empty interface is not intuitive to them.
Whereas, the best thing about its interface is that you can customize it. REAPER allows you to add different wallpapers and layouts to your software interface.
4. Strong Stability
REAPER Recording Software has very strong stability. This is one of its strongest features as compared to other competitors. The RAM is rarely affected by the load time and the used resources. Moreover, the software offers a wide range of languages. You can select your desired language to run the software.
Part 2. How to Download and Install REAPER Software?
REAPER is a Digital Audio Workstation. The perfect platform where you can manipulate and transform your audio. With REAPER Record Computer audio, you can work efficiently in a resource-friendly studio with saving your time. Stay tuned if you plan to learn more about its pricing and requirements.

Pricing of REAPER Software
A reaper is a brilliant software. It has a 60-day trial period. REAPER costs $60 in total to register. It has complete MIDI sequencing. You can also get a discounted license if REAPER is the best private option for you or has commercial usage. You can set the equal license key on every computer for someone with multiple computers.
System Requirements
The recording software has uncountable features. REAPER software facilitates its users at every level by giving the best audio manipulating platform. The best thing about REAPER Recording Software is its compatibility with different operating systems. Let us add more to your knowledge on this.
Windows
REAPER software is available for Windows 7, 8, 10, XP, and Vista. The version of REAPER for Windows is 6.42. This is for Windows 64-bit whereas, a download package is also available for Windows 32-bit.
macOS
For macOS 64-bit, REAPER has a 6.42 version. This version is compatible with macOS 10.5 – 10.14. Whereas, for macOS 10.15+, the available version of REAPER is 6.42 with a 15MB file size.
Linux
REAPER Recording Software is also compatible with Linux x86_64. The REAPER version is 6.42 with an 11 MB file size. This version can also work on AMD64 64-bit.
Downloading and Installing REAPER
Now that REAPER Record Computer Audio has impressed you a lot. You must be thinking about how to download it. If this is on your mind, then we got you. Allow us to share its steps that will guide you to download the software easily.
Step 1: To install REAPER software, first of all, visit its official website. Then locate and head over to its download section.
Step 2: Click on ‘Download REAPER from the download section.’ For Windows users, they can download the Windows installation package. At the same time, Linux and macOS users can select their installation packages.
Step 3: Lastly, after you have downloaded your systems compatible installation package, you simply have to run it and then install it according to your respective operating system.
Part 3. Tutorial for Using REAPER Recording Software
After its attractive features and detailed downloading procedure, it is finally the time to talk about its works. This section of the article will explain to you more about REAPER Recording Software as we are now going to present a tutorial on how to use the software.
Understand the Layout
Understanding and knowing the layout of your software before you start working on it is essential. The crucial components of REAPER software include the Timeline, Arrangement Window, Track Panel, Toolbar, and lastly, Transport.

The Arrangement window holds all the added items. The items are played from left to right order, similar to their timeline arrangement. You can also zoom in and out. Then comes the transport toolbar, which holds the functions to stop, rewind, play, fast forward, adjust the timeline speed, etc. The toolbar holds all the toggle buttons. You can also customize your toolbar.
New Track Creation
For creating a new track on REAPER, go to the Track menu and hit Insert New Track. A track is like another layer to your audio. Multiple layers and tracks make your work complex yet interesting as you can play all the different tracks at the same time. By double-clicking in the Track Control Panel, you can set a name for the added track.

Audio Hardware Settings for Audio Recording
It is best suggested always to check your audio hardware settings before you start to record, edit or mix with REAPER Recording Software. Your primary focus should be on the recording device’s devices should be set as Input Device, whereas the listening device should be set as the Output Device.
For this, you have to select Preferences from the Options menu. A window will appear in front of you, the REAPER Preference window. You have to select the correct Input and Output devices from the dropdown menu from this window.

Arm your Track
Arming your track is very important. For this, head over to the Track Control Panel, and next to your track name, hit the red circle. If you have various tracks, you should solo this track and mute the other tracks.
As soon as the track is armed, a Gain Meter will activate on the side. From this, you can check if you have properly set the microphone or not. This could be tested by tapping on the microphone.

Record
After all, the hardware settings are done, and your track is armed, it’s time to start the recording. For that, just tap on the Record button in the Transport toolbar. A yellow line in the timeline will indicate the end of the recording.

To end the recording, tap on the Stop button from the Transport Toolbar. Lastly, REAPER Recording Software will ask you to save the file. In case you don’t want it, you can also delete it.
Create and Manipulate Clips
Things like manipulation get a lot easier if you split the clips in REAPER. From the items menu, you have to select the option of Split Item on Cursor. This divides your clip into two clips on each side of the cursor. You can also remove the clips by going to the Items Menu. From there, you just have to hit the Remove Item option, or else, simply press the Delete key on your keyboard.

Removing clips will create a gap in the arrangement window that can be filled by dragging forward the remaining clip.
Volume Adjustments – Normalize
By double-clicking on the item or by selecting ‘Item Properties’ from a right-click, you can normalize the item. A new window will appear as Media Item Properties, from where you have to locate the Volume Settings and then select the option of Normalize.
If your item is already loud, then nothing will happen, but if it is not, then the slider will change from 0.00 dB showing an increase in the volume. Lastly, hit the ‘Apply’ or ‘OK’ button to imply the changes.
Fade in/out
With the Media Properties, you can also adjust a Fade in and a Fade out. For this, you simply have to set an end time for the Fade in, whereas a start time is entered for Fade out. Hit the ‘Ok’ or ‘Apply’ button to apply the changes.
From the Arrangement window, fades can be adjusted. For adjusting the fades, hover with your mouse over the red line. You will see a newly shaped cursor. Just drag on the timeline to play and adjust the Fade with this new cursor.

Automate Changes
With REAPER, you can also automate changes in track parameters. We will guide about automation from Track Envelopes. From Track Control Panel, hit the Trim option. A new Envelopes window will open at this point from where you have to check the Volume box.
A new Volume Track will open up. Here, you have to set new Envelope points. That could be done by holding the shift key, right-clicking on the point, and then selecting Create New Point. A green circle will indicate the new point.
By dragging the Envelope point, you can also adjust the volume. Dragging it towards the top will increase the volume, whereas dragging it towards the bottom will eventually decrease.

Finalize the Audio – Render
After all the above steps have been completed to set the order and adjust your desired volume, the last step comes to render your project file. For that, move to the File menu and select the ‘Render’ option. A window will be opened as ‘Render to File.’ Now, from the dropdown menu, select your desired Output Format.
Lastly, hit the Render 1 File button, and then REAPER will export your project. You can immediately listen to it by selecting the ‘Launch File’ option.

Concluding Thoughts
This article is everything you need to learn about REAPER Recording Software. The article that started from an introduction on DAW took you on a roller coaster ride. Everything about REAPER software has been shared.
We hope that this article helps you in all possible ways. The attractive features impress you, and its pricing and system specifications increase your knowledge. Along with that, the shared tutorial will guide you thoroughly on how to use it.
02 How to Download and Install REAPER Software?
03 Tutorial for Using REAPER Recording Software
Part 1. What Is REAPER Recording Software?
Recording software like REAPER records computer audio is used to produce music, edit it, transform, and customize your music. With REAPER Recording Software , you can record multi-layer audio and MIDI in various formats. REAPER has the easiest interface that allows you to drag and drop to import, split, move and do many other tasks.
This is just one feature of REAPER that sounds very interesting. In this section, we will talk about more of its features.
1. Record and Edit
You can easily record the audio and (MIDI) Musical Instrumental Digital Interface with REAPER recording software. It lets you edit and customize everything. You can record and edit things limitlessly. When it comes to recording, it’s not at all difficult for REAPER software to record various instruments or vocals.
2. Mixing
Initially, the mixer might seem inflexible, but in reality, REAPER has a lot to offer you. It has great automated capabilities for instrument and effect parameters. It doesn’t matter if you are working because you can still bounce or freeze tracks while working.
The mixer is very flexible. With REAPERs mixer, you just have to drag and drop your recordings so that you can create tracks, and also, you can customize the arrangements by moving the portions.
3. Interface
While looking at the interface, you might question yourself about how to use its interface. Some people love to learn about new things, such as the REAPER Recording Software. Whereas, some people seem least interested because the half-empty interface is not intuitive to them.
Whereas, the best thing about its interface is that you can customize it. REAPER allows you to add different wallpapers and layouts to your software interface.
4. Strong Stability
REAPER Recording Software has very strong stability. This is one of its strongest features as compared to other competitors. The RAM is rarely affected by the load time and the used resources. Moreover, the software offers a wide range of languages. You can select your desired language to run the software.
Part 2. How to Download and Install REAPER Software?
REAPER is a Digital Audio Workstation. The perfect platform where you can manipulate and transform your audio. With REAPER Record Computer audio, you can work efficiently in a resource-friendly studio with saving your time. Stay tuned if you plan to learn more about its pricing and requirements.
Pricing of REAPER Software
A reaper is a brilliant software. It has a 60-day trial period. REAPER costs $60 in total to register. It has complete MIDI sequencing. You can also get a discounted license if REAPER is the best private option for you or has commercial usage. You can set the equal license key on every computer for someone with multiple computers.
System Requirements
The recording software has uncountable features. REAPER software facilitates its users at every level by giving the best audio manipulating platform. The best thing about REAPER Recording Software is its compatibility with different operating systems. Let us add more to your knowledge on this.
Windows
REAPER software is available for Windows 7, 8, 10, XP, and Vista. The version of REAPER for Windows is 6.42. This is for Windows 64-bit whereas, a download package is also available for Windows 32-bit.
macOS
For macOS 64-bit, REAPER has a 6.42 version. This version is compatible with macOS 10.5 – 10.14. Whereas, for macOS 10.15+, the available version of REAPER is 6.42 with a 15MB file size.
Linux
REAPER Recording Software is also compatible with Linux x86_64. The REAPER version is 6.42 with an 11 MB file size. This version can also work on AMD64 64-bit.
Downloading and Installing REAPER
Now that REAPER Record Computer Audio has impressed you a lot. You must be thinking about how to download it. If this is on your mind, then we got you. Allow us to share its steps that will guide you to download the software easily.
Step 1: To install REAPER software, first of all, visit its official website. Then locate and head over to its download section.
Step 2: Click on ‘Download REAPER from the download section.’ For Windows users, they can download the Windows installation package. At the same time, Linux and macOS users can select their installation packages.
Step 3: Lastly, after you have downloaded your systems compatible installation package, you simply have to run it and then install it according to your respective operating system.
Part 3. Tutorial for Using REAPER Recording Software
After its attractive features and detailed downloading procedure, it is finally the time to talk about its works. This section of the article will explain to you more about REAPER Recording Software as we are now going to present a tutorial on how to use the software.
Understand the Layout
Understanding and knowing the layout of your software before you start working on it is essential. The crucial components of REAPER software include the Timeline, Arrangement Window, Track Panel, Toolbar, and lastly, Transport.
The Arrangement window holds all the added items. The items are played from left to right order, similar to their timeline arrangement. You can also zoom in and out. Then comes the transport toolbar, which holds the functions to stop, rewind, play, fast forward, adjust the timeline speed, etc. The toolbar holds all the toggle buttons. You can also customize your toolbar.
New Track Creation
For creating a new track on REAPER, go to the Track menu and hit Insert New Track. A track is like another layer to your audio. Multiple layers and tracks make your work complex yet interesting as you can play all the different tracks at the same time. By double-clicking in the Track Control Panel, you can set a name for the added track.
Audio Hardware Settings for Audio Recording
It is best suggested always to check your audio hardware settings before you start to record, edit or mix with REAPER Recording Software. Your primary focus should be on the recording device’s devices should be set as Input Device, whereas the listening device should be set as the Output Device.
For this, you have to select Preferences from the Options menu. A window will appear in front of you, the REAPER Preference window. You have to select the correct Input and Output devices from the dropdown menu from this window.
Arm your Track
Arming your track is very important. For this, head over to the Track Control Panel, and next to your track name, hit the red circle. If you have various tracks, you should solo this track and mute the other tracks.
As soon as the track is armed, a Gain Meter will activate on the side. From this, you can check if you have properly set the microphone or not. This could be tested by tapping on the microphone.
Record
After all, the hardware settings are done, and your track is armed, it’s time to start the recording. For that, just tap on the Record button in the Transport toolbar. A yellow line in the timeline will indicate the end of the recording.
To end the recording, tap on the Stop button from the Transport Toolbar. Lastly, REAPER Recording Software will ask you to save the file. In case you don’t want it, you can also delete it.
Create and Manipulate Clips
Things like manipulation get a lot easier if you split the clips in REAPER. From the items menu, you have to select the option of Split Item on Cursor. This divides your clip into two clips on each side of the cursor. You can also remove the clips by going to the Items Menu. From there, you just have to hit the Remove Item option, or else, simply press the Delete key on your keyboard.
Removing clips will create a gap in the arrangement window that can be filled by dragging forward the remaining clip.
Volume Adjustments – Normalize
By double-clicking on the item or by selecting ‘Item Properties’ from a right-click, you can normalize the item. A new window will appear as Media Item Properties, from where you have to locate the Volume Settings and then select the option of Normalize.
If your item is already loud, then nothing will happen, but if it is not, then the slider will change from 0.00 dB showing an increase in the volume. Lastly, hit the ‘Apply’ or ‘OK’ button to imply the changes.
Fade in/out
With the Media Properties, you can also adjust a Fade in and a Fade out. For this, you simply have to set an end time for the Fade in, whereas a start time is entered for Fade out. Hit the ‘Ok’ or ‘Apply’ button to apply the changes.
From the Arrangement window, fades can be adjusted. For adjusting the fades, hover with your mouse over the red line. You will see a newly shaped cursor. Just drag on the timeline to play and adjust the Fade with this new cursor.
Automate Changes
With REAPER, you can also automate changes in track parameters. We will guide about automation from Track Envelopes. From Track Control Panel, hit the Trim option. A new Envelopes window will open at this point from where you have to check the Volume box.
A new Volume Track will open up. Here, you have to set new Envelope points. That could be done by holding the shift key, right-clicking on the point, and then selecting Create New Point. A green circle will indicate the new point.
By dragging the Envelope point, you can also adjust the volume. Dragging it towards the top will increase the volume, whereas dragging it towards the bottom will eventually decrease.
Finalize the Audio – Render
After all the above steps have been completed to set the order and adjust your desired volume, the last step comes to render your project file. For that, move to the File menu and select the ‘Render’ option. A window will be opened as ‘Render to File.’ Now, from the dropdown menu, select your desired Output Format.
Lastly, hit the Render 1 File button, and then REAPER will export your project. You can immediately listen to it by selecting the ‘Launch File’ option.
Concluding Thoughts
This article is everything you need to learn about REAPER Recording Software. The article that started from an introduction on DAW took you on a roller coaster ride. Everything about REAPER software has been shared.
We hope that this article helps you in all possible ways. The attractive features impress you, and its pricing and system specifications increase your knowledge. Along with that, the shared tutorial will guide you thoroughly on how to use it.
“Mastering Gender Transformation in Voice: The Essential Male to Female Software Collection”
If you’ve been searching for the best android and iOS voice-changing apps around the internet, you’re on the right spot. Voice-changing applications are always fun. They’re handy when you’re pulling a prank on a friend, or you want some amazing effects to test your voice. Thus, we provide you with all the best male to female voice changer apps in the list below.
Record & Edit Voice Fast before Changing Voice
Before changing your voice from male to female, I suggest you edit your voice first. Filmora is an easy-to-use yet powerful video editor helping you quickly edit voice no matter your voice or the audio extracted from videos. Explore Filmora’s audio editing features and get ready for changing voice!
For Win 7 or later (64-bit)
For macOS 10.12 or later


Part 1: Changing Voice Online for Free with Media.io
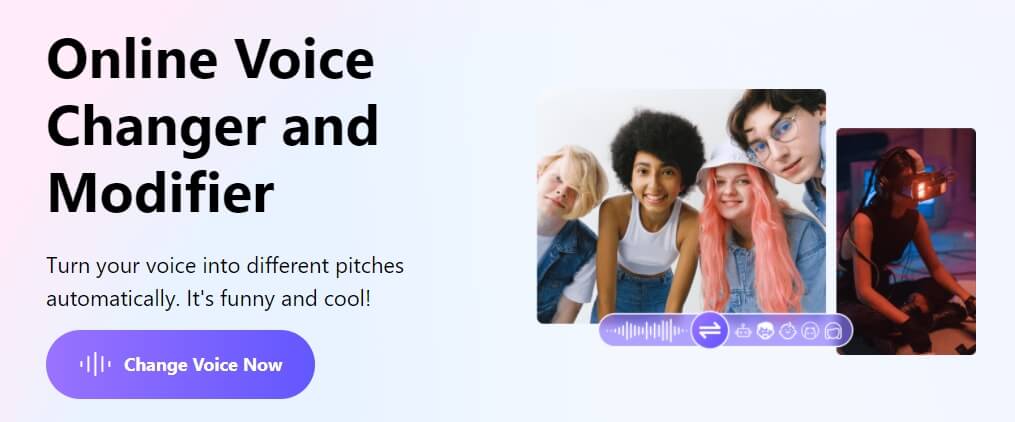
If you want to change voice without downloading and installing any app on your mobile phone, you can try some online solutions. Media.io is an all-in-one online video toolkit that allows you to edit, convert and compress video, audio and image files easily. The online voice changer from Media.io can transform your voice to a male voice, female voice, child voice, robot voice, and Donald Duck voice. If you wish to have voice filters, you won’t have any problems in the future with the Media.io voice changer.

This online voice changer works best on the Chrome browser, so you can utilize it whether using a Windows, Mac, Linux, or Chromebook device. As a result, you can deceive your family or friends by speaking in another people’s voice rather than your own. Doesn’t that sound like fun?
![]()
A cross-platform for making videos anywhere for all creators

Why your video editing isn’t good enough? How about some creative inspo?
- 100 Million+ Users
- 150+ Countries and Regions
- 4 Million+ Social Media Followers
- 5 Million+ Stock Media for Use
* Secure Download

Part 2: Best Male to Female Voice Changer Apps for iPhone and Android
- Girls Voice Changer
- Voice Changer Voice Recorder Editor & Effect
- VoiceFX
- Voice Changer
- Voice Changer - Audio effects
- Magic Call App
- Voice Changer and Sound Recorder
- Super Voice Editor
- Voice Changer with Effects
- Voice Changer - Girls Voice changer Male to Female
1. Girls Voice Changer
Available for: Android, iOS
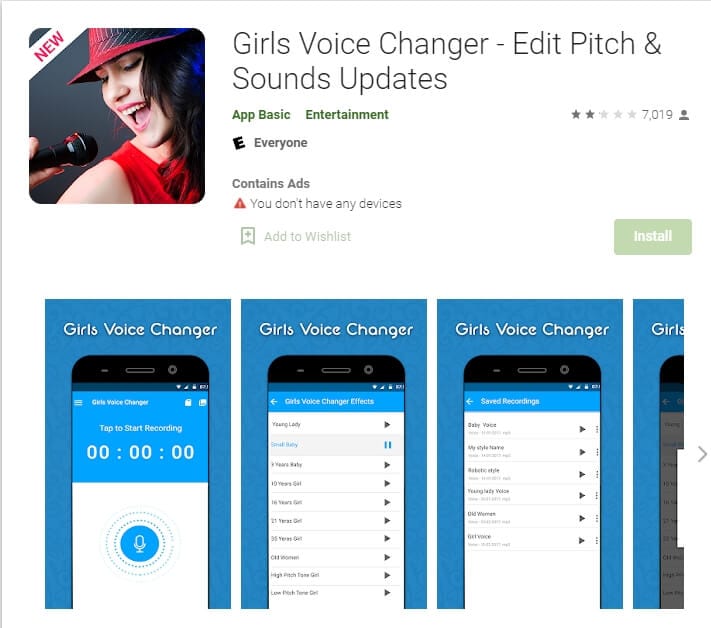
This girl voice changer app is highly portable and easy for any user to use comfortably. It is specifically more popular for changing male voice to female and for pitch adjustments. It’s completely free, so download on your android if you have a storage of about 8MB ready, and start using it!
This male-to-female voice changer app has several options in the library. Though the pitch adjustments are easy to make, some users have informed a lack of performance on very high-pitched settings. However, the smoothness of an android application also depends on how much space is readily available in the device. So next time you’re bored at a part, you have the perfect partner!
2. Voice Changer Voice Recorder Editor & Effect
Available for: Android
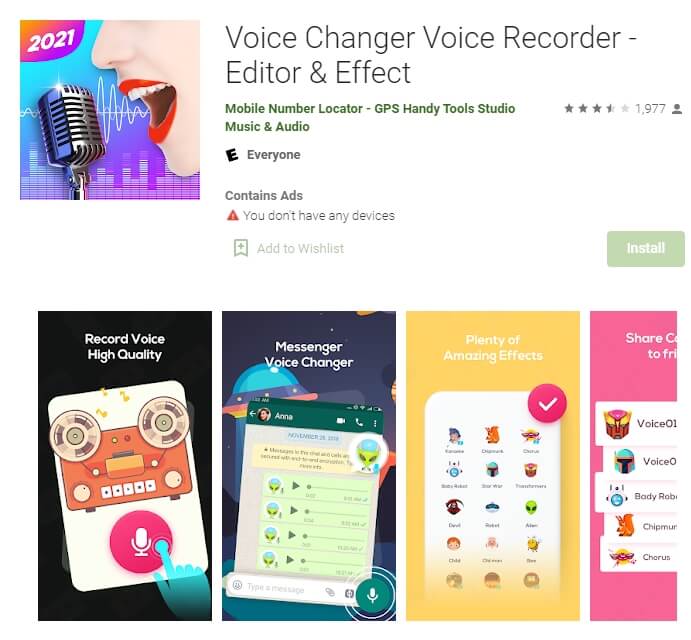
This voice changer application is for multi-purpose. Yes, you can use it as a girl voice changer smoothly and with ease. But apart from male to female voice changing, The “voice changer - voice editor application” can also be used to autotune your voice.
Now autotune is a big feature that every singer uses to make their voices tuned perfectly. With this app, you can also do the same to record your music or have fun while you are bored. The application is pretty to use and can be used as a girl voice changer not only for entertainment but also if you’re practicing. Many people who wish to seek a career in background voices might find this useful.
3. VoiceFX
Available for: Android

The VoiceFX application is filled with a lot of exciting options and features. If you are looking for an app that is more than just a male-to-female voice changer app, the voice fx is highly recommended.
You can also convert your voice into a robot or even an animal from male to female voice. Yes, you read it right. You can turn your manly voice into any of the fictional cartoons you want. This one’s a very easy and efficient way of filming a video with added effects or developing a mini-game with different voice characters. If you haven’t forgotten, there was a very big trend of converting famous music into chipmunk voices. With this app, you can convert your favorite songs into a chipmunk addition song without any problem.
4. Voice Changer
Available for: Android

The voice changer is a very famous male-to-female voice changer app. With over 10 million downloads on the google play store, the voice changer is highly recommended for users who have fun changing their voices from male to female. Compared to other voice changer applications, The Voice changer app has a very elegant and sleek design that makes it very easy to use.
Apart from the male to female voice change option, There are more than 50 other options that you can enjoy. Furthermore, you can share your creations with your friends through Bluetooth or other social media.
5. Voice Changer - Audio effects
Available for: Android

There are a lot of girl voice changer applications on the google play store. But not all of them are up to the mark. The Voice changer - audio effects is another highly recommended voice changer application.
The Voice Changer - Audio effects have a lot of other things to offer as well. Converting your voice from a male to a female has never been easier. Not only can you convert your voice into a girl, but you can also modify it. Furthermore, you can talk to your friends on the phone while you use the voice changer application. Moreover, the voices of animals and robots can also be an alternative to the female voice if you ever get bored of it.
6. Magic Call App
Available for: Android

The magic call is a real-time voice changer app that you can use for changing your voice during a call specifically. It is a really fun app which you can use with your friends to prank even your family!
This is a perfect option for people looking for a real-time girl voice changer app. The main purpose of this application is real-time calls. The magic call is ideal specifically for a male-to-female voice modification. And you can operate this application easily in call durations.
All you have to do is open the voice changer app and dial your call. Apart from Female voice, you can also convert your voice into a cartoon or an animal.
7. Voice Changer and Sound Recorder
Available for: iOS

If you are an iPhone user, then you must know that finding a voice changer on the apple store is like digging a diamond from the ground.
The Voice changer and sound recorder application is found exclusively on the apple store for people who love girl voice changer apps. It is a live call voice changer app, which means converting your voice from a male to a female in between the call. Furthermore, you can even add background voices such as traffic and echo to make your call even funnier. If you are looking for an excuse to get off from your call, then this application has got your back.
8. Super Voice Editor
Available for: Android
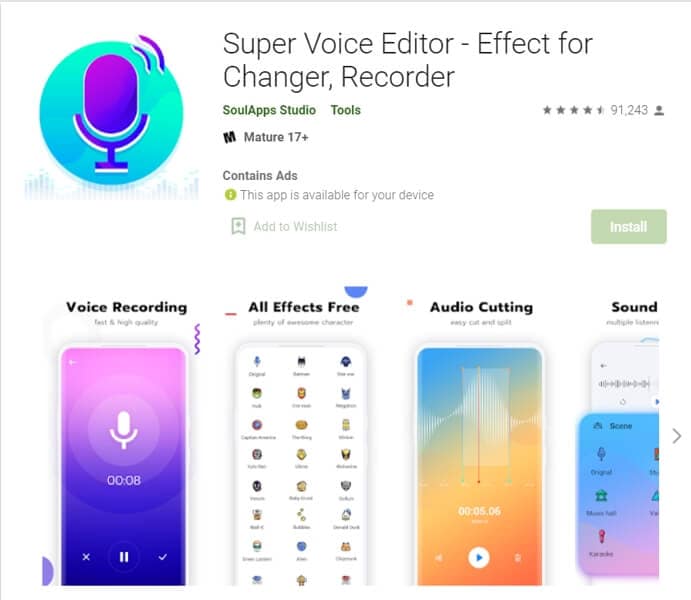
This one is a fun application for people searching for a voice changer app male to female. Not only can you record the audio that you edit, but also use it in real-time! Amazing right? Super voice editor enables you to add effects to your voice while you’re on a call as well. This feature means, next time you’re pulling a prank on the birthday boy, he won’t ever know! Sound like the wonder woman or dexter from his laboratory. The Super-Voice editor is perfect for kids playing in the house and even teenagers looking for something interesting. The SoulApps studio has made it easy for you to sound like your dream faces on the screen. With an MP3 cutter and Ringtone maker, this girl voice changer app is pure creativity.
9. Voice Changer with Effects
Available for: Android

Our list of girl voice changers, Voice changer with effects, is a very practical application that we highly recommend to our users.
With over 50 million downloads on google play, Voice changer with effects is highly suited for anyone looking for more than just a male-to-female voice changer. It has over 40 plus options such as helium, chipmunk, zombie, alien, and many more. With this application, you can even import a favorite audio clip of yours, and then you can easily convert it into a voice you like. If you want to modify your ringtone to an audio clip you just converted, then there is no better application than this one.
10. Voice Changer - Girls Voice changer Male to Female
Available for: Android

If you are looking for a girl voice changer app solely, this application perfectly fits you. The application is specifically designed only to change your voice from a male to a female. Although this application does provide options apart from female voice conversions, those features don’t function ideally. However, if you want a girl voice changer, you won’t have any trouble.
You can use this application while you are on a call. Hence, you can fool your family or friends by using a girl voice instead of your own. We recommend this as an average application that would fit your needs sufficiently.
In conclusion, you have now gone through the list of the perfect options for your android or iOS. Therefore, now you must be ready to choose the best girl voice changer app. So head on to your play store and search for your favorite app right now!
For Win 7 or later (64-bit)
For macOS 10.12 or later
Part 1: Changing Voice Online for Free with Media.io
If you want to change voice without downloading and installing any app on your mobile phone, you can try some online solutions. Media.io is an all-in-one online video toolkit that allows you to edit, convert and compress video, audio and image files easily. The online voice changer from Media.io can transform your voice to a male voice, female voice, child voice, robot voice, and Donald Duck voice. If you wish to have voice filters, you won’t have any problems in the future with the Media.io voice changer.
This online voice changer works best on the Chrome browser, so you can utilize it whether using a Windows, Mac, Linux, or Chromebook device. As a result, you can deceive your family or friends by speaking in another people’s voice rather than your own. Doesn’t that sound like fun?
![]()
A cross-platform for making videos anywhere for all creators
Why your video editing isn’t good enough? How about some creative inspo?
- 100 Million+ Users
- 150+ Countries and Regions
- 4 Million+ Social Media Followers
- 5 Million+ Stock Media for Use
* Secure Download
Part 2: Best Male to Female Voice Changer Apps for iPhone and Android
- Girls Voice Changer
- Voice Changer Voice Recorder Editor & Effect
- VoiceFX
- Voice Changer
- Voice Changer - Audio effects
- Magic Call App
- Voice Changer and Sound Recorder
- Super Voice Editor
- Voice Changer with Effects
- Voice Changer - Girls Voice changer Male to Female
1. Girls Voice Changer
Available for: Android, iOS
This girl voice changer app is highly portable and easy for any user to use comfortably. It is specifically more popular for changing male voice to female and for pitch adjustments. It’s completely free, so download on your android if you have a storage of about 8MB ready, and start using it!
This male-to-female voice changer app has several options in the library. Though the pitch adjustments are easy to make, some users have informed a lack of performance on very high-pitched settings. However, the smoothness of an android application also depends on how much space is readily available in the device. So next time you’re bored at a part, you have the perfect partner!
2. Voice Changer Voice Recorder Editor & Effect
Available for: Android
This voice changer application is for multi-purpose. Yes, you can use it as a girl voice changer smoothly and with ease. But apart from male to female voice changing, The “voice changer - voice editor application” can also be used to autotune your voice.
Now autotune is a big feature that every singer uses to make their voices tuned perfectly. With this app, you can also do the same to record your music or have fun while you are bored. The application is pretty to use and can be used as a girl voice changer not only for entertainment but also if you’re practicing. Many people who wish to seek a career in background voices might find this useful.
3. VoiceFX
Available for: Android
The VoiceFX application is filled with a lot of exciting options and features. If you are looking for an app that is more than just a male-to-female voice changer app, the voice fx is highly recommended.
You can also convert your voice into a robot or even an animal from male to female voice. Yes, you read it right. You can turn your manly voice into any of the fictional cartoons you want. This one’s a very easy and efficient way of filming a video with added effects or developing a mini-game with different voice characters. If you haven’t forgotten, there was a very big trend of converting famous music into chipmunk voices. With this app, you can convert your favorite songs into a chipmunk addition song without any problem.
4. Voice Changer
Available for: Android
The voice changer is a very famous male-to-female voice changer app. With over 10 million downloads on the google play store, the voice changer is highly recommended for users who have fun changing their voices from male to female. Compared to other voice changer applications, The Voice changer app has a very elegant and sleek design that makes it very easy to use.
Apart from the male to female voice change option, There are more than 50 other options that you can enjoy. Furthermore, you can share your creations with your friends through Bluetooth or other social media.
5. Voice Changer - Audio effects
Available for: Android
There are a lot of girl voice changer applications on the google play store. But not all of them are up to the mark. The Voice changer - audio effects is another highly recommended voice changer application.
The Voice Changer - Audio effects have a lot of other things to offer as well. Converting your voice from a male to a female has never been easier. Not only can you convert your voice into a girl, but you can also modify it. Furthermore, you can talk to your friends on the phone while you use the voice changer application. Moreover, the voices of animals and robots can also be an alternative to the female voice if you ever get bored of it.
6. Magic Call App
Available for: Android
The magic call is a real-time voice changer app that you can use for changing your voice during a call specifically. It is a really fun app which you can use with your friends to prank even your family!
This is a perfect option for people looking for a real-time girl voice changer app. The main purpose of this application is real-time calls. The magic call is ideal specifically for a male-to-female voice modification. And you can operate this application easily in call durations.
All you have to do is open the voice changer app and dial your call. Apart from Female voice, you can also convert your voice into a cartoon or an animal.
7. Voice Changer and Sound Recorder
Available for: iOS
If you are an iPhone user, then you must know that finding a voice changer on the apple store is like digging a diamond from the ground.
The Voice changer and sound recorder application is found exclusively on the apple store for people who love girl voice changer apps. It is a live call voice changer app, which means converting your voice from a male to a female in between the call. Furthermore, you can even add background voices such as traffic and echo to make your call even funnier. If you are looking for an excuse to get off from your call, then this application has got your back.
8. Super Voice Editor
Available for: Android
This one is a fun application for people searching for a voice changer app male to female. Not only can you record the audio that you edit, but also use it in real-time! Amazing right? Super voice editor enables you to add effects to your voice while you’re on a call as well. This feature means, next time you’re pulling a prank on the birthday boy, he won’t ever know! Sound like the wonder woman or dexter from his laboratory. The Super-Voice editor is perfect for kids playing in the house and even teenagers looking for something interesting. The SoulApps studio has made it easy for you to sound like your dream faces on the screen. With an MP3 cutter and Ringtone maker, this girl voice changer app is pure creativity.
9. Voice Changer with Effects
Available for: Android
Our list of girl voice changers, Voice changer with effects, is a very practical application that we highly recommend to our users.
With over 50 million downloads on google play, Voice changer with effects is highly suited for anyone looking for more than just a male-to-female voice changer. It has over 40 plus options such as helium, chipmunk, zombie, alien, and many more. With this application, you can even import a favorite audio clip of yours, and then you can easily convert it into a voice you like. If you want to modify your ringtone to an audio clip you just converted, then there is no better application than this one.
10. Voice Changer - Girls Voice changer Male to Female
Available for: Android
If you are looking for a girl voice changer app solely, this application perfectly fits you. The application is specifically designed only to change your voice from a male to a female. Although this application does provide options apart from female voice conversions, those features don’t function ideally. However, if you want a girl voice changer, you won’t have any trouble.
You can use this application while you are on a call. Hence, you can fool your family or friends by using a girl voice instead of your own. We recommend this as an average application that would fit your needs sufficiently.
In conclusion, you have now gone through the list of the perfect options for your android or iOS. Therefore, now you must be ready to choose the best girl voice changer app. So head on to your play store and search for your favorite app right now!
Unmissable Collection: The Ultimate Playlist of Song Recorders
Who doesn’t like to listen to songs? Who doesn’t enjoy listening to songs? Everyone listens to music and songs of various genres because they relax and soothe us at different levels. Sometimes pop hip-hop is what we are looking to relax, whereas sometimes, slow, rhythmic music is what we are looking for to grant us comfort.
The only factor that might bother you at any point is your internet connection. You cannot always listen to songs on the internet. For this reason, we download songs. Some platforms do not allow you to download songs; song recording software is needed for such cases. If you plan to learn about song recorders, then let us start.
Part 1. 10 Best Song Recorder to Capture Your Favorite Song Easily
Songs that can’t be downloaded can be recorded so that you can easily enjoy them even if you are offline. The process of recording songs is not at all problematic but selecting the correct song recorder is essential. Not every song recording software delivers quality recordings.
If ‘how to record a song at home’ is the question that’s bothering you and additionally you want to learn about 10 song recorders that are best and guarantee quality recordings, then stay with us.
1. MixPad
The very first song recording software is MixPad. With this platform, audio processing and mixing have become a lot easier than before. The interface of this software is very smart visually and sleek in design.

An amazing thing about MixPad is that it supports cloud storage. The biggest advantage of using cloud storage is that the users’ work is always safe. The users’ data is secure and far from any kind of data loss. Some more features of MixPad are:
- You can import any sound format with perfection because MixPad supports almost all sound formats.
- MixPad allows the simultaneous mixing of an unlimited number of tracks.
- The best thing about MixPad is that its latency rate is very low.
2. FLStudio
Another song recording software that could be used to record songs to enjoy them later is FL Studio. With this software, you can easily compose, edit, mix and also record songs. Its amazing nature lets you create sound patterns and sequencing.

FL Studio has a flexible interface as the user can adjust and resize the interface. The recording software is very easy to use. Along with that, it is very lightweight. Let us share some more features of FLStudio:
- FL Studio includes a lot of plugins. Approximately it includes more than 80.
- The song recordersupports both Windows and Mac.
- The software also supports MIDI (Musical Instrument Digital Interface).
- The users receive free updates for FL Studio. It is also highly customizable.
3. Leawo Music Recorder
With Leawo Music Recorder, you can record your favorite songs. The tool has a lot more than just recording like it contains a task scheduler, recording album, cover finder, etc. Using a Leawo recorder, you can record songs from various platforms like YouTube, AOL Music, and many others.

The best part of Leawo recording software is that you can record with the mic as well as with the other built-in input audio. Some more features of the Leawo music recorder are:
- By using the Task Scheduler, you can record your songs and set the start and end duration.
- Leawo Music Recorder only supports Windows.
- You can easily manage the recorded song file and also edit it accordingly.
4. GilliSoft Audio Recorder Pro
By using Gillisoft Audio Recorder, you can easily record songs from various platforms like YouTube, Pandora, and other streaming audio websites. The software allows time-triggered recording. In case you want to learn more about the Gilisoft Audio Recorder, then here are its features:

- With Gilisoft recorder, you can save the files in WAV, MP3, OGG, or WMA files.
- The reordered songs can be played on a PC, MP3 player, or the car’s audio system.
- The streaming audio recorder is connected directly to the sound card. With this, you can record perfect voices.
5. WavePad
Another very powerful song recorder where even beginners can work easily is WavePad. The layout and the interface of the software are very smooth, intuitive and it encourages a good workflow. WavePad allows you to customize the toolbar. Let us share with you the features of WavePad:

- WavePad has a lot of different effects and filters that could be used and added to your recorded song.
- With WavePad, you can also convert the file format to another file format that’s viable with your gear.
- The software allows you to trim, edit, mix, remove extra background noise, etc.
6. Audacity
The software where songs could be recorded for free is Audacity. The software is being used professionally. With Audacity, you can also check that whether you can share your recording on various platforms or not. The song recording software promises to deliver high-quality results. Some more features of this software are:

- The Audacity program is portable. It could be used for pitch correction.
- The song recorderis free of ads which helps to provide hassle-free work.
- Another amazing thing about Audacity software is the support for the VST plugin.
7. Windows Voice Recorder
This song recording software is merely for Windows users. This is the default recording software designed for Windows operating system by Microsoft. The precious name was Sound Recorder. In the coming part, we will share its features with you:

- After you have completely recorded the song, it grants you the very basic tools to edit your recording.
- In your recorded song, you can add markers to identify some special moments.
- As Windows Voice Recorder is the default recorder for Windows operating system, so it is free.
8. Apple GarageBand
Apple GarageBand is another brilliant song recording software. The software is not just a recorder; but instead, it is also a musical workstation. The available effects can be used and added to your songs to make new and unique musical numbers. It has crazy impressive features that are shared below:

- The software is completely free to work with.
- Apple GarageBand has a very intuitive and modern user interface.
- The software is very strong as music can be created without instruments.
9. Adobe Audition
One of the best things about Adobe Audition is that it is a very advanced program when it comes to song recording on this software. This tool is used by professionals. They even recommend this software to beginners so that they can learn and work perfectly. Let us highlight more of its features:

- The song recording platform can also be used to create brilliant podcasts.
- With Adobe Audition, you can integrate the song recording with the music clips and make it more professional.
- The song recording softwareincludes multi-track, wave editing, and lastly, audio restoration.
10. Apowersoft Streaming Audio Recorder
Last but not least, let us talk about the Apowersoft Streaming Audio Recorder. This is the best song recorder. With Apowersoft recorder, you can convert the format of the audio to device-compatible format. The recorder offers a lot of practical functions. It has some fascinating features that are given below.

- The recorder supports various file formats like MP3, WMA, M4A, and others.
- The most fantastic feature of Apowersoft Streaming Audio Recorder is its auto addition of ID3 tags for your music file.
- The recorder has the easiest interface. It promises to record and always deliver songs of high quality.
Final Words
The article above is all you need in today’s world, where you cannot survive without songs. Even if you don’t have internet access, you can still enjoy offline songs. This all is possible if you use good song recording software. In this article, we shared 10 different and best recording software for this purpose.
2. FLStudio
Another song recording software that could be used to record songs to enjoy them later is FL Studio. With this software, you can easily compose, edit, mix and also record songs. Its amazing nature lets you create sound patterns and sequencing.
FL Studio has a flexible interface as the user can adjust and resize the interface. The recording software is very easy to use. Along with that, it is very lightweight. Let us share some more features of FLStudio:
- FL Studio includes a lot of plugins. Approximately it includes more than 80.
- The song recordersupports both Windows and Mac.
- The software also supports MIDI (Musical Instrument Digital Interface).
- The users receive free updates for FL Studio. It is also highly customizable.
3. Leawo Music Recorder
With Leawo Music Recorder, you can record your favorite songs. The tool has a lot more than just recording like it contains a task scheduler, recording album, cover finder, etc. Using a Leawo recorder, you can record songs from various platforms like YouTube, AOL Music, and many others.
The best part of Leawo recording software is that you can record with the mic as well as with the other built-in input audio. Some more features of the Leawo music recorder are:
- By using the Task Scheduler, you can record your songs and set the start and end duration.
- Leawo Music Recorder only supports Windows.
- You can easily manage the recorded song file and also edit it accordingly.
4. GilliSoft Audio Recorder Pro
By using Gillisoft Audio Recorder, you can easily record songs from various platforms like YouTube, Pandora, and other streaming audio websites. The software allows time-triggered recording. In case you want to learn more about the Gilisoft Audio Recorder, then here are its features:
- With Gilisoft recorder, you can save the files in WAV, MP3, OGG, or WMA files.
- The reordered songs can be played on a PC, MP3 player, or the car’s audio system.
- The streaming audio recorder is connected directly to the sound card. With this, you can record perfect voices.
5. WavePad
Another very powerful song recorder where even beginners can work easily is WavePad. The layout and the interface of the software are very smooth, intuitive and it encourages a good workflow. WavePad allows you to customize the toolbar. Let us share with you the features of WavePad:
- WavePad has a lot of different effects and filters that could be used and added to your recorded song.
- With WavePad, you can also convert the file format to another file format that’s viable with your gear.
- The software allows you to trim, edit, mix, remove extra background noise, etc.
6. Audacity
The software where songs could be recorded for free is Audacity. The software is being used professionally. With Audacity, you can also check that whether you can share your recording on various platforms or not. The song recording software promises to deliver high-quality results. Some more features of this software are:
- The Audacity program is portable. It could be used for pitch correction.
- The song recorderis free of ads which helps to provide hassle-free work.
- Another amazing thing about Audacity software is the support for the VST plugin.
7. Windows Voice Recorder
This song recording software is merely for Windows users. This is the default recording software designed for Windows operating system by Microsoft. The precious name was Sound Recorder. In the coming part, we will share its features with you:
- After you have completely recorded the song, it grants you the very basic tools to edit your recording.
- In your recorded song, you can add markers to identify some special moments.
- As Windows Voice Recorder is the default recorder for Windows operating system, so it is free.
8. Apple GarageBand
Apple GarageBand is another brilliant song recording software. The software is not just a recorder; but instead, it is also a musical workstation. The available effects can be used and added to your songs to make new and unique musical numbers. It has crazy impressive features that are shared below:
- The software is completely free to work with.
- Apple GarageBand has a very intuitive and modern user interface.
- The software is very strong as music can be created without instruments.
9. Adobe Audition
One of the best things about Adobe Audition is that it is a very advanced program when it comes to song recording on this software. This tool is used by professionals. They even recommend this software to beginners so that they can learn and work perfectly. Let us highlight more of its features:
- The song recording platform can also be used to create brilliant podcasts.
- With Adobe Audition, you can integrate the song recording with the music clips and make it more professional.
- The song recording softwareincludes multi-track, wave editing, and lastly, audio restoration.
10. Apowersoft Streaming Audio Recorder
Last but not least, let us talk about the Apowersoft Streaming Audio Recorder. This is the best song recorder. With Apowersoft recorder, you can convert the format of the audio to device-compatible format. The recorder offers a lot of practical functions. It has some fascinating features that are given below.
- The recorder supports various file formats like MP3, WMA, M4A, and others.
- The most fantastic feature of Apowersoft Streaming Audio Recorder is its auto addition of ID3 tags for your music file.
- The recorder has the easiest interface. It promises to record and always deliver songs of high quality.
Final Words
The article above is all you need in today’s world, where you cannot survive without songs. Even if you don’t have internet access, you can still enjoy offline songs. This all is possible if you use good song recording software. In this article, we shared 10 different and best recording software for this purpose.
Also read:
- Updated Peer-to-Peer Dialogue Hubs A Review of Reliable, User-Friendly & Amusing Applications for 2024
- 10 Best Nature Sounds Apps for iOS and Android
- New 2024 Approved Discover Top-Rated Software for Silencing Unwanted Sounds in Your Recordings
- Updated Cutting-Edge 11 Mobile Audio Tools for Home Studios
- New Live Audio Capture Techniques for Todays Streaming Platforms
- Skype Vocalizer Master the Art of Sound Alteration in Digital Calls
- New Comprehensive Alternatives Choosing the Right Digital Recording Software for 2024
- New 2024 Approved Unveiling the Premier Windows 10 Audio Blenders for Enhanced Sound Quality
- Updated 2024 Approved Harnessing AI for Audio to Text Conversion in the New Decade
- Beatmaking Breakdown Top 8 Digital Audio Workstations (DAWs) For Mac & PC Enthusiasts
- New In 2024, Mastering Seamless Scene Shifts in Video Editing
- New 2024 Approved The Essential Guide to Choosing Your Best Guitar Recording Application
- New Essential Tips for Picking the Ideal Mac-Compatible Music Catalog Tool for 2024
- 2024 Approved Enhancing Your MP4 Visuals with Premium Music Selection Techniques
- 2024 Approved The Beginners Handbook to Saving Your Conversations via Google Voice
- 2024 Approved Mastering Call Recording on Google Voice A Comprehensive Guide
- New 2024 Approved Top 6 No-Cost Web-Based Sound Crafting Tools
- Updated Must-Try List of Prime Song Capture Technology for Fans for 2024
- Updated In 2024, Harmonizing Time and Tone The Guide to Changing Audio Tempo and Octave in Adobe Rush
- Updated The Ultimate List 8 Best Audio Starts to Boost Your Youtuber Profile
- Updated REAPER Recording Software Features, Reviews and Tutorial
- Updated 2024 Approved Mastering Sound Separation Techniques for Isolating Audio From Videos
- Updated In 2024, The Art of Easing Audio Levels Keyframe Control in Filmora for Mac Users
- Updated Perfected Acoustic Parameters for Electronics Optimization
- Updated Mastering Sound Quality Eliminating Unwanted Audio From Recording Spaces
- Updated Perfected Acoustic Parameters for Electronics Optimization for 2024
- Updated In 2024, Premier Vocal Transformation Suite Unveiling the Top Singing Audio Enhancer
- 2024 Approved The Ultimate Step-by-Step on Incorporating Sound Into Videos Using Magix
- Elevate Your Listening Experience Top 10 Audio Compressors and Expanders for Windows (2 Written by an AI Developer)
- Tidal Transformations Using Discords Clownfish Voice Filter for a Unique Skype Experience for 2024
- 2024 Approved Top-Rated Speech-to-Text Applications for Mobile Devices
- Updated In 2024, Audacity Mastery Enhancing Your Podcast Sound and Delivery
- Updated 2024 Approved Understanding Enhanced Functionality in Nero WaveEdito As
- Updated 2024 Approved Auditory Access From MP4 An Assembled List of Simple Steps to Tap Into Sound
- Updated In 2024, 10 Best Voice Recorder for PC
- New 2024 Approved BeatBank Your Digital Library of DJ Masterpieces
- New Expanding Your Expression Methods for Adapting Your Natural Voice for 2024
- Updated In 2024, Introduction Guide Mastering Wave Editor Tools and Techniques
- Updated Universal Ledger of Podcast Navigation Points and Directories for 2024
- New 2024 Approved Decoding Ditties Techniques to Pinpoint Songs Without Music Recognition Apps
- New In 2024, Percussive Purge Mastering the Art of Drum-Free Music Online
- New 2024 Approved Mastering Melody Match Identifying Tunes on Your iPhone Devices
- New In 2024, Recommendations for Music Video Editors
- Updated Music Without Boundaries Enjoy Pristine Audio for ZERO Cost
- New ClearSound Cutter Mastering Silence in Your Recordings for 2024
- New In 2024, Cutting-Edge Free Digital Audio Equalizer Utilities
- In 2024, An Insiders Look 6 Exemplary Chrome OS Gadgets for Exceptional Voice Alteration Experiences - CreativeSuiteLumiere
- In 2024, How Can Meizu 21Mirror Share to PC? | Dr.fone
- Updated Download the Best Video Editor for Mac Splice Video Editor for 2024
- In 2024, Does find my friends work on Honor Magic 5 Lite | Dr.fone
- Android Safe Mode - How to Turn off Safe Mode on Oppo K11 5G? | Dr.fone
- In 2024, Unlock Your Infinix Hot 40 Pro Phone with Ease The 3 Best Lock Screen Removal Tools
- In 2024, How to Spy on Text Messages from Computer & Vivo S18 Pro | Dr.fone
- In 2024, How to Unlock Vivo Y27 4G Phone with Broken Screen
- Apple iPhone 15 Plus Mirror to PC? Top Apps You Must Know | Dr.fone
- In 2024, Fixing Foneazy MockGo Not Working On Honor 100 | Dr.fone
- In 2024, The 10 Best Tools to Bypass iCloud Activation Lock On Apple iPhone 14 Pro You Should Try Out
- In 2024, How to Transfer Contacts from Samsung Galaxy F54 5G to Other Android Devices Using Bluetooth? | Dr.fone
- In 2024, Top 10 Password Cracking Tools For Infinix Smart 7
- 2024 Approved The Battle for Your TV Time TiVo vs Comcasts X1
- How To Unlock A Found Apple iPhone XS? | Dr.fone
- In 2024, How to Change Credit Card from Your iPhone 12 Apple ID and Apple Pay
- A Step-by-Step Guide on Using ADB and Fastboot to Remove FRP Lock from your HTC U23 Pro
- Updated 2024 Approved OS X Mavericks MP4 Editing Software Top Picks
- Best Anti Tracker Software For Honor 90 Lite | Dr.fone
- Android Unlock Code Sim Unlock Your Vivo Y36i Phone and Remove Locked Screen
- New Edit Videos Like a Pro Microsoft Video Editor for Windows 10/8/7
- In 2024, A Guide Tecno Camon 20 Wireless and Wired Screen Mirroring | Dr.fone
- Updated 2024 Approved 5 Tips for Faster Editing in Filmora Video Editor
- In 2024, Is GSM Flasher ADB Legit? Full Review To Bypass Your OnePlus Ace 3 Phone FRP Lock
- How to recover old messages from your Oppo A1x 5G
- How Do You Unlock your iPhone XS Max? Learn All 4 Methods
- Forgot Pattern Lock? Heres How You Can Unlock Honor 90 GT Pattern Lock Screen
- In 2024, The Best iSpoofer Alternative to Try On Tecno Camon 20 | Dr.fone
- What is Fake GPS Location Pro and Is It Good On Samsung Galaxy A24? | Dr.fone
- New In 2024, Discover the Top 12 Audio Converters A Comprehensive Guide
- In 2024, How To Enable USB Debugging on a Locked Realme 11 Pro+ Phone
- Updated 2024 Approved Free MOV Video Concatenation 5 Best Tools to Get the Job Done
- In 2024, Preparation to Beat Giovani in Pokemon Go For Realme 11 Pro+ | Dr.fone
- In 2024, 8 Ways to Transfer Photos from Infinix Hot 40 to iPhone Easily | Dr.fone
- How to Repair Broken video files of X100 Pro?
- New 2024 Approved Minitool Movie Maker Worth the Hype? Review, Ratings, and Alternative Choices
- 7 Solutions to Fix Error Code 963 on Google Play Of OnePlus Open | Dr.fone
- 4 Feasible Ways to Fake Location on Facebook For your Samsung Galaxy S24 Ultra | Dr.fone
- How To Enable USB Debugging on a Locked Vivo Phone
- In 2024, Why Your WhatsApp Location is Not Updating and How to Fix On Poco C65 | Dr.fone
- 2024 Approved Top 5 Best Free AVI Video Rotators
- Best Pokemons for PVP Matches in Pokemon Go For Oppo Find N3 | Dr.fone
- 4 Ways to Transfer Music from Samsung Galaxy F04 to iPhone | Dr.fone
- In 2024, How to Mirror PC to Apple iPhone 6s? | Dr.fone
- Title: Updated 2024 Approved The Essential Guide to REAPER Tools & Techniques for New Users
- Author: Paul
- Created at : 2024-05-05 06:05:38
- Updated at : 2024-05-06 06:05:38
- Link: https://voice-adjusting.techidaily.com/updated-2024-approved-the-essential-guide-to-reaper-tools-and-techniques-for-new-users/
- License: This work is licensed under CC BY-NC-SA 4.0.
