
:max_bytes(150000):strip_icc():format(webp)/GettyImages-1164718779-aa87dac78cd44ad7b71e76c27adc7e9a.jpg)
Updated 2024 Approved Mastering Frequency Adjustment in Audacity Without Compromising Sound Fidelity
Mastering Frequency Adjustment in Audacity Without Compromising Sound Fidelity
You may raise or lower the pitch of a pre-recorded song. Likewise, you may apply the pitch-changing effect in real-time sound recording. Change in pitch affects your noise in certain ways. For instance, it can help you sound younger. Similarly, it can convert the male voice into a female voice. Another notable use of the pitch-changing technique is that you can produce sounds like cartoons. So, changing pitch can add a unique touch to your voice. You can also change pitch when recording in Audacity. The following article covers details about the Audacity change pitch feature. Let’s get started.
In this article
01 What is pitch, and how does it work?
02 How to Change Pitch in Audacity?
Part 1: What is pitch, and how does it work?
Not all sounds are the same. Some vary in terms of amplitude, which makes them loud or quiet. In contrast, others vary in terms of pitch, which makes them high or low. Pitch is used to differentiate between the acute and flat notes in a sound wave. High-pitched sounds are likely to be shrilling, whereas the lower-pitched will be bassy. Pitch depends upon the frequency of the sound waves producing them. In short, notes at a higher frequency are high-pitched.
On the contrary, notes at lower frequencies are low-pitched. Changing a pitch of noise from low to high or vice versa is an art. Thus, sound recording and editing applications like Audacity come with the in-built effect that enables you to change the pitch of a sound.
Part 2: How to Change Pitch in Audacity?
Sound editing is becoming increasingly popular in music and other relevant industries. Several applications offer sound editing tools to serve the needs of the people. Pitch-changing is one of the common tools that people look for in sound editors.
Audacity is one of the notable software that allows users to change the pitch of the voice. It comes with an Audacity pitch shift mechanism to facilitate users. So, if you are editing sound in Audacity, changing the pitch is just a matter of a few clicks. Are you still wondering how you can apply the Audacity change pitch technique when editing? Here’s how you can do it in simple steps.
Step 1: Select the audio portion
Launch Audacity and add sound recordings you want to edit. Click on the timeline and drag to select the portion of the sound.
Note: Only the portion whose pitch you want to change.

Step 2: Open Effect menu
Click on the Effect tab at the top right of the screen next to Generate. Select Pitch Change from the drop-down menu.
Note: You can also make other changes, such as Change Speed and Change Tempo option will let you alter the speed of the sound. So, the pitch can also be altered using this process.

Step 3: Adjust pitch
Drag the slider to alter the pitch of the sound and press the OK button to apply changes.
Note: To increase pitch, slide towards the right. Similarly, slide towards the left to a lower pitch. In addition, the pitch can also be changed by configuring From and To parameters.

Bonus Section: How to Adjust Sound Louder in Audacity?
Volume in an audio file may or may not be ideal for use. Sometimes, the sound is too loud or low. Audacity can help you in such a situation. So, if you are editing sound recordings in Audacity, you can also fix the volume of the sound. The good thing to note is that you can adjust the sound in both directions, which implies you can easily amplify or reduce the volume in these open-source applications. Are you interested in knowing about the volume adjustment process in Audacity? If yes, we have summarized the process in simple steps. Let’s take a look.
Step 1: Add an audio file
Launch the software and click on File. Select Open and select the desired audio.
Note: It is not recommended to change the volume through the playback volume knob at the top right corner of the screen, as this will only increase the volume in your device. However, the actual volume of the audio will remain unchanged.

Step 2: Increase/Decrease audio gain
Change the gain of the audio at the left-hand side of the screen. Move the slider to adjust the volume to the desired level.

Note: Alternatively, you may also increase or increase the volume through the amplification process. To use this method, select the audio portion, access Effect, and tap Amplify. Tick allow clipping box and move the slider to set the volume of the sound.
Conclusion
There are high chances of audio sound not being in the required pitch or volume. Plus, you may also need to change the sound characteristics of an audio file for specific use. So, if this is the case, the Audacity change pitch technique is all you need to learn. Thus, we have summarized the process of changing pitch and volume in a step-by-step guide in this article. Hopefully, all your concerns will have been addressed.
02 How to Change Pitch in Audacity?
Part 1: What is pitch, and how does it work?
Not all sounds are the same. Some vary in terms of amplitude, which makes them loud or quiet. In contrast, others vary in terms of pitch, which makes them high or low. Pitch is used to differentiate between the acute and flat notes in a sound wave. High-pitched sounds are likely to be shrilling, whereas the lower-pitched will be bassy. Pitch depends upon the frequency of the sound waves producing them. In short, notes at a higher frequency are high-pitched.
On the contrary, notes at lower frequencies are low-pitched. Changing a pitch of noise from low to high or vice versa is an art. Thus, sound recording and editing applications like Audacity come with the in-built effect that enables you to change the pitch of a sound.
Part 2: How to Change Pitch in Audacity?
Sound editing is becoming increasingly popular in music and other relevant industries. Several applications offer sound editing tools to serve the needs of the people. Pitch-changing is one of the common tools that people look for in sound editors.
Audacity is one of the notable software that allows users to change the pitch of the voice. It comes with an Audacity pitch shift mechanism to facilitate users. So, if you are editing sound in Audacity, changing the pitch is just a matter of a few clicks. Are you still wondering how you can apply the Audacity change pitch technique when editing? Here’s how you can do it in simple steps.
Step 1: Select the audio portion
Launch Audacity and add sound recordings you want to edit. Click on the timeline and drag to select the portion of the sound.
Note: Only the portion whose pitch you want to change.
Step 2: Open Effect menu
Click on the Effect tab at the top right of the screen next to Generate. Select Pitch Change from the drop-down menu.
Note: You can also make other changes, such as Change Speed and Change Tempo option will let you alter the speed of the sound. So, the pitch can also be altered using this process.
Step 3: Adjust pitch
Drag the slider to alter the pitch of the sound and press the OK button to apply changes.
Note: To increase pitch, slide towards the right. Similarly, slide towards the left to a lower pitch. In addition, the pitch can also be changed by configuring From and To parameters.
Bonus Section: How to Adjust Sound Louder in Audacity?
Volume in an audio file may or may not be ideal for use. Sometimes, the sound is too loud or low. Audacity can help you in such a situation. So, if you are editing sound recordings in Audacity, you can also fix the volume of the sound. The good thing to note is that you can adjust the sound in both directions, which implies you can easily amplify or reduce the volume in these open-source applications. Are you interested in knowing about the volume adjustment process in Audacity? If yes, we have summarized the process in simple steps. Let’s take a look.
Step 1: Add an audio file
Launch the software and click on File. Select Open and select the desired audio.
Note: It is not recommended to change the volume through the playback volume knob at the top right corner of the screen, as this will only increase the volume in your device. However, the actual volume of the audio will remain unchanged.
Step 2: Increase/Decrease audio gain
Change the gain of the audio at the left-hand side of the screen. Move the slider to adjust the volume to the desired level.
Note: Alternatively, you may also increase or increase the volume through the amplification process. To use this method, select the audio portion, access Effect, and tap Amplify. Tick allow clipping box and move the slider to set the volume of the sound.
Conclusion
There are high chances of audio sound not being in the required pitch or volume. Plus, you may also need to change the sound characteristics of an audio file for specific use. So, if this is the case, the Audacity change pitch technique is all you need to learn. Thus, we have summarized the process of changing pitch and volume in a step-by-step guide in this article. Hopefully, all your concerns will have been addressed.
Step-by-Step Guide: Swapping Out the Soundtrack in Your Movie File
Video editing is inclusive of editing the audio track. You may be working on background scores, original soundtracks, and different kinds of sound effects. These tasks would need you to edit or replace audio in the video. You may have to mix other audio tracks to have one score. From sound engineering to finely editing every track being mixed, it is an ever expanding and exciting technical niche that will depend largely on a plethora of tools, so in this article, we will let you how to replace audio in video with 2 methods by using Filmora and Windows Movie Maker.
In this article
01 How to replace audio in video with Filmora
02 How to change audio in video with Windows Movie Maker
Part 1: How to replace audio in video with Filmora
The first method, let us explore how you can replace audio in video with Wondershare Filmora.
To begin with, get a free trial copy of Wondershare Filmora .
For Win 7 or later (64-bit)
For macOS 10.12 or later
Step 1. Import file
Open the application and click ‘ Import once you have downloaded and installed Wondershare Filmora. Please search for the relevant video you wish to edit and load it from the hard disk or the specific folder. You can select multiple videos using ‘ctrl’ and clicking on the chosen files.

Step 2. Drag and drop to the video Timeline
The videos selected will be displayed as thumbnails. Choose a video, hit and click without releasing the click and drag the chosen video to the Video Timeline.

Step 3. Remove the original sound of the video
Right-click on it, and you would see the option of “Audio detach.” Click on it, and the audio file will detach from the video file and get added to Music Timeline.
Press “Delete” on your keyboard, and you will get rid of it. You can save this video without the audio, and you would only have the visuals, unimpaired and unaffected in any way, without the sound.

Step 4. Add a new audio track
You can add a new audio track to the video by choosing royalty sound or music from the Filmora library or importing any audio you like.

Part 2: How to change audio in video with Windows Movie Maker
The second method, Apart from replacing audio by Filmora, you can also make it by Windows Movie Maker. Though it is discontinued to develop a new version, you can still use it in Windows 7. Below are the steps to replace audio in Windows Movie Maker .
Step 1: Import video
First, download and run it. Click Add videos and photos to import video.

Step 2: Turn off the original sound
Click Edit tab > Video volume to turn off the sound by draging the slider to the left.

Step 3: Add audio to video
Click Add music to import the targeted music to Windows Movie Maker. You can select Add music or Add music at the current point.

Step 4: Save project
Click the file icon in the top left corner to save the video. Choose Save movie to export the targeted file.

Wondershare Filmora allows you to replace easily and edit the audio in the video
Unfortunately, no application by default on your desktop or laptop, phone, or tablet would get this done. To replace audio in the video, you would need the help of state of the art software. Fortunately, you have Wondershare Filmora at your disposal.
With Wondershare Filmora, you can replace audio in the video, mute audio, detach the audio, and add audio. You can eliminate background noise, organic noise, sound effects, address the sync problem in a video file, and edit the audio in a video without any extensive training or expertise.
- It has a user-friendly interface which makes things simple even for amateurs.
- It supports all common video and audio formats, including WMV, MOV, FLV, MTS, MP4, etc.
- You can move audio, replace it or add new audio to the video without worrying about general loss, which is loss of quality.
- You can export the edited video with the new or edited audio to various devices, including the cloud and social media sites.
- Compatible with Windows (including Windows 8) & Mac OS X (10.6 and above).
For Win 7 or later (64-bit)
For macOS 10.12 or later
02 How to change audio in video with Windows Movie Maker
Part 1: How to replace audio in video with Filmora
The first method, let us explore how you can replace audio in video with Wondershare Filmora.
To begin with, get a free trial copy of Wondershare Filmora .
For Win 7 or later (64-bit)
For macOS 10.12 or later
Step 1. Import file
Open the application and click ‘ Import once you have downloaded and installed Wondershare Filmora. Please search for the relevant video you wish to edit and load it from the hard disk or the specific folder. You can select multiple videos using ‘ctrl’ and clicking on the chosen files.
Step 2. Drag and drop to the video Timeline
The videos selected will be displayed as thumbnails. Choose a video, hit and click without releasing the click and drag the chosen video to the Video Timeline.
Step 3. Remove the original sound of the video
Right-click on it, and you would see the option of “Audio detach.” Click on it, and the audio file will detach from the video file and get added to Music Timeline.
Press “Delete” on your keyboard, and you will get rid of it. You can save this video without the audio, and you would only have the visuals, unimpaired and unaffected in any way, without the sound.
Step 4. Add a new audio track
You can add a new audio track to the video by choosing royalty sound or music from the Filmora library or importing any audio you like.
Part 2: How to change audio in video with Windows Movie Maker
The second method, Apart from replacing audio by Filmora, you can also make it by Windows Movie Maker. Though it is discontinued to develop a new version, you can still use it in Windows 7. Below are the steps to replace audio in Windows Movie Maker .
Step 1: Import video
First, download and run it. Click Add videos and photos to import video.
Step 2: Turn off the original sound
Click Edit tab > Video volume to turn off the sound by draging the slider to the left.
Step 3: Add audio to video
Click Add music to import the targeted music to Windows Movie Maker. You can select Add music or Add music at the current point.
Step 4: Save project
Click the file icon in the top left corner to save the video. Choose Save movie to export the targeted file.
Wondershare Filmora allows you to replace easily and edit the audio in the video
Unfortunately, no application by default on your desktop or laptop, phone, or tablet would get this done. To replace audio in the video, you would need the help of state of the art software. Fortunately, you have Wondershare Filmora at your disposal.
With Wondershare Filmora, you can replace audio in the video, mute audio, detach the audio, and add audio. You can eliminate background noise, organic noise, sound effects, address the sync problem in a video file, and edit the audio in a video without any extensive training or expertise.
- It has a user-friendly interface which makes things simple even for amateurs.
- It supports all common video and audio formats, including WMV, MOV, FLV, MTS, MP4, etc.
- You can move audio, replace it or add new audio to the video without worrying about general loss, which is loss of quality.
- You can export the edited video with the new or edited audio to various devices, including the cloud and social media sites.
- Compatible with Windows (including Windows 8) & Mac OS X (10.6 and above).
For Win 7 or later (64-bit)
For macOS 10.12 or later
Audio Innovations: 8 Cutting-Edge Cartoon Soundtracks Now Available for Download [2023 Edition]
8 Best Cartoon Sound Effects You Can Download

Benjamin Arango
Mar 27, 2024• Proven solutions
The sound plays a significant role in the videos. Without the right sound effects, your videos become dull. It doesn’t create an impact to grab the attention of the viewers. Especially when it comes to attracting the attention of kids while they watch cartoons.
Are you working on a cartoon video for kids or some animated action cartoons? Use the cartoon sound effects to add more intensity and emotions to the videos. Every time creating a new sound effect for your cartoon video becomes difficult.
If you are on a strict budget, producing new content becomes almost impossible. In such situations, free cartoon sound effects are the best way to enhance your cartoon videos.
In this article, you will learn eight best cartoon sound effects that you can download and make your videos perfect.
8 Best Cartoon Sound Effects Resources
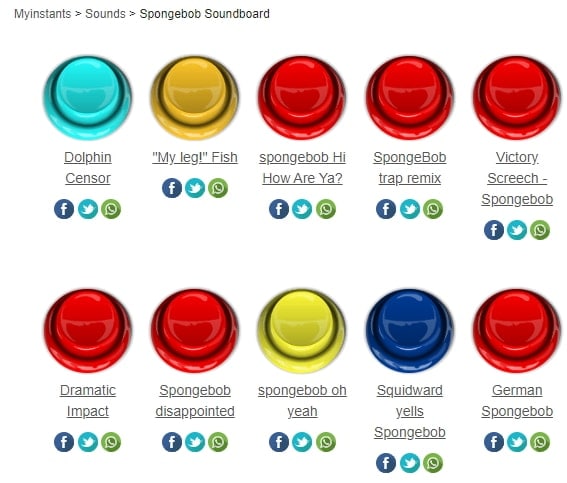
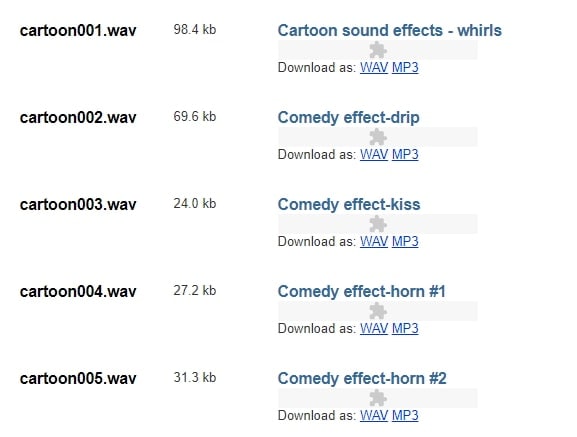
1. Spongebob Sound Effects
MyInstant’s Spongebob soundboard offers a range of cartoon sound effects that can be easily downloaded just by clicking on the Download mp3 sound effect button. You can listen to over 120 classic cartoon sound effects and download it for free. You can also copy the embed link and paste it to your website.
2. Hanna Barbera Sound Effects
From Sounddogs, Hanna Barbera sound effects library, you can find over 2200 cartoon sound effects that are divided into 4 CDs. It has almost all the legendary classic cartoon sound effects from the cartoon shows like Yogi Bear, Huckleberry Hound, the Flintstones, The Jetsons, Quick Draw McGraw, and all the rest of the gang.
You can download the mp3 cartoon sound effects completely free by clicking on the Download ID number mentioned at the right end of each link.
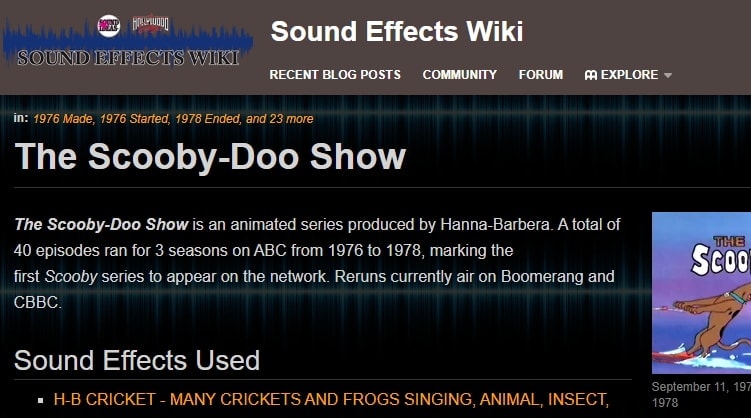
3. Scooby Doo Running Sound
Fandom’s Scooby Doo running sound effects offers all the ideas used in 40 episodes of Scooby Doo throughout the three seasons on ABC. It is over 37000 pages wiki that you can click and browse through the pages to find the right sound effect and download it for free.
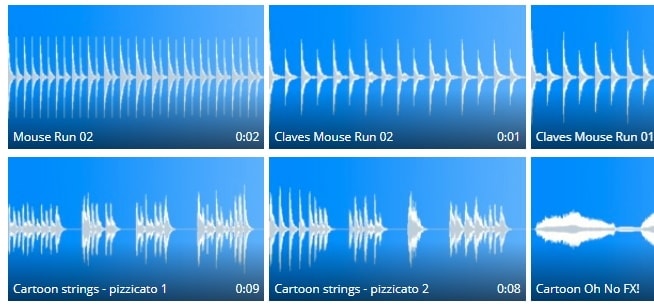
4. Tom and Jerry Sound Effects
Pond5 offers 13 Tom and Jerry sound effects that you can listen by scrolling the cursor over the boxes and download the free preview of cartoon sound effects by clicking on Download Preview.
If you want to download the entire cartoon sound effect, you need to register, log in, and pay for it. There are filters like price, collections, duration, etc. to make your selection more precise.
5. Free SFX
In FreeSFX website, you can find a range of comical cartoon sound effects that includes classic effects like descend, boink, impact, pop, musical, running, rip and snap, bounce spring, slide whistle, squelch and splat, horn and loads more.
You need to log in to the website to download free cartoon sound effects.

6.GRSites
With over 1980 cartoon sound effects, the GRSites is one of the best free sites for downloading both mp3 and WAV files. You can browse from a range of categories to find the best cartoon sound effects for your videos.
7. Cartoon Running Sound Effect
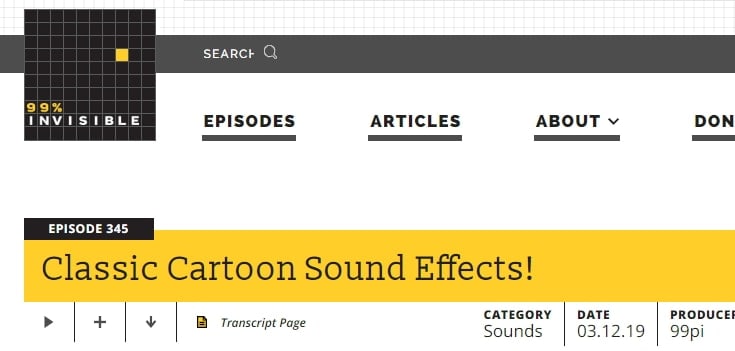
If you are looking for cartoon running sound effect, turn to Episode 345 in 99PercentInvisible. You can download the complete transcript page of around 30 minutes to use it in your video. Use the cartoon running sound effect produced by 99pi to enhance your video.
8. Big Fish Audio
The Big Fish Audio’s cartoon sound FX includes 23 free classic cartoon sound effects. The filters include a range of sound FX types, styles, format, brand, etc.
You can click on the cartoon sound effect and listen to it or add it to your playlist. But, if you wish to download the free cartoon sound effects, you need to register and pay to use the sound effect.

You may also like: How to Extract Audio from Videos on Win/Mac/Phone >>
Conclusion
Make your cartoon videos perfect with the fantastic free cartoon sound effects available for download completely free. With the range of free cartoon sound effects, you don’t need to worry about creating new sounds or expenses. You need to download the free sounds and beautifully enhance it with your creativity. There are several other sites for downloading free cartoon sound effects, but here you can check out some of the trusted ones to use.
Benjamin Arango
Benjamin Arango is a writer and a lover of all things video.
Follow @Benjamin Arango
Benjamin Arango
Mar 27, 2024• Proven solutions
The sound plays a significant role in the videos. Without the right sound effects, your videos become dull. It doesn’t create an impact to grab the attention of the viewers. Especially when it comes to attracting the attention of kids while they watch cartoons.
Are you working on a cartoon video for kids or some animated action cartoons? Use the cartoon sound effects to add more intensity and emotions to the videos. Every time creating a new sound effect for your cartoon video becomes difficult.
If you are on a strict budget, producing new content becomes almost impossible. In such situations, free cartoon sound effects are the best way to enhance your cartoon videos.
In this article, you will learn eight best cartoon sound effects that you can download and make your videos perfect.
8 Best Cartoon Sound Effects Resources
1. Spongebob Sound Effects
MyInstant’s Spongebob soundboard offers a range of cartoon sound effects that can be easily downloaded just by clicking on the Download mp3 sound effect button. You can listen to over 120 classic cartoon sound effects and download it for free. You can also copy the embed link and paste it to your website.
2. Hanna Barbera Sound Effects
From Sounddogs, Hanna Barbera sound effects library, you can find over 2200 cartoon sound effects that are divided into 4 CDs. It has almost all the legendary classic cartoon sound effects from the cartoon shows like Yogi Bear, Huckleberry Hound, the Flintstones, The Jetsons, Quick Draw McGraw, and all the rest of the gang.
You can download the mp3 cartoon sound effects completely free by clicking on the Download ID number mentioned at the right end of each link.
3. Scooby Doo Running Sound
Fandom’s Scooby Doo running sound effects offers all the ideas used in 40 episodes of Scooby Doo throughout the three seasons on ABC. It is over 37000 pages wiki that you can click and browse through the pages to find the right sound effect and download it for free.
4. Tom and Jerry Sound Effects
Pond5 offers 13 Tom and Jerry sound effects that you can listen by scrolling the cursor over the boxes and download the free preview of cartoon sound effects by clicking on Download Preview.
If you want to download the entire cartoon sound effect, you need to register, log in, and pay for it. There are filters like price, collections, duration, etc. to make your selection more precise.
5. Free SFX
In FreeSFX website, you can find a range of comical cartoon sound effects that includes classic effects like descend, boink, impact, pop, musical, running, rip and snap, bounce spring, slide whistle, squelch and splat, horn and loads more.
You need to log in to the website to download free cartoon sound effects.
6.GRSites
With over 1980 cartoon sound effects, the GRSites is one of the best free sites for downloading both mp3 and WAV files. You can browse from a range of categories to find the best cartoon sound effects for your videos.
7. Cartoon Running Sound Effect
If you are looking for cartoon running sound effect, turn to Episode 345 in 99PercentInvisible. You can download the complete transcript page of around 30 minutes to use it in your video. Use the cartoon running sound effect produced by 99pi to enhance your video.
8. Big Fish Audio
The Big Fish Audio’s cartoon sound FX includes 23 free classic cartoon sound effects. The filters include a range of sound FX types, styles, format, brand, etc.
You can click on the cartoon sound effect and listen to it or add it to your playlist. But, if you wish to download the free cartoon sound effects, you need to register and pay to use the sound effect.
You may also like: How to Extract Audio from Videos on Win/Mac/Phone >>
Conclusion
Make your cartoon videos perfect with the fantastic free cartoon sound effects available for download completely free. With the range of free cartoon sound effects, you don’t need to worry about creating new sounds or expenses. You need to download the free sounds and beautifully enhance it with your creativity. There are several other sites for downloading free cartoon sound effects, but here you can check out some of the trusted ones to use.
Benjamin Arango
Benjamin Arango is a writer and a lover of all things video.
Follow @Benjamin Arango
Also read:
- Movie Magic at Work The Crucial Functions and Impact of Every Film Set Team Member for 2024
- New Probing Sound Clarity An Updated Analysis of Cambridges CXU Series for 2024
- Updated How to Fade In and Fade Out Audio in Adobe After Effects Effortlessly
- Harnessing Free Tools to Turn Audio Into Text The Essential Guide with Top Three Strategies (Step by Step) for 2024
- Updated 6 Best Voice Changers for Chromebook Deserve a Try for 2024
- New 2024 Approved Crafting a Commanding Presence in Audio Media with Filmoras Filters
- New Mastering Dynamic Volume Control in Final Cut Pro X An Introduction to Automatic Audio Ducking
- New In 2024, Fusing Sight and Sound Tips for Merging Audio Elements with Visual Content
- New Beat Yourself Up Less Dive Into a World of Free Audio Tracks
- New Unveiling Omegle Understanding Online Chat Rooms and Their Security Implications for 2024
- Premium No-Cost Audio Distortion Reducers for 2024
- In 2024, How to Record Audio on PowerPoint? Guideline for Windows and Mac
- New Top 6 Real-Time Voice Modifiers Unveiling the Best Tools for 2024
- In 2024, Insightful Exploration Discovering the Finest Zero-Price Free Audio Design Platforms on Windows
- New Expert Audio Tidying Up Techniques and Applications to Purify Soundtracks
- Searching for Realistic Church Bells Acoustics for 2024
- The Guide to Flawless Acoustics Techniques for Reducing Pitch-Shifting Distortion in Visual Media for 2024
- Updated In 2024, BeatBank Your Digital Library of DJ Masterpieces
- Updated 2024 Approved Sonic Treasure Trove The 8 Best Websites to Explore a World of High-Quality, Gratis Audio Enhancements
- Mastering Microphone Use in Microsoft PowerPoint Windows & macOS Guide for 2024
- New Mac Users Top 4 Choices for Exquisite Music Editing Software
- New The Soundscapes Alliance Techniques to Amalgamate Diverse Audio for Seamless Videos
- Updated Essential List of Cost-Free Audio to Transcription Tools for the Modern User
- New In 2024, Explore Whispered Complaint Samples
- New Navigating Internet-Based Audio Manipulation Techniques
- Updated Film Set Harmony Exploring Every Members Critical Function in Movie-Making
- Updated Master the Art of Audio Recording Top 8 Software Platforms to Achieve Professional Mixing and Mastering Results
- Updated Unlock Free Vocal Manipulation Expertise with In-Depth Guide to Voice Editing via Filmora for 2024
- Fake Android Location without Rooting For Your Asus ROG Phone 7 Ultimate | Dr.fone
- How To Transfer Messages From Apple iPhone 6s Plus to other iPhone All iOS Versions | Dr.fone
- Remove the lock of S17 Pro
- How to Factory Reset Xiaomi 14 in 5 Easy Ways | Dr.fone
- Top 10 Nokia G42 5G Android SIM Unlock APK
- Fix Cant Take Screenshot Due to Security Policy on Samsung Galaxy XCover 7 | Dr.fone
- How to Detect and Remove Spyware on Samsung Galaxy M14 5G? | Dr.fone
- In 2024, Unlock Apple iPhone 7 Without Passcode Easily
- Updated New Essential Details of Making Perfect Talking Face
- 3 Ways to Fake GPS Without Root On Motorola Moto G23 | Dr.fone
- Does Samsung Galaxy Z Fold 5 support MKV video files?
- iSpoofer is not working On Motorola Edge+ (2023)? Fixed | Dr.fone
- In 2024, How to Change/Fake Your Lava Blaze Pro 5G Location on Viber | Dr.fone
- In 2024, How to Bypass FRP on Oppo A56s 5G?
- How to Transfer Photos From Samsung Galaxy F14 5G to Samsung Galaxy S21 Ultra | Dr.fone
- In 2024, How to Change/Fake Your Honor X9b Location on Viber | Dr.fone
- How to Reset OnePlus 12 without Losing Data | Dr.fone
- In 2024, Full Tutorial to Bypass Your Vivo T2 5G Face Lock?
- How to Retrieve deleted photos on Itel A05s
- Title: Updated 2024 Approved Mastering Frequency Adjustment in Audacity Without Compromising Sound Fidelity
- Author: Paul
- Created at : 2024-05-05 05:56:59
- Updated at : 2024-05-06 05:56:59
- Link: https://voice-adjusting.techidaily.com/updated-2024-approved-mastering-frequency-adjustment-in-audacity-without-compromising-sound-fidelity/
- License: This work is licensed under CC BY-NC-SA 4.0.
