
:max_bytes(150000):strip_icc():format(webp)/how-to-set-up-speech-to-text-on-android-0-928c48ab121248f9aa543a136d971f9a.jpg)
Updated 2024 Approved Beyond the Script Delving Into the World of Anime Dubbing and Its Impact
Beyond the Script: Delving Into the World of Anime Dubbing and Its Impact
All about Anime Dubbing

Shanoon Cox
Mar 27, 2024• Proven solutions
Anime might have been originated from Japan, but today it has become a worldwide phenomenon with millions of fans out there. Since most of the anime series are in Japanese, they are dubbed in different languages for their global audience. Though, anime dubbing is an art in itself as it takes a lot of effort to provide a seamless entertainment experience to others. In this post, I’m going to make you familiar with the process that goes behind anime dubbing and how you can master it in no time.

- Part 1: What is the Art of Anime Dubbing?
- Part 2: Why is Voicing Important in an Anime?
- Part 3: What is the Process of Anime Dubbing?
- Part 4: Is Anime Dubbing Enjoyable or Painful?
- Part 5: Anime Dubbing Tips for Beginners
What is the Art of Anime Dubbing?

http://animeyourway.blogspot.com/
There are tons of anime out there, but most of them are originally made in Japanese. To make them appealing to an international audience, the concepts of dubbing and subbing are implemented. In subbing, we simply add subtitles to the scene by placing its strip at the bottom, which is comparatively easier.
On the other hand, Anime dubbing is a more complex process in which the original soundtrack in Japanese is first removed from the video. Now, a script is designed for the other language (like English) in which the video has to be dubbed. Afterward, voiceover artists would match the dialogues with the original pace of the video to attain flawless dubbing results. Now, the audience of the second language can also watch the anime with the dubbed soundtrack instead of the Japanese.
In some cases, even after dubbing, subtitles are also added in post-production to get better results.
Why is Voicing Important in an Anime?

Anime is an art-form and hence, it is should be treated creatively when transitioning into different cultures. The first generation of anime traces to the 1910s in Japan while they became mainstream with Astro Boy that was a hit not only in Japan but in the US as well. Needless to say, the anime industry has grown drastically with over $17 billion worth worldwide.
That’s why it has become more important than ever to focus on anime dubbing and make the content appealing to a vast audience. Too many times, while dubbing, the original nature of a character is lost due to the improper voice transition. Sometimes, there are edits in the script to match the pace of the scene that ends up changing the meaning drastically.
Therefore, to make sure the true essence of the anime is maintained, the concept of voice interpretation is implemented. In this, voiceover artists are taught about their characters and their nature. Instead of bringing their own flair while recording, they are encouraged to voice their characters instead.
What is the Process of Anime Dubbing?
Now when you know the importance of anime dubbing, let’s get to know about the process in detail. Although the overall process can be implemented differently in various countries and studios, the following steps are mostly followed by professionals.
Step 1: Transitioning and Translation
This is the foundation of anime dubbing as it helps us in scriptwriting and voiceover. Firstly, the anime is studied by the team, which includes native Japanese experts. For instance, if the anime is about Japanese history or its pop culture, then an expert from the related field is asked to join.
Furthermore, all the dialogues are transcribed and further translated by professionals. To make sure that no cultural norms are lost in the process, a group of people is invited to work on this. If the anime is about pop culture, then it can be a bit tough since some dialogues might lose the original meaning in the translation.
Step 2: Scripting and Adaptation
A mere translation of the anime is not enough as it is needed to fit the scene and should have a flawless transition. For this, scriptwriters take the translated document (for instance, Japanese to English translated version) and start developing a script for that. They will watch the scene simultaneously and would work with voiceover artists as well. In this way, we can avoid any delay or rapid movement between the picture and voiceover audio.
- The new dialogues should be spoken in the same way so that the original speech and the voiceover should be matched.
- A lot of sentences have to be reconstructed entirely since Japanese grammar is pretty different than English. Sometimes, a single word in Japanese might mean a whole sentence in English. This means we need to write the script while matching the pace of the scene and keeping the meaning intact (which can be pretty challenging).
- Scriptwriters need to focus on the way a sentence is delivered and conveyed. If you are not careful, then you will lose out on certain nuances.
- To get an ideal script, you might need to watch the anime and deliver your dialogues back-and-forth. Writers are encouraged to be more adaptive and keep the cultural knowledge of their audience in mind as well.
- If the anime is deeply rooted in Japanese cultural norms that you know your audience won’t understand, then you can abandon it while still being faithful to the original material. For instance, Shin-chan had too many Japanese norms and thus it was re-written in English to include more local terms.
Step 3: Recording and Finishing
After completing the scriptwriting, recording artists work on it to give it a final touch. Although it is recommended for all recording artists to do their voice work together for a seamless amalgamation, sometimes they record their dialogues separately as well.
The recording artists are encouraged to do their bit of research and are made familiar with the anime. During the recording process, artists focus on the “matching flap” movement, which means their dialogues should match with the movement of their character’s lips. For this, they can fasten or slow their speed of dialogue delivery or add bits and pieces in between to give it a personal character.
While it is not possible to be entirely accurate and match the pace, artists try their best by looking at the video while delivering their dialogues. Some mistakes and flubs are bound to happen in the process, but that is what makes anime dubbing so hilarious and creative.
Is Anime Dubbing Enjoyable or Painful?
This is something that a lot of anime fans would like to ask voiceover professionals. Well, it would be subjective and depend on the anime as well as the professionals working on it.
In most of the cases, the process is pretty enjoyable if the artists and writers are fans of anime. Yes, the process can be a bit tedious, but that is the demand of this challenging profession altogether.
Michael Lindsay, who was widely appreciated for his work in the Marmalade Boy, admits how tough the job can be. It requires a lot of rework and the voiceover artists need to go back-and-forth to get the right pace.
Olivia Venegas, who has been a part of the anime dubbing industry for over a decade, admits how the process has changed. Now, production houses are more focused on creating a “localized” version of the anime that their audience can understand instead of keeping it rigid to their original material.
Overall, the change in the anime dubbing process and the presence of better technology has certainly made it more fun and less painful.
Anime Dubbing Tips for Beginners
If you are just starting your career in anime dubbing and would like to improve your work, then consider these expert tips.
- To start with, do your bit of research and make sure you understand the Japanese culture. If the anime is about history or a cultural phenomenon, then get to know about it so that you won’t miss any nuance.
- If you are a voiceover artist, then sit with the scriptwriter during the translation and writing process. This will help you understand their writing process and you can also give suggestions regarding voiceover.
- Focus on your speech and the pace while recording every word. At times, we are needed to eat some words or have to stretch them to match with the movement of the character’s lips.
- Try not to be overdramatic and don’t “act” too much while recording. Consider anime characters as real humans with organic feelings. If you over-do it, then it can become funny and take away the gravity of the scene.
- Apart from your usual research, also watch the body language of your characters and their expressions. You can try to take the same posture and position while delivering any dialogue for a better anime dubbing experience.
- Most importantly, let the transition be more organic and feel free to make some creative choices to own the character. Remember, your aim is to be the character and not let the character become you.
- Lastly, keep in mind your audience while dubbing and make sure that they should relate to the nuances and cultural slangs you have included. While it is suggested to stick to the source material, you can bend it keeping the mindset of your target audience.
That’s a wrap, everyone! I’m sure that after reading this guide, you would be able to know more about anime dubbing and the effort that goes behind it. Although it is a complicated and tiresome process, some new-age tools and applications have made it better. If you are also just starting, then make sure you follow the above-listed tips and be familiar with the available tools. This will help you become a pro and you can certainly level-up your skills with time.
Shanoon Cox
Shanoon Cox is a writer and a lover of all things video.
Follow @Shanoon Cox
Shanoon Cox
Mar 27, 2024• Proven solutions
Anime might have been originated from Japan, but today it has become a worldwide phenomenon with millions of fans out there. Since most of the anime series are in Japanese, they are dubbed in different languages for their global audience. Though, anime dubbing is an art in itself as it takes a lot of effort to provide a seamless entertainment experience to others. In this post, I’m going to make you familiar with the process that goes behind anime dubbing and how you can master it in no time.
- Part 1: What is the Art of Anime Dubbing?
- Part 2: Why is Voicing Important in an Anime?
- Part 3: What is the Process of Anime Dubbing?
- Part 4: Is Anime Dubbing Enjoyable or Painful?
- Part 5: Anime Dubbing Tips for Beginners
What is the Art of Anime Dubbing?
http://animeyourway.blogspot.com/
There are tons of anime out there, but most of them are originally made in Japanese. To make them appealing to an international audience, the concepts of dubbing and subbing are implemented. In subbing, we simply add subtitles to the scene by placing its strip at the bottom, which is comparatively easier.
On the other hand, Anime dubbing is a more complex process in which the original soundtrack in Japanese is first removed from the video. Now, a script is designed for the other language (like English) in which the video has to be dubbed. Afterward, voiceover artists would match the dialogues with the original pace of the video to attain flawless dubbing results. Now, the audience of the second language can also watch the anime with the dubbed soundtrack instead of the Japanese.
In some cases, even after dubbing, subtitles are also added in post-production to get better results.
Why is Voicing Important in an Anime?
Anime is an art-form and hence, it is should be treated creatively when transitioning into different cultures. The first generation of anime traces to the 1910s in Japan while they became mainstream with Astro Boy that was a hit not only in Japan but in the US as well. Needless to say, the anime industry has grown drastically with over $17 billion worth worldwide.
That’s why it has become more important than ever to focus on anime dubbing and make the content appealing to a vast audience. Too many times, while dubbing, the original nature of a character is lost due to the improper voice transition. Sometimes, there are edits in the script to match the pace of the scene that ends up changing the meaning drastically.
Therefore, to make sure the true essence of the anime is maintained, the concept of voice interpretation is implemented. In this, voiceover artists are taught about their characters and their nature. Instead of bringing their own flair while recording, they are encouraged to voice their characters instead.
What is the Process of Anime Dubbing?
Now when you know the importance of anime dubbing, let’s get to know about the process in detail. Although the overall process can be implemented differently in various countries and studios, the following steps are mostly followed by professionals.
Step 1: Transitioning and Translation
This is the foundation of anime dubbing as it helps us in scriptwriting and voiceover. Firstly, the anime is studied by the team, which includes native Japanese experts. For instance, if the anime is about Japanese history or its pop culture, then an expert from the related field is asked to join.
Furthermore, all the dialogues are transcribed and further translated by professionals. To make sure that no cultural norms are lost in the process, a group of people is invited to work on this. If the anime is about pop culture, then it can be a bit tough since some dialogues might lose the original meaning in the translation.
Step 2: Scripting and Adaptation
A mere translation of the anime is not enough as it is needed to fit the scene and should have a flawless transition. For this, scriptwriters take the translated document (for instance, Japanese to English translated version) and start developing a script for that. They will watch the scene simultaneously and would work with voiceover artists as well. In this way, we can avoid any delay or rapid movement between the picture and voiceover audio.
- The new dialogues should be spoken in the same way so that the original speech and the voiceover should be matched.
- A lot of sentences have to be reconstructed entirely since Japanese grammar is pretty different than English. Sometimes, a single word in Japanese might mean a whole sentence in English. This means we need to write the script while matching the pace of the scene and keeping the meaning intact (which can be pretty challenging).
- Scriptwriters need to focus on the way a sentence is delivered and conveyed. If you are not careful, then you will lose out on certain nuances.
- To get an ideal script, you might need to watch the anime and deliver your dialogues back-and-forth. Writers are encouraged to be more adaptive and keep the cultural knowledge of their audience in mind as well.
- If the anime is deeply rooted in Japanese cultural norms that you know your audience won’t understand, then you can abandon it while still being faithful to the original material. For instance, Shin-chan had too many Japanese norms and thus it was re-written in English to include more local terms.
Step 3: Recording and Finishing
After completing the scriptwriting, recording artists work on it to give it a final touch. Although it is recommended for all recording artists to do their voice work together for a seamless amalgamation, sometimes they record their dialogues separately as well.
The recording artists are encouraged to do their bit of research and are made familiar with the anime. During the recording process, artists focus on the “matching flap” movement, which means their dialogues should match with the movement of their character’s lips. For this, they can fasten or slow their speed of dialogue delivery or add bits and pieces in between to give it a personal character.
While it is not possible to be entirely accurate and match the pace, artists try their best by looking at the video while delivering their dialogues. Some mistakes and flubs are bound to happen in the process, but that is what makes anime dubbing so hilarious and creative.
Is Anime Dubbing Enjoyable or Painful?
This is something that a lot of anime fans would like to ask voiceover professionals. Well, it would be subjective and depend on the anime as well as the professionals working on it.
In most of the cases, the process is pretty enjoyable if the artists and writers are fans of anime. Yes, the process can be a bit tedious, but that is the demand of this challenging profession altogether.
Michael Lindsay, who was widely appreciated for his work in the Marmalade Boy, admits how tough the job can be. It requires a lot of rework and the voiceover artists need to go back-and-forth to get the right pace.
Olivia Venegas, who has been a part of the anime dubbing industry for over a decade, admits how the process has changed. Now, production houses are more focused on creating a “localized” version of the anime that their audience can understand instead of keeping it rigid to their original material.
Overall, the change in the anime dubbing process and the presence of better technology has certainly made it more fun and less painful.
Anime Dubbing Tips for Beginners
If you are just starting your career in anime dubbing and would like to improve your work, then consider these expert tips.
- To start with, do your bit of research and make sure you understand the Japanese culture. If the anime is about history or a cultural phenomenon, then get to know about it so that you won’t miss any nuance.
- If you are a voiceover artist, then sit with the scriptwriter during the translation and writing process. This will help you understand their writing process and you can also give suggestions regarding voiceover.
- Focus on your speech and the pace while recording every word. At times, we are needed to eat some words or have to stretch them to match with the movement of the character’s lips.
- Try not to be overdramatic and don’t “act” too much while recording. Consider anime characters as real humans with organic feelings. If you over-do it, then it can become funny and take away the gravity of the scene.
- Apart from your usual research, also watch the body language of your characters and their expressions. You can try to take the same posture and position while delivering any dialogue for a better anime dubbing experience.
- Most importantly, let the transition be more organic and feel free to make some creative choices to own the character. Remember, your aim is to be the character and not let the character become you.
- Lastly, keep in mind your audience while dubbing and make sure that they should relate to the nuances and cultural slangs you have included. While it is suggested to stick to the source material, you can bend it keeping the mindset of your target audience.
That’s a wrap, everyone! I’m sure that after reading this guide, you would be able to know more about anime dubbing and the effort that goes behind it. Although it is a complicated and tiresome process, some new-age tools and applications have made it better. If you are also just starting, then make sure you follow the above-listed tips and be familiar with the available tools. This will help you become a pro and you can certainly level-up your skills with time.
Shanoon Cox
Shanoon Cox is a writer and a lover of all things video.
Follow @Shanoon Cox
“Exploring the Best Audio Blending Software - Top Picks , Free of Charge!”
Top 10 Best Audio Mixer Software for FREE

Benjamin Arango
Mar 27, 2024• Proven solutions
You may be a musician who wants to record their music, or just a person wanting to develop his custom ringtone. In either case, a physical or virtual audio mixer is required, whether it be analog or a dedicated audio mixer software.
But you need to have some technical knowledge to make optimal use and funk up your music/sound.
Here we are to give you the knowledge you need and some amazing audio mixer software that could be perfect for you. So buckle up, and get ready to level up the harmoniousness of your creativity!
You will Learn :
- Part 1. 10 Best Sound/Audio Mixer Software - [Video Guide]
- Part 2. All You Know About Audio Mixer
- Part 3. What to Consider While Choosing an Audio Mixer Software?
- Part 4. Basic Audio Mixer Settings You Should Know
- Part 5. Why Audio Mixer Software?
Part 1. 10 Best Sound/Audio Mixer Software
Whether you are pursuing a music career, making a video for a movie clip, or merely creating some hard-core beats for fun, you’ll be needing good sound mixing software.
Selecting an audio mixer software perfect for your requirements and available resources is not an easy task.
Some of them are for free while some charge for it, some offer limited features. At the same time, some are specific to a certain operating system, the options and availabilities are endless, and choosing among them is a hell of a daunting task.
But no need to stress out because we are here to take your burden on our shoulders and help you choose exactly what you want! So sit back and relax!
| 1 - Wondershare Filmora | 2 - Adobe Audition |
|---|---|
| 3 - Logic Pro X | 4 - Audacity |
| 5 - Reaper | 6 - Fl Studio |
| 7 - SoundAtion | 8 - HyaWave |
| 9 - Twisted Wave Online | 10 - Bear Audio Tool |
1. Wondershare Filmora
Filmora Audio Mixer is professional in audio mixing and video editing. This is used for mixing, balancing, and combining different sounds, and audio signals, sources like microphones, instruments, and synthesizers, or previously recorded audio.


Pros
- Imports audio file in the original format and mix the audio with built-in tools.
- Split, rearrange, and apply remix effects on added audio clips.
- Auto remix music to change audio length with high quality.
- Export audio files in MP3, FLAC, M4A, OGG, etc…
- Audio sync option while editing.
- Audio ducking features to lowers the background volume.
Audio formats support: all (import/export and audio/video) file formats.
Compatibility: Windows 7 to windows 10 sound mixer and mac OS.
Price: free and paid.
If you are facing any trouble regarding audio mixing through an audio mixer software, then here’s a video tutorial for Filmora software.
You can download it for free and follow the video guide step by step. Check the below video:
2. Adobe Audition

It is primarily designed for professional users having several features like multi-track editing and mixing, Auto Ducking, clip editing.
Pros:
- Availability of a vast range of features.
- Attractive user interface.
- Good for video sounds or voice-over editing overall, including sound mixing.
Cons:
- A little too complex for a newbie to understand.
- Not good enough for music productions.
- This software is subscription-based.
Audio formats support: MP3, WMA, WAV, AIFF, AC-3, PCM, AIFC, and more.
Compatibility: Mac OS, Windows.
Price: free and paid for both.
3. Logic Pro X

This software is suitable for both professional users and beginners. It combines all the basic and advanced features, including Flex Time, automatic time matching of different tracks, Flex Pitch, arpeggiator, etc.
Pros
- Works wonderfully on Mac.
- Rich Featured software and several plugins.
- Singular notes control.
- Tutorial easily available.
Cons:
- Mac only.
- Expensive.
Audio formats support: WAV, AIFF, CAF, PCM, ALAC, MP3, and more.
Compatibility: macOS.
Price: Paid
4. Audacity

A free, open-source, and features rich software perfect for both professional and beginner users. Its offers multiple effects and tolls like analysis, envelope, time-shift tools, etc.
Pros
- Free.
- Cross-platform.
- Easy to use.
- Features for beginner and pro-level, both.
- Online community available for help.
Cons:
- Not very appealing UI.
- May face crashes on Mac.
Audio formats support: MP3, MP4, AIFF, PCM, WMA, AC3, AMR, and more.
Compatibility: Linux, Windows, and macOS.
Price : free.

Filmora Audio Mixer
Wondershare Filmora - Audio Mixer
• Easily mix audio, sound, music or song as your need
• Edit audio files like denoise, crop, audio ducking, audio auto synchronization, etc…
• Cross-platform supported - (Windows, Mac, iOS, Android)
Mix Your Audio Now Mix Your Audio Now Mix Your Audio Now Learn More >
5. Reaper

This is one of the few software facilities with a bunch of features at such an affordable price. It has multiple tracks, multichannel support, real-time, non-destructive effect application, pitch-shifting, and time-shifting features.
Pros
- Feature-rich.
- More affordable than other audio mixer software.
- Detailed tutorials are available online.
Cons:
- Not very appealing UI as of LPX or Audition.
- Not suitable for beginners.
Audio formats support ACID, AIFF, MP3, MPEG WMV, and more.
Compatibility: Linux, Windows, and macOS.
Price: free and paid.
6. Fl Studio
It is one of the top-notch software used for sound mixer and editing purposes. It supports pitch shifting, time stretching and multi-track recording, 80 plugins, VST standards, delay compensation, etc.
Pros
- Comes with abundant Features.
- Works great for music productions.
- Supports 3rd party plugin.
Cons:
- Not very appealing UI.
- May be intimidating for beginners.
Audio formats support: AIFF, DS, MP3, OGG, WAV and more.
Compatibility : Windows and macOS.
Price: free and paid.
7. SoundAtion
It is a browser-based software that facilitates non-destructive Multi-track audio editing, dynamic mixing, several effects selection, and EQ across multiple tracks.
Pros
- Free digital audio Workstation (DAW).
- Works wonderfully for sound effects, podcasting, and general-purpose sound task.
- Supports 3rd party plugin.
Cons:
- Automation not featured in a free trial.
- Limited audio quality in a trial version.
Audio Formats Support: MP3 and WAV.
Compatibility: any operating system.
Price : free and paid.
8. HyaWave
It offers functions like cutting with an online audio cutter, paste and trim audio, and supports 18 filters, effects, and publication through URL and social media with the minimalistic user interface.
Pros
- Easy and simple user interface.
- Audio filter customization.
- Has a built-in audio player, recorder, and editor.
Audio formats support: MP3, WAV, and more.
Compatibility : any operating system.
Price : free.
9. Twisted Wave Online

It is an online software almost equally compatible with many paid sound mixer and editing tools. It also supports uncompressed audio recording, VST effects, and several core effects.
Pros
- Cloud storage of edited audio, saving the disk space.
- Sampling rate conversation.
- Online and free.
Cons:
- Upload file in mono in a trial version.
- Supports 5 minutes audio clip in a trial version.
Audio formats support : MP3.
Compatibility: any operating system.
Price: free and paid.
10. Bear Audio Tool
This is online browser-based software that can edit the files from our local storage, and you don’t have to upload the audio to their server. It can cut, apply effects, trim, etc. It has ample own music library, effects and import options.
Pros
- Copyright-free.
- Import audio directly from URL or social media domains.
- Features rich.
Cons:
- Not suitable for very advanced usage.
Audio formats support : MP3, OGG, WAV, WMA, M4R and OGG.
Compatibility : any operating system.
Price: free and paid.
Part 2. All You Know About Audio Mixer
[1] What is an audio mixer?
An audio mixer is used for several significant purposes. It is known with several names. Whether a mixing desk, soundboard, mixing board, audio mixer, or mixing console, all have a coherent purpose. The sole purpose of an audio mixer is to manage either the live or recorded event.
As the name suggests, audio mixing is the process of mixing multiple sounds and consolidating them into one or more channels.
This process is performed in a way that manipulates or enhances the dynamics, source’s volume level, panoramic position, and frequency content. The end moto of this creative and aesthetic treatment is to present the audio appealing to the listeners.
[2] What does an audio mixer do?
As mentioned above, the primary function of an audio mixer is to mix more than one audio signal and combine them into one or more output signals.
As an example, you may think of an audio mixing engineer, let’s say, orchestra conductor, who ensures that all the segregated sound sources mix into one harmonious soundtrack.
For this, they will use an audio mixer for filtering and optimizing sound by level adjusting, developing monitor feeds, using equalization and effects for sound enhancement.
This process is performed by a mixing engineer who operates either a digital audio workstation or a mixing console .
[3] What is audio mixing used for?
Audio mixing can be used in many fields, and it’s very common in our daily life, such as:
- 1. Music
- 2. Live sound
- 3. Film
- 4. Television
Filmora Audio Mixer
Wondershare Filmora - Audio Mixer
• Easily mix audio, sound, music or song as your need
• Edit audio files like denoise, crop, audio ducking, audio auto synchronization, etc…
• Cross-platform supported - (Windows, Mac, iOS, Android)
Mix Your Audio Now Mix Your Audio Now Mix Your Audio Now Learn More >
Part 3. What to consider while choosing an audio mixer software?
Before starting off with the audio mixing activity itself, one must be able to determine which audio mixer software is best for them with respect to their availability of resources or usability. Here are some of the factors to consider while opting for an audio mixer software:
- Check whether the software is paid or free.
- Check whether the limited features offered in a trial/free audio mixer software are enough to satisfy all your needs.
- Choose the paid or the free one depending on the extent of audio mixing quality you want.
- Look for an easy user interface.
- Look for software compatibility with your existing operating system.
- Check for the availability of tutorials related to the use of audio mixer software that you want to opt for better guidance.
- Look for the basic or advanced functions support in the audio mixer software that you choose depending upon your usability.
- Whether the software is available online or you need to install the version.
Part 4. Basic audio mixer settings you should know
It is necessary to know at least somewhat about the fundamental terminologies to decipher the specifications and features of an audio mixer. Here you’ll get to know what it takes to be able to distinguish among different audio mixers and their respective software.
Channel:
It is a signal path. Channels are made to accept microphones, preamps, amplifiers, and signal processors. A mixer with several channels integrated with it allows several things to be integrated and routed through it.
Channel Strip:
It is a cluster of controls and circuits that works together on a specified mixing channel to manipulate the audio that passes through it. Some of which includes the following:
Input jack:
It is the jack where any external instrument, like guitar, microphone etc., integrates with the mixer. The noise and interface are minimized to maximum extent by balancing the XLR inputs. A quarter-inch TRS connector or RCA are connected to other inputs.
Microphone preamp:
It produces weak mic signals by the raise of line-level strength for processing.
Equalization:
Often abbreviated as “EQ”, is used to adjust the frequency response of a signal.
Dynamics:
This process is used to perform grating and compressing.
Routing:
It directs the incoming signals to external devices or mixer circuitry.
Fader:
Its fundamental objective is to control the inputs and outputs of a channel.
Meter:
Kind of a gauge or interface that presents the channel output.
I/O:
I/O is abbreviated as inputs/outputs on a mixer in this regards. The number and category of I/O will depend on the use of a mixer.
Now, let’s understand the scenario of live mixing.
Such a mixer is needed which is enough to handle the outputs needed to connect the mains, microphones, other devices that connect to it and monitor speakers. The devices that are a part of a recording process or signal chain must also be included while calculating I/O for studio mixers.
Such inputs/outputs include headphones, effects processors, monitor speakers, signal processors and other instruments as well that uses direct injection (DI) boxes to connect to the mixer.
Buses:
It can be understood as a circuit intersection where the outputs from different channels meet. The signal channels are routed to a specific bus or set of busses. The main mixer output to a recorder or a speaker by the master mix bus.
Auxiliary buses, often known as aux buses or aux sends, are usually fed by the channel’s volume controls with which they are connected and then send those signals through their own output jacks. This is called as post-fader sends which are used to send the mixes of monitor speakers, signals to headphones or effects processors.
Groups:
Several channels in a mixer often offer a group function that allows one to simultaneously process and control various channels. Its works are similar to that of sub-mixer that shares the coherent signal routing and processing and provides the ease in controlling master bus since a single fader is used to control all the channels.
Inserts:
External and add-on sound processors, such as equalizers and compressors, are connected with the help of a channel insert.
Direct Output:
These feed mixer’s preamplifiers output to recording systems and external sound interfaces.
Cue System:
Cue systems allow listening on the specified channels without affecting the mixer’s output. This usually allows the signal to listen either before fading manipulation or after.
Part 5. Why audio mixer software?
In the early days, analog audio mixers were the only option available to perform sounding mixing. But the rise of the era of the 21st century brings more opportunities for easy and optimized audio mixing by sound mixer software.
All you need is a configured laptop, audio mixer software, and merely a control surface to jump into this world while being within the budget!
This audio mixer software is easily available to do everything or even more than what a physical mixer could have done. Several sound mixer applications are available to start with basic sound mixing using your smartphones or even tablets.
For the sake of recording, software-based mixers allow easy integration with the virtual instruments, drum loops, samples, and several other additions in your productions. The use of advanced MIDI functions with a digital audio workstation (DAW) lets you enlighten with a whole new world of possibilities to elevate your sounds/music to the next level.
Final verdict: Have you decided on your audio mixer software?
The usability and optimality of a sound mixer online software depend solely on the extent of application, available resources, and OS compatibility.
But, it can be said without a doubt that Wondershare Filmora is the most user-friendly, with immense flexibility in terms of uses and compatibility. Its broad-scale usability and promising results make it outshine the most among other audio mixing software.
Benjamin Arango
Benjamin Arango is a writer and a lover of all things video.
Follow @Benjamin Arango
Benjamin Arango
Mar 27, 2024• Proven solutions
You may be a musician who wants to record their music, or just a person wanting to develop his custom ringtone. In either case, a physical or virtual audio mixer is required, whether it be analog or a dedicated audio mixer software.
But you need to have some technical knowledge to make optimal use and funk up your music/sound.
Here we are to give you the knowledge you need and some amazing audio mixer software that could be perfect for you. So buckle up, and get ready to level up the harmoniousness of your creativity!
You will Learn :
- Part 1. 10 Best Sound/Audio Mixer Software - [Video Guide]
- Part 2. All You Know About Audio Mixer
- Part 3. What to Consider While Choosing an Audio Mixer Software?
- Part 4. Basic Audio Mixer Settings You Should Know
- Part 5. Why Audio Mixer Software?
Part 1. 10 Best Sound/Audio Mixer Software
Whether you are pursuing a music career, making a video for a movie clip, or merely creating some hard-core beats for fun, you’ll be needing good sound mixing software.
Selecting an audio mixer software perfect for your requirements and available resources is not an easy task.
Some of them are for free while some charge for it, some offer limited features. At the same time, some are specific to a certain operating system, the options and availabilities are endless, and choosing among them is a hell of a daunting task.
But no need to stress out because we are here to take your burden on our shoulders and help you choose exactly what you want! So sit back and relax!
| 1 - Wondershare Filmora | 2 - Adobe Audition |
|---|---|
| 3 - Logic Pro X | 4 - Audacity |
| 5 - Reaper | 6 - Fl Studio |
| 7 - SoundAtion | 8 - HyaWave |
| 9 - Twisted Wave Online | 10 - Bear Audio Tool |
1. Wondershare Filmora
Filmora Audio Mixer is professional in audio mixing and video editing. This is used for mixing, balancing, and combining different sounds, and audio signals, sources like microphones, instruments, and synthesizers, or previously recorded audio.
Pros
- Imports audio file in the original format and mix the audio with built-in tools.
- Split, rearrange, and apply remix effects on added audio clips.
- Auto remix music to change audio length with high quality.
- Export audio files in MP3, FLAC, M4A, OGG, etc…
- Audio sync option while editing.
- Audio ducking features to lowers the background volume.
Audio formats support: all (import/export and audio/video) file formats.
Compatibility: Windows 7 to windows 10 sound mixer and mac OS.
Price: free and paid.
If you are facing any trouble regarding audio mixing through an audio mixer software, then here’s a video tutorial for Filmora software.
You can download it for free and follow the video guide step by step. Check the below video:
2. Adobe Audition
It is primarily designed for professional users having several features like multi-track editing and mixing, Auto Ducking, clip editing.
Pros:
- Availability of a vast range of features.
- Attractive user interface.
- Good for video sounds or voice-over editing overall, including sound mixing.
Cons:
- A little too complex for a newbie to understand.
- Not good enough for music productions.
- This software is subscription-based.
Audio formats support: MP3, WMA, WAV, AIFF, AC-3, PCM, AIFC, and more.
Compatibility: Mac OS, Windows.
Price: free and paid for both.
3. Logic Pro X
This software is suitable for both professional users and beginners. It combines all the basic and advanced features, including Flex Time, automatic time matching of different tracks, Flex Pitch, arpeggiator, etc.
Pros
- Works wonderfully on Mac.
- Rich Featured software and several plugins.
- Singular notes control.
- Tutorial easily available.
Cons:
- Mac only.
- Expensive.
Audio formats support: WAV, AIFF, CAF, PCM, ALAC, MP3, and more.
Compatibility: macOS.
Price: Paid
4. Audacity
A free, open-source, and features rich software perfect for both professional and beginner users. Its offers multiple effects and tolls like analysis, envelope, time-shift tools, etc.
Pros
- Free.
- Cross-platform.
- Easy to use.
- Features for beginner and pro-level, both.
- Online community available for help.
Cons:
- Not very appealing UI.
- May face crashes on Mac.
Audio formats support: MP3, MP4, AIFF, PCM, WMA, AC3, AMR, and more.
Compatibility: Linux, Windows, and macOS.
Price : free.
Filmora Audio Mixer
Wondershare Filmora - Audio Mixer
• Easily mix audio, sound, music or song as your need
• Edit audio files like denoise, crop, audio ducking, audio auto synchronization, etc…
• Cross-platform supported - (Windows, Mac, iOS, Android)
Mix Your Audio Now Mix Your Audio Now Mix Your Audio Now Learn More >
5. Reaper
This is one of the few software facilities with a bunch of features at such an affordable price. It has multiple tracks, multichannel support, real-time, non-destructive effect application, pitch-shifting, and time-shifting features.
Pros
- Feature-rich.
- More affordable than other audio mixer software.
- Detailed tutorials are available online.
Cons:
- Not very appealing UI as of LPX or Audition.
- Not suitable for beginners.
Audio formats support ACID, AIFF, MP3, MPEG WMV, and more.
Compatibility: Linux, Windows, and macOS.
Price: free and paid.
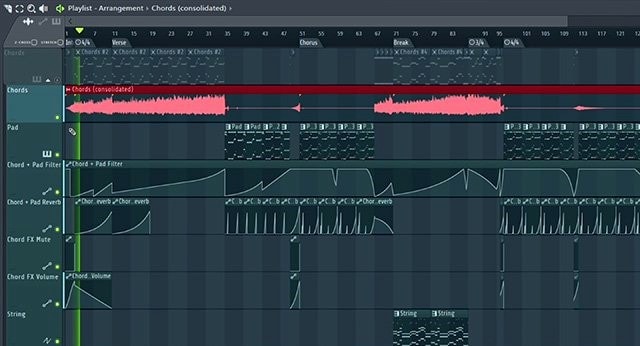
6. Fl Studio
It is one of the top-notch software used for sound mixer and editing purposes. It supports pitch shifting, time stretching and multi-track recording, 80 plugins, VST standards, delay compensation, etc.
Pros
- Comes with abundant Features.
- Works great for music productions.
- Supports 3rd party plugin.
Cons:
- Not very appealing UI.
- May be intimidating for beginners.
Audio formats support: AIFF, DS, MP3, OGG, WAV and more.
Compatibility : Windows and macOS.
Price: free and paid.
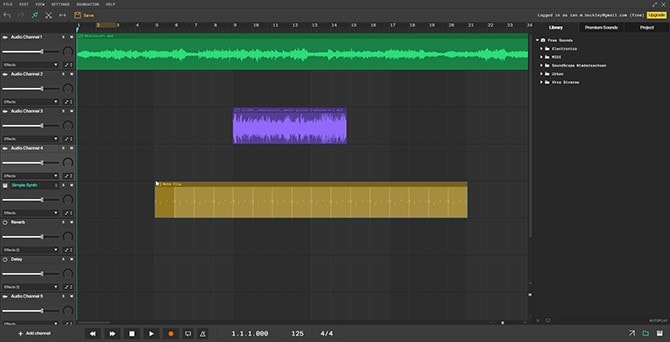
7. SoundAtion
It is a browser-based software that facilitates non-destructive Multi-track audio editing, dynamic mixing, several effects selection, and EQ across multiple tracks.
Pros
- Free digital audio Workstation (DAW).
- Works wonderfully for sound effects, podcasting, and general-purpose sound task.
- Supports 3rd party plugin.
Cons:
- Automation not featured in a free trial.
- Limited audio quality in a trial version.
Audio Formats Support: MP3 and WAV.
Compatibility: any operating system.
Price : free and paid.
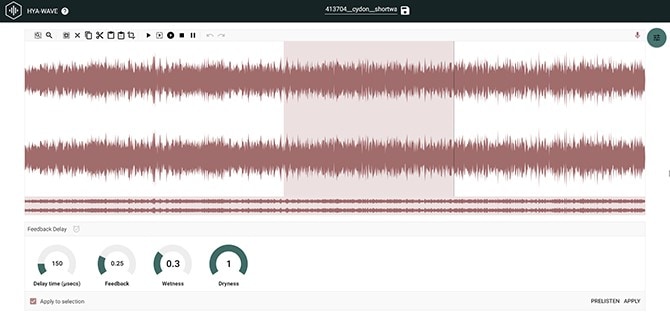
8. HyaWave
It offers functions like cutting with an online audio cutter, paste and trim audio, and supports 18 filters, effects, and publication through URL and social media with the minimalistic user interface.
Pros
- Easy and simple user interface.
- Audio filter customization.
- Has a built-in audio player, recorder, and editor.
Audio formats support: MP3, WAV, and more.
Compatibility : any operating system.
Price : free.
9. Twisted Wave Online
It is an online software almost equally compatible with many paid sound mixer and editing tools. It also supports uncompressed audio recording, VST effects, and several core effects.
Pros
- Cloud storage of edited audio, saving the disk space.
- Sampling rate conversation.
- Online and free.
Cons:
- Upload file in mono in a trial version.
- Supports 5 minutes audio clip in a trial version.
Audio formats support : MP3.
Compatibility: any operating system.
Price: free and paid.
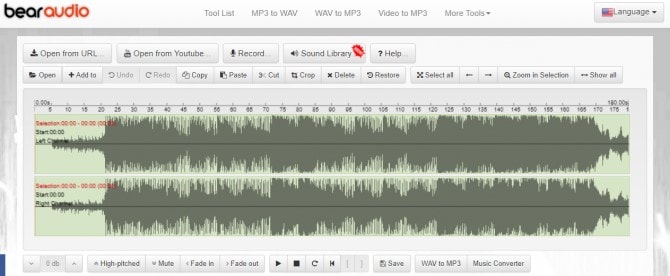
10. Bear Audio Tool
This is online browser-based software that can edit the files from our local storage, and you don’t have to upload the audio to their server. It can cut, apply effects, trim, etc. It has ample own music library, effects and import options.
Pros
- Copyright-free.
- Import audio directly from URL or social media domains.
- Features rich.
Cons:
- Not suitable for very advanced usage.
Audio formats support : MP3, OGG, WAV, WMA, M4R and OGG.
Compatibility : any operating system.
Price: free and paid.
Part 2. All You Know About Audio Mixer
[1] What is an audio mixer?
An audio mixer is used for several significant purposes. It is known with several names. Whether a mixing desk, soundboard, mixing board, audio mixer, or mixing console, all have a coherent purpose. The sole purpose of an audio mixer is to manage either the live or recorded event.
As the name suggests, audio mixing is the process of mixing multiple sounds and consolidating them into one or more channels.
This process is performed in a way that manipulates or enhances the dynamics, source’s volume level, panoramic position, and frequency content. The end moto of this creative and aesthetic treatment is to present the audio appealing to the listeners.
[2] What does an audio mixer do?
As mentioned above, the primary function of an audio mixer is to mix more than one audio signal and combine them into one or more output signals.
As an example, you may think of an audio mixing engineer, let’s say, orchestra conductor, who ensures that all the segregated sound sources mix into one harmonious soundtrack.
For this, they will use an audio mixer for filtering and optimizing sound by level adjusting, developing monitor feeds, using equalization and effects for sound enhancement.
This process is performed by a mixing engineer who operates either a digital audio workstation or a mixing console .
[3] What is audio mixing used for?
Audio mixing can be used in many fields, and it’s very common in our daily life, such as:
- 1. Music
- 2. Live sound
- 3. Film
- 4. Television
Filmora Audio Mixer
Wondershare Filmora - Audio Mixer
• Easily mix audio, sound, music or song as your need
• Edit audio files like denoise, crop, audio ducking, audio auto synchronization, etc…
• Cross-platform supported - (Windows, Mac, iOS, Android)
Mix Your Audio Now Mix Your Audio Now Mix Your Audio Now Learn More >
Part 3. What to consider while choosing an audio mixer software?
Before starting off with the audio mixing activity itself, one must be able to determine which audio mixer software is best for them with respect to their availability of resources or usability. Here are some of the factors to consider while opting for an audio mixer software:
- Check whether the software is paid or free.
- Check whether the limited features offered in a trial/free audio mixer software are enough to satisfy all your needs.
- Choose the paid or the free one depending on the extent of audio mixing quality you want.
- Look for an easy user interface.
- Look for software compatibility with your existing operating system.
- Check for the availability of tutorials related to the use of audio mixer software that you want to opt for better guidance.
- Look for the basic or advanced functions support in the audio mixer software that you choose depending upon your usability.
- Whether the software is available online or you need to install the version.
Part 4. Basic audio mixer settings you should know
It is necessary to know at least somewhat about the fundamental terminologies to decipher the specifications and features of an audio mixer. Here you’ll get to know what it takes to be able to distinguish among different audio mixers and their respective software.
Channel:
It is a signal path. Channels are made to accept microphones, preamps, amplifiers, and signal processors. A mixer with several channels integrated with it allows several things to be integrated and routed through it.
Channel Strip:
It is a cluster of controls and circuits that works together on a specified mixing channel to manipulate the audio that passes through it. Some of which includes the following:
Input jack:
It is the jack where any external instrument, like guitar, microphone etc., integrates with the mixer. The noise and interface are minimized to maximum extent by balancing the XLR inputs. A quarter-inch TRS connector or RCA are connected to other inputs.
Microphone preamp:
It produces weak mic signals by the raise of line-level strength for processing.
Equalization:
Often abbreviated as “EQ”, is used to adjust the frequency response of a signal.
Dynamics:
This process is used to perform grating and compressing.
Routing:
It directs the incoming signals to external devices or mixer circuitry.
Fader:
Its fundamental objective is to control the inputs and outputs of a channel.
Meter:
Kind of a gauge or interface that presents the channel output.
I/O:
I/O is abbreviated as inputs/outputs on a mixer in this regards. The number and category of I/O will depend on the use of a mixer.
Now, let’s understand the scenario of live mixing.
Such a mixer is needed which is enough to handle the outputs needed to connect the mains, microphones, other devices that connect to it and monitor speakers. The devices that are a part of a recording process or signal chain must also be included while calculating I/O for studio mixers.
Such inputs/outputs include headphones, effects processors, monitor speakers, signal processors and other instruments as well that uses direct injection (DI) boxes to connect to the mixer.
Buses:
It can be understood as a circuit intersection where the outputs from different channels meet. The signal channels are routed to a specific bus or set of busses. The main mixer output to a recorder or a speaker by the master mix bus.
Auxiliary buses, often known as aux buses or aux sends, are usually fed by the channel’s volume controls with which they are connected and then send those signals through their own output jacks. This is called as post-fader sends which are used to send the mixes of monitor speakers, signals to headphones or effects processors.
Groups:
Several channels in a mixer often offer a group function that allows one to simultaneously process and control various channels. Its works are similar to that of sub-mixer that shares the coherent signal routing and processing and provides the ease in controlling master bus since a single fader is used to control all the channels.
Inserts:
External and add-on sound processors, such as equalizers and compressors, are connected with the help of a channel insert.
Direct Output:
These feed mixer’s preamplifiers output to recording systems and external sound interfaces.
Cue System:
Cue systems allow listening on the specified channels without affecting the mixer’s output. This usually allows the signal to listen either before fading manipulation or after.
Part 5. Why audio mixer software?
In the early days, analog audio mixers were the only option available to perform sounding mixing. But the rise of the era of the 21st century brings more opportunities for easy and optimized audio mixing by sound mixer software.
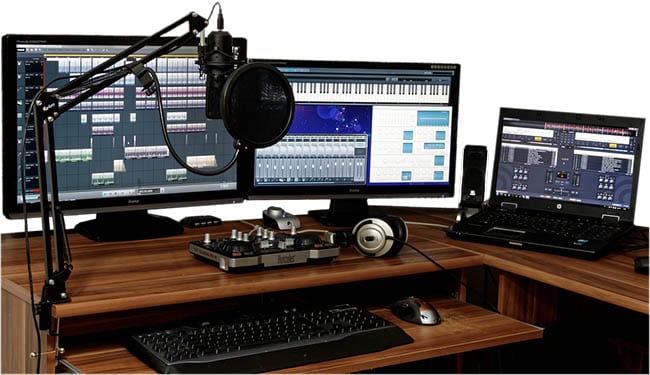
All you need is a configured laptop, audio mixer software, and merely a control surface to jump into this world while being within the budget!
This audio mixer software is easily available to do everything or even more than what a physical mixer could have done. Several sound mixer applications are available to start with basic sound mixing using your smartphones or even tablets.
For the sake of recording, software-based mixers allow easy integration with the virtual instruments, drum loops, samples, and several other additions in your productions. The use of advanced MIDI functions with a digital audio workstation (DAW) lets you enlighten with a whole new world of possibilities to elevate your sounds/music to the next level.
Final verdict: Have you decided on your audio mixer software?
The usability and optimality of a sound mixer online software depend solely on the extent of application, available resources, and OS compatibility.
But, it can be said without a doubt that Wondershare Filmora is the most user-friendly, with immense flexibility in terms of uses and compatibility. Its broad-scale usability and promising results make it outshine the most among other audio mixing software.
Benjamin Arango
Benjamin Arango is a writer and a lover of all things video.
Follow @Benjamin Arango
Benjamin Arango
Mar 27, 2024• Proven solutions
You may be a musician who wants to record their music, or just a person wanting to develop his custom ringtone. In either case, a physical or virtual audio mixer is required, whether it be analog or a dedicated audio mixer software.
But you need to have some technical knowledge to make optimal use and funk up your music/sound.
Here we are to give you the knowledge you need and some amazing audio mixer software that could be perfect for you. So buckle up, and get ready to level up the harmoniousness of your creativity!
You will Learn :
- Part 1. 10 Best Sound/Audio Mixer Software - [Video Guide]
- Part 2. All You Know About Audio Mixer
- Part 3. What to Consider While Choosing an Audio Mixer Software?
- Part 4. Basic Audio Mixer Settings You Should Know
- Part 5. Why Audio Mixer Software?
Part 1. 10 Best Sound/Audio Mixer Software
Whether you are pursuing a music career, making a video for a movie clip, or merely creating some hard-core beats for fun, you’ll be needing good sound mixing software.
Selecting an audio mixer software perfect for your requirements and available resources is not an easy task.
Some of them are for free while some charge for it, some offer limited features. At the same time, some are specific to a certain operating system, the options and availabilities are endless, and choosing among them is a hell of a daunting task.
But no need to stress out because we are here to take your burden on our shoulders and help you choose exactly what you want! So sit back and relax!
| 1 - Wondershare Filmora | 2 - Adobe Audition |
|---|---|
| 3 - Logic Pro X | 4 - Audacity |
| 5 - Reaper | 6 - Fl Studio |
| 7 - SoundAtion | 8 - HyaWave |
| 9 - Twisted Wave Online | 10 - Bear Audio Tool |
1. Wondershare Filmora
Filmora Audio Mixer is professional in audio mixing and video editing. This is used for mixing, balancing, and combining different sounds, and audio signals, sources like microphones, instruments, and synthesizers, or previously recorded audio.
Pros
- Imports audio file in the original format and mix the audio with built-in tools.
- Split, rearrange, and apply remix effects on added audio clips.
- Auto remix music to change audio length with high quality.
- Export audio files in MP3, FLAC, M4A, OGG, etc…
- Audio sync option while editing.
- Audio ducking features to lowers the background volume.
Audio formats support: all (import/export and audio/video) file formats.
Compatibility: Windows 7 to windows 10 sound mixer and mac OS.
Price: free and paid.
If you are facing any trouble regarding audio mixing through an audio mixer software, then here’s a video tutorial for Filmora software.
You can download it for free and follow the video guide step by step. Check the below video:
2. Adobe Audition
It is primarily designed for professional users having several features like multi-track editing and mixing, Auto Ducking, clip editing.
Pros:
- Availability of a vast range of features.
- Attractive user interface.
- Good for video sounds or voice-over editing overall, including sound mixing.
Cons:
- A little too complex for a newbie to understand.
- Not good enough for music productions.
- This software is subscription-based.
Audio formats support: MP3, WMA, WAV, AIFF, AC-3, PCM, AIFC, and more.
Compatibility: Mac OS, Windows.
Price: free and paid for both.
3. Logic Pro X
This software is suitable for both professional users and beginners. It combines all the basic and advanced features, including Flex Time, automatic time matching of different tracks, Flex Pitch, arpeggiator, etc.
Pros
- Works wonderfully on Mac.
- Rich Featured software and several plugins.
- Singular notes control.
- Tutorial easily available.
Cons:
- Mac only.
- Expensive.
Audio formats support: WAV, AIFF, CAF, PCM, ALAC, MP3, and more.
Compatibility: macOS.
Price: Paid
4. Audacity
A free, open-source, and features rich software perfect for both professional and beginner users. Its offers multiple effects and tolls like analysis, envelope, time-shift tools, etc.
Pros
- Free.
- Cross-platform.
- Easy to use.
- Features for beginner and pro-level, both.
- Online community available for help.
Cons:
- Not very appealing UI.
- May face crashes on Mac.
Audio formats support: MP3, MP4, AIFF, PCM, WMA, AC3, AMR, and more.
Compatibility: Linux, Windows, and macOS.
Price : free.
Filmora Audio Mixer
Wondershare Filmora - Audio Mixer
• Easily mix audio, sound, music or song as your need
• Edit audio files like denoise, crop, audio ducking, audio auto synchronization, etc…
• Cross-platform supported - (Windows, Mac, iOS, Android)
Mix Your Audio Now Mix Your Audio Now Mix Your Audio Now Learn More >
5. Reaper
This is one of the few software facilities with a bunch of features at such an affordable price. It has multiple tracks, multichannel support, real-time, non-destructive effect application, pitch-shifting, and time-shifting features.
Pros
- Feature-rich.
- More affordable than other audio mixer software.
- Detailed tutorials are available online.
Cons:
- Not very appealing UI as of LPX or Audition.
- Not suitable for beginners.
Audio formats support ACID, AIFF, MP3, MPEG WMV, and more.
Compatibility: Linux, Windows, and macOS.
Price: free and paid.
6. Fl Studio
It is one of the top-notch software used for sound mixer and editing purposes. It supports pitch shifting, time stretching and multi-track recording, 80 plugins, VST standards, delay compensation, etc.
Pros
- Comes with abundant Features.
- Works great for music productions.
- Supports 3rd party plugin.
Cons:
- Not very appealing UI.
- May be intimidating for beginners.
Audio formats support: AIFF, DS, MP3, OGG, WAV and more.
Compatibility : Windows and macOS.
Price: free and paid.
7. SoundAtion
It is a browser-based software that facilitates non-destructive Multi-track audio editing, dynamic mixing, several effects selection, and EQ across multiple tracks.
Pros
- Free digital audio Workstation (DAW).
- Works wonderfully for sound effects, podcasting, and general-purpose sound task.
- Supports 3rd party plugin.
Cons:
- Automation not featured in a free trial.
- Limited audio quality in a trial version.
Audio Formats Support: MP3 and WAV.
Compatibility: any operating system.
Price : free and paid.
8. HyaWave
It offers functions like cutting with an online audio cutter, paste and trim audio, and supports 18 filters, effects, and publication through URL and social media with the minimalistic user interface.
Pros
- Easy and simple user interface.
- Audio filter customization.
- Has a built-in audio player, recorder, and editor.
Audio formats support: MP3, WAV, and more.
Compatibility : any operating system.
Price : free.
9. Twisted Wave Online
It is an online software almost equally compatible with many paid sound mixer and editing tools. It also supports uncompressed audio recording, VST effects, and several core effects.
Pros
- Cloud storage of edited audio, saving the disk space.
- Sampling rate conversation.
- Online and free.
Cons:
- Upload file in mono in a trial version.
- Supports 5 minutes audio clip in a trial version.
Audio formats support : MP3.
Compatibility: any operating system.
Price: free and paid.
10. Bear Audio Tool
This is online browser-based software that can edit the files from our local storage, and you don’t have to upload the audio to their server. It can cut, apply effects, trim, etc. It has ample own music library, effects and import options.
Pros
- Copyright-free.
- Import audio directly from URL or social media domains.
- Features rich.
Cons:
- Not suitable for very advanced usage.
Audio formats support : MP3, OGG, WAV, WMA, M4R and OGG.
Compatibility : any operating system.
Price: free and paid.
Part 2. All You Know About Audio Mixer
[1] What is an audio mixer?
An audio mixer is used for several significant purposes. It is known with several names. Whether a mixing desk, soundboard, mixing board, audio mixer, or mixing console, all have a coherent purpose. The sole purpose of an audio mixer is to manage either the live or recorded event.
As the name suggests, audio mixing is the process of mixing multiple sounds and consolidating them into one or more channels.
This process is performed in a way that manipulates or enhances the dynamics, source’s volume level, panoramic position, and frequency content. The end moto of this creative and aesthetic treatment is to present the audio appealing to the listeners.
[2] What does an audio mixer do?
As mentioned above, the primary function of an audio mixer is to mix more than one audio signal and combine them into one or more output signals.
As an example, you may think of an audio mixing engineer, let’s say, orchestra conductor, who ensures that all the segregated sound sources mix into one harmonious soundtrack.
For this, they will use an audio mixer for filtering and optimizing sound by level adjusting, developing monitor feeds, using equalization and effects for sound enhancement.
This process is performed by a mixing engineer who operates either a digital audio workstation or a mixing console .
[3] What is audio mixing used for?
Audio mixing can be used in many fields, and it’s very common in our daily life, such as:
- 1. Music
- 2. Live sound
- 3. Film
- 4. Television
Filmora Audio Mixer
Wondershare Filmora - Audio Mixer
• Easily mix audio, sound, music or song as your need
• Edit audio files like denoise, crop, audio ducking, audio auto synchronization, etc…
• Cross-platform supported - (Windows, Mac, iOS, Android)
Mix Your Audio Now Mix Your Audio Now Mix Your Audio Now Learn More >
Part 3. What to consider while choosing an audio mixer software?
Before starting off with the audio mixing activity itself, one must be able to determine which audio mixer software is best for them with respect to their availability of resources or usability. Here are some of the factors to consider while opting for an audio mixer software:
- Check whether the software is paid or free.
- Check whether the limited features offered in a trial/free audio mixer software are enough to satisfy all your needs.
- Choose the paid or the free one depending on the extent of audio mixing quality you want.
- Look for an easy user interface.
- Look for software compatibility with your existing operating system.
- Check for the availability of tutorials related to the use of audio mixer software that you want to opt for better guidance.
- Look for the basic or advanced functions support in the audio mixer software that you choose depending upon your usability.
- Whether the software is available online or you need to install the version.
Part 4. Basic audio mixer settings you should know
It is necessary to know at least somewhat about the fundamental terminologies to decipher the specifications and features of an audio mixer. Here you’ll get to know what it takes to be able to distinguish among different audio mixers and their respective software.
Channel:
It is a signal path. Channels are made to accept microphones, preamps, amplifiers, and signal processors. A mixer with several channels integrated with it allows several things to be integrated and routed through it.
Channel Strip:
It is a cluster of controls and circuits that works together on a specified mixing channel to manipulate the audio that passes through it. Some of which includes the following:
Input jack:
It is the jack where any external instrument, like guitar, microphone etc., integrates with the mixer. The noise and interface are minimized to maximum extent by balancing the XLR inputs. A quarter-inch TRS connector or RCA are connected to other inputs.
Microphone preamp:
It produces weak mic signals by the raise of line-level strength for processing.
Equalization:
Often abbreviated as “EQ”, is used to adjust the frequency response of a signal.
Dynamics:
This process is used to perform grating and compressing.
Routing:
It directs the incoming signals to external devices or mixer circuitry.
Fader:
Its fundamental objective is to control the inputs and outputs of a channel.
Meter:
Kind of a gauge or interface that presents the channel output.
I/O:
I/O is abbreviated as inputs/outputs on a mixer in this regards. The number and category of I/O will depend on the use of a mixer.
Now, let’s understand the scenario of live mixing.
Such a mixer is needed which is enough to handle the outputs needed to connect the mains, microphones, other devices that connect to it and monitor speakers. The devices that are a part of a recording process or signal chain must also be included while calculating I/O for studio mixers.
Such inputs/outputs include headphones, effects processors, monitor speakers, signal processors and other instruments as well that uses direct injection (DI) boxes to connect to the mixer.
Buses:
It can be understood as a circuit intersection where the outputs from different channels meet. The signal channels are routed to a specific bus or set of busses. The main mixer output to a recorder or a speaker by the master mix bus.
Auxiliary buses, often known as aux buses or aux sends, are usually fed by the channel’s volume controls with which they are connected and then send those signals through their own output jacks. This is called as post-fader sends which are used to send the mixes of monitor speakers, signals to headphones or effects processors.
Groups:
Several channels in a mixer often offer a group function that allows one to simultaneously process and control various channels. Its works are similar to that of sub-mixer that shares the coherent signal routing and processing and provides the ease in controlling master bus since a single fader is used to control all the channels.
Inserts:
External and add-on sound processors, such as equalizers and compressors, are connected with the help of a channel insert.
Direct Output:
These feed mixer’s preamplifiers output to recording systems and external sound interfaces.
Cue System:
Cue systems allow listening on the specified channels without affecting the mixer’s output. This usually allows the signal to listen either before fading manipulation or after.
Part 5. Why audio mixer software?
In the early days, analog audio mixers were the only option available to perform sounding mixing. But the rise of the era of the 21st century brings more opportunities for easy and optimized audio mixing by sound mixer software.
All you need is a configured laptop, audio mixer software, and merely a control surface to jump into this world while being within the budget!
This audio mixer software is easily available to do everything or even more than what a physical mixer could have done. Several sound mixer applications are available to start with basic sound mixing using your smartphones or even tablets.
For the sake of recording, software-based mixers allow easy integration with the virtual instruments, drum loops, samples, and several other additions in your productions. The use of advanced MIDI functions with a digital audio workstation (DAW) lets you enlighten with a whole new world of possibilities to elevate your sounds/music to the next level.
Final verdict: Have you decided on your audio mixer software?
The usability and optimality of a sound mixer online software depend solely on the extent of application, available resources, and OS compatibility.
But, it can be said without a doubt that Wondershare Filmora is the most user-friendly, with immense flexibility in terms of uses and compatibility. Its broad-scale usability and promising results make it outshine the most among other audio mixing software.
Benjamin Arango
Benjamin Arango is a writer and a lover of all things video.
Follow @Benjamin Arango
“REAPER 101: A Comprehensive Overview of Features and Functionality”
DAW stands for Digital Audio Workstation. It is where you can record, edit, mix or even master your music. You always need good DAW software to help you with the job to produce music or live recording musicians.
A good DAW software must have a multi-track audio recording , virtual instruments, MIDI sequencer, excellent mixing capabilities, and plug-in processor hosting. The software is found for all major operating systems such as Linux , Windows, and Mac. If you want to learn more about DAW, then stay with us. The article will discuss in detail REAPER Recording Software.
In this article
01 What Is REAPER Recording Software?
02 How to Download and Install REAPER Software?
03 Tutorial for Using REAPER Recording Software
Part 1. What Is REAPER Recording Software?
Recording software like REAPER records computer audio is used to produce music, edit it, transform, and customize your music. With REAPER Recording Software , you can record multi-layer audio and MIDI in various formats. REAPER has the easiest interface that allows you to drag and drop to import, split, move and do many other tasks.

This is just one feature of REAPER that sounds very interesting. In this section, we will talk about more of its features.
1. Record and Edit
You can easily record the audio and (MIDI) Musical Instrumental Digital Interface with REAPER recording software. It lets you edit and customize everything. You can record and edit things limitlessly. When it comes to recording, it’s not at all difficult for REAPER software to record various instruments or vocals.
2. Mixing
Initially, the mixer might seem inflexible, but in reality, REAPER has a lot to offer you. It has great automated capabilities for instrument and effect parameters. It doesn’t matter if you are working because you can still bounce or freeze tracks while working.
The mixer is very flexible. With REAPERs mixer, you just have to drag and drop your recordings so that you can create tracks, and also, you can customize the arrangements by moving the portions.
3. Interface
While looking at the interface, you might question yourself about how to use its interface. Some people love to learn about new things, such as the REAPER Recording Software. Whereas, some people seem least interested because the half-empty interface is not intuitive to them.
Whereas, the best thing about its interface is that you can customize it. REAPER allows you to add different wallpapers and layouts to your software interface.
4. Strong Stability
REAPER Recording Software has very strong stability. This is one of its strongest features as compared to other competitors. The RAM is rarely affected by the load time and the used resources. Moreover, the software offers a wide range of languages. You can select your desired language to run the software.
Part 2. How to Download and Install REAPER Software?
REAPER is a Digital Audio Workstation. The perfect platform where you can manipulate and transform your audio. With REAPER Record Computer audio, you can work efficiently in a resource-friendly studio with saving your time. Stay tuned if you plan to learn more about its pricing and requirements.

Pricing of REAPER Software
A reaper is a brilliant software. It has a 60-day trial period. REAPER costs $60 in total to register. It has complete MIDI sequencing. You can also get a discounted license if REAPER is the best private option for you or has commercial usage. You can set the equal license key on every computer for someone with multiple computers.
System Requirements
The recording software has uncountable features. REAPER software facilitates its users at every level by giving the best audio manipulating platform. The best thing about REAPER Recording Software is its compatibility with different operating systems. Let us add more to your knowledge on this.
Windows
REAPER software is available for Windows 7, 8, 10, XP, and Vista. The version of REAPER for Windows is 6.42. This is for Windows 64-bit whereas, a download package is also available for Windows 32-bit.
macOS
For macOS 64-bit, REAPER has a 6.42 version. This version is compatible with macOS 10.5 – 10.14. Whereas, for macOS 10.15+, the available version of REAPER is 6.42 with a 15MB file size.
Linux
REAPER Recording Software is also compatible with Linux x86_64. The REAPER version is 6.42 with an 11 MB file size. This version can also work on AMD64 64-bit.
Downloading and Installing REAPER
Now that REAPER Record Computer Audio has impressed you a lot. You must be thinking about how to download it. If this is on your mind, then we got you. Allow us to share its steps that will guide you to download the software easily.
Step 1: To install REAPER software, first of all, visit its official website. Then locate and head over to its download section.
Step 2: Click on ‘Download REAPER from the download section.’ For Windows users, they can download the Windows installation package. At the same time, Linux and macOS users can select their installation packages.
Step 3: Lastly, after you have downloaded your systems compatible installation package, you simply have to run it and then install it according to your respective operating system.
Part 3. Tutorial for Using REAPER Recording Software
After its attractive features and detailed downloading procedure, it is finally the time to talk about its works. This section of the article will explain to you more about REAPER Recording Software as we are now going to present a tutorial on how to use the software.
Understand the Layout
Understanding and knowing the layout of your software before you start working on it is essential. The crucial components of REAPER software include the Timeline, Arrangement Window, Track Panel, Toolbar, and lastly, Transport.

The Arrangement window holds all the added items. The items are played from left to right order, similar to their timeline arrangement. You can also zoom in and out. Then comes the transport toolbar, which holds the functions to stop, rewind, play, fast forward, adjust the timeline speed, etc. The toolbar holds all the toggle buttons. You can also customize your toolbar.
New Track Creation
For creating a new track on REAPER, go to the Track menu and hit Insert New Track. A track is like another layer to your audio. Multiple layers and tracks make your work complex yet interesting as you can play all the different tracks at the same time. By double-clicking in the Track Control Panel, you can set a name for the added track.

Audio Hardware Settings for Audio Recording
It is best suggested always to check your audio hardware settings before you start to record, edit or mix with REAPER Recording Software. Your primary focus should be on the recording device’s devices should be set as Input Device, whereas the listening device should be set as the Output Device.
For this, you have to select Preferences from the Options menu. A window will appear in front of you, the REAPER Preference window. You have to select the correct Input and Output devices from the dropdown menu from this window.

Arm your Track
Arming your track is very important. For this, head over to the Track Control Panel, and next to your track name, hit the red circle. If you have various tracks, you should solo this track and mute the other tracks.
As soon as the track is armed, a Gain Meter will activate on the side. From this, you can check if you have properly set the microphone or not. This could be tested by tapping on the microphone.

Record
After all, the hardware settings are done, and your track is armed, it’s time to start the recording. For that, just tap on the Record button in the Transport toolbar. A yellow line in the timeline will indicate the end of the recording.

To end the recording, tap on the Stop button from the Transport Toolbar. Lastly, REAPER Recording Software will ask you to save the file. In case you don’t want it, you can also delete it.
Create and Manipulate Clips
Things like manipulation get a lot easier if you split the clips in REAPER. From the items menu, you have to select the option of Split Item on Cursor. This divides your clip into two clips on each side of the cursor. You can also remove the clips by going to the Items Menu. From there, you just have to hit the Remove Item option, or else, simply press the Delete key on your keyboard.

Removing clips will create a gap in the arrangement window that can be filled by dragging forward the remaining clip.
Volume Adjustments – Normalize
By double-clicking on the item or by selecting ‘Item Properties’ from a right-click, you can normalize the item. A new window will appear as Media Item Properties, from where you have to locate the Volume Settings and then select the option of Normalize.
If your item is already loud, then nothing will happen, but if it is not, then the slider will change from 0.00 dB showing an increase in the volume. Lastly, hit the ‘Apply’ or ‘OK’ button to imply the changes.
Fade in/out
With the Media Properties, you can also adjust a Fade in and a Fade out. For this, you simply have to set an end time for the Fade in, whereas a start time is entered for Fade out. Hit the ‘Ok’ or ‘Apply’ button to apply the changes.
From the Arrangement window, fades can be adjusted. For adjusting the fades, hover with your mouse over the red line. You will see a newly shaped cursor. Just drag on the timeline to play and adjust the Fade with this new cursor.

Automate Changes
With REAPER, you can also automate changes in track parameters. We will guide about automation from Track Envelopes. From Track Control Panel, hit the Trim option. A new Envelopes window will open at this point from where you have to check the Volume box.
A new Volume Track will open up. Here, you have to set new Envelope points. That could be done by holding the shift key, right-clicking on the point, and then selecting Create New Point. A green circle will indicate the new point.
By dragging the Envelope point, you can also adjust the volume. Dragging it towards the top will increase the volume, whereas dragging it towards the bottom will eventually decrease.

Finalize the Audio – Render
After all the above steps have been completed to set the order and adjust your desired volume, the last step comes to render your project file. For that, move to the File menu and select the ‘Render’ option. A window will be opened as ‘Render to File.’ Now, from the dropdown menu, select your desired Output Format.
Lastly, hit the Render 1 File button, and then REAPER will export your project. You can immediately listen to it by selecting the ‘Launch File’ option.

Concluding Thoughts
This article is everything you need to learn about REAPER Recording Software. The article that started from an introduction on DAW took you on a roller coaster ride. Everything about REAPER software has been shared.
We hope that this article helps you in all possible ways. The attractive features impress you, and its pricing and system specifications increase your knowledge. Along with that, the shared tutorial will guide you thoroughly on how to use it.
02 How to Download and Install REAPER Software?
03 Tutorial for Using REAPER Recording Software
Part 1. What Is REAPER Recording Software?
Recording software like REAPER records computer audio is used to produce music, edit it, transform, and customize your music. With REAPER Recording Software , you can record multi-layer audio and MIDI in various formats. REAPER has the easiest interface that allows you to drag and drop to import, split, move and do many other tasks.
This is just one feature of REAPER that sounds very interesting. In this section, we will talk about more of its features.
1. Record and Edit
You can easily record the audio and (MIDI) Musical Instrumental Digital Interface with REAPER recording software. It lets you edit and customize everything. You can record and edit things limitlessly. When it comes to recording, it’s not at all difficult for REAPER software to record various instruments or vocals.
2. Mixing
Initially, the mixer might seem inflexible, but in reality, REAPER has a lot to offer you. It has great automated capabilities for instrument and effect parameters. It doesn’t matter if you are working because you can still bounce or freeze tracks while working.
The mixer is very flexible. With REAPERs mixer, you just have to drag and drop your recordings so that you can create tracks, and also, you can customize the arrangements by moving the portions.
3. Interface
While looking at the interface, you might question yourself about how to use its interface. Some people love to learn about new things, such as the REAPER Recording Software. Whereas, some people seem least interested because the half-empty interface is not intuitive to them.
Whereas, the best thing about its interface is that you can customize it. REAPER allows you to add different wallpapers and layouts to your software interface.
4. Strong Stability
REAPER Recording Software has very strong stability. This is one of its strongest features as compared to other competitors. The RAM is rarely affected by the load time and the used resources. Moreover, the software offers a wide range of languages. You can select your desired language to run the software.
Part 2. How to Download and Install REAPER Software?
REAPER is a Digital Audio Workstation. The perfect platform where you can manipulate and transform your audio. With REAPER Record Computer audio, you can work efficiently in a resource-friendly studio with saving your time. Stay tuned if you plan to learn more about its pricing and requirements.
Pricing of REAPER Software
A reaper is a brilliant software. It has a 60-day trial period. REAPER costs $60 in total to register. It has complete MIDI sequencing. You can also get a discounted license if REAPER is the best private option for you or has commercial usage. You can set the equal license key on every computer for someone with multiple computers.
System Requirements
The recording software has uncountable features. REAPER software facilitates its users at every level by giving the best audio manipulating platform. The best thing about REAPER Recording Software is its compatibility with different operating systems. Let us add more to your knowledge on this.
Windows
REAPER software is available for Windows 7, 8, 10, XP, and Vista. The version of REAPER for Windows is 6.42. This is for Windows 64-bit whereas, a download package is also available for Windows 32-bit.
macOS
For macOS 64-bit, REAPER has a 6.42 version. This version is compatible with macOS 10.5 – 10.14. Whereas, for macOS 10.15+, the available version of REAPER is 6.42 with a 15MB file size.
Linux
REAPER Recording Software is also compatible with Linux x86_64. The REAPER version is 6.42 with an 11 MB file size. This version can also work on AMD64 64-bit.
Downloading and Installing REAPER
Now that REAPER Record Computer Audio has impressed you a lot. You must be thinking about how to download it. If this is on your mind, then we got you. Allow us to share its steps that will guide you to download the software easily.
Step 1: To install REAPER software, first of all, visit its official website. Then locate and head over to its download section.
Step 2: Click on ‘Download REAPER from the download section.’ For Windows users, they can download the Windows installation package. At the same time, Linux and macOS users can select their installation packages.
Step 3: Lastly, after you have downloaded your systems compatible installation package, you simply have to run it and then install it according to your respective operating system.
Part 3. Tutorial for Using REAPER Recording Software
After its attractive features and detailed downloading procedure, it is finally the time to talk about its works. This section of the article will explain to you more about REAPER Recording Software as we are now going to present a tutorial on how to use the software.
Understand the Layout
Understanding and knowing the layout of your software before you start working on it is essential. The crucial components of REAPER software include the Timeline, Arrangement Window, Track Panel, Toolbar, and lastly, Transport.
The Arrangement window holds all the added items. The items are played from left to right order, similar to their timeline arrangement. You can also zoom in and out. Then comes the transport toolbar, which holds the functions to stop, rewind, play, fast forward, adjust the timeline speed, etc. The toolbar holds all the toggle buttons. You can also customize your toolbar.
New Track Creation
For creating a new track on REAPER, go to the Track menu and hit Insert New Track. A track is like another layer to your audio. Multiple layers and tracks make your work complex yet interesting as you can play all the different tracks at the same time. By double-clicking in the Track Control Panel, you can set a name for the added track.
Audio Hardware Settings for Audio Recording
It is best suggested always to check your audio hardware settings before you start to record, edit or mix with REAPER Recording Software. Your primary focus should be on the recording device’s devices should be set as Input Device, whereas the listening device should be set as the Output Device.
For this, you have to select Preferences from the Options menu. A window will appear in front of you, the REAPER Preference window. You have to select the correct Input and Output devices from the dropdown menu from this window.
Arm your Track
Arming your track is very important. For this, head over to the Track Control Panel, and next to your track name, hit the red circle. If you have various tracks, you should solo this track and mute the other tracks.
As soon as the track is armed, a Gain Meter will activate on the side. From this, you can check if you have properly set the microphone or not. This could be tested by tapping on the microphone.
Record
After all, the hardware settings are done, and your track is armed, it’s time to start the recording. For that, just tap on the Record button in the Transport toolbar. A yellow line in the timeline will indicate the end of the recording.
To end the recording, tap on the Stop button from the Transport Toolbar. Lastly, REAPER Recording Software will ask you to save the file. In case you don’t want it, you can also delete it.
Create and Manipulate Clips
Things like manipulation get a lot easier if you split the clips in REAPER. From the items menu, you have to select the option of Split Item on Cursor. This divides your clip into two clips on each side of the cursor. You can also remove the clips by going to the Items Menu. From there, you just have to hit the Remove Item option, or else, simply press the Delete key on your keyboard.
Removing clips will create a gap in the arrangement window that can be filled by dragging forward the remaining clip.
Volume Adjustments – Normalize
By double-clicking on the item or by selecting ‘Item Properties’ from a right-click, you can normalize the item. A new window will appear as Media Item Properties, from where you have to locate the Volume Settings and then select the option of Normalize.
If your item is already loud, then nothing will happen, but if it is not, then the slider will change from 0.00 dB showing an increase in the volume. Lastly, hit the ‘Apply’ or ‘OK’ button to imply the changes.
Fade in/out
With the Media Properties, you can also adjust a Fade in and a Fade out. For this, you simply have to set an end time for the Fade in, whereas a start time is entered for Fade out. Hit the ‘Ok’ or ‘Apply’ button to apply the changes.
From the Arrangement window, fades can be adjusted. For adjusting the fades, hover with your mouse over the red line. You will see a newly shaped cursor. Just drag on the timeline to play and adjust the Fade with this new cursor.
Automate Changes
With REAPER, you can also automate changes in track parameters. We will guide about automation from Track Envelopes. From Track Control Panel, hit the Trim option. A new Envelopes window will open at this point from where you have to check the Volume box.
A new Volume Track will open up. Here, you have to set new Envelope points. That could be done by holding the shift key, right-clicking on the point, and then selecting Create New Point. A green circle will indicate the new point.
By dragging the Envelope point, you can also adjust the volume. Dragging it towards the top will increase the volume, whereas dragging it towards the bottom will eventually decrease.
Finalize the Audio – Render
After all the above steps have been completed to set the order and adjust your desired volume, the last step comes to render your project file. For that, move to the File menu and select the ‘Render’ option. A window will be opened as ‘Render to File.’ Now, from the dropdown menu, select your desired Output Format.
Lastly, hit the Render 1 File button, and then REAPER will export your project. You can immediately listen to it by selecting the ‘Launch File’ option.
Concluding Thoughts
This article is everything you need to learn about REAPER Recording Software. The article that started from an introduction on DAW took you on a roller coaster ride. Everything about REAPER software has been shared.
We hope that this article helps you in all possible ways. The attractive features impress you, and its pricing and system specifications increase your knowledge. Along with that, the shared tutorial will guide you thoroughly on how to use it.
Also read:
- Updated The Ultimate Guide to GarageBand Tracking Techniques for 2024
- The Ultimate List of Free Haunting Noise Archives for 2024
- Updated Top-Tier AE Templates for Poetic Visual Storytelling for 2024
- Updated How to Remove Audio From Video
- In 2024, Artisan Soundscapes for Blog and YouTube Visionaries
- New Tutorials for Beginners How to Add Audio to iMovie for 2024
- Separate Sounds From Images IMovies Methodology for Mac Computers
- New 2024 Approved Delving Into the World of Googles Digital Podcast Service
- New Step by Step to Silence Zoom Microphones on Windows, macOS, and Android Devices for 2024
- New Ultimate Guide to Clear Sound Eradicating Audio Distortion in Multimedia Projects
- The Ultimate Guide to Disabling Sound in Windows 10 Movies & Tutorials (No Software Needed) for 2024
- New The Future of Finding Audio Virtuosos Tips and Techniques for 2024
- Updated 2024 Approved Discover the Best Free Beats and Tunes Creation Programs for PC & Mac, Updated
- Your Guide to the Top 6 Fee-Free Digital Soundscape Editors on the Web
- In 2024, Freely Available Tunes to Elevate Your Film and Video Compositions
- New AMR Audio Converter Complete Guide to AMR Files for 2024
- Updated Top 5 Sources for Legal Comedy Soundtracks Online for 2024
- The Future of Silence Leading Applications for Pure Auditory Experience
- New In 2024, Best 10 Websites to Download Montage Music
- New In 2024, Free Vs. Paid Linux Audio Software An Insiders Look at Leading Choices
- Mastering Podcasting A Look at the Premier Hosting Services for 2024
- Achieving Audio Equilibrium Methods for Adjusting Sound Pressure Levels with VLC
- New Tasteful Harmonies for Streaming Media Artistry for 2024
- In 2024, Expert Audio Tidying Up Techniques and Applications to Purify Soundtracks
- New 2024 Approved Frequency Finder The Leading Linux Audio Software Options, Free or Full-Price,
- Updated Ultimate DJ Streaming Repository for 2024
- In 2024, Essential Windows Audio Production Tools Selecting Top 8 DAWs with Various Pricing Models
- The Art of Remote Sonic Adjustments Controlling Playback Velocity and Tone Online
- Achieve Crystal Clear Sound Mastering Mic Noise Reduction Techniques for 2024
- New In 2024, Finding Your Perfect Game Voice Conversion Companion
- Updated In 2024, Top Picks Instrumental Music That Elevates Your Video Projects
- Resonant Praise Sound Composer for 2024
- Updated Where Can I Find Laughing Sound Effect for 2024
- Updated In 2024, Efficient Methods for Audio Trimming in Apple Videos
- In 2024, Exploring 8 Prime Picks for Free Sound Design Tools
- Updated A Step-by-Step Guide to Crafting Professional-Level Android Media With Audio Integration for 2024
- From Silence to Symphony Incorporating Audio in Video Projects
- Updated In 2024, The Essence of Clubhouse Uncovered Insights Into Its Core Values, User Experience, and Impact on Digital Interactions
- 2024 Approved Enhancing Sound Quality From Anywhere A Guide to Modifying Speed and Pitch Through the Web
- 2024 Approved Steps for Incorporating Musical Elements Into Windows-Compatible GIFs
- Updated The Essential List Top 8 Android DAWs Revolutionizing Music for 2024
- Updated The Years Most Acclaimed PC Voice & Sound Capture Utilities for 2024
- In 2024, Unlocking the Potential A Basic Guide to Using Lexis Sound Laboratory
- New Best Light Video Editing Software for 2024
- Ultimate Guide from Samsung Galaxy Z Fold 5 FRP Bypass
- In 2024, How does the stardust trade cost In pokemon go On Samsung Galaxy S24 Ultra? | Dr.fone
- In 2024, Hassle-Free Ways to Remove FRP Lock on Xiaomi Mix Fold 3 Phones with/without a PC
- Easily Blur Video Backgrounds or Faces with These Top Apps
- FRP Hijacker by Hagard Download and Bypass your Poco M6 Pro 5G FRP Locks
- 2024 Approved Merge Multiple MOV Files for Free Top Tools
- How to Repair Corrupt Excel 2010 Files | Stellar
- How to Bypass FRP on Samsung?
- In 2024, How Do You Get Sun Stone Evolutions in Pokémon For Vivo Y100i Power 5G? | Dr.fone
- In 2024, How Can You Transfer Files From Realme 11 Pro To iPhone 15/14/13? | Dr.fone
- How to Exit Android Factory Mode On Vivo X Flip? | Dr.fone
- Updated Change Video Speed with FFmpeg for 2024
- How To Check if Your Realme C53 Is Unlocked
- In 2024, Mastering Lock Screen Settings How to Enable and Disable on Nokia C12 Plus
- New In 2024, Top Free Online Video Rotators for Easy Flips
- In 2024, Catch or Beat Sleeping Snorlax on Pokemon Go For Motorola Moto G34 5G | Dr.fone
- 2024 Approved 9 Best French Video Translators Online and Download Options
- How To Pause Life360 Location Sharing For Motorola Edge 40 Pro | Dr.fone
- Turn Off Screen Lock - Tecno Pop 8
- Updated In 2024, The Perfect Aspect Ratio for Instagram Videos
- Updated Free Video Editing Software The Best Options Without Watermarks
- In 2024, Users Guide How To Create Photo Talking Videos With the Best Tools?
- Updated No-Cost Video Trimming 10 Best Free Online Tools for 2024
- In 2024, Recommended Best Applications for Mirroring Your Tecno Spark 10 4G Screen | Dr.fone
- 2024 Approved Final Cut Pro X How to Crop an Image
- In 2024, 5 Ways Change Your Home Address in Google/Apple Map on Apple iPhone 12 Pro/iPad | Dr.fone
- 3 Things You Must Know about Fake Snapchat Location On Tecno Camon 20 Pro 5G | Dr.fone
- How to share/fake gps on Uber for Poco C55 | Dr.fone
- In 2024, Why Your WhatsApp Location is Not Updating and How to Fix On Oppo Find X6 | Dr.fone
- Updated In 2024, The Ultimate List Top 10 Free Video Trimmers for Windows 10
- Solved Warning Camera Failed on Itel A70 | Dr.fone
- In 2024, The Ultimate Facebook Video Cover Checklist Size, Resolution, and More
- Android Unlock Code Sim Unlock Your Honor 70 Lite 5G Phone and Remove Locked Screen
- In 2024, How To Bypass iCloud Activation Lock on Mac For Apple iPhone XR?
- Title: Updated 2024 Approved Beyond the Script Delving Into the World of Anime Dubbing and Its Impact
- Author: Paul
- Created at : 2024-05-05 05:45:21
- Updated at : 2024-05-06 05:45:21
- Link: https://voice-adjusting.techidaily.com/updated-2024-approved-beyond-the-script-delving-into-the-world-of-anime-dubbing-and-its-impact/
- License: This work is licensed under CC BY-NC-SA 4.0.
