
:max_bytes(150000):strip_icc():format(webp)/tiktok-smart-tv-12dcac76114b4747b9b3db8bb3551ddc.jpg)
The Speakers Selection Top-Rated Audio Recording Applications of the Year
“The Speaker’s Selection: Top-Rated Audio Recording Applications of the Year”
Top 10 Audio Recording Software to Capture Your Voice Easily

Shanoon Cox
Mar 27, 2024• Proven solutions
Whether professional or for amateur purposes, the audio recording software programs are very important. These programs allow manipulating the audio so that it matches the need for a specific project.
The best audio recording software has a variety of tools embedded to polish the audio recorded, in which this article we are going to review the best of them for you.
What is Audio Recording Software?
As the name suggests, the audio recording software is used to record audio using a unique technology. This allows the users to capture their own or the voice they want and transfer it wherever they want. The software also adds effects to the voice and makes it professional to use wherever the user wants to.
What Does a Sound Recorder Use for?
There are several uses of audio recording software program. Some are listed as under:
- In the music field, this software is of great use. It can be used for multitrack recording. The mixing of the sound is then done using the same or different tools.
- The audio recorded can be edited with ease. This includes enhancing and adding effects to it with perfection.
- With microphone use, the recording software can be integrated to make sure that the voice of the user is also recorded if required.
- Some audio recording software programs also come with screen recording, and therefore, these foster multitasking.
List of Top 10 Audio Recording Software Programs
The audio recording software for PC that would make your life easy is mentioned as under.
1.Wondershare DemoCreator
This is by far the best and the most used software program when it comes to audio recording. It is highly reliable and comes with a GUI. The user interface is easy to understand, and so are the functionalities.
With the best and the most advanced controls recording audio has never been this easy. It also acts as Mac audio recording software, and therefore it is highly recommended for all platforms. The frequent updates make this program even easier to use.
Features
- The interface of the program is very easy to use and stress-free.
- The high definition audio can be recorded with ease.
- The program supports 50+ formats to import audio, video, and other files to the system.
- There are highly advanced options for professional audio recording.
- The program can record endless video and audio as far as there is space on your disk.
Pros
- It is one of the programs that support professional audio editing.
- The program is very easy to use as it has a graphical interface.
Cons
- The program is flash software-based, which can slow down the system.
- It does not offer highly advanced audio editing at all.
Supported Platforms
The program can be used with both Windows and Mac.
Go ahead to download and have a try now!
2.WavePad
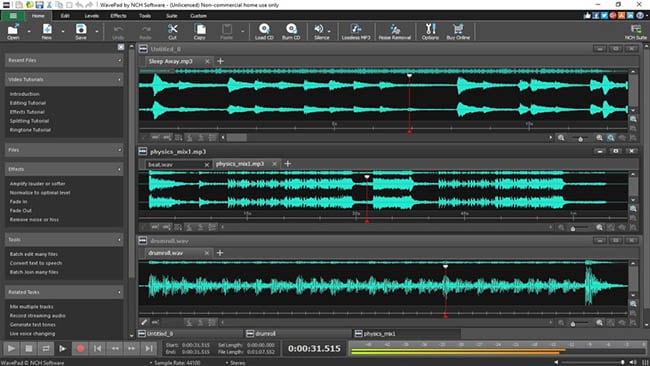
It is one of the best and most used programs to make sure that the audio is recorded with perfection. This program is compatible with most of the audio formats, and therefore it is highly recommended. The overall rating of the program is high as it is used by professionals and, therefore, highly rated as well.
Features
- It has several audio enhancing capabilities, which include amplification and effect addition.
- The audio can be edited, trimmed, and cropped with this program.
- The professional-quality sound recording is used by this program to enhance the capabilities.
Pros
- The best part of this program is its quality of end product that is very high.
- It is a wave editor that gives the users more control over the end product.
Cons
- The mp3 editor of this program does not offer top quality work.
- The program cannot work with multiple files efficiently.
Supported Platforms
It can be installed over Mac, Windows, Android, and iOS.
3.Ocenaudio

As a cross-platform program, this one has a lot to offer. The interface is a bit technical, but overall the use of the program is easy once the hands-on is done. The program is also highly intuitive and allows the users to overcome the day to day audio recording and editing tasks.
Features
- The Ocen Framework is also integrated with this platform to enhance its capabilities.
- The program also records screen if required by the users.
- It is one of the programs that have been rated on other high-end platforms.
Pros
- The program uses auto trim and voice recording controls.
- The sound spectral analysis of the program is highly advanced.
Cons
- The program cannot directly load the file from a CD.
- The program cannot be opened in multiple screens, so the work rate is slow.
Supported Platforms
It is compatible with Mac, Windows, and Linux.
4.Adobe Audition

It can be rightfully regarded as one of the best and the most advanced programs. Backed by years of Adobe experience, it is a program that will get the user a step forward. It is highly recommended to all those users that are looking for a professional level of audio recording.
Features
- It includes multitrack, wave editing, and audio restoration tools to give the best results.
- The essential sound panel has been integrated with the program to get the best oomph effect to the audio.
- The music clips can be integrated within the audio recording to make it sound professional.
Pros
- The platform can be used to create awesome podcasts.
- The audio break can be repaired with perfection.
Cons
- It is expensive, so all the users cannot afford it at all.
- The interface is high tech in nature and requires time to learn.
Supported Platforms
It is supported by Windows and Mac.
5.Audacity

It is free software that is used to record audio professionally. This high-performance program makes sure that the audio which is recorded is also shared with different platforms. The built-in panel is upgraded, and therefore it is highly advance.
Features
- It is ad-free and therefore provides hassle-free work.
- The audio editing and recording have never been as easy as it is with audacity.
- Multitrack editing is also possible with this program.
Pros
- The VST plugin support is provided by the program.
- It is a portable program that can be used for pitch correction.
Cons
- The noise reduction tool of this program needs an upgrade.
- The record to tape feature is currently unavailable.
Supported Platforms
It is supported by Mac, Linux, Windows, and BSD.
6.Wavosaur

It is one of the free programs that can be regarded as better than many paid ones. It is all because the qualities of the program are matchless. The processing of files is done with WAV and Mp3 files filter, which makes the process very much easier.
Features
- The program has multiple document interfaces for multiple file handling.
- The editing features such as cut, copy, paste, and edit can be performed in a single window.
- The waveform representation of the program is accurate and highly advanced.
Pros
- The program offers bit depth convert, pitch shift, and DC offset removal.
- The VST effects can be added to the entire batch of sound files.
Cons
- The audio routing and the multichannel support of the program are not efficient.
- The software sampler extraction is a bit slow when it comes to this program.
Supported Platforms
The program can only be installed on Windows.
7.MixPad
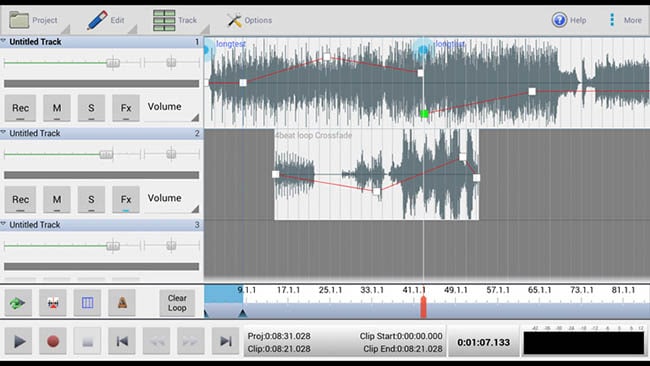
The audio processing and mixing have been made very easy with this platform. The program has an interface that is sleek in design and allows the processing of the audio info with care. The program also supports cloud storage, which means that the entire user’s hard work remains safe and secures all the time.
Features
- The program can mix the unlimited number of tracks all at the same time.
- Depending upon the requirement, the multiple or a single track can be processed at the same time.
- The program supports almost every sound format, so any type of sound can be imported with perfection.
Pros
- The audio effects such as EQ, compression, and reverb can be added with perfection.
- The latency rate is very low, and the program also offers ASIO support for accurate processing.
Cons
- The program only offers the export of the sound that is up to 32 bits.
- The sample rates of up to 96 kHz are only supported, which is less than most of the other mixers.
Supported Platforms
The program can be installed on Mac, Windows, Android, iPad, and Kindle Fire.
8.Sound Forge

If a user wants to completely control the audio editing process, then this software is for them. It is highly advanced and makes sure that the work that is done is highly précised. From Red Book CD creation to sound design and mixing, this program provides the users with complete control and authority over the process.
Features
- The multichannel WAV recording and processing is now possible with the new version of the program.
- The VST plugin support is provided by this program with perfection.
- The VST effects can be chained in a virtual rack.
Pros
- The simple digitization and restoration of the audio have been made simple by this program.
- The one-click solutions allow the users to process the audio tracks easily.
Cons
- The program only offers 32 bits of power, which is very low.
- The multiple VST GUI is not supported by this program.
Supported Platforms
The Sound Forge can be installed on Mac and Windows.
9.Spek

The best part of the software is that it is free and allows the users to overcome the problems which the other audio recorders present. The interface is easy to learn, and therefore the overall usage is easy. The lossless quality is something for which the software is known for. It also supports the FFMPEG library.
Features
- The signal processing is ultra-fast as it uses several threads to process audio.
- The drag and drop support of the program is highly efficient, and the program supports common audio formats.
- The program can be accessed in 19 different languages.
Pros
- The spectral density rulers allow the auto fitting of time.
- The spectral density range of the program is also adjustable.
Cons
- The codec names are, and the audio signal parameters cannot be seen.
- The program is licensed under GPLv3, which is now obsolete.
Supported Platforms
The program is compatible with Windows, Linux, and Mac.
10.Audio Highjack

The program, as the name suggests, makes it possible for the users to completely delve deep into the process of audio editing. The interface, as well as the controls, is very easy to understand and use. For novice users, this program is highly recommended as it makes audio editing a fun-filled activity.
Features
- It provides detailed statistics and min, the max value per channel.
- The processed audio can be listened in real-time to get an idea about the end product.
- The waveform generator and frequency impulse train are embedded within the program.
Pros
- The lame encoder support has been embedded within the recorder to export mp3 files.
- The editor’s look is skin able, which can be changed as per the user choice.
Cons
- The processing options are less as compared to the other recorders.
- The audio files cannot be exported as text, so the program cannot be used with PSpice.
Supported Platforms
The program is only available for Mac.
A Roundup of the Best Audio Recording Software Programs
| No. | Tools | Rating | Supported Formats | Price | Processing Power |
|---|---|---|---|---|---|
| 1 | DemoCreator | 4.5 | .mp3, .m4a, .wav, .wma, .ogg, .flac, .aif, .aiff | $29.99 | 64-bit |
| 2 | WavePad | 4.4 | vox, gsm, WMA, real audio, au, aif, FLAC, and Ogg | $69.95 | 64-bit |
| 3 | Ocenaudio | 4.0 | vox, gsm, WMA, wav, .wma, .ogg, and .flac | Free | 32-bit |
| 4 | Adobe Audition | 4.5 | AIF, AIFF, AIFC | $74.99 | 64-bit |
| 5 | Audacity | 3.9 | mp3, wav, AIFF, au, and ogg | Free | 32-bit |
| 6 | Wavosaur | 3.5 | VST plugins, ASIO driver, multichannel wav files, real-time effect processing. | Free | 32-bit |
| 7 | MixPad | 3.2 | wav, mp3, vox, and gsm | $129 | 32-bit |
| 8 | Sound Forge | 4.0 | SWF, RealMedia 9, WMA, AVI , AIFF, AIF, and SND | Free | 32-bit |
| 9 | Spek | 4.4 | vox, gsm, WMA, Wav, WMA, real audio, au, aif, FLAC, and Ogg | Free | 64-bit |
| 10 | Audio Highjack | 4.2 | .mp3, .m4a, .wav, .wma, aif, FLAC, and Ogg | Free | 64-bit |
Conclusion
With the overall specs and ratings by the users, the Wondershare DemoCreator is the best software that should be used for audio recording.
The program is highly compatible with major operating systems, and therefore it is highly recommended. The overall mechanism is easy, and the program also supports multiple formats.
It is highly technical and is constantly upgraded to make sure that it remains in line with modern technologies. It is a one-stop-shop for all the audio recording needs of the users and therefore highly viable.
With this program, the audio that has been worked on can be shared on most popular social media platforms like YouTube and Facebook.


Shanoon Cox
Shanoon Cox is a writer and a lover of all things video.
Follow @Shanoon Cox
Shanoon Cox
Mar 27, 2024• Proven solutions
Whether professional or for amateur purposes, the audio recording software programs are very important. These programs allow manipulating the audio so that it matches the need for a specific project.
The best audio recording software has a variety of tools embedded to polish the audio recorded, in which this article we are going to review the best of them for you.
What is Audio Recording Software?
As the name suggests, the audio recording software is used to record audio using a unique technology. This allows the users to capture their own or the voice they want and transfer it wherever they want. The software also adds effects to the voice and makes it professional to use wherever the user wants to.
What Does a Sound Recorder Use for?
There are several uses of audio recording software program. Some are listed as under:
- In the music field, this software is of great use. It can be used for multitrack recording. The mixing of the sound is then done using the same or different tools.
- The audio recorded can be edited with ease. This includes enhancing and adding effects to it with perfection.
- With microphone use, the recording software can be integrated to make sure that the voice of the user is also recorded if required.
- Some audio recording software programs also come with screen recording, and therefore, these foster multitasking.
List of Top 10 Audio Recording Software Programs
The audio recording software for PC that would make your life easy is mentioned as under.
1.Wondershare DemoCreator
This is by far the best and the most used software program when it comes to audio recording. It is highly reliable and comes with a GUI. The user interface is easy to understand, and so are the functionalities.
With the best and the most advanced controls recording audio has never been this easy. It also acts as Mac audio recording software, and therefore it is highly recommended for all platforms. The frequent updates make this program even easier to use.
Features
- The interface of the program is very easy to use and stress-free.
- The high definition audio can be recorded with ease.
- The program supports 50+ formats to import audio, video, and other files to the system.
- There are highly advanced options for professional audio recording.
- The program can record endless video and audio as far as there is space on your disk.
Pros
- It is one of the programs that support professional audio editing.
- The program is very easy to use as it has a graphical interface.
Cons
- The program is flash software-based, which can slow down the system.
- It does not offer highly advanced audio editing at all.
Supported Platforms
The program can be used with both Windows and Mac.
Go ahead to download and have a try now!
2.WavePad
It is one of the best and most used programs to make sure that the audio is recorded with perfection. This program is compatible with most of the audio formats, and therefore it is highly recommended. The overall rating of the program is high as it is used by professionals and, therefore, highly rated as well.
Features
- It has several audio enhancing capabilities, which include amplification and effect addition.
- The audio can be edited, trimmed, and cropped with this program.
- The professional-quality sound recording is used by this program to enhance the capabilities.
Pros
- The best part of this program is its quality of end product that is very high.
- It is a wave editor that gives the users more control over the end product.
Cons
- The mp3 editor of this program does not offer top quality work.
- The program cannot work with multiple files efficiently.
Supported Platforms
It can be installed over Mac, Windows, Android, and iOS.
3.Ocenaudio
As a cross-platform program, this one has a lot to offer. The interface is a bit technical, but overall the use of the program is easy once the hands-on is done. The program is also highly intuitive and allows the users to overcome the day to day audio recording and editing tasks.
Features
- The Ocen Framework is also integrated with this platform to enhance its capabilities.
- The program also records screen if required by the users.
- It is one of the programs that have been rated on other high-end platforms.
Pros
- The program uses auto trim and voice recording controls.
- The sound spectral analysis of the program is highly advanced.
Cons
- The program cannot directly load the file from a CD.
- The program cannot be opened in multiple screens, so the work rate is slow.
Supported Platforms
It is compatible with Mac, Windows, and Linux.
4.Adobe Audition
It can be rightfully regarded as one of the best and the most advanced programs. Backed by years of Adobe experience, it is a program that will get the user a step forward. It is highly recommended to all those users that are looking for a professional level of audio recording.
Features
- It includes multitrack, wave editing, and audio restoration tools to give the best results.
- The essential sound panel has been integrated with the program to get the best oomph effect to the audio.
- The music clips can be integrated within the audio recording to make it sound professional.
Pros
- The platform can be used to create awesome podcasts.
- The audio break can be repaired with perfection.
Cons
- It is expensive, so all the users cannot afford it at all.
- The interface is high tech in nature and requires time to learn.
Supported Platforms
It is supported by Windows and Mac.
5.Audacity
It is free software that is used to record audio professionally. This high-performance program makes sure that the audio which is recorded is also shared with different platforms. The built-in panel is upgraded, and therefore it is highly advance.
Features
- It is ad-free and therefore provides hassle-free work.
- The audio editing and recording have never been as easy as it is with audacity.
- Multitrack editing is also possible with this program.
Pros
- The VST plugin support is provided by the program.
- It is a portable program that can be used for pitch correction.
Cons
- The noise reduction tool of this program needs an upgrade.
- The record to tape feature is currently unavailable.
Supported Platforms
It is supported by Mac, Linux, Windows, and BSD.
6.Wavosaur
It is one of the free programs that can be regarded as better than many paid ones. It is all because the qualities of the program are matchless. The processing of files is done with WAV and Mp3 files filter, which makes the process very much easier.
Features
- The program has multiple document interfaces for multiple file handling.
- The editing features such as cut, copy, paste, and edit can be performed in a single window.
- The waveform representation of the program is accurate and highly advanced.
Pros
- The program offers bit depth convert, pitch shift, and DC offset removal.
- The VST effects can be added to the entire batch of sound files.
Cons
- The audio routing and the multichannel support of the program are not efficient.
- The software sampler extraction is a bit slow when it comes to this program.
Supported Platforms
The program can only be installed on Windows.
7.MixPad
The audio processing and mixing have been made very easy with this platform. The program has an interface that is sleek in design and allows the processing of the audio info with care. The program also supports cloud storage, which means that the entire user’s hard work remains safe and secures all the time.
Features
- The program can mix the unlimited number of tracks all at the same time.
- Depending upon the requirement, the multiple or a single track can be processed at the same time.
- The program supports almost every sound format, so any type of sound can be imported with perfection.
Pros
- The audio effects such as EQ, compression, and reverb can be added with perfection.
- The latency rate is very low, and the program also offers ASIO support for accurate processing.
Cons
- The program only offers the export of the sound that is up to 32 bits.
- The sample rates of up to 96 kHz are only supported, which is less than most of the other mixers.
Supported Platforms
The program can be installed on Mac, Windows, Android, iPad, and Kindle Fire.
8.Sound Forge
If a user wants to completely control the audio editing process, then this software is for them. It is highly advanced and makes sure that the work that is done is highly précised. From Red Book CD creation to sound design and mixing, this program provides the users with complete control and authority over the process.
Features
- The multichannel WAV recording and processing is now possible with the new version of the program.
- The VST plugin support is provided by this program with perfection.
- The VST effects can be chained in a virtual rack.
Pros
- The simple digitization and restoration of the audio have been made simple by this program.
- The one-click solutions allow the users to process the audio tracks easily.
Cons
- The program only offers 32 bits of power, which is very low.
- The multiple VST GUI is not supported by this program.
Supported Platforms
The Sound Forge can be installed on Mac and Windows.
9.Spek
The best part of the software is that it is free and allows the users to overcome the problems which the other audio recorders present. The interface is easy to learn, and therefore the overall usage is easy. The lossless quality is something for which the software is known for. It also supports the FFMPEG library.
Features
- The signal processing is ultra-fast as it uses several threads to process audio.
- The drag and drop support of the program is highly efficient, and the program supports common audio formats.
- The program can be accessed in 19 different languages.
Pros
- The spectral density rulers allow the auto fitting of time.
- The spectral density range of the program is also adjustable.
Cons
- The codec names are, and the audio signal parameters cannot be seen.
- The program is licensed under GPLv3, which is now obsolete.
Supported Platforms
The program is compatible with Windows, Linux, and Mac.
10.Audio Highjack
The program, as the name suggests, makes it possible for the users to completely delve deep into the process of audio editing. The interface, as well as the controls, is very easy to understand and use. For novice users, this program is highly recommended as it makes audio editing a fun-filled activity.
Features
- It provides detailed statistics and min, the max value per channel.
- The processed audio can be listened in real-time to get an idea about the end product.
- The waveform generator and frequency impulse train are embedded within the program.
Pros
- The lame encoder support has been embedded within the recorder to export mp3 files.
- The editor’s look is skin able, which can be changed as per the user choice.
Cons
- The processing options are less as compared to the other recorders.
- The audio files cannot be exported as text, so the program cannot be used with PSpice.
Supported Platforms
The program is only available for Mac.
A Roundup of the Best Audio Recording Software Programs
| No. | Tools | Rating | Supported Formats | Price | Processing Power |
|---|---|---|---|---|---|
| 1 | DemoCreator | 4.5 | .mp3, .m4a, .wav, .wma, .ogg, .flac, .aif, .aiff | $29.99 | 64-bit |
| 2 | WavePad | 4.4 | vox, gsm, WMA, real audio, au, aif, FLAC, and Ogg | $69.95 | 64-bit |
| 3 | Ocenaudio | 4.0 | vox, gsm, WMA, wav, .wma, .ogg, and .flac | Free | 32-bit |
| 4 | Adobe Audition | 4.5 | AIF, AIFF, AIFC | $74.99 | 64-bit |
| 5 | Audacity | 3.9 | mp3, wav, AIFF, au, and ogg | Free | 32-bit |
| 6 | Wavosaur | 3.5 | VST plugins, ASIO driver, multichannel wav files, real-time effect processing. | Free | 32-bit |
| 7 | MixPad | 3.2 | wav, mp3, vox, and gsm | $129 | 32-bit |
| 8 | Sound Forge | 4.0 | SWF, RealMedia 9, WMA, AVI , AIFF, AIF, and SND | Free | 32-bit |
| 9 | Spek | 4.4 | vox, gsm, WMA, Wav, WMA, real audio, au, aif, FLAC, and Ogg | Free | 64-bit |
| 10 | Audio Highjack | 4.2 | .mp3, .m4a, .wav, .wma, aif, FLAC, and Ogg | Free | 64-bit |
Conclusion
With the overall specs and ratings by the users, the Wondershare DemoCreator is the best software that should be used for audio recording.
The program is highly compatible with major operating systems, and therefore it is highly recommended. The overall mechanism is easy, and the program also supports multiple formats.
It is highly technical and is constantly upgraded to make sure that it remains in line with modern technologies. It is a one-stop-shop for all the audio recording needs of the users and therefore highly viable.
With this program, the audio that has been worked on can be shared on most popular social media platforms like YouTube and Facebook.
Shanoon Cox
Shanoon Cox is a writer and a lover of all things video.
Follow @Shanoon Cox
Mastering Mac Audio Keyframe Techniques in Adobe Premiere Pro (2023 Edition)
How to Create Audio Keyframes in Adobe Premiere Pro on Mac

Benjamin Arango
Aug 18, 2022• Proven solutions
Keyframing is one of the most vital components in post-production that can be applied to video and audio tracks. For instance, by adding keyframes in Premiere Pro, you can easily apply properties and values to a specific segment. To do this, you can set up an audio keyframe at the start and another one at the ending of the selected part.
Therefore, with the Premiere Pro keyframe options, you can achieve a gradual flow in your tracks. Without much ado, I’m going to help you set up audio keyframes in Premiere Pro with their vital operations in this post.
Part 1: How to Add Audio Keyframes in Adobe Premiere Pro on Mac?
As I have mentioned, to apply adjustments or properties to a specific point in the audio track, we can use Adobe Premiere keyframes. As of now, there are two kinds of keyframes in Adobe Premiere – Clip Keyframe and Track Keyframe. Before you start adding keyframes in Premiere Pro, you should know their difference.
- Clip Keyframes: This would apply audio effects for the selected clip (like adjusting the volume level). The audio keyframe will only apply to the clip that you have selected and not the entire track.
- Track Keyframes: These audio keyframes in Premiere are applied to the entire audio track (they have values like Volume and Mute).
Now when we have covered the basics, let’s learn how to set up audio keyframes in Premiere on your Mac.
Step 1: Add the Audio Track on Adobe Premiere Pro
To start with, you can launch Adobe Premiere Pro, go to your Project > Import, and simply load any audio track. You can also drag and drop any audio file to the project as well.

Once the audio track is added to the project, you can further drag and drop it to the sequence section (timelines) at the bottom.

Step 2: Show Keyframes for the Track
The application would automatically render different keyframes already present in the track. For this, you need to first select the ribbon of your audio track from the timeline. Now, just right-click on the working area and click on the “Show Audio Keyframes” button from the context menu.

If you want, you can also click on the “Show Keyframes” button that is depicted by a radio/circle icon on the timeline.

Step 3: Work on Audio Keyframes in Premiere Pro
Now, you can view either clip or track keyframes for the track. For this, you can just right-click the keyframe button on the timeline to get different options. Here, you can choose to get Clip or Track keyframes in Premiere Pro. There are options to mute the entire audio or set up its volume under the track option.

Once you have enabled the audio keyframe options in Premiere Pro, you can view keyframes in a highlighted color. You can now take the assistance of the Pen tool or press the CMD key on your Mac to select keyframes. This will let you select the starting and ending keyframes in Premiere Pro so that you can easily apply the desired effect to the selected segment.

Part 2: How to Fade Audio In/Out with Keyframes in Adobe Premiere Pro on Mac?
Once you have learned how to use the Adobe Premiere keyframe feature, you can apply all kinds of transitions and effects to a segment. Let’s suppose you wish to implement fade-in or out features for any segment. In this case, we will use the Clip Keyframing option in Premiere Pro to achieve these transitions the way we like.
Step 1: Get Clip Keyframes in Premiere Pro
Firstly, you can just add any audio track to your Premiere Pro project and drag it to the timeline. You can just click on the show keyframes button to start adding keyframes in Premiere Pro.
If you want, you can just right-click the track, go to the Show Clip Keyframes > Volume > Level option. This will show the level of the volume for different keyframes, letting you pick the right segments to fade in and out.

Step 2: Apply Fade-in or Out options
Once you have clip keyframes in your track, you can easily do whatever you like. You can use the Pen tool or press the CMD key on your Mac to select the starting and the ending of the clip.
Now, go to the audio segment from the timeline and simply place the audio level up (to fade-in) or down (to fade-out). You can set the audio levels for different segments the way you like to customize these operations in your audio track.

Pro Tip: Use Inbuilt Fade In/Out Transitions
With keyframes in Premiere Pro, you can certainly customize the fade in/out options. Though, if you are running short on time, then you can use its inbuilt features for audio adjustments.
For this, you can just go to its Effects > Audio Transitions option. To fade-out any clip, select the Crossfade > Exponential Fade and simply drag and drop to the location of your choice.

In the same way, you can also go to Effects > Audio Transitions > Crossfade and choose the “Constant Gain” feature. You can drag and drop the Contact Gain effect on any segment to implement the fade-in effect.
That’s a wrap, everyone! I’m sure that after reading this post, you would be able to set up audio keyframes in Adobe Premiere Pro. Since adding keyframes in Premiere can be done automatically, it would save your time in audio editing and post-production. Mostly, the clip audio keyframing is used in Adobe to customize the sound at any desired segment. Apart from fade-in or out, there are tons of other effects that you can apply to your audio tracks with the help of keyframes. Go ahead and try the Adobe Premiere Pro keyframing feature and let us know about your experience in the comments.
Benjamin Arango
Benjamin Arango is a writer and a lover of all things video.
Follow @Benjamin Arango
Benjamin Arango
Aug 18, 2022• Proven solutions
Keyframing is one of the most vital components in post-production that can be applied to video and audio tracks. For instance, by adding keyframes in Premiere Pro, you can easily apply properties and values to a specific segment. To do this, you can set up an audio keyframe at the start and another one at the ending of the selected part.
Therefore, with the Premiere Pro keyframe options, you can achieve a gradual flow in your tracks. Without much ado, I’m going to help you set up audio keyframes in Premiere Pro with their vital operations in this post.
Part 1: How to Add Audio Keyframes in Adobe Premiere Pro on Mac?
As I have mentioned, to apply adjustments or properties to a specific point in the audio track, we can use Adobe Premiere keyframes. As of now, there are two kinds of keyframes in Adobe Premiere – Clip Keyframe and Track Keyframe. Before you start adding keyframes in Premiere Pro, you should know their difference.
- Clip Keyframes: This would apply audio effects for the selected clip (like adjusting the volume level). The audio keyframe will only apply to the clip that you have selected and not the entire track.
- Track Keyframes: These audio keyframes in Premiere are applied to the entire audio track (they have values like Volume and Mute).
Now when we have covered the basics, let’s learn how to set up audio keyframes in Premiere on your Mac.
Step 1: Add the Audio Track on Adobe Premiere Pro
To start with, you can launch Adobe Premiere Pro, go to your Project > Import, and simply load any audio track. You can also drag and drop any audio file to the project as well.
Once the audio track is added to the project, you can further drag and drop it to the sequence section (timelines) at the bottom.
Step 2: Show Keyframes for the Track
The application would automatically render different keyframes already present in the track. For this, you need to first select the ribbon of your audio track from the timeline. Now, just right-click on the working area and click on the “Show Audio Keyframes” button from the context menu.
If you want, you can also click on the “Show Keyframes” button that is depicted by a radio/circle icon on the timeline.
Step 3: Work on Audio Keyframes in Premiere Pro
Now, you can view either clip or track keyframes for the track. For this, you can just right-click the keyframe button on the timeline to get different options. Here, you can choose to get Clip or Track keyframes in Premiere Pro. There are options to mute the entire audio or set up its volume under the track option.
Once you have enabled the audio keyframe options in Premiere Pro, you can view keyframes in a highlighted color. You can now take the assistance of the Pen tool or press the CMD key on your Mac to select keyframes. This will let you select the starting and ending keyframes in Premiere Pro so that you can easily apply the desired effect to the selected segment.
Part 2: How to Fade Audio In/Out with Keyframes in Adobe Premiere Pro on Mac?
Once you have learned how to use the Adobe Premiere keyframe feature, you can apply all kinds of transitions and effects to a segment. Let’s suppose you wish to implement fade-in or out features for any segment. In this case, we will use the Clip Keyframing option in Premiere Pro to achieve these transitions the way we like.
Step 1: Get Clip Keyframes in Premiere Pro
Firstly, you can just add any audio track to your Premiere Pro project and drag it to the timeline. You can just click on the show keyframes button to start adding keyframes in Premiere Pro.
If you want, you can just right-click the track, go to the Show Clip Keyframes > Volume > Level option. This will show the level of the volume for different keyframes, letting you pick the right segments to fade in and out.
Step 2: Apply Fade-in or Out options
Once you have clip keyframes in your track, you can easily do whatever you like. You can use the Pen tool or press the CMD key on your Mac to select the starting and the ending of the clip.
Now, go to the audio segment from the timeline and simply place the audio level up (to fade-in) or down (to fade-out). You can set the audio levels for different segments the way you like to customize these operations in your audio track.
Pro Tip: Use Inbuilt Fade In/Out Transitions
With keyframes in Premiere Pro, you can certainly customize the fade in/out options. Though, if you are running short on time, then you can use its inbuilt features for audio adjustments.
For this, you can just go to its Effects > Audio Transitions option. To fade-out any clip, select the Crossfade > Exponential Fade and simply drag and drop to the location of your choice.
In the same way, you can also go to Effects > Audio Transitions > Crossfade and choose the “Constant Gain” feature. You can drag and drop the Contact Gain effect on any segment to implement the fade-in effect.
That’s a wrap, everyone! I’m sure that after reading this post, you would be able to set up audio keyframes in Adobe Premiere Pro. Since adding keyframes in Premiere can be done automatically, it would save your time in audio editing and post-production. Mostly, the clip audio keyframing is used in Adobe to customize the sound at any desired segment. Apart from fade-in or out, there are tons of other effects that you can apply to your audio tracks with the help of keyframes. Go ahead and try the Adobe Premiere Pro keyframing feature and let us know about your experience in the comments.
Benjamin Arango
Benjamin Arango is a writer and a lover of all things video.
Follow @Benjamin Arango
TOP 3 Online Services for Augmenting MP3 Sound Intensity and Clarity
No matter how high-end your speakers are, there are certain audio files you will come across that sound uncomfortably low. Even when you put the volume at its peak, the sound seems to be dampened for those audio files. For example, if you have an old music file, you will find it sound lower in comparison to a modern music file. That is when you will need an MP3 volume booster that can be highly useful. You can boost the volume of the audio file so that the music as well as the voice becomes prominent.
Such an MP3 audio booster is useful for podcasters, music producers, and voiceover recorders. If you want to boost audio for a few files, you can opt for an online tool. But if you are making a professional video where you need to boost the audio, we recommend a professional video editor with audio booster. Here is the list of the top 3 MP3 volume booster online that you can use on your computer as well as smartphone.
Filmora Audio Editor
Edit system and microphone audio seperately
One click to match your sound with your video
Automatically lower the volume of one track to make another track clearer
1. FileConverto Boost MP3 Volume
FileConverto has the most popular mp3 volume booster online tool. This is because FileConverto has all the different tools to modify audio and video files in one place. You have to opt for Boost MP3 Volume tool to enhance the volume of your audio file. You can not only increase the volume but also decrease the volume as per your requirements. Most importantly, you can select decibel of increment or decrement. Moreover, you can select the audio channel whose volume you want to boost. Here are the key features of File Boost MP3 Volume tool.
- Allows uploading audio files of up to 150 MB.
- Option to choose decibel value as per requirement.
- Select audio channel for boosting volume.
- Increase as well as decrease volume.
- Easy user interface and quick boosting process.
How to boost audio volume with FileConverto?
Step 1: You need to visit “fileconverto.com/boost-mp3-volume” from your web browser.
Step 2: You need to click on Browse button and select the MP3 file whose volume you want to boost.
Step 3: You will have to select Increase Volume option from Select Action.
Step 4: Select the decibel value by which you want the increment.
Step 5: Select the appropriate audio channel(s) for the boost.
Step 6: Click on ‘Submit Now’ for the file to get uploaded and volume to get boosted.
Once completed, you can select the file name and download it.

2. Audio Alter Volume Changer
Audio Alter is a versatile online tool through which you can boost the volume of your audio files. The platform supports not just MP3 files but also WAV, FLAC, and OGG audio files. Therefore, it has become a preferred destination for the concerned users. You can increase or decrease volume using decibel slider. Moreover, you can listen to the modified audio file before downloading to ensure that you have the correct volume level. Here are all the key features of Audio Alter Volume Changer.
- Drag and drop files directly.
- Supports multiple file formats.
- Allows uploading audio file up to 50 MB.
- Raise or lower volume as required.
- Live preview of modifications before downloading.
- Various presets available on bass boost.

How to boost sound online with Audio Alter?
Step 1: On your web browser, you need to navigate to audioalter.com/volume
Step 2: Add your file by clicking on Browse Computer. You can even drag and drop the file on the user interface.
Step 3: Now you can use the slider and select the dB value. You can click on Play button for live preview.
Step 4: Click on Submit button to make the changes in your audio file. Once done, you can download the file.
3. Online Converter MP3 Audio Booster
This is another simple but effective online tool to boost the volume of any MP3 audio file. The best part is that you can upload an MP3 file of size 200 MB which is the largest among all online tools. You should keep in mind that the platform supports only MP3 files. You can increase as well as decrease the volume of your audio file. Besides, you can select the percentage or the decibel by which you the appreciation or depression on the audio volume. Here are the key features of Online Converter MP3 volume booster.
- Allows boost by decibel or percentage.
- Maximum upload file size of 200 MB.
- Allows increase or decreasing volume.
- Various other audio file based tools available.
How to boost audio volume with Online Converter?
Step 1: You will have visit “www.onlineconverter.com/increase-mp3-volume“ from your web browser.
Step 2: Click on Choose File button to upload MP3 file whose volume you want to boost.
Step 3: Select the Volume boost percentage or decibel as per your preference.
Step 4: Finally, click on Convert button for its volume to get boosted as per selected parameters.

Bonus: Boost Volume Of Any Audio File With A Professional Software
You can see that all these online audio booster tools have certain limitations. First of all, there is a limitation of file size. Secondly, you have to waste your internet data to upload and download files. At times, the uploading gets stuck which could be annoying. Besides, you cannot edit different aspects of audio to enhance the overall pleasantness of the audio. That is where a professional audio editor can be useful.
We recommend Wondershare Filmora where you can edit audio and video as per requirement. The software supports various types of audio files instead of just MP3 files. You can combine and sync audio and video and edit all the different aspects of audio as per requirement. Here are the steps to boost audio volume using Filmora.
For Win 7 or later (64-bit)
For macOS 10.12 or later
Step 1: Download and install Wondershare Filmora.
Step 2: Open Filmora and go to File > Import Media > Import Media Files option.

Step 3: From your hard drive select the audio file whose volume you want to boost.
Step 4: Thereafter, drag the audio file on the timeline and right-click on it to select Adjust Audio option.

Step 5: You can adjust the volume on the left side of the screen as well as tweak with other available parameters.

Step 6: Click on Export button and save the file to your hard drive.
Conclusion –
Boosting the volume of an MP3 audio file is no more an esoteric task. You do not need to download any software as there are mp3 volume booster online tools available to get the job done perfectly. Starting from boosting the background music to increasing and decreasing voice, you can modify MP3 as well as other audio files. If you are looking for a professional software to tweak various aspects of audio, we recommend Wondershare Filmora.
1. FileConverto Boost MP3 Volume
FileConverto has the most popular mp3 volume booster online tool. This is because FileConverto has all the different tools to modify audio and video files in one place. You have to opt for Boost MP3 Volume tool to enhance the volume of your audio file. You can not only increase the volume but also decrease the volume as per your requirements. Most importantly, you can select decibel of increment or decrement. Moreover, you can select the audio channel whose volume you want to boost. Here are the key features of File Boost MP3 Volume tool.
- Allows uploading audio files of up to 150 MB.
- Option to choose decibel value as per requirement.
- Select audio channel for boosting volume.
- Increase as well as decrease volume.
- Easy user interface and quick boosting process.
How to boost audio volume with FileConverto?
Step 1: You need to visit “fileconverto.com/boost-mp3-volume” from your web browser.
Step 2: You need to click on Browse button and select the MP3 file whose volume you want to boost.
Step 3: You will have to select Increase Volume option from Select Action.
Step 4: Select the decibel value by which you want the increment.
Step 5: Select the appropriate audio channel(s) for the boost.
Step 6: Click on ‘Submit Now’ for the file to get uploaded and volume to get boosted.
Once completed, you can select the file name and download it.
2. Audio Alter Volume Changer
Audio Alter is a versatile online tool through which you can boost the volume of your audio files. The platform supports not just MP3 files but also WAV, FLAC, and OGG audio files. Therefore, it has become a preferred destination for the concerned users. You can increase or decrease volume using decibel slider. Moreover, you can listen to the modified audio file before downloading to ensure that you have the correct volume level. Here are all the key features of Audio Alter Volume Changer.
- Drag and drop files directly.
- Supports multiple file formats.
- Allows uploading audio file up to 50 MB.
- Raise or lower volume as required.
- Live preview of modifications before downloading.
- Various presets available on bass boost.
How to boost sound online with Audio Alter?
Step 1: On your web browser, you need to navigate to audioalter.com/volume
Step 2: Add your file by clicking on Browse Computer. You can even drag and drop the file on the user interface.
Step 3: Now you can use the slider and select the dB value. You can click on Play button for live preview.
Step 4: Click on Submit button to make the changes in your audio file. Once done, you can download the file.
3. Online Converter MP3 Audio Booster
This is another simple but effective online tool to boost the volume of any MP3 audio file. The best part is that you can upload an MP3 file of size 200 MB which is the largest among all online tools. You should keep in mind that the platform supports only MP3 files. You can increase as well as decrease the volume of your audio file. Besides, you can select the percentage or the decibel by which you the appreciation or depression on the audio volume. Here are the key features of Online Converter MP3 volume booster.
- Allows boost by decibel or percentage.
- Maximum upload file size of 200 MB.
- Allows increase or decreasing volume.
- Various other audio file based tools available.
How to boost audio volume with Online Converter?
Step 1: You will have visit “www.onlineconverter.com/increase-mp3-volume“ from your web browser.
Step 2: Click on Choose File button to upload MP3 file whose volume you want to boost.
Step 3: Select the Volume boost percentage or decibel as per your preference.
Step 4: Finally, click on Convert button for its volume to get boosted as per selected parameters.
Bonus: Boost Volume Of Any Audio File With A Professional Software
You can see that all these online audio booster tools have certain limitations. First of all, there is a limitation of file size. Secondly, you have to waste your internet data to upload and download files. At times, the uploading gets stuck which could be annoying. Besides, you cannot edit different aspects of audio to enhance the overall pleasantness of the audio. That is where a professional audio editor can be useful.
We recommend Wondershare Filmora where you can edit audio and video as per requirement. The software supports various types of audio files instead of just MP3 files. You can combine and sync audio and video and edit all the different aspects of audio as per requirement. Here are the steps to boost audio volume using Filmora.
For Win 7 or later (64-bit)
For macOS 10.12 or later
Step 1: Download and install Wondershare Filmora.
Step 2: Open Filmora and go to File > Import Media > Import Media Files option.
Step 3: From your hard drive select the audio file whose volume you want to boost.
Step 4: Thereafter, drag the audio file on the timeline and right-click on it to select Adjust Audio option.
Step 5: You can adjust the volume on the left side of the screen as well as tweak with other available parameters.
Step 6: Click on Export button and save the file to your hard drive.
Conclusion –
Boosting the volume of an MP3 audio file is no more an esoteric task. You do not need to download any software as there are mp3 volume booster online tools available to get the job done perfectly. Starting from boosting the background music to increasing and decreasing voice, you can modify MP3 as well as other audio files. If you are looking for a professional software to tweak various aspects of audio, we recommend Wondershare Filmora.
Also read:
- Updated Should I Use Audio Ducking to Help Sound Better?
- Essential Guide Integrating Audio with Animated GIFs on macOS for 2024
- Top 10 Online Platforms for Sourcing Professional-Quality Montage Tracks for 2024
- New 2024 Approved The Ultimate Guide to GarageBand Audio Capture Techniques
- Updated Navigating the Maze of Auditory Reflections Three Straightforward Solutions for 2024
- Updated In 2024, Useful Resources to Listen or Download Soft Background Music
- Updated 2024 Approved Elite 10 Audio Alteration Solutions for Males Seeking Gender-Specific Soundscapes
- Updated 2024 Approved Mastering Silent Soundscapes Cutting-Edge Techniques for Background Noise Management
- 2024 Approved How to Extract the Beat From Any Song Using Online Tools
- In 2024, Discovering the Elite 6 Leading Auto-Transcribing Software Solutions
- Updated 2024 Approved Best Free Online Audio Trimmers to Trim Audio Easily
- New 3 Ways to Convert a Podcast to MP3 for 2024
- Unlocking the Potential of Sound in Animated Windows GIF Creations for 2024
- New The Ultimate Guide 10 Leading Audio-to-Text Transcription Applications (Free/Paid) for 2024
- Updated How to Cut Audio From Video on iPhone/Mac
- New 2024 Approved Leading Sites for Accessing True Nature Audio Archives
- New Windows Audio Level Automation Using Adobe Premiere
- Updated Harmonized Discoveries Your Online Compendium for Chart-Topping Songs
- 5 Best Sound Mixer for Windows 10
- Updated Progressive Audio Fade-Out Effects in Adobe Rushs 2023 Update for 2024
- 2024 Approved Top 7 Online Audio Cutters for Efficient and Hassle-Free File Management
- Updated In 2024, How to Record Sound on Mac? 5 Useful Tips for You
- In 2024, Mastering Sound Silence in iMovie on macOS A Step-by-Step Tutorial
- Updated Mastering Pitch Adjustment with Pristine Audacity Outputs for 2024
- Updated 2024 Approved Exploring the Top Audio Distortion Software of Today
- 2024 Approved Audiovisual Alchemy Expert Tips for Incorinasiting and Modifying Audio Timestamps for Cinematic Effects in Final Cut Pro X
- Updated In 2024, Seeking High-Pitched Wind Chime Audio Replica
- Perfect Purity of Sound Unveiling Techniques to Exclude Voices in Adobe Audition Projects
- Updated How to Change Your Voice on Audacity, In 2024
- Updated 2024 Approved Voice Variation Ventures 10 Novel Approaches to Infuse Joy Into Phone Conversations
- Updated 2024 Approved Premier Voice Capture Apps on Android The Best
- New Ranking Your Voice The Top 7 Editing Software for Android Users
- 2024 Approved Paramount Practices in Gathering Your Precious Collection of High-Fidelity YouTube Audio
- Updated The Ultimate Compilation Top 7 FREE Voice Transformation Tools for Unleashing Your Inner Artist for 2024
- Updated In 2024, Cutting-Edge Free Digital Audio Equalizer Utilities
- Voice Clarity Revolution An Overview of Noise Reduction Strategies in Audio Editing Web Portals for 2024
- Sourcing Sonic Analogs of Alloy Wind Instruments
- New In 2024, Precision Timing in Post-Production Matching Video Cuts with Audio Beats Using Premiere Pro
- Leading Internet MP3 Editing Solution
- Updated 2024 Approved Comprehensive Guide to Attaching Audios in Magix Movie Editor 2023
- HarmonyHack Pro V3 Next-Gen Audio Manipulation for Singers
- New The Leading 2024 Audio Eradicator Software Upgrade Your Multimedia Experience
- Updated Beginners Journey Into Podcasting Making Sounds Count Using Audacity for 2024
- New In 2024, Elevate Sound Integrity with Preventative Noise Suppression Tactics
- Updated Best Practices for Exporting Audacity Sessions as MP3 Files
- Updated 2024 Approved Busting the DAW Fallacies Insights Into Digital Audio Production
- Updated For All Level 9 Best Podcast Microphones for 2024
- New 2024 Approved Harmonizing Sounds with Imagery Professional Strategies to Boost Your Videography
- Innovations in Home Audio Engineering Analyzing the Best and Worst of the Top Digital Music Makers This Year for 2024
- Updated In 2024, How to Use Voice Changer Plus on Your iPhone?
- New Best 10 Linux Alternatives To Adobe Premiere
- In 2024, Unlocking Apple iPhone 12 Lock Screen 3 Foolproof Methods that Actually Work
- In 2024, Here are Some of the Best Pokemon Discord Servers to Join On Tecno Spark 20C | Dr.fone
- Hassle-Free Ways to Remove FRP Lock from Oppo F25 Pro 5G Phones with/without a PC
- How To Bypass Vivo Y36i FRP In 3 Different Ways
- Undelete lost contacts from Samsung Galaxy S23+.
- Updated 2024 Approved Break Free From Adobe 10 Innovative Premiere Elements Alternatives
- In 2024, Additional Tips About Sinnoh Stone For Samsung Galaxy F14 5G | Dr.fone
- How to Reset a Samsung Galaxy M34 5G Phone that is Locked?
- Top 15 Augmented Reality Games Like Pokémon GO To Play On Samsung Galaxy A15 5G | Dr.fone
- How to Change Your Samsung Galaxy S23 Ultra Location on life360 Without Anyone Knowing? | Dr.fone
- Motorola Razr 40 Ultra Video Recovery - Recover Deleted Videos from Motorola Razr 40 Ultra
- How to Unlock Xiaomi Redmi Note 12R Phone without Any Data Loss
- In 2024, How To Erase an iPhone X Without Apple ID Password?
- In 2024, Hassle-Free Ways to Remove FRP Lock on Motorola Edge 2023 Phones with/without a PC
- A Step-by-Step Guide on Using ADB and Fastboot to Remove FRP Lock from your Honor Play 8T
- How to Detect and Remove Spyware on Vivo Y78t? | Dr.fone
- In 2024, How Do You Remove Restricted Mode on iPhone 6s | Dr.fone
- In 2024, Ultimate Guide from Infinix Hot 40 Pro FRP Bypass
- Title: The Speakers Selection Top-Rated Audio Recording Applications of the Year
- Author: Paul
- Created at : 2024-05-20 01:47:38
- Updated at : 2024-05-21 01:47:38
- Link: https://voice-adjusting.techidaily.com/the-speakers-selection-top-rated-audio-recording-applications-of-the-year/
- License: This work is licensed under CC BY-NC-SA 4.0.
