
:max_bytes(150000):strip_icc():format(webp)/how-to-view-instagram-without-an-account-5271416-505eeceaf0e142ed8674d2ce2244a8be.jpg)
New Harnessing Free Speech-to-Text Technology A 2023 Roundup of Online Resources
“Harnessing Free Speech-to-Text Technology: A 2023 Roundup of Online Resources”
10+ Free Online Audio to Text Converters

Shanoon Cox
Mar 27, 2024• Proven solutions
An audio-to-text converter is a tool that can convert audio files to texts or even record any audio and produce the text of it simultaneously. Audio files are one of the most used methods of storing information. From online classes and long lectures to big business meetings and product information, audio is being shared a lot across the world.
But accessing information from a long audio file can be difficult and time-consuming, which is why there is a need to convert audio to text. Information in the form of text can easily be fully or partly accessed and edited whenever needed. And texts can also easily be shared with whomever you want.
So let’s have a look at some of the best audio-to-text converters that might be of use to you.


10+ Free Online Audio to Text Converters
There is number of audio text converters available in the online market that can help you while studying, researching, or even in your business. Some of these recorders can convert any audio file to texts while some others can record and convert to text at the same time. Here we will talk about the top 11 free applications that can be used to convert audio to text.
| 1 - Filmora | 2 - Audext | 3 - Sonix.ai |
|---|---|---|
| 4 - Virtualspeech.com | 5 - Speechnotes | 6 - SpeechTexter |
| 7 - Textfromtospeech.com | 8 - Dictation.io | 9 - Voice Note |
| 10 - Voice Notebook | 11 - NaturalReaders |
1. Wondershare Filmora
Filmora’s Speech To Text (STT) function allows you to transcript audio/voice to subtitles/text in one click. it can save your plenty of time on transcribing subtitles and boost your editing efficiency by applying speech-to-text.
What you need to do is download the software and subsribe for its plan.
Features
- Built-in function to transcribe subtitles and captions for your video
- High accuracy in generating text, allows you to edit text by yourself
- Supports up to 26 languages of transcription to engage more users all around the world
- Offers various tools for editing your videos and audio
2. Audext
Audext is a free online application that can help you to save a lot of time while transcribing any audio to text. The transcription to text is done with the use of an advanced AI and hence produces faster and more accurate results.
Audext is used by people from different sectors like education, marketing, media, consulting, healthcare, etc. for their work purposes.

Features
- An inbuilt editor for editing the text while transcribing
- Identifies the speaker easily
- Supports a variety of audio and video formats like MP3, WAV, MP4, etc.
- Offers an option of easy upload and export of files
Pricing
- Free
- Transcription costs for one hour are $12
- Or with the subscription $5
3. Sonix.ai
Sonix is a fast and accurate application that can be used to convert audio to text for any purpose. This application offers a 30-minute free transcription after which an affordable amount may be charged.
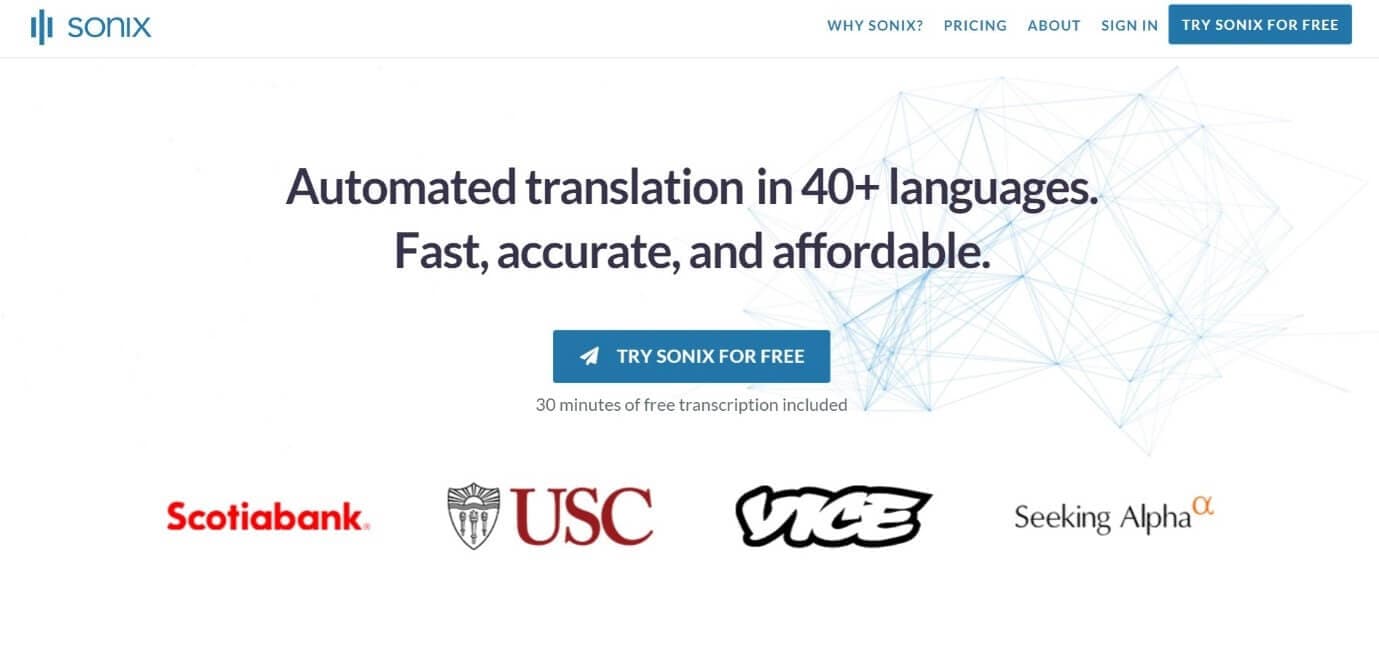
Features
- Automatic transcription of files and accessibility of these files from any device
- Advanced translation of these devices into 30 different languages
- Addition of subtitles into any video for easy understanding
- A Sonix media player that allows to share and publish files easily
Pricing
- Free
- Standard subscription - $10 per hour
- Premium subscription - $5 per hour, and an addition of $22 per month
4. Virtualspeech.com
Virtualspeech is an online tool that can transcribe audio to text free. It is a very simple application that allows fats conversion of audio files to texts. After conversion, the file will be emailed to the user from where it can be downloaded and saved.
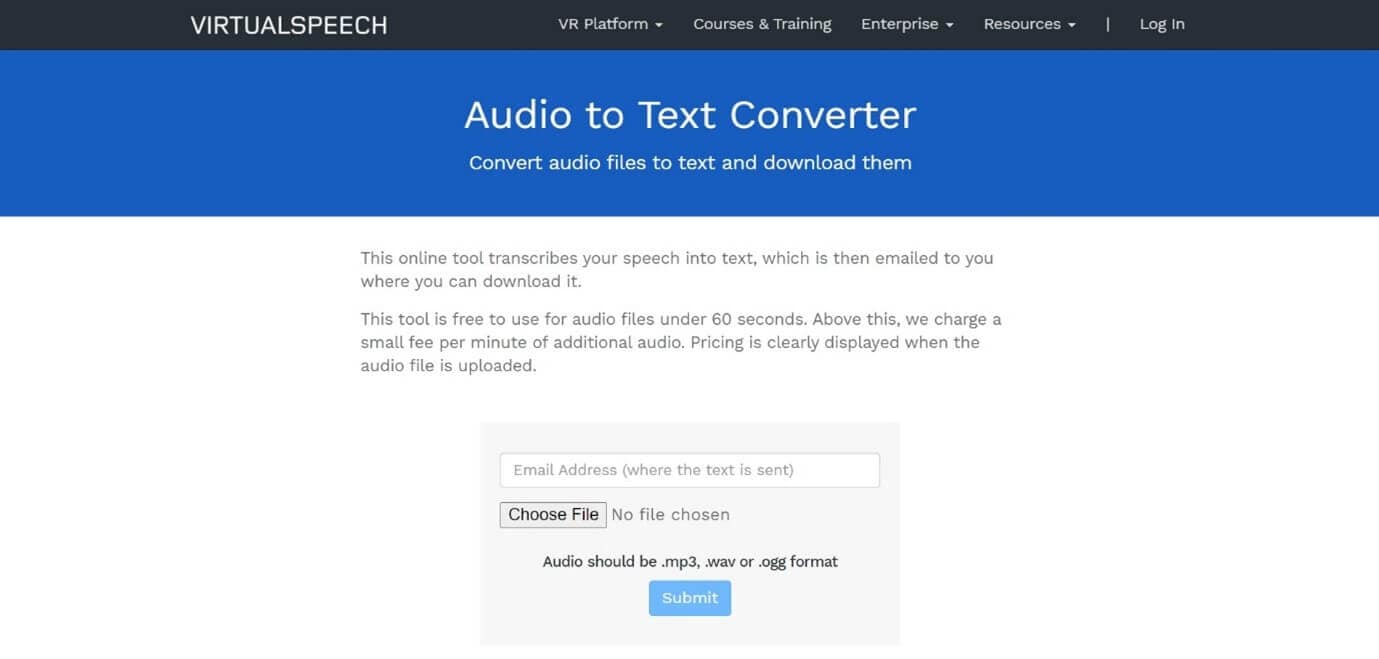
Features
- Free conversion of any audio files under 1 minute.
- Conversion of audio files of formats Mp3, Wav, or Ogg.
- Provides security as the no files are stored on the server and the site is secured with a b SSL
- Speech to text converter within the site
Pricing
- $0.50 per minute after the free minute

Filmora Audio to Text Converter
Filmora - Audio to Text Converter
• Enables you to convert video speech to text in one click
• Extremely accurate in video speech recognition
• Cross-platform supported - (Windows, Mac, iOS, Android)
Transcribe Audio to Text Free Transcribe Audio to Text Free Transcribe Audio to Text Free Learn More >
5. Speechnotes
Speechnotes is a powerful online notepad that can easily convert audio to text. This tool has implemented an efficient and clean design that makes conversion and editing very easy.
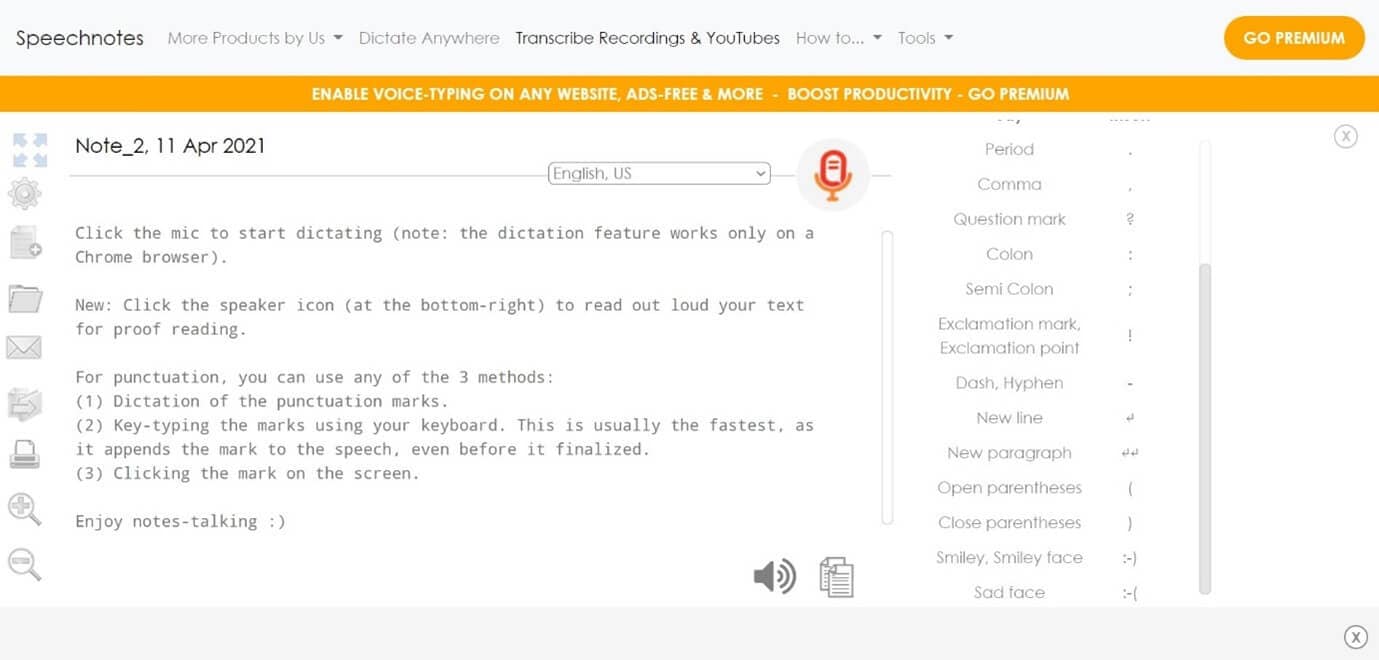
Features
- Best results with an advanced speech recognition technology
- Built-in tools that allow easy editing and correction of the converted text
- Fast working on any web browser and no installation apps required
- Autosave feature that ensures that your data is not lost
- Export to Google Drive option for easy accessibility from any device
Pricing
- Free
- Premium version with the addition of some extra features
6. SpeechTexter
SpeechTexter is a multilingual application that can help you transcribe any type of book, document, blog posts, etc. by using your audio. This tool has a custom dictionary that allows adding short commands for adding frequently used data like phone numbers, punctuation marks, addresses, etc.
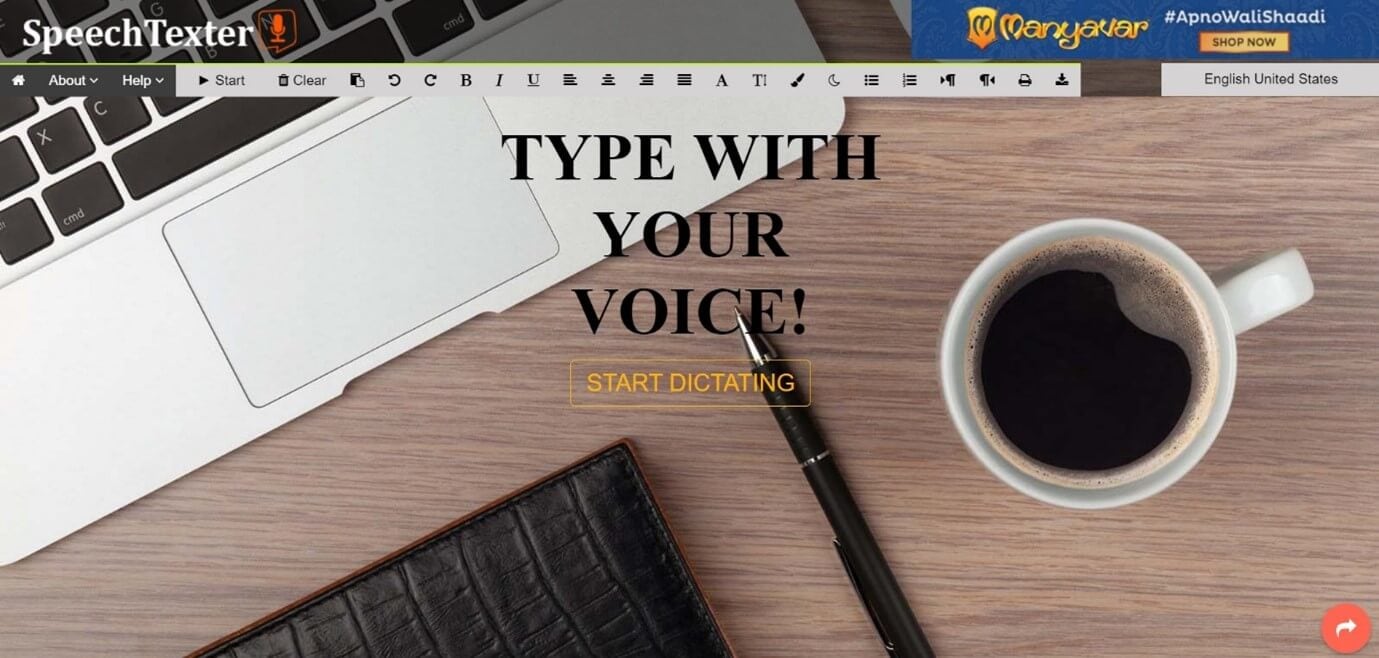
Features
- Offers accuracy rate of 90 to 95% percent
- Can be used to increase your fluency in English
- Offers powerful real-time speech recognition
- Easy creation of emails, text notes, blog posts, etc.
- A custom dictionary that can be customized according to the individual use
- Supports more than 60 languages
- Available on both chrome browser and android
Pricing
- Free
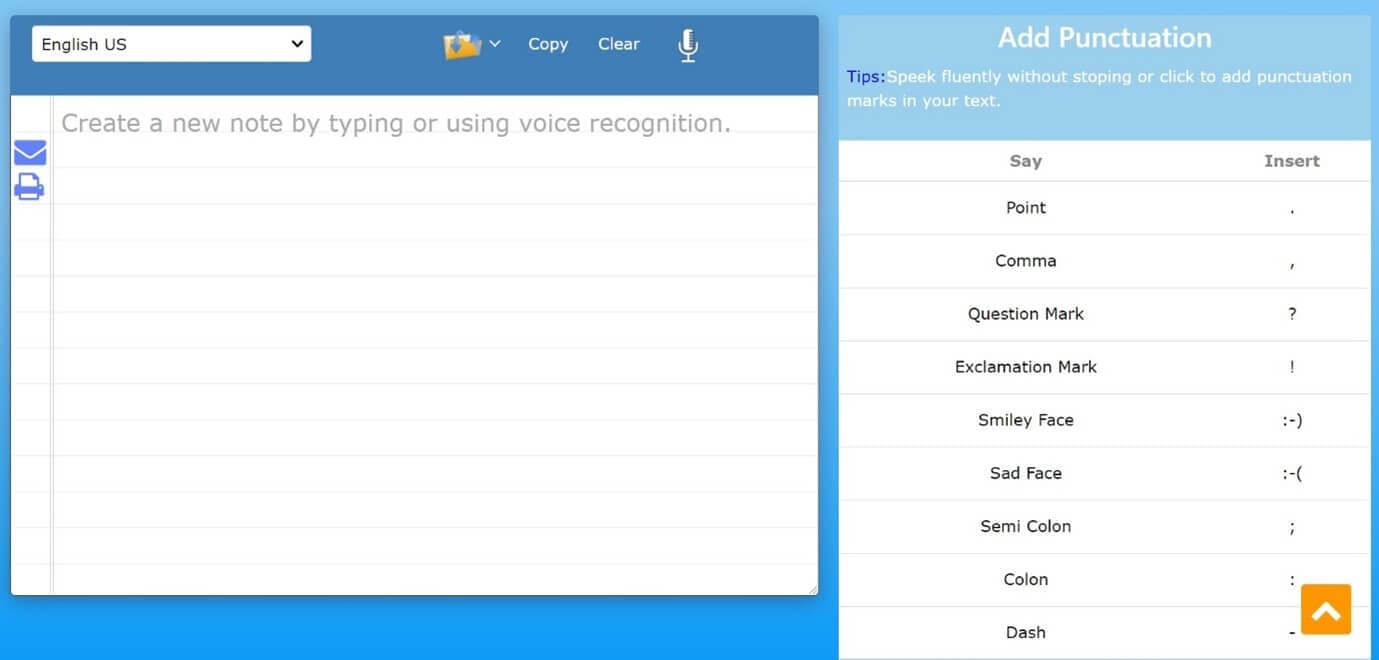
7. Textfromtospeech.com
Textfromtospeech is a free online tool that allows you to easily convert audio to text without the need for registration downloading or installation. It has a very simple interface that can record and convert your speech into text with a single click.
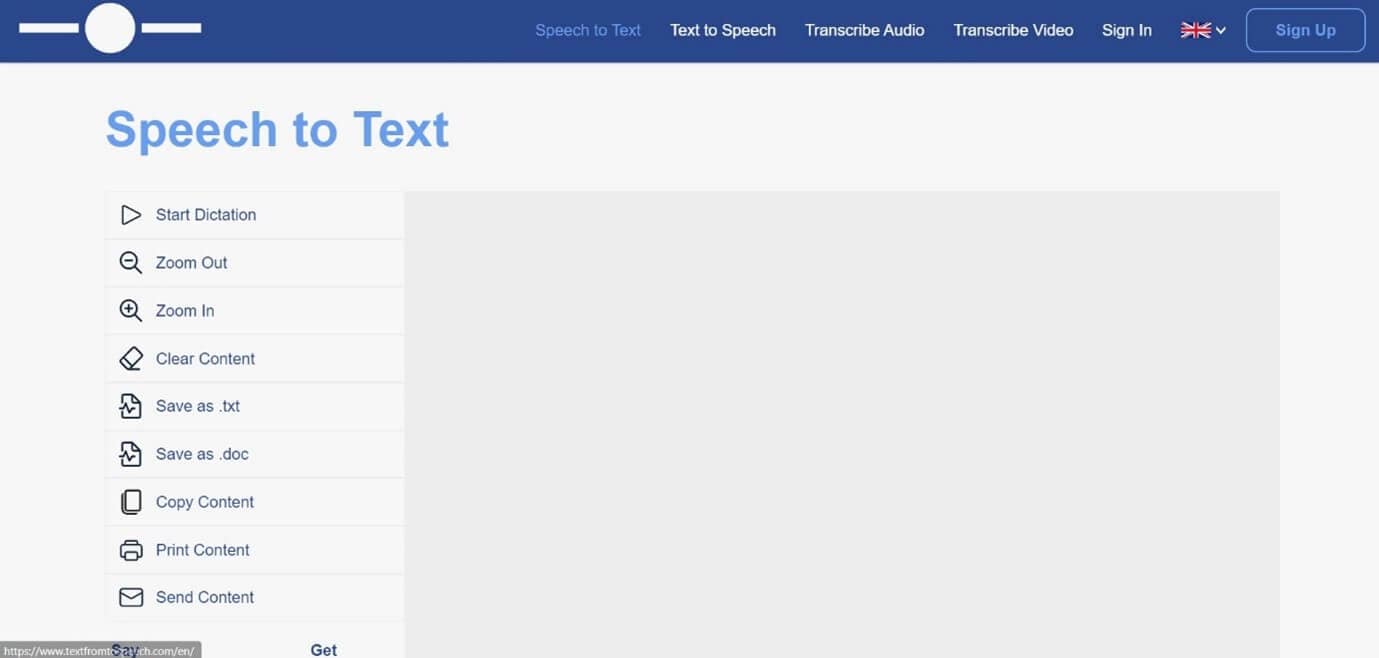
Features
- Free and online text recognition and transcription
- Supports many languages
- Pause and record option while converting large files
- Can use voice commands for insertion of symbols like “comma”, “full stop”, etc.
- Smart capitalization
- Easy saving, copying, and sharing of the dictated text
- Available on mobile devices, tablet, and computer
Pricing
- Free
![]()
A cross-platform for making videos anywhere for all creators

Why your video editing isn’t good enough? How about some creative inspo?
- 100 Million+ Users
- 150+ Countries and Regions
- 4 Million+ Social Media Followers
- 5 Million+ Stock Media for Use
* Secure Download

8. Dictation.io
Dictation is a free and simple tool that offers fast conversion of audio to text. Its interface is like that of a very simple notepad and allows the conversion of audio to text for a number of languages including English, Español, Français, Italiano, Português, and more.

Features
- Advanced speech recognition
- Easy editing within the notes
- Easy sharing to mail, tweets, etc.
- No storing of any data and hence offers the necessary security
Pricing
- Free
9. Voice Note
Voice Note is an online speech recognition tool that can automatically record and type anything including speech, interview, etc. This tool can convert any audio file into text format which can easily be opened in Microsoft Word.
Features
- No saving of data in any servers
- Customizable options for audio and text
- A number of languages to choose from while converting audio to text
- Easy copying and exporting options
- Direct Print option from the site
Price
- Free
10. Voice Notebook
Voice Notebook is a speech recognition app that can also convert audio files to text. This application is compatible with a wide range of devices like Mac, Windows, Linux OS, Android, and iOS.
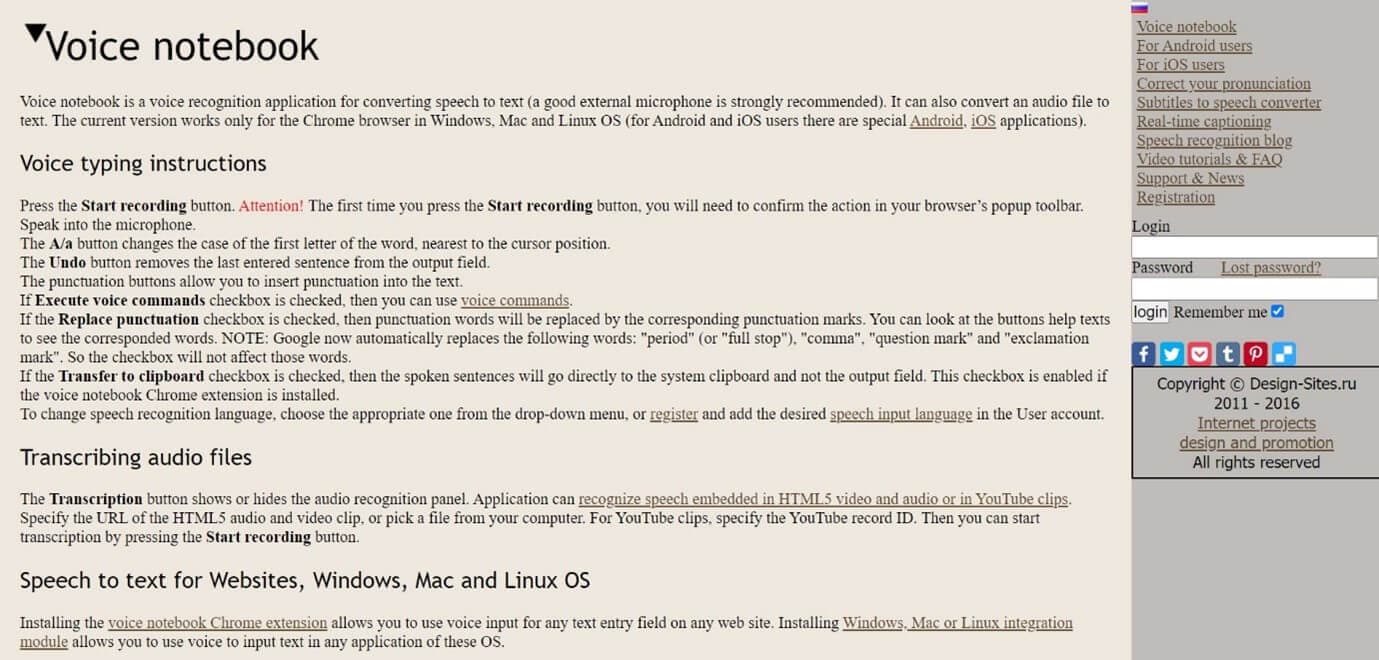
Features
- Voice commands are available when you transcribe audio to text
- Has the ability to recognize any speech embedded in YouTube clips or HTML5 audio or video
- Simple interface and easy editing of text
- An option to download into TXT format is available
Price
- Free
11. NaturalReaders
Natural Readers is a professional program that can convert any text into spoken words. This program offers a lot of features like adjusting the speed of audio, conversion into mp3, selection of voice, etc.
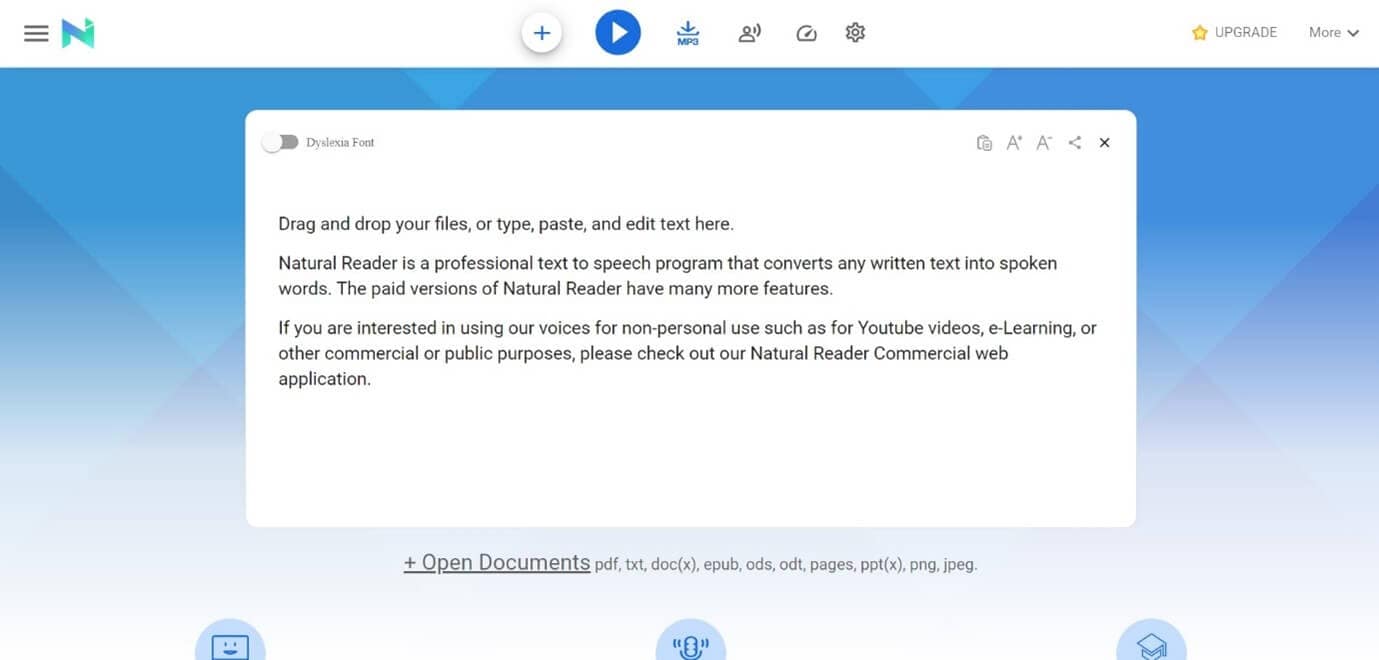
Features
- A font option available for dyslexic people
- Supports formats like pdf, txt, docs, epub, ods, ppt, png, jpeg
- App versions of this online tool are available both for android and apple devices
Pricing
- Free
- Premium plan - $9.99 per month, $59.88 per year
- Plus plan - $19.00 per month, $110.00 per year
Filmora Audio to Text Converter
Filmora - Audio to Text Converter
• Enables you to convert video speech to text in one click
• Extremely accurate in video speech recognition
• Cross-platform supported - (Windows, Mac, iOS, Android)
Transcribe Audio to Text Free Transcribe Audio to Text Free Transcribe Audio to Text Free Learn More >
Conclusion
We have listed above the top 11 tools that can be used to convert audio to text on any device using a browser. Converting audio to text allows you to easily access the required information, edit it, or even share it fully or partially with anyone you wish,
The applications we have listed are free and some of them might charge for the extra features they provide. So no matter what your profession is if you are looking for an app to convert audio to text or record and produce the text of the recordings, choose any one of the listed above applications.
We hope our suggestions help you reduce effort and save time. Please leave your valuable feedback in the comment box below, thank you.
Transform Long Videos into Short Ones Instantly
Turn long videos into viral clips. Effortlessly transform lengthy videos into engaging, shareable clips.

Shanoon Cox
Shanoon Cox is a writer and a lover of all things video.
Follow @Shanoon Cox
Shanoon Cox
Mar 27, 2024• Proven solutions
An audio-to-text converter is a tool that can convert audio files to texts or even record any audio and produce the text of it simultaneously. Audio files are one of the most used methods of storing information. From online classes and long lectures to big business meetings and product information, audio is being shared a lot across the world.
But accessing information from a long audio file can be difficult and time-consuming, which is why there is a need to convert audio to text. Information in the form of text can easily be fully or partly accessed and edited whenever needed. And texts can also easily be shared with whomever you want.
So let’s have a look at some of the best audio-to-text converters that might be of use to you.
10+ Free Online Audio to Text Converters
There is number of audio text converters available in the online market that can help you while studying, researching, or even in your business. Some of these recorders can convert any audio file to texts while some others can record and convert to text at the same time. Here we will talk about the top 11 free applications that can be used to convert audio to text.
| 1 - Filmora | 2 - Audext | 3 - Sonix.ai |
|---|---|---|
| 4 - Virtualspeech.com | 5 - Speechnotes | 6 - SpeechTexter |
| 7 - Textfromtospeech.com | 8 - Dictation.io | 9 - Voice Note |
| 10 - Voice Notebook | 11 - NaturalReaders |
1. Wondershare Filmora
Filmora’s Speech To Text (STT) function allows you to transcript audio/voice to subtitles/text in one click. it can save your plenty of time on transcribing subtitles and boost your editing efficiency by applying speech-to-text.
What you need to do is download the software and subsribe for its plan.
Features
- Built-in function to transcribe subtitles and captions for your video
- High accuracy in generating text, allows you to edit text by yourself
- Supports up to 26 languages of transcription to engage more users all around the world
- Offers various tools for editing your videos and audio
2. Audext
Audext is a free online application that can help you to save a lot of time while transcribing any audio to text. The transcription to text is done with the use of an advanced AI and hence produces faster and more accurate results.
Audext is used by people from different sectors like education, marketing, media, consulting, healthcare, etc. for their work purposes.
Features
- An inbuilt editor for editing the text while transcribing
- Identifies the speaker easily
- Supports a variety of audio and video formats like MP3, WAV, MP4, etc.
- Offers an option of easy upload and export of files
Pricing
- Free
- Transcription costs for one hour are $12
- Or with the subscription $5
3. Sonix.ai
Sonix is a fast and accurate application that can be used to convert audio to text for any purpose. This application offers a 30-minute free transcription after which an affordable amount may be charged.
Features
- Automatic transcription of files and accessibility of these files from any device
- Advanced translation of these devices into 30 different languages
- Addition of subtitles into any video for easy understanding
- A Sonix media player that allows to share and publish files easily
Pricing
- Free
- Standard subscription - $10 per hour
- Premium subscription - $5 per hour, and an addition of $22 per month
4. Virtualspeech.com
Virtualspeech is an online tool that can transcribe audio to text free. It is a very simple application that allows fats conversion of audio files to texts. After conversion, the file will be emailed to the user from where it can be downloaded and saved.
Features
- Free conversion of any audio files under 1 minute.
- Conversion of audio files of formats Mp3, Wav, or Ogg.
- Provides security as the no files are stored on the server and the site is secured with a b SSL
- Speech to text converter within the site
Pricing
- $0.50 per minute after the free minute
Filmora Audio to Text Converter
Filmora - Audio to Text Converter
• Enables you to convert video speech to text in one click
• Extremely accurate in video speech recognition
• Cross-platform supported - (Windows, Mac, iOS, Android)
Transcribe Audio to Text Free Transcribe Audio to Text Free Transcribe Audio to Text Free Learn More >
5. Speechnotes
Speechnotes is a powerful online notepad that can easily convert audio to text. This tool has implemented an efficient and clean design that makes conversion and editing very easy.
Features
- Best results with an advanced speech recognition technology
- Built-in tools that allow easy editing and correction of the converted text
- Fast working on any web browser and no installation apps required
- Autosave feature that ensures that your data is not lost
- Export to Google Drive option for easy accessibility from any device
Pricing
- Free
- Premium version with the addition of some extra features
6. SpeechTexter
SpeechTexter is a multilingual application that can help you transcribe any type of book, document, blog posts, etc. by using your audio. This tool has a custom dictionary that allows adding short commands for adding frequently used data like phone numbers, punctuation marks, addresses, etc.
Features
- Offers accuracy rate of 90 to 95% percent
- Can be used to increase your fluency in English
- Offers powerful real-time speech recognition
- Easy creation of emails, text notes, blog posts, etc.
- A custom dictionary that can be customized according to the individual use
- Supports more than 60 languages
- Available on both chrome browser and android
Pricing
- Free
7. Textfromtospeech.com
Textfromtospeech is a free online tool that allows you to easily convert audio to text without the need for registration downloading or installation. It has a very simple interface that can record and convert your speech into text with a single click.
Features
- Free and online text recognition and transcription
- Supports many languages
- Pause and record option while converting large files
- Can use voice commands for insertion of symbols like “comma”, “full stop”, etc.
- Smart capitalization
- Easy saving, copying, and sharing of the dictated text
- Available on mobile devices, tablet, and computer
Pricing
- Free
![]()
A cross-platform for making videos anywhere for all creators
Why your video editing isn’t good enough? How about some creative inspo?
- 100 Million+ Users
- 150+ Countries and Regions
- 4 Million+ Social Media Followers
- 5 Million+ Stock Media for Use
* Secure Download
8. Dictation.io
Dictation is a free and simple tool that offers fast conversion of audio to text. Its interface is like that of a very simple notepad and allows the conversion of audio to text for a number of languages including English, Español, Français, Italiano, Português, and more.
Features
- Advanced speech recognition
- Easy editing within the notes
- Easy sharing to mail, tweets, etc.
- No storing of any data and hence offers the necessary security
Pricing
- Free
9. Voice Note
Voice Note is an online speech recognition tool that can automatically record and type anything including speech, interview, etc. This tool can convert any audio file into text format which can easily be opened in Microsoft Word.
Features
- No saving of data in any servers
- Customizable options for audio and text
- A number of languages to choose from while converting audio to text
- Easy copying and exporting options
- Direct Print option from the site
Price
- Free
10. Voice Notebook
Voice Notebook is a speech recognition app that can also convert audio files to text. This application is compatible with a wide range of devices like Mac, Windows, Linux OS, Android, and iOS.
Features
- Voice commands are available when you transcribe audio to text
- Has the ability to recognize any speech embedded in YouTube clips or HTML5 audio or video
- Simple interface and easy editing of text
- An option to download into TXT format is available
Price
- Free
11. NaturalReaders
Natural Readers is a professional program that can convert any text into spoken words. This program offers a lot of features like adjusting the speed of audio, conversion into mp3, selection of voice, etc.
Features
- A font option available for dyslexic people
- Supports formats like pdf, txt, docs, epub, ods, ppt, png, jpeg
- App versions of this online tool are available both for android and apple devices
Pricing
- Free
- Premium plan - $9.99 per month, $59.88 per year
- Plus plan - $19.00 per month, $110.00 per year
Filmora Audio to Text Converter
Filmora - Audio to Text Converter
• Enables you to convert video speech to text in one click
• Extremely accurate in video speech recognition
• Cross-platform supported - (Windows, Mac, iOS, Android)
Transcribe Audio to Text Free Transcribe Audio to Text Free Transcribe Audio to Text Free Learn More >
Conclusion
We have listed above the top 11 tools that can be used to convert audio to text on any device using a browser. Converting audio to text allows you to easily access the required information, edit it, or even share it fully or partially with anyone you wish,
The applications we have listed are free and some of them might charge for the extra features they provide. So no matter what your profession is if you are looking for an app to convert audio to text or record and produce the text of the recordings, choose any one of the listed above applications.
We hope our suggestions help you reduce effort and save time. Please leave your valuable feedback in the comment box below, thank you.
Transform Long Videos into Short Ones Instantly
Turn long videos into viral clips. Effortlessly transform lengthy videos into engaging, shareable clips.
Shanoon Cox
Shanoon Cox is a writer and a lover of all things video.
Follow @Shanoon Cox
Elevating Your Video’s Atmosphere with Exemplary Instrumental Soundscape
Are you a pianist? Or a content creator on YouTuber? Do you wish to access cool instrumental music?
Most content creators prefer instrumental background music in their videos. It is because the use of different instruments captures the audience’s attention. The absence of vocals in the song makes it useful for viewers who love relaxing environments as they eat, meditate, sleep, and study.
The article gives an overview of top websites from which to download free instrumental music. The tips on choosing the best instrumental background music for videos will also be discussed. So, what are we waiting for? Let us start!
In this article
01 How to Choose the Best Instrumental Background Music for Videos
02 Where to Find Nice Instrumental Background Music?
Part 1: How to Choose the Best Instrumental Background Music for Videos
The royalty-free instrumental music can be accessed from a wide range of platform libraries globally. Hence, you do not have to worry about that! The concern is the choice of MP3 instrumental music. The careful selection of instrumental background music is crucial as it decides if the audience is interested.

Additionally, a carefully planned video with the right instrument usage helps create the required symphony. Don’t you think? Therefore, the article mentions some workable tips for the lot. The tips reflect upon the ideas invested in before making the call. So, let us begin! Shall we?
1. Rhythm and Tempo
The most significant thing to notice is the rhythm and tempo of the music. The instrumental music comes at different speeds. The piano, guitar, cello, guitar, violin, and harmonica can create nuisance and be slowed down as per the player. It is important to choose royalty-free instrumental music whose tempo syncs with the video.
2. Content-Type of Video
The type of content in the video is essential to be studied. It is because the right information will lead to the right choice. If the video content is a product promo or description, there is nothing wrong with going a little high with tempo. However, if the video genre is business-related, avoid MP3 instrumental music with more movement and energy.
3. Targeted Audience and their Preference
For the audience, one should know their preferences. Conduct market research to know what your viewers respond to. You can also watch your competitors’ videos to understand their reactions to different instrumental music. The background instrumental music should be according to the audience’s needs to engage them better.
4. Frequency and Tone
The frequency and tone of the music matter with the video. If the video has more dialogues and talking, the users should pick the instrumental background music with the same notes as human voices. The emotional tones of the guitar, violin, cello, viola, and keyboard would help in this situation as they would complement the voice in the video.
5. Video Length
The video length is yet another important pointer while selecting copyright-free instrumental music. If the video is big, the instrumental background music to fill it won’t last long. Therefore, pick instrumental music that syncs with the video length. You can also use the 30 or 60 seconds loop version to continue the background instrumental track.
6. Video Message
As far as the video’s message is concerned, it is recommended to keep the content in mind while making a choice. The MP3 instrumental music includes five classes such as percussion, woodwind, brass, keyboard, and string. Make sure that your video story is not neglected with your music choice.
Part 2: Where to Find Nice Instrumental Background Music?
Access to free instrumental music means there is no friction in making a top-notch video for your YouTube channel. With the market teeming up with platforms to offer free downloadable instrumental music, we have sketched out four websites of them.
Creative professionals don’t have to worry about the workability of online websites as they can be navigated by beginners easily. Let us have a look at each of them!
1. AShamaluevMusic
AShamaluevMusic is a royalty-free instrumental music platform. As soon as the interface is launched, piano, guitar, ukulele, and orchestral options are displayed. If you are into instrumental music for your video, there is no better choice than AShamaluevMusic.
With AShamaluevMusic, premium and royalty-free music can be downloaded. However, your YouTube channel mustn’t be monetized. One tap on “Free Download,” and MP3 instrumental music is saved. The music tracks can be previewed before downloading them.
Seashell Silver, Bay, Sunny Platinum, Christmas Snow, Paradise, Primary, and Evolution are remarkable instrumental background music from AShamaluevMusic. You can buy a license in case your YouTube account is monetized.

2. Free Music Archive
Free Music Archive is a phenomenal place for music. It keeps all its users’ content satisfied. Free Music Archive provides background music for YouTube, Instagram, and podcasts, presenting copyright-free instrumental music.
FMA has a diverse catalog to display music as backdrop and content as center stage. It shows artists, tracks, albums, and genres to lose nothing in translation. The search results can be tailored based on their upload and measure of interest.
After you have previewed the track, Free Music Archive gives its duration. It assists the users in making the right decision based on the video length. You can also enjoy music personally. So, it is a win-win! Don’t you agree?

3. Chosic
Are you into flute? Follow us to know more!
Chosic is another website to find free instrumental music. The interface shows a list of searches to choose from. You can change the genre of the music by choosing different instruments of your choice. Moreover, Chosic offers flute, drums, orchestral, violin, piano, and guitar.
After making the music choice, the different tags below the track help find relevant content. Feel free to adjust the filter results based on relevance, popularity, newness, and randomness. You can listen to the music and download it to access the content in seconds.

4. Pixabay
Pixabay is known for its high filter range. The content streamers can play with the search results extensively. From duration and genre to mood and themes, Pixabay is perfect in all ways. If you are unsure what instrumental background music to choose, you can head to the theme and choose based on the type of content.
Pixabay also shows the number of people who watched, liked, and downloaded the content. The tags below the track give more variety to the lot. The audio is saved in MP3 format upon download.

Conclusion
The great selection of music is the essence of the video. Don’t you agree? The instrumental background music has no vocals, but it gives a calming environment for the video content to get the desired attention. The message is lost if both music and content are expressive with full of lyrics.
Therefore, the article discussed important tips to choose MP3 instrumental music for the videos. The platforms to download copyright-free instrumental music were also explained extensively. Furthermore, Wondershare Filmora can be used for video editing and adding instrumental music to the video. The process doesn’t require any technical knowledge. So, it is perfect, right?
Versatile Video Editor - Wondershare Filmora
An easy yet powerful editor
Numerous effects to choose from
Detailed tutorials provided by the official channel
02 Where to Find Nice Instrumental Background Music?
Part 1: How to Choose the Best Instrumental Background Music for Videos
The royalty-free instrumental music can be accessed from a wide range of platform libraries globally. Hence, you do not have to worry about that! The concern is the choice of MP3 instrumental music. The careful selection of instrumental background music is crucial as it decides if the audience is interested.
Additionally, a carefully planned video with the right instrument usage helps create the required symphony. Don’t you think? Therefore, the article mentions some workable tips for the lot. The tips reflect upon the ideas invested in before making the call. So, let us begin! Shall we?
1. Rhythm and Tempo
The most significant thing to notice is the rhythm and tempo of the music. The instrumental music comes at different speeds. The piano, guitar, cello, guitar, violin, and harmonica can create nuisance and be slowed down as per the player. It is important to choose royalty-free instrumental music whose tempo syncs with the video.
2. Content-Type of Video
The type of content in the video is essential to be studied. It is because the right information will lead to the right choice. If the video content is a product promo or description, there is nothing wrong with going a little high with tempo. However, if the video genre is business-related, avoid MP3 instrumental music with more movement and energy.
3. Targeted Audience and their Preference
For the audience, one should know their preferences. Conduct market research to know what your viewers respond to. You can also watch your competitors’ videos to understand their reactions to different instrumental music. The background instrumental music should be according to the audience’s needs to engage them better.
4. Frequency and Tone
The frequency and tone of the music matter with the video. If the video has more dialogues and talking, the users should pick the instrumental background music with the same notes as human voices. The emotional tones of the guitar, violin, cello, viola, and keyboard would help in this situation as they would complement the voice in the video.
5. Video Length
The video length is yet another important pointer while selecting copyright-free instrumental music. If the video is big, the instrumental background music to fill it won’t last long. Therefore, pick instrumental music that syncs with the video length. You can also use the 30 or 60 seconds loop version to continue the background instrumental track.
6. Video Message
As far as the video’s message is concerned, it is recommended to keep the content in mind while making a choice. The MP3 instrumental music includes five classes such as percussion, woodwind, brass, keyboard, and string. Make sure that your video story is not neglected with your music choice.
Part 2: Where to Find Nice Instrumental Background Music?
Access to free instrumental music means there is no friction in making a top-notch video for your YouTube channel. With the market teeming up with platforms to offer free downloadable instrumental music, we have sketched out four websites of them.
Creative professionals don’t have to worry about the workability of online websites as they can be navigated by beginners easily. Let us have a look at each of them!
1. AShamaluevMusic
AShamaluevMusic is a royalty-free instrumental music platform. As soon as the interface is launched, piano, guitar, ukulele, and orchestral options are displayed. If you are into instrumental music for your video, there is no better choice than AShamaluevMusic.
With AShamaluevMusic, premium and royalty-free music can be downloaded. However, your YouTube channel mustn’t be monetized. One tap on “Free Download,” and MP3 instrumental music is saved. The music tracks can be previewed before downloading them.
Seashell Silver, Bay, Sunny Platinum, Christmas Snow, Paradise, Primary, and Evolution are remarkable instrumental background music from AShamaluevMusic. You can buy a license in case your YouTube account is monetized.
2. Free Music Archive
Free Music Archive is a phenomenal place for music. It keeps all its users’ content satisfied. Free Music Archive provides background music for YouTube, Instagram, and podcasts, presenting copyright-free instrumental music.
FMA has a diverse catalog to display music as backdrop and content as center stage. It shows artists, tracks, albums, and genres to lose nothing in translation. The search results can be tailored based on their upload and measure of interest.
After you have previewed the track, Free Music Archive gives its duration. It assists the users in making the right decision based on the video length. You can also enjoy music personally. So, it is a win-win! Don’t you agree?
3. Chosic
Are you into flute? Follow us to know more!
Chosic is another website to find free instrumental music. The interface shows a list of searches to choose from. You can change the genre of the music by choosing different instruments of your choice. Moreover, Chosic offers flute, drums, orchestral, violin, piano, and guitar.
After making the music choice, the different tags below the track help find relevant content. Feel free to adjust the filter results based on relevance, popularity, newness, and randomness. You can listen to the music and download it to access the content in seconds.
4. Pixabay
Pixabay is known for its high filter range. The content streamers can play with the search results extensively. From duration and genre to mood and themes, Pixabay is perfect in all ways. If you are unsure what instrumental background music to choose, you can head to the theme and choose based on the type of content.
Pixabay also shows the number of people who watched, liked, and downloaded the content. The tags below the track give more variety to the lot. The audio is saved in MP3 format upon download.
Conclusion
The great selection of music is the essence of the video. Don’t you agree? The instrumental background music has no vocals, but it gives a calming environment for the video content to get the desired attention. The message is lost if both music and content are expressive with full of lyrics.
Therefore, the article discussed important tips to choose MP3 instrumental music for the videos. The platforms to download copyright-free instrumental music were also explained extensively. Furthermore, Wondershare Filmora can be used for video editing and adding instrumental music to the video. The process doesn’t require any technical knowledge. So, it is perfect, right?
Versatile Video Editor - Wondershare Filmora
An easy yet powerful editor
Numerous effects to choose from
Detailed tutorials provided by the official channel
Mastering Audio Clarity: Techniques for Eliminating Distortion in Videos
Create High-Quality Video - Wondershare Filmora
An easy and powerful YouTube video editor
Numerous video and audio effects to choose from
Detailed tutorials are provided by the official channel
Whether you are in the business of shooting or editing, noisy or distorted footage is among the most frustrating roadblocks you’ll ever encounter in your workflow. The magic of filmmaking lies after the scenes in post-production. You can remove distortion from audio using various methods.
In this article
01 What Is Distortion in Audio?
02 The Difference Between Noise and Distortion
03 How to Remove Distortion From Audio for Your Video
What Is Distortion in Audio?
You have probably heard the term distortion and would like to know what it is. Distortion is a common term in music production.
Although the term is simple, there is more than meets the eye. Distortion is defined as the change or deformation of an audio waveform that results in the production of an audio output that is different from the input. Distortion can occur at a single point or multiple points in a specific signal chain.
While there are many types of audio distortion, the most common one is clipping. It occurs when an audio signal is amplified beyond the maximum allowed unit in both analog and digital systems.
A signal is distorted when an output does not record the same signal as the input. The issue can occur due to amplifier clipping, faulty equipment, overloading of a sound source, production of hot signals, and pushing speakers beyond their limit.
In the past, people perceived distortion as a bad thing. Today, however, some kinds of distortions are considered beneficial because of their positive effect on the sound. Sound engineers apply plugins, outboard gear, and other techniques to add pleasing distortions to audios. The distortions work by adding unique elements to audios, thus improving sounds in many instances.
The Difference Between Noise and Distortion
Noise and distortion can sound very similar and hard to tell apart. However, the two are different phenomena with unique characteristics. Noise is an undesired disturbance that sounds white or pink and creates an even-tempered sound wave. On the other hand, distortion is the alteration of a waveform, where some parts are amplified while others are attenuated, leading to an uneven distribution of energy among frequencies. Let’s look at the differences between noise and distortion.
1. Where It Appears in a Signal
Noise appears randomly throughout the signal, while distortion seems at the same frequency. One example of noise is an audio hiss that can be heard when no other sounds are present. An example of distortion is a sine wave with a flat top and bottom combined with different amplitudes.
2. How It Affects Signals
Noise is random and can appear when signals are quiet. Distortion is affected by the input signal and can be altered by adding or removing signal frequencies.
How It’s Measured
You can measure distortion by using an oscilloscope to display the input signal’s waveform over time. The oscilloscope measures energy distribution among different frequencies, while you can measure noise with a spectrum analyzer by displaying an audio signal’s magnitude and frequency content over time.
Despite their differences, noise and distortion are both unwanted sounds. When they are present in a signal, they can degrade its quality. For this reason, it is essential to understand the differences between them to assess signs and produce better results accurately.
How to Remove Distortion From Audio for Your Video
You can use several different methods to remove audio distortion in your video. They include:
Method 1: Use an Online Audio Distortion Tool
You can use an online distortion tool to fix this problem. One of the popular tools for removing distortion from audio is Audacity. Available for Linux, macOS, Windows, and other Unix-like operating systems, Audacity is a FOSS (free and open-source digital audio editor software). It is also a recording application software, and you can use the program for varying tasks, including conversing audio files, removing audio distortion, adding effects, and mixing audio clips.
Keeping this in mind, let’s look at how to remove distortion from audio using Audacity.
- The first step is opening the file. To do this, drag and drop the audio file into Audacity.
- Next, you need to select the distorted area before clicking on Effect. Once you have done this, click on the Noise Reduction option.

- Doing this will open the Noise reduction window.
- Go to the Noise Profile and click on it; this will allow Audacity to know what it should filter out.

- Now, select the whole audio before reopening the Noise Reduction Window. Set the values as you see necessary.
- Check the audio by clicking Preview. If you are satisfied with the results, click OK.
- Be sure to apply the filter again if your audio is still distorted. Avoid doing it excessively, as the audio could be degraded. In turn, this can lead to the voice sounding robotic and tinny.
Method 2: Software Solutions - Adobe Audition
You can remove distortion from audio using specialized audio editing software. One of the professional audio tools that you can use to fix audio distortion is Adobe Audition; this software allows you to carve out any unwanted sound for impressive results.
These steps below will allow you to remove distortion from audio with Adobe Audition.
- Double click on the track to access the Waveform.
- Go to Window, and then select the Amplitude Statistics option.
- A new window will open. Now, hit the Scan button in the left corner. The software will then scan the audio.

- Check the section written Possibly Clipped Samples.

- Head over to Effects>Diagnostics> DeClipper.

- In the Preset section, select the Restore Heavily Clipped option.

- Next, hit the Settings button, and adjust the Tolerance.

- Hit the Scan button again, and you’ll see all the problems in your audio.
- Click Repair all to fix your distorted audio.

- Alternatively, you could head to Effects Rack and click on Filter and EQ, then FFT Filter.

- Put the Preset option to Default settings. Take out a few of the frequencies where your audio is distorted.

Method 3: Video Editing Tools like VSDC
When it comes to removing distortion from audio, you can use video editing tools to fix this problem. VSDC is one of the non-linear editing applications that people use to remove audio distortion.
Follow the steps below to learn how to remove distortion from audio using VSDC.
- Upload your footage to VSDC and right-click on it.
- Select the Audio effects option, then choose Filters. Click on Gate.

- You will see the Properties window. Here, you will find all the parameters that you need to fix your audio problems, including distortion.

The Gate filter allows users to control how fast and when the gate opens and what sort of sounds can get in.
- Threshold: This is the level of the decibel at which the gate opens. Set it based on the loudness of the audio distortion.
- Attack: This parameter defines how fast the gate will open. Essentially, the higher the attack value, the slower the gate opens. /li>
- Knee: With this parameter, you can control the response of the compressor to the signal that’s crossing the threshold. That means you can apply compression with a delay or instantly.
- Make-up gain: This increases the signal level after it has been processed.
- Ratio: This value controls compression applied to the distortion. It defines how quieter the distortion will be after gating.
- Reduction: This parameter defines the level of signal reduction will be.
- Release: This value defines how fast the gate will close after opening. You can change the Release parameter to suit your preferences.
Method 4:Normalize Your Audio with Filmora Audio Equalizer
Filmora is a video editing software that you can use to shoot, edit, and share clips with other people. It provides an easy-to-use interface that has made it one of the most popular choices for independent filmmakers. Filmora also offers audio equalizer effects designed for professional sound designers who want to work on projects with their voice-over recordings.
You can normalize your audio with Filmora by following the three simple steps below:
Step 1. Open Filmora and Import your file
First, open up Filmora and open your audio file. It can be any format you have except MOV from Apple devices like iPhone or iPad. Then, select the Media tab on the top of Filmora’s main window to import your media file.
Step 2. Adjust the Levels
Next, click the Levels option on Filmora’s left panel, where you will find three options: Gain, Equalize, and Normalizer. You can use this to adjust your audio level to be loud enough without being too loud. The normalizer helps you ensure that your audio is at a consistent level throughout the recording. You can use it both for music or voice-over recordings.

Step 3. Export Your File
Finally, you may export it when you have made the necessary adjustments to your audio file. Just click the File tab in Filmora’s main window and select Export. Many options are available for exporting your media file, including an output profile setting where you may choose MP4, AVI, or WMV and upload to Facebook, Youtube, and Vimeo.
For Win 7 or later (64-bit)
For macOS 10.12 or later
Conclusion
● Normalizing your audio file is not a complicated process, but it does require some technical knowledge. However, your audio will sound excellent and professional if you follow the steps above. You can use Filmora’s audio equalizer effects to normalize your video.
Whether you are in the business of shooting or editing, noisy or distorted footage is among the most frustrating roadblocks you’ll ever encounter in your workflow. The magic of filmmaking lies after the scenes in post-production. You can remove distortion from audio using various methods.
In this article
01 What Is Distortion in Audio?
02 The Difference Between Noise and Distortion
03 How to Remove Distortion From Audio for Your Video
What Is Distortion in Audio?
You have probably heard the term distortion and would like to know what it is. Distortion is a common term in music production.
Although the term is simple, there is more than meets the eye. Distortion is defined as the change or deformation of an audio waveform that results in the production of an audio output that is different from the input. Distortion can occur at a single point or multiple points in a specific signal chain.
While there are many types of audio distortion, the most common one is clipping. It occurs when an audio signal is amplified beyond the maximum allowed unit in both analog and digital systems.
A signal is distorted when an output does not record the same signal as the input. The issue can occur due to amplifier clipping, faulty equipment, overloading of a sound source, production of hot signals, and pushing speakers beyond their limit.
In the past, people perceived distortion as a bad thing. Today, however, some kinds of distortions are considered beneficial because of their positive effect on the sound. Sound engineers apply plugins, outboard gear, and other techniques to add pleasing distortions to audios. The distortions work by adding unique elements to audios, thus improving sounds in many instances.
The Difference Between Noise and Distortion
Noise and distortion can sound very similar and hard to tell apart. However, the two are different phenomena with unique characteristics. Noise is an undesired disturbance that sounds white or pink and creates an even-tempered sound wave. On the other hand, distortion is the alteration of a waveform, where some parts are amplified while others are attenuated, leading to an uneven distribution of energy among frequencies. Let’s look at the differences between noise and distortion.
1. Where It Appears in a Signal
Noise appears randomly throughout the signal, while distortion seems at the same frequency. One example of noise is an audio hiss that can be heard when no other sounds are present. An example of distortion is a sine wave with a flat top and bottom combined with different amplitudes.
2. How It Affects Signals
Noise is random and can appear when signals are quiet. Distortion is affected by the input signal and can be altered by adding or removing signal frequencies.
How It’s Measured
You can measure distortion by using an oscilloscope to display the input signal’s waveform over time. The oscilloscope measures energy distribution among different frequencies, while you can measure noise with a spectrum analyzer by displaying an audio signal’s magnitude and frequency content over time.
Despite their differences, noise and distortion are both unwanted sounds. When they are present in a signal, they can degrade its quality. For this reason, it is essential to understand the differences between them to assess signs and produce better results accurately.
How to Remove Distortion From Audio for Your Video
You can use several different methods to remove audio distortion in your video. They include:
Method 1: Use an Online Audio Distortion Tool
You can use an online distortion tool to fix this problem. One of the popular tools for removing distortion from audio is Audacity. Available for Linux, macOS, Windows, and other Unix-like operating systems, Audacity is a FOSS (free and open-source digital audio editor software). It is also a recording application software, and you can use the program for varying tasks, including conversing audio files, removing audio distortion, adding effects, and mixing audio clips.
Keeping this in mind, let’s look at how to remove distortion from audio using Audacity.
- The first step is opening the file. To do this, drag and drop the audio file into Audacity.
- Next, you need to select the distorted area before clicking on Effect. Once you have done this, click on the Noise Reduction option.
- Doing this will open the Noise reduction window.
- Go to the Noise Profile and click on it; this will allow Audacity to know what it should filter out.
- Now, select the whole audio before reopening the Noise Reduction Window. Set the values as you see necessary.
- Check the audio by clicking Preview. If you are satisfied with the results, click OK.
- Be sure to apply the filter again if your audio is still distorted. Avoid doing it excessively, as the audio could be degraded. In turn, this can lead to the voice sounding robotic and tinny.
Method 2: Software Solutions - Adobe Audition
You can remove distortion from audio using specialized audio editing software. One of the professional audio tools that you can use to fix audio distortion is Adobe Audition; this software allows you to carve out any unwanted sound for impressive results.
These steps below will allow you to remove distortion from audio with Adobe Audition.
- Double click on the track to access the Waveform.
- Go to Window, and then select the Amplitude Statistics option.
- A new window will open. Now, hit the Scan button in the left corner. The software will then scan the audio.
- Check the section written Possibly Clipped Samples.
- Head over to Effects>Diagnostics> DeClipper.
- In the Preset section, select the Restore Heavily Clipped option.
- Next, hit the Settings button, and adjust the Tolerance.
- Hit the Scan button again, and you’ll see all the problems in your audio.
- Click Repair all to fix your distorted audio.
- Alternatively, you could head to Effects Rack and click on Filter and EQ, then FFT Filter.
- Put the Preset option to Default settings. Take out a few of the frequencies where your audio is distorted.
Method 3: Video Editing Tools like VSDC
When it comes to removing distortion from audio, you can use video editing tools to fix this problem. VSDC is one of the non-linear editing applications that people use to remove audio distortion.
Follow the steps below to learn how to remove distortion from audio using VSDC.
- Upload your footage to VSDC and right-click on it.
- Select the Audio effects option, then choose Filters. Click on Gate.
- You will see the Properties window. Here, you will find all the parameters that you need to fix your audio problems, including distortion.
The Gate filter allows users to control how fast and when the gate opens and what sort of sounds can get in.
- Threshold: This is the level of the decibel at which the gate opens. Set it based on the loudness of the audio distortion.
- Attack: This parameter defines how fast the gate will open. Essentially, the higher the attack value, the slower the gate opens. /li>
- Knee: With this parameter, you can control the response of the compressor to the signal that’s crossing the threshold. That means you can apply compression with a delay or instantly.
- Make-up gain: This increases the signal level after it has been processed.
- Ratio: This value controls compression applied to the distortion. It defines how quieter the distortion will be after gating.
- Reduction: This parameter defines the level of signal reduction will be.
- Release: This value defines how fast the gate will close after opening. You can change the Release parameter to suit your preferences.
Method 4:Normalize Your Audio with Filmora Audio Equalizer
Filmora is a video editing software that you can use to shoot, edit, and share clips with other people. It provides an easy-to-use interface that has made it one of the most popular choices for independent filmmakers. Filmora also offers audio equalizer effects designed for professional sound designers who want to work on projects with their voice-over recordings.
You can normalize your audio with Filmora by following the three simple steps below:
Step 1. Open Filmora and Import your file
First, open up Filmora and open your audio file. It can be any format you have except MOV from Apple devices like iPhone or iPad. Then, select the Media tab on the top of Filmora’s main window to import your media file.
Step 2. Adjust the Levels
Next, click the Levels option on Filmora’s left panel, where you will find three options: Gain, Equalize, and Normalizer. You can use this to adjust your audio level to be loud enough without being too loud. The normalizer helps you ensure that your audio is at a consistent level throughout the recording. You can use it both for music or voice-over recordings.
Step 3. Export Your File
Finally, you may export it when you have made the necessary adjustments to your audio file. Just click the File tab in Filmora’s main window and select Export. Many options are available for exporting your media file, including an output profile setting where you may choose MP4, AVI, or WMV and upload to Facebook, Youtube, and Vimeo.
For Win 7 or later (64-bit)
For macOS 10.12 or later
Conclusion
● Normalizing your audio file is not a complicated process, but it does require some technical knowledge. However, your audio will sound excellent and professional if you follow the steps above. You can use Filmora’s audio equalizer effects to normalize your video.
Also read:
- Updated 2024 Approved Advanced Audacity Methods for High-Fidelity Computer Audio Recording (2023 Guidebook)
- 2024 Approved Mastering Gender Transformation in Voice The Essential Male to Female Software Collection
- A Curated Selection Top 8 Streaming Audio Tools to Enhance Your Broadcasts
- Maximizing Logic Pro X Potential 8 Must-Have Plugins (Free & Paid) for 2024
- New In 2024, Capturing Stories A Deep Dive Into Each Personnels Impact on a Film Set
- Updated Best Mac App for Amplifying and Blending Car Audio
- Updated Where Can I Find Dog Sound Effects for 2024
- Advanced Strategies to Exclude Percussion From Digital Song Archives
- Updated 2024 Approved Seamless Audio Transfer Essential Tips for Downloading Music From Spotify
- 2024 Approved Top 5 Essential Linux Tools for Capturing Professional-Quality Audio
- Updated In 2024, A Beginners Guide to Effective GarageBand Recording Processes
- 2024 Approved How to Use Autotune in Audacity with Plugins for Free?
- Updated 2024 Approved The Ultimate Guide to Cost-Free Music Production Tools Available Online and Offline Updated
- Updated In 2024, Introduction to LexiEdit A Starters Guide for Novice Editors
- The Complete Podcatchers Handbook Step-by-Step Computer Podcast Acquisition for 2024
- Updated Mastering Wav Conversion The Ultimate Resource for 2024
- New Top Free Video Branding Software for Watermarks and More for 2024
- How to Recover Apple iPhone X Data From iOS iCloud? | Dr.fone
- The Best Android Unlock Software For Lava Yuva 3 Pro Device Top 5 Picks to Remove Android Locks
- In 2024, Life360 Circle Everything You Need to Know On Realme 11 5G | Dr.fone
- New Vignette Masterpieces The Best iOS and Android Apps
- How to Soft Reset Honor X50 GT phone? | Dr.fone
- Undelete lost call logs from Nokia G310
- Where Is the Best Place to Catch Dratini On Samsung Galaxy F15 5G | Dr.fone
- New Streamline Your Edit Efficient Color Matching Techniques for Final Cut Pro Users for 2024
- 6 Proven Ways to Unlock Vivo Y100i Phone When You Forget the Password
- New Top Aspect Ratio Conversion Tools on the Web for 2024
- The way to get back lost videos from Samsung Galaxy M34 5G
- Title: New Harnessing Free Speech-to-Text Technology A 2023 Roundup of Online Resources
- Author: Paul
- Created at : 2024-05-20 01:48:18
- Updated at : 2024-05-21 01:48:18
- Link: https://voice-adjusting.techidaily.com/new-harnessing-free-speech-to-text-technology-a-2023-roundup-of-online-resources/
- License: This work is licensed under CC BY-NC-SA 4.0.
