
:max_bytes(150000):strip_icc():format(webp)/airpodbatterylevelonandroid-15c1db7e9fac43248d130a42540c12a6.jpg)
New 2024 Approved Elite 10 Audio Alteration Solutions for Males Seeking Gender-Specific Soundscapes
Elite 10 Audio Alteration Solutions for Males Seeking Gender-Specific Soundscapes
If you’ve been searching for the best android and iOS voice-changing apps around the internet, you’re on the right spot. Voice-changing applications are always fun. They’re handy when you’re pulling a prank on a friend, or you want some amazing effects to test your voice. Thus, we provide you with all the best male to female voice changer apps in the list below.
Record & Edit Voice Fast before Changing Voice
Before changing your voice from male to female, I suggest you edit your voice first. Filmora is an easy-to-use yet powerful video editor helping you quickly edit voice no matter your voice or the audio extracted from videos. Explore Filmora’s audio editing features and get ready for changing voice!
For Win 7 or later (64-bit)
For macOS 10.12 or later


Part 1: Changing Voice Online for Free with Media.io
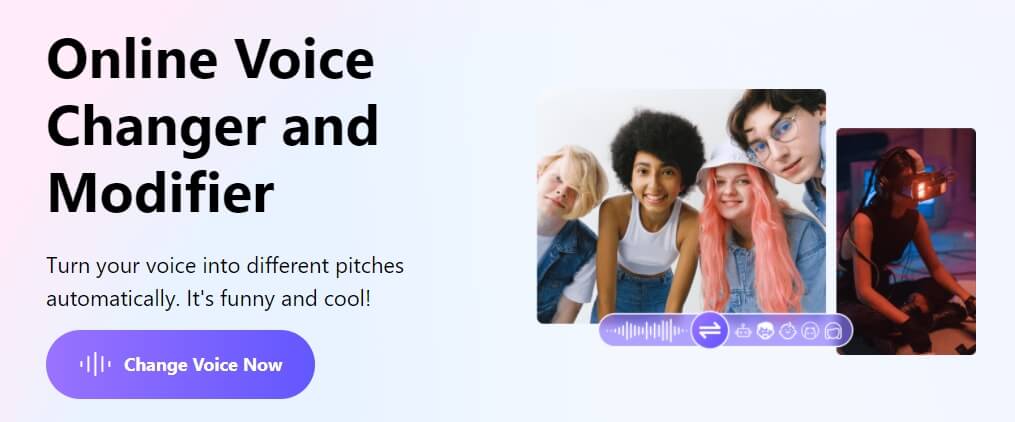
If you want to change voice without downloading and installing any app on your mobile phone, you can try some online solutions. Media.io is an all-in-one online video toolkit that allows you to edit, convert and compress video, audio and image files easily. The online voice changer from Media.io can transform your voice to a male voice, female voice, child voice, robot voice, and Donald Duck voice. If you wish to have voice filters, you won’t have any problems in the future with the Media.io voice changer.

This online voice changer works best on the Chrome browser, so you can utilize it whether using a Windows, Mac, Linux, or Chromebook device. As a result, you can deceive your family or friends by speaking in another people’s voice rather than your own. Doesn’t that sound like fun?
![]()
A cross-platform for making videos anywhere for all creators

Why your video editing isn’t good enough? How about some creative inspo?
- 100 Million+ Users
- 150+ Countries and Regions
- 4 Million+ Social Media Followers
- 5 Million+ Stock Media for Use
* Secure Download

Part 2: Best Male to Female Voice Changer Apps for iPhone and Android
- Girls Voice Changer
- Voice Changer Voice Recorder Editor & Effect
- VoiceFX
- Voice Changer
- Voice Changer - Audio effects
- Magic Call App
- Voice Changer and Sound Recorder
- Super Voice Editor
- Voice Changer with Effects
- Voice Changer - Girls Voice changer Male to Female
1. Girls Voice Changer
Available for: Android, iOS
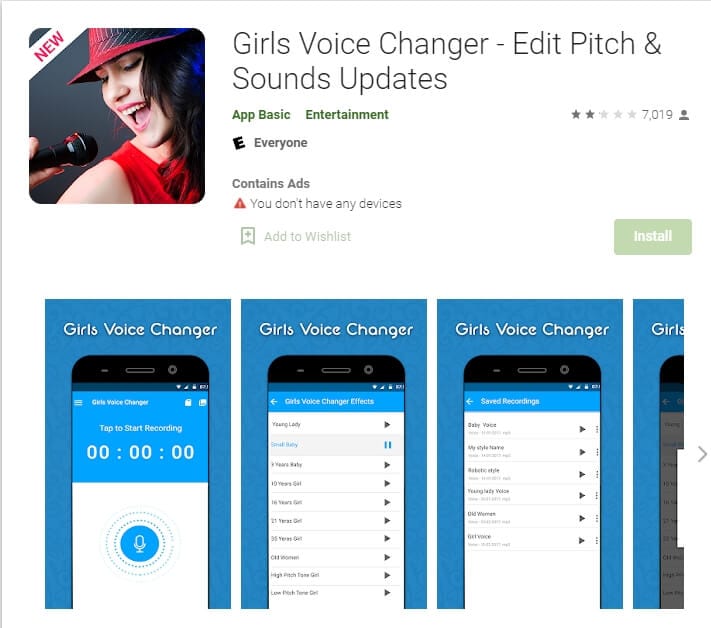
This girl voice changer app is highly portable and easy for any user to use comfortably. It is specifically more popular for changing male voice to female and for pitch adjustments. It’s completely free, so download on your android if you have a storage of about 8MB ready, and start using it!
This male-to-female voice changer app has several options in the library. Though the pitch adjustments are easy to make, some users have informed a lack of performance on very high-pitched settings. However, the smoothness of an android application also depends on how much space is readily available in the device. So next time you’re bored at a part, you have the perfect partner!
2. Voice Changer Voice Recorder Editor & Effect
Available for: Android
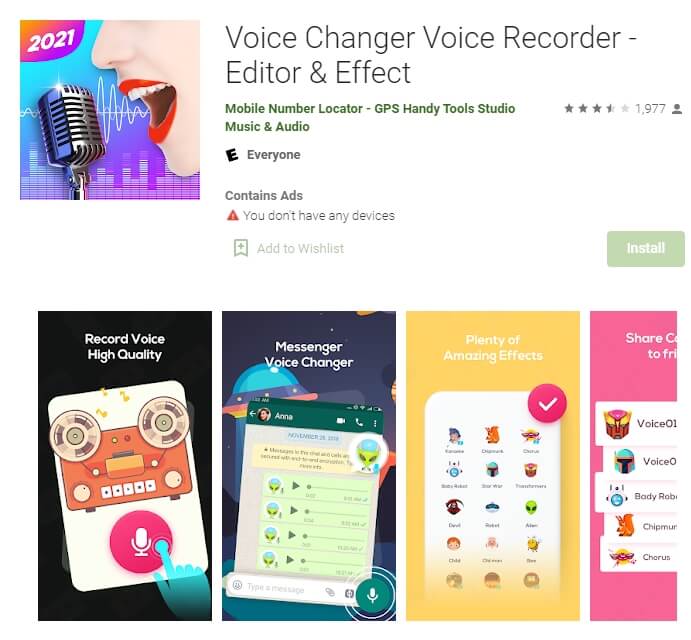
This voice changer application is for multi-purpose. Yes, you can use it as a girl voice changer smoothly and with ease. But apart from male to female voice changing, The “voice changer - voice editor application” can also be used to autotune your voice.
Now autotune is a big feature that every singer uses to make their voices tuned perfectly. With this app, you can also do the same to record your music or have fun while you are bored. The application is pretty to use and can be used as a girl voice changer not only for entertainment but also if you’re practicing. Many people who wish to seek a career in background voices might find this useful.
3. VoiceFX
Available for: Android

The VoiceFX application is filled with a lot of exciting options and features. If you are looking for an app that is more than just a male-to-female voice changer app, the voice fx is highly recommended.
You can also convert your voice into a robot or even an animal from male to female voice. Yes, you read it right. You can turn your manly voice into any of the fictional cartoons you want. This one’s a very easy and efficient way of filming a video with added effects or developing a mini-game with different voice characters. If you haven’t forgotten, there was a very big trend of converting famous music into chipmunk voices. With this app, you can convert your favorite songs into a chipmunk addition song without any problem.
4. Voice Changer
Available for: Android

The voice changer is a very famous male-to-female voice changer app. With over 10 million downloads on the google play store, the voice changer is highly recommended for users who have fun changing their voices from male to female. Compared to other voice changer applications, The Voice changer app has a very elegant and sleek design that makes it very easy to use.
Apart from the male to female voice change option, There are more than 50 other options that you can enjoy. Furthermore, you can share your creations with your friends through Bluetooth or other social media.
5. Voice Changer - Audio effects
Available for: Android

There are a lot of girl voice changer applications on the google play store. But not all of them are up to the mark. The Voice changer - audio effects is another highly recommended voice changer application.
The Voice Changer - Audio effects have a lot of other things to offer as well. Converting your voice from a male to a female has never been easier. Not only can you convert your voice into a girl, but you can also modify it. Furthermore, you can talk to your friends on the phone while you use the voice changer application. Moreover, the voices of animals and robots can also be an alternative to the female voice if you ever get bored of it.
6. Magic Call App
Available for: Android

The magic call is a real-time voice changer app that you can use for changing your voice during a call specifically. It is a really fun app which you can use with your friends to prank even your family!
This is a perfect option for people looking for a real-time girl voice changer app. The main purpose of this application is real-time calls. The magic call is ideal specifically for a male-to-female voice modification. And you can operate this application easily in call durations.
All you have to do is open the voice changer app and dial your call. Apart from Female voice, you can also convert your voice into a cartoon or an animal.
7. Voice Changer and Sound Recorder
Available for: iOS

If you are an iPhone user, then you must know that finding a voice changer on the apple store is like digging a diamond from the ground.
The Voice changer and sound recorder application is found exclusively on the apple store for people who love girl voice changer apps. It is a live call voice changer app, which means converting your voice from a male to a female in between the call. Furthermore, you can even add background voices such as traffic and echo to make your call even funnier. If you are looking for an excuse to get off from your call, then this application has got your back.
8. Super Voice Editor
Available for: Android
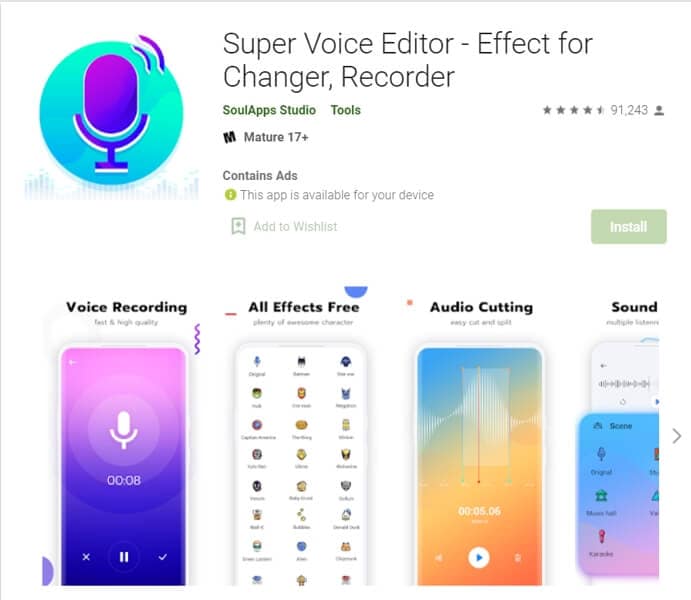
This one is a fun application for people searching for a voice changer app male to female. Not only can you record the audio that you edit, but also use it in real-time! Amazing right? Super voice editor enables you to add effects to your voice while you’re on a call as well. This feature means, next time you’re pulling a prank on the birthday boy, he won’t ever know! Sound like the wonder woman or dexter from his laboratory. The Super-Voice editor is perfect for kids playing in the house and even teenagers looking for something interesting. The SoulApps studio has made it easy for you to sound like your dream faces on the screen. With an MP3 cutter and Ringtone maker, this girl voice changer app is pure creativity.
9. Voice Changer with Effects
Available for: Android

Our list of girl voice changers, Voice changer with effects, is a very practical application that we highly recommend to our users.
With over 50 million downloads on google play, Voice changer with effects is highly suited for anyone looking for more than just a male-to-female voice changer. It has over 40 plus options such as helium, chipmunk, zombie, alien, and many more. With this application, you can even import a favorite audio clip of yours, and then you can easily convert it into a voice you like. If you want to modify your ringtone to an audio clip you just converted, then there is no better application than this one.
10. Voice Changer - Girls Voice changer Male to Female
Available for: Android

If you are looking for a girl voice changer app solely, this application perfectly fits you. The application is specifically designed only to change your voice from a male to a female. Although this application does provide options apart from female voice conversions, those features don’t function ideally. However, if you want a girl voice changer, you won’t have any trouble.
You can use this application while you are on a call. Hence, you can fool your family or friends by using a girl voice instead of your own. We recommend this as an average application that would fit your needs sufficiently.
In conclusion, you have now gone through the list of the perfect options for your android or iOS. Therefore, now you must be ready to choose the best girl voice changer app. So head on to your play store and search for your favorite app right now!
For Win 7 or later (64-bit)
For macOS 10.12 or later
Part 1: Changing Voice Online for Free with Media.io
If you want to change voice without downloading and installing any app on your mobile phone, you can try some online solutions. Media.io is an all-in-one online video toolkit that allows you to edit, convert and compress video, audio and image files easily. The online voice changer from Media.io can transform your voice to a male voice, female voice, child voice, robot voice, and Donald Duck voice. If you wish to have voice filters, you won’t have any problems in the future with the Media.io voice changer.
This online voice changer works best on the Chrome browser, so you can utilize it whether using a Windows, Mac, Linux, or Chromebook device. As a result, you can deceive your family or friends by speaking in another people’s voice rather than your own. Doesn’t that sound like fun?
![]()
A cross-platform for making videos anywhere for all creators
Why your video editing isn’t good enough? How about some creative inspo?
- 100 Million+ Users
- 150+ Countries and Regions
- 4 Million+ Social Media Followers
- 5 Million+ Stock Media for Use
* Secure Download
Part 2: Best Male to Female Voice Changer Apps for iPhone and Android
- Girls Voice Changer
- Voice Changer Voice Recorder Editor & Effect
- VoiceFX
- Voice Changer
- Voice Changer - Audio effects
- Magic Call App
- Voice Changer and Sound Recorder
- Super Voice Editor
- Voice Changer with Effects
- Voice Changer - Girls Voice changer Male to Female
1. Girls Voice Changer
Available for: Android, iOS
This girl voice changer app is highly portable and easy for any user to use comfortably. It is specifically more popular for changing male voice to female and for pitch adjustments. It’s completely free, so download on your android if you have a storage of about 8MB ready, and start using it!
This male-to-female voice changer app has several options in the library. Though the pitch adjustments are easy to make, some users have informed a lack of performance on very high-pitched settings. However, the smoothness of an android application also depends on how much space is readily available in the device. So next time you’re bored at a part, you have the perfect partner!
2. Voice Changer Voice Recorder Editor & Effect
Available for: Android
This voice changer application is for multi-purpose. Yes, you can use it as a girl voice changer smoothly and with ease. But apart from male to female voice changing, The “voice changer - voice editor application” can also be used to autotune your voice.
Now autotune is a big feature that every singer uses to make their voices tuned perfectly. With this app, you can also do the same to record your music or have fun while you are bored. The application is pretty to use and can be used as a girl voice changer not only for entertainment but also if you’re practicing. Many people who wish to seek a career in background voices might find this useful.
3. VoiceFX
Available for: Android
The VoiceFX application is filled with a lot of exciting options and features. If you are looking for an app that is more than just a male-to-female voice changer app, the voice fx is highly recommended.
You can also convert your voice into a robot or even an animal from male to female voice. Yes, you read it right. You can turn your manly voice into any of the fictional cartoons you want. This one’s a very easy and efficient way of filming a video with added effects or developing a mini-game with different voice characters. If you haven’t forgotten, there was a very big trend of converting famous music into chipmunk voices. With this app, you can convert your favorite songs into a chipmunk addition song without any problem.
4. Voice Changer
Available for: Android
The voice changer is a very famous male-to-female voice changer app. With over 10 million downloads on the google play store, the voice changer is highly recommended for users who have fun changing their voices from male to female. Compared to other voice changer applications, The Voice changer app has a very elegant and sleek design that makes it very easy to use.
Apart from the male to female voice change option, There are more than 50 other options that you can enjoy. Furthermore, you can share your creations with your friends through Bluetooth or other social media.
5. Voice Changer - Audio effects
Available for: Android
There are a lot of girl voice changer applications on the google play store. But not all of them are up to the mark. The Voice changer - audio effects is another highly recommended voice changer application.
The Voice Changer - Audio effects have a lot of other things to offer as well. Converting your voice from a male to a female has never been easier. Not only can you convert your voice into a girl, but you can also modify it. Furthermore, you can talk to your friends on the phone while you use the voice changer application. Moreover, the voices of animals and robots can also be an alternative to the female voice if you ever get bored of it.
6. Magic Call App
Available for: Android
The magic call is a real-time voice changer app that you can use for changing your voice during a call specifically. It is a really fun app which you can use with your friends to prank even your family!
This is a perfect option for people looking for a real-time girl voice changer app. The main purpose of this application is real-time calls. The magic call is ideal specifically for a male-to-female voice modification. And you can operate this application easily in call durations.
All you have to do is open the voice changer app and dial your call. Apart from Female voice, you can also convert your voice into a cartoon or an animal.
7. Voice Changer and Sound Recorder
Available for: iOS
If you are an iPhone user, then you must know that finding a voice changer on the apple store is like digging a diamond from the ground.
The Voice changer and sound recorder application is found exclusively on the apple store for people who love girl voice changer apps. It is a live call voice changer app, which means converting your voice from a male to a female in between the call. Furthermore, you can even add background voices such as traffic and echo to make your call even funnier. If you are looking for an excuse to get off from your call, then this application has got your back.
8. Super Voice Editor
Available for: Android
This one is a fun application for people searching for a voice changer app male to female. Not only can you record the audio that you edit, but also use it in real-time! Amazing right? Super voice editor enables you to add effects to your voice while you’re on a call as well. This feature means, next time you’re pulling a prank on the birthday boy, he won’t ever know! Sound like the wonder woman or dexter from his laboratory. The Super-Voice editor is perfect for kids playing in the house and even teenagers looking for something interesting. The SoulApps studio has made it easy for you to sound like your dream faces on the screen. With an MP3 cutter and Ringtone maker, this girl voice changer app is pure creativity.
9. Voice Changer with Effects
Available for: Android
Our list of girl voice changers, Voice changer with effects, is a very practical application that we highly recommend to our users.
With over 50 million downloads on google play, Voice changer with effects is highly suited for anyone looking for more than just a male-to-female voice changer. It has over 40 plus options such as helium, chipmunk, zombie, alien, and many more. With this application, you can even import a favorite audio clip of yours, and then you can easily convert it into a voice you like. If you want to modify your ringtone to an audio clip you just converted, then there is no better application than this one.
10. Voice Changer - Girls Voice changer Male to Female
Available for: Android
If you are looking for a girl voice changer app solely, this application perfectly fits you. The application is specifically designed only to change your voice from a male to a female. Although this application does provide options apart from female voice conversions, those features don’t function ideally. However, if you want a girl voice changer, you won’t have any trouble.
You can use this application while you are on a call. Hence, you can fool your family or friends by using a girl voice instead of your own. We recommend this as an average application that would fit your needs sufficiently.
In conclusion, you have now gone through the list of the perfect options for your android or iOS. Therefore, now you must be ready to choose the best girl voice changer app. So head on to your play store and search for your favorite app right now!
Premium Techniques for Integrating Audio Into Instagram TV
People are putting lots of effort into creating videos and sharing them on IGTV to get fame. Due to it, they also want to figure out how to add music to IGTV to create impressive videos. For all these things, the interested ones have to consider some video editors. In this blog, you will get complete information about these factors.
In this article
01 [3 Ways To Add Music To IGTV On Android & iOS](#Part 1)
02 [2 Ways To Add Music To IGTV On Windows & Mac](#Part 2)
03 [How To Add Music To IGTV Without Copyright?](#Part 3)
04 [How To Post Your Video To IGTV?](#Part 4)
Part 1 3 Ways To Add Music To IGTV On Android & iOS
Most individuals are using mobile devices for Instagram and IGTV purposes. Similarly, they are looking for the best video editors by which they can edit videos and prepare impressive content for IGTV uploads. If you are one of these, the following are some major apps for Android and iOS.
Filmora

Videoshop

Videoshop is considered by numerous individuals. Mainly, this video editor is beneficial in adding audio to the video’s background. It can be used for both Android and iOS mobile devices. It is available with some basic editing features.
Prequel

In case you want to add music to IGTV, Prequel can be a good option as well. It also available for both types of devices Android and iOS. By using this particular application, you can add effects, text, do editing, and alter videos.
Part 2 2 Ways To Add Music To IGTV On Windows & Mac
Filmora
Filmora is one of the best video editors for Windows & Mac. It is almost similar to the mobile version (Filmora). In case you want to use it, you should follow below mentioned procedure.
Wondershare Filmora
Get started easily with Filmora’s powerful performance, intuitive interface, and countless effects!
Try It Free Try It Free Try It Free Learn More about Filmora>

Step1
Firstly, you should import video and audio files to the Filmora. For importing files, it should be available on the device.
Step2
Now, you need to add audio to the video. Filmora also has a big music library with lots of free files. You can pick sound effects from here to create an impressive video. By using audio keyframing features, you can also make changes to the files.
Step3
After all these things, you can proceed by saving the changes and exporting the available file.
Final Cut Pro

Final Cut Pro is a video editor that is mainly considered by professionals only. The biggest thing about this particular editor is, the tool is available for Mac devices only. It has a good and easy-to-understand interface with lots of features. But, you cannot ignore the fact that it is too expensive so everyone cannot consider its services.
Part 3 How To Add Music To IGTV Without Copyright?
In the case of the online system, copyright problems are taking place several times. It is the main reason why some publishers cannot post their content or get their videos removed by force. Due to all these things, many individuals are interested in figuring out the best ways that can be useful in avoiding copyright issues by uploading a music file with video.
Here, you can find out some basic things. Firstly, you should be careful with the copyright rules. If you want to add music to IGTV video, you should check out the music file and its all types of copyrights first. This inspection will help you figure out lots of things, such as – the current legal condition of the file. There are numerous free music files also available on the internet.
You can use these files in your videos as you want. While using these ones, you will never face any kind of copyright problem. For getting such kinds of audio files, you can get help from third-party sources on the internet. These websites are offering royalty-free music files. Another major way is contacting the copyright holder and getting his or her permission to use the file.
Part 4 How To Post Your Video To IGTV?
Everyone does not have expertise in using the IGTV. It is the main reason why they are looking for a proper guide in some major steps, such as -the best way to post a video on IGTV. Before that, you should get clarity that the process will be a little bit different for mobile and desktop. You should follow the procedure according to the device you are using. In the upcoming details, you can get a step-by-step guide for both types of devices.
For Mobile – Step-By-Step Guide
Step1
Firstly, you should proceed by accessing the mobile application of Instagram. After opening the application, you should pay attention to the top-right section of feeds. Here, you can see the IGTV symbol. In case you want direct access, you can also download the IGTV application separately.
Step2
After accessing the IGTV, you will get a different interface. Here, you can see the “+” button. When you click the button, it will open your video gallery. You can pick the video, you want to upload on the IGTV feeds.
Step3
When you successfully choose a video, you should be focused on choosing an image that will be used as the cover. When choosing an image or video scene for cover, you need to be smart and careful. Try to keep it interesting and eye-catching, so people would like to watch it.
Step4
The addition of cover images will complete media-related options. Now, you should proceed with the ‘NEXT’ button. It will take you to the title and description page. You should put an interesting title and description to showcase the right data about the video.
Step5
Now, you have to finalize everything. Before posting the video, you will get an option with a notification. If you click the ‘yes’ button, it will help you preview the video and figure out everything is perfect or not. In case you consider the ‘no’ button, it will eliminate the preview and proceed to publish the video. Within a few minutes, your video will be posted on IGTV and visible to the audience.
For Desktop – Step-By-Step Guide
Step1
Firstly, you need to proceed by opening Instagram on a desktop, no matter Windows or Mac. Here, you should log in to Instagram Web by using credentials. You should log in account by using the official sources only. Don’t fall for fake websites or scammers.
Step2
Now, you should access your account profile. Here, you can see multiple buttons in the interface. You should proceed by choosing the ‘IGTV’ button. You can see this button between the ‘post’ and ‘saved’ buttons.
Step3
In the IGTV interface, you can see the ‘upload’ button as well. Clicking this particular button will allow you to access the video upload interface and procedure.
Step4
The video that you want to upload on IGTV should be available on your device. By using the interface, you can access device storage and upload the desired video.
Step5
You can also upload the video by using drag and drop features. After adding the video, you should proceed with the addition of the title and description. In case you also want to target the Facebook audience, you can make it visible there as well. For such a task, you can see a specific button that will allow you to do that as well.
These are basic procedures to upload videos on IGTV. After completing the procedure, you need to wait for a few minutes only. Here, the video uploading procedure will take time as per your internet speed and connection quality.
Final Words
After all these things, you can easily figure out how to add music to IGTV video and the best methods to use IGTV. Along with it, you can understand what methods can help you get audio files by avoiding copyright problems. The most important thing is content. In case you don’t upload creative content, it will not please your audience. You should be using the best tools to create video content for sharing on IGTV. The best content will entertain your audience and provide better recognition as well. In case you are using mobile platforms, it will be good to consider Filmora and for desktops, Filmora works great. You should be smart and careful while making a final decision.
02 [2 Ways To Add Music To IGTV On Windows & Mac](#Part 2)
03 [How To Add Music To IGTV Without Copyright?](#Part 3)
04 [How To Post Your Video To IGTV?](#Part 4)
Part 1 3 Ways To Add Music To IGTV On Android & iOS
Most individuals are using mobile devices for Instagram and IGTV purposes. Similarly, they are looking for the best video editors by which they can edit videos and prepare impressive content for IGTV uploads. If you are one of these, the following are some major apps for Android and iOS.
Filmora
Videoshop
Videoshop is considered by numerous individuals. Mainly, this video editor is beneficial in adding audio to the video’s background. It can be used for both Android and iOS mobile devices. It is available with some basic editing features.
Prequel
In case you want to add music to IGTV, Prequel can be a good option as well. It also available for both types of devices Android and iOS. By using this particular application, you can add effects, text, do editing, and alter videos.
Part 2 2 Ways To Add Music To IGTV On Windows & Mac
Filmora
Filmora is one of the best video editors for Windows & Mac. It is almost similar to the mobile version (Filmora). In case you want to use it, you should follow below mentioned procedure.
Wondershare Filmora
Get started easily with Filmora’s powerful performance, intuitive interface, and countless effects!
Try It Free Try It Free Try It Free Learn More about Filmora>
Step1
Firstly, you should import video and audio files to the Filmora. For importing files, it should be available on the device.
Step2
Now, you need to add audio to the video. Filmora also has a big music library with lots of free files. You can pick sound effects from here to create an impressive video. By using audio keyframing features, you can also make changes to the files.
Step3
After all these things, you can proceed by saving the changes and exporting the available file.
Final Cut Pro
Final Cut Pro is a video editor that is mainly considered by professionals only. The biggest thing about this particular editor is, the tool is available for Mac devices only. It has a good and easy-to-understand interface with lots of features. But, you cannot ignore the fact that it is too expensive so everyone cannot consider its services.
Part 3 How To Add Music To IGTV Without Copyright?
In the case of the online system, copyright problems are taking place several times. It is the main reason why some publishers cannot post their content or get their videos removed by force. Due to all these things, many individuals are interested in figuring out the best ways that can be useful in avoiding copyright issues by uploading a music file with video.
Here, you can find out some basic things. Firstly, you should be careful with the copyright rules. If you want to add music to IGTV video, you should check out the music file and its all types of copyrights first. This inspection will help you figure out lots of things, such as – the current legal condition of the file. There are numerous free music files also available on the internet.
You can use these files in your videos as you want. While using these ones, you will never face any kind of copyright problem. For getting such kinds of audio files, you can get help from third-party sources on the internet. These websites are offering royalty-free music files. Another major way is contacting the copyright holder and getting his or her permission to use the file.
Part 4 How To Post Your Video To IGTV?
Everyone does not have expertise in using the IGTV. It is the main reason why they are looking for a proper guide in some major steps, such as -the best way to post a video on IGTV. Before that, you should get clarity that the process will be a little bit different for mobile and desktop. You should follow the procedure according to the device you are using. In the upcoming details, you can get a step-by-step guide for both types of devices.
For Mobile – Step-By-Step Guide
Step1
Firstly, you should proceed by accessing the mobile application of Instagram. After opening the application, you should pay attention to the top-right section of feeds. Here, you can see the IGTV symbol. In case you want direct access, you can also download the IGTV application separately.
Step2
After accessing the IGTV, you will get a different interface. Here, you can see the “+” button. When you click the button, it will open your video gallery. You can pick the video, you want to upload on the IGTV feeds.
Step3
When you successfully choose a video, you should be focused on choosing an image that will be used as the cover. When choosing an image or video scene for cover, you need to be smart and careful. Try to keep it interesting and eye-catching, so people would like to watch it.
Step4
The addition of cover images will complete media-related options. Now, you should proceed with the ‘NEXT’ button. It will take you to the title and description page. You should put an interesting title and description to showcase the right data about the video.
Step5
Now, you have to finalize everything. Before posting the video, you will get an option with a notification. If you click the ‘yes’ button, it will help you preview the video and figure out everything is perfect or not. In case you consider the ‘no’ button, it will eliminate the preview and proceed to publish the video. Within a few minutes, your video will be posted on IGTV and visible to the audience.
For Desktop – Step-By-Step Guide
Step1
Firstly, you need to proceed by opening Instagram on a desktop, no matter Windows or Mac. Here, you should log in to Instagram Web by using credentials. You should log in account by using the official sources only. Don’t fall for fake websites or scammers.
Step2
Now, you should access your account profile. Here, you can see multiple buttons in the interface. You should proceed by choosing the ‘IGTV’ button. You can see this button between the ‘post’ and ‘saved’ buttons.
Step3
In the IGTV interface, you can see the ‘upload’ button as well. Clicking this particular button will allow you to access the video upload interface and procedure.
Step4
The video that you want to upload on IGTV should be available on your device. By using the interface, you can access device storage and upload the desired video.
Step5
You can also upload the video by using drag and drop features. After adding the video, you should proceed with the addition of the title and description. In case you also want to target the Facebook audience, you can make it visible there as well. For such a task, you can see a specific button that will allow you to do that as well.
These are basic procedures to upload videos on IGTV. After completing the procedure, you need to wait for a few minutes only. Here, the video uploading procedure will take time as per your internet speed and connection quality.
Final Words
After all these things, you can easily figure out how to add music to IGTV video and the best methods to use IGTV. Along with it, you can understand what methods can help you get audio files by avoiding copyright problems. The most important thing is content. In case you don’t upload creative content, it will not please your audience. You should be using the best tools to create video content for sharing on IGTV. The best content will entertain your audience and provide better recognition as well. In case you are using mobile platforms, it will be good to consider Filmora and for desktops, Filmora works great. You should be smart and careful while making a final decision.
“Easy Steps to Get and Remove Audacity on Ubuntu Linux - 2023 Edition”
Open-source audio editor Audacity is available for free download and usage. It is one of the most popular multi-track audio editing tools for Windows, Mac OS X, and Linux. Audio recordings may be recorded, edited, spliced, and altered with Audacity. How to install Audacity on your Ubuntu 20.04 LTS system is explained in this post.
Key Features of Audacity
- Creative Commons Attribution-NonCommercial-ShareAlike License
- It is a cross-platform program
- Sound files may be imported, edited, and combined. Use a variety of file types when exporting your recordings. You may even export many files at once.
- Record and playback live sound
- Audio Quality: Audacity can playback 16-bit, 24-bit, and 32-bit audio files, respectively.
- Accessible in 38 different dialects
- Assistive Listening Device
- Keyboard shortcuts are many
- A wide range of audio formats is supported, including AIFF, WAV, FLAC, and MP2.
- With the keyboard, tracks and choices may be handled to their greatest extent
- VST and Audio Unit effect plug-ins are supported. Plug-ins may even be written by you.
- Duplicate, chop, combine, or splice together several sound documents.
- There is a slew of others…
Installation
The official website for Audacity shows version 2.4.2 as the most recent release. Download the newest version of Audacity for Ubuntu 20.04 and then install it.
- Install Audacity via PPA
- Install Audacity via Snap Store
First, we’ll use the PPA approach to install Audacity.
Install Audacity via PPA
Installing Audacity on an Ubuntu system is as simple as entering the following line in the terminal to include the unofficial PPA developed by “ubuntuhandbook” to the Ubuntu system’s software sources, then rebooting.

You will be prompted to hit the Enter key to proceed with the process of adding your Audacity package to your sources list. To begin the process of introducing PPA to the sources list, press the Enter key.

After you’ve added the Audacity package to the system’s software sources, you’ll need to update the package repository in order to get Audacity to work.

As soon as you have updated the package repository, you should be able to successfully install Audacity.
Navigate to Activities & type in the word ‘audacity’ to find it.

As you can see in the picture, Audacity has been successfully installed and is ready for usage on my PC.

Installing Audacity from the Snap Store
A version of Audacity is also available for download via the Snap shop. Using a Snap is among the quickest and most straightforward methods of installing any program since it takes into account all of the application’s updates and dependencies. In order to install Audacity using Snap, you must first ensure that Snap is already installed on the Ubuntu system. Snap is pre-installed in the newest versions of Ubuntu and is available as a default. If Snap is not already installed on your system, you may do it by using the instructions shown below.

After safely installing Snap, you’ll be able to proceed to install Audacity by using the script provided in the next section.

It will just take a few minutes to download & install Audacity on your computer.

As soon as Audacity has been installed via the Snap method, launch the program by searching for the phrase ‘audacity’ in the Application menu.
To launch Audacity, click on the Audacity icon on your desktop.
How to uninstall Audacity Ubuntu
For whatever reason, if you wish to remove the Audacity program from your computer, you may follow these instructions.
Method 1
If you installed Audacity through the Snap method, execute the following command in your terminal: $ sudo snap remove Audacity
Method 2
If you have installed the application using the PPA, you may remove it by performing the instructions shown below.
>Step 1:
The first step is to
This indicates that the add-apt-repository command was used to add the PPA to your system. You may also use the same command to uninstall the PPA from your computer. Simply include the —remove option in your command.
$ sudo add-apt-repository –remove ppa:ubuntuhandbook1/audacity
>Step 2:
As of the right moment, the PPA has been withdrawn. What happens to the programs that are installed using these PPAs? Will they be eliminated as a consequence of the abolition of the Patriot Act? The answer is a resounding no.
Thus, PPA-purge enters the scene to help solve the problem. The PPA is disabled, but all of the apps installed by the PPA are also uninstalled, or they are reverted to the original versions given by your distribution.
Install the PPA-purge package and remove the Audacity package may be accomplished by running the following command.
$ sudo apt install ppa-purge && sudo ppa-purge ppa:ubuntuhandbook1/audacity
Conclusion
I hope you now have a clear grasp of installing and uninstalling Audacity on Ubuntu 20.04 LTS Focal Fossa. I hope this article has been helpful. Additionally, we cover Filmora’s voice effects & how users may use the program to improve and change their own voices. Filmora allows you to re-voice video/audio & previously recorded voiceovers. The Pitch option on the Timeline may be used with video/audio and voiceover files. Change the tone of a video and recording to make it sound unique. You may quickly alter the voices in the videos with Filmora. A story or video should accompany your viral. Allows you to alter the pitch of your voice by selecting the Changing Pitch option. You may adjust the video’s pace (Optional). Make a duplicate of the video or audio that has been altered.
For Win 7 or later (64-bit)
For macOS 10.12 or later
You will be prompted to hit the Enter key to proceed with the process of adding your Audacity package to your sources list. To begin the process of introducing PPA to the sources list, press the Enter key.
After you’ve added the Audacity package to the system’s software sources, you’ll need to update the package repository in order to get Audacity to work.
As soon as you have updated the package repository, you should be able to successfully install Audacity.
Navigate to Activities & type in the word ‘audacity’ to find it.
As you can see in the picture, Audacity has been successfully installed and is ready for usage on my PC.
Installing Audacity from the Snap Store
A version of Audacity is also available for download via the Snap shop. Using a Snap is among the quickest and most straightforward methods of installing any program since it takes into account all of the application’s updates and dependencies. In order to install Audacity using Snap, you must first ensure that Snap is already installed on the Ubuntu system. Snap is pre-installed in the newest versions of Ubuntu and is available as a default. If Snap is not already installed on your system, you may do it by using the instructions shown below.
After safely installing Snap, you’ll be able to proceed to install Audacity by using the script provided in the next section.
It will just take a few minutes to download & install Audacity on your computer.
As soon as Audacity has been installed via the Snap method, launch the program by searching for the phrase ‘audacity’ in the Application menu.
To launch Audacity, click on the Audacity icon on your desktop.
How to uninstall Audacity Ubuntu
For whatever reason, if you wish to remove the Audacity program from your computer, you may follow these instructions.
Method 1
If you installed Audacity through the Snap method, execute the following command in your terminal: $ sudo snap remove Audacity
Method 2
If you have installed the application using the PPA, you may remove it by performing the instructions shown below.
>Step 1:
The first step is to
This indicates that the add-apt-repository command was used to add the PPA to your system. You may also use the same command to uninstall the PPA from your computer. Simply include the —remove option in your command.
$ sudo add-apt-repository –remove ppa:ubuntuhandbook1/audacity
>Step 2:
As of the right moment, the PPA has been withdrawn. What happens to the programs that are installed using these PPAs? Will they be eliminated as a consequence of the abolition of the Patriot Act? The answer is a resounding no.
Thus, PPA-purge enters the scene to help solve the problem. The PPA is disabled, but all of the apps installed by the PPA are also uninstalled, or they are reverted to the original versions given by your distribution.
Install the PPA-purge package and remove the Audacity package may be accomplished by running the following command.
$ sudo apt install ppa-purge && sudo ppa-purge ppa:ubuntuhandbook1/audacity
Conclusion
I hope you now have a clear grasp of installing and uninstalling Audacity on Ubuntu 20.04 LTS Focal Fossa. I hope this article has been helpful. Additionally, we cover Filmora’s voice effects & how users may use the program to improve and change their own voices. Filmora allows you to re-voice video/audio & previously recorded voiceovers. The Pitch option on the Timeline may be used with video/audio and voiceover files. Change the tone of a video and recording to make it sound unique. You may quickly alter the voices in the videos with Filmora. A story or video should accompany your viral. Allows you to alter the pitch of your voice by selecting the Changing Pitch option. You may adjust the video’s pace (Optional). Make a duplicate of the video or audio that has been altered.
For Win 7 or later (64-bit)
For macOS 10.12 or later
Also read:
- Be the Life of Your Virtual Gathering Top 6 Voice Changes for Zoom That Add Fun and Flair for 2024
- 2024 Approved Top 8 Auditory Frequency Patterns for Media Crafting
- 2024 Approved The Ultimate List of High-Quality Instant Speech Transformers
- New 2024 Approved How to Remove Audio From Video Online?
- New Leading Linux Auditory Tools A Guide to the Most Trending Recorders with Best Practices for 2024
- Updated Scour the Soundscape of Laughter and Whimsy
- New 2024 Approved Getting Started in Recording Insights Into REAPERs Software Design
- Updated Sounds of Success Unveiling the Top 8 Cinematic Audio Wonders for 2024
- New In 2024, 10 Leading Real-Time Voice Transformers An In-Depth Evaluation for Consumers
- Updated Navigating Noise Nullification An In-Depth User Manual for Online Auditory Enhancement
- Understanding the Significance of Team Collaboration in Cinematic Projects
- 2024 Approved Directory of Free, Non-Copyrighted Background Song Sources
- The Three Simplest and Costless Audio-to-Text Solutions for Todays World (Step by Step) for 2024
- Exploring the Best A Ranked List of 10 Podcast Transcription Software Options for 2024
- In 2024, The Symphony of Applause Finding the Peak Sound Effects
- Updated In 2024, Perfecting the Symphony Techniques for Seamless Blending of Auditory Elements and Visuals in MP4
- Crafting a Comprehensive Guide to Choosing Superior Sound Editors of the Current Decade
- In 2024, Marketing Mastery Series Top Podcasts to Guide You Through Social Medias Impact
- Silent the Screen How to Strip Audio From Your Movies in iMovie for 2024
- New Streamlining Speaker Audio in Microsoft PowerPoint Cross-Platform Solutions for Windows and Mac for 2024
- 2024 Approved Accessible Vocal Isolation Equipment for All Voice Levels
- Updated 2024 Approved Auditory Access From MP4 An Assembled List of Simple Steps to Tap Into Sound
- Updated In 2024, The Symphony of Applause Finding the Peak Sound Effects
- Updated In 2024, How Cinematic Piano Background Music Help Video Editors
- 2024 Approved MAGIX Samplitude Vs. Other Leading Music Software The Ultimate Showdown
- New Step-by-Step Walkthrough The 5 Essential Skills to Record Sounds on a Mac
- New 2024 Approved Sound Effects for Podcasts Places to Find Them
- New In 2024, MP3 Cutter for Mac - Which Is the Best MP3 Cutter on Mac?
- Updated In 2024, Pro-Level MP3 Cutting Discover the Top 5 Online Platforms
- Leading Linux Auditory Tools A Guide to the Most Trending Recorders with Best Practices for 2024
- Top 6 Apps/Services to Trace Any Apple iPhone 15 Location By Mobile Number | Dr.fone
- 9 Quick Fixes to Unfortunately TouchWiz has stopped Of Tecno Camon 20 | Dr.fone
- 4 Solutions to Fix Unfortunately Your App Has Stopped Error on Samsung Galaxy A25 5G | Dr.fone
- How to Unlock iPhone X Online? Here are 6 Easy Ways
- How to Cast Honor X50 Screen to PC Using WiFi | Dr.fone
- New In 2024, The Ultimate List of Cartoon Video Makers for Beginners
- Top 6 Apps/Services to Trace Any Apple iPhone X Location By Mobile Number | Dr.fone
- In 2024, How To Use Allshare Cast To Turn On Screen Mirroring On Samsung Galaxy XCover 7 | Dr.fone
- How to Unlock the Lock Screen on my Itel
- A Full Review for iTools Virtual Location and Top 5 Alternatives For Apple iPhone 13 mini/iPad | Dr.fone
- In 2024, Edit and Send Fake Location on Telegram For your Apple iPhone 12 Pro in 3 Ways | Dr.fone
- AddROM Bypass An Android Tool to Unlock FRP Lock Screen For your Tecno Pop 8
- How to Transfer Data from Lava Yuva 3 to Other Android Devices? | Dr.fone
- Title: New 2024 Approved Elite 10 Audio Alteration Solutions for Males Seeking Gender-Specific Soundscapes
- Author: Paul
- Created at : 2024-05-05 05:49:45
- Updated at : 2024-05-06 05:49:45
- Link: https://voice-adjusting.techidaily.com/new-2024-approved-elite-10-audio-alteration-solutions-for-males-seeking-gender-specific-soundscapes/
- License: This work is licensed under CC BY-NC-SA 4.0.
