
:max_bytes(150000):strip_icc():format(webp)/should-you-buy-an-apple-tv-5248431-f35331ef36b749b9895a2c1e3705cf22.jpg)
Innovations in Home Audio Engineering Analyzing the Best and Worst of the Top Digital Music Makers This Year for 2024
Innovations in Home Audio Engineering: Analyzing the Best and Worst of the Top Digital Music Makers This Year
FREE 10 Best Online Music Makers

Benjamin Arango
Apr 26, 2024• Proven solutions


Expressing ideas through music was never easy, and even today in the age of powerful digital audio stations like Ableton Live or FruityLoops , producing original music requires a certain set of skills. However, online content producers often need music for their videos, but they neither have the time or the budget to hire a professional musician to create a soundtrack for their project in studio conditions. If you are looking for a quick way to make your own music online, then you should keep reading, because in this article we are going to take you through the ten best online music makers you should check out in 2021.
10 Best Online Music Makers in 2021
The music-making platforms that are currently available online are still not as nearly as powerful as professional software products for music producers. Nonetheless, this doesn’t mean that you can’t use them to create the music you like or just have fun with them. Here are the ten best online music makers in 2019.
1. Typeatone
Price: Free
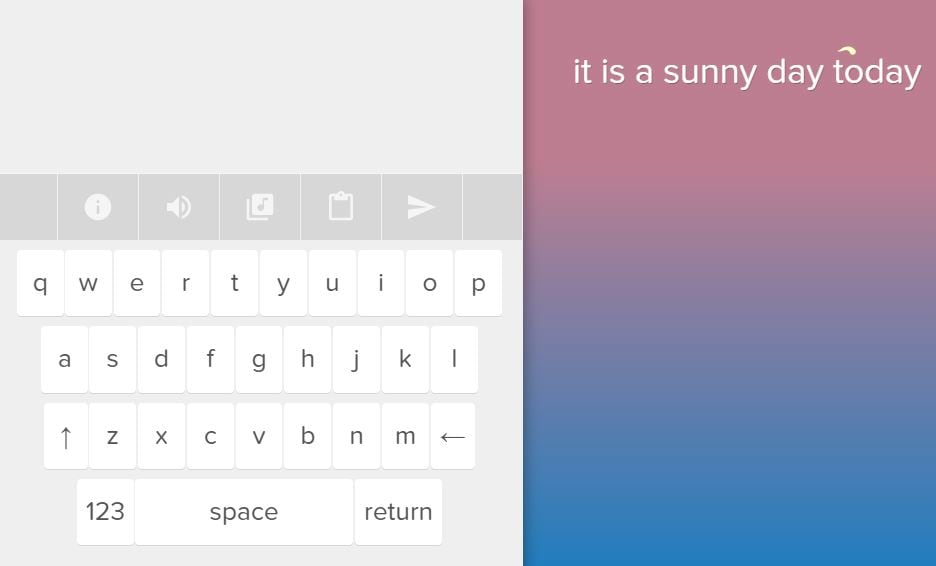
Image from Internet
Have you ever wondered what your words would sound like if they were turned into music? Head over to the Typeatone platform if you want to find out since all you have to do in order to start creating your own music is type in the text. As you type, the platform will automatically start playing your words and once you’re done, you’ll be able to hear your new song. You can also choose between different instruments to make the process of creating music with Typeatone even more entertaining. You can share all of your creations with your friends on social media.
![]()
A cross-platform for making videos anywhere for all creators

Why your video editing isn’t good enough? How about some creative inspo?
- 100 Million+ Users
- 150+ Countries and Regions
- 4 Million+ Social Media Followers
- 5 Million+ Stock Media for Use
* Secure Download

2. Audiotool
Price: Free
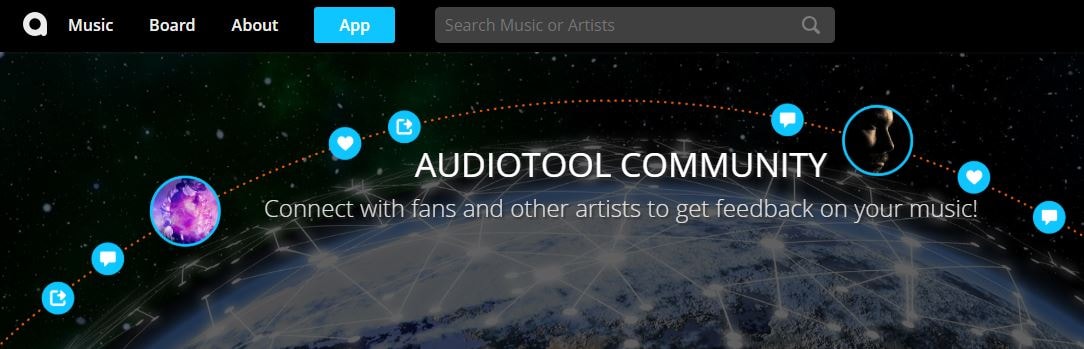
Image from Internet
Electronic music producers who often use synthesizers like Roland TB-303 or Roland TR-909 are going to love the features this online collaborative platform offers. Audiotool hosts a huge music library, you can explore even if you are not a registered user. In order to access the platform’s music studio, you first have to create an account and make sure that you are signed in. Audiotool is also a community of like-minded people where you can meet artists whose work you appreciate or hear what others think about your work. The only downside is that Audiotool’s abundance of features can be overwhelming for the newcomers to the world of electronic music production.
3. AudioSauna
Price: Free
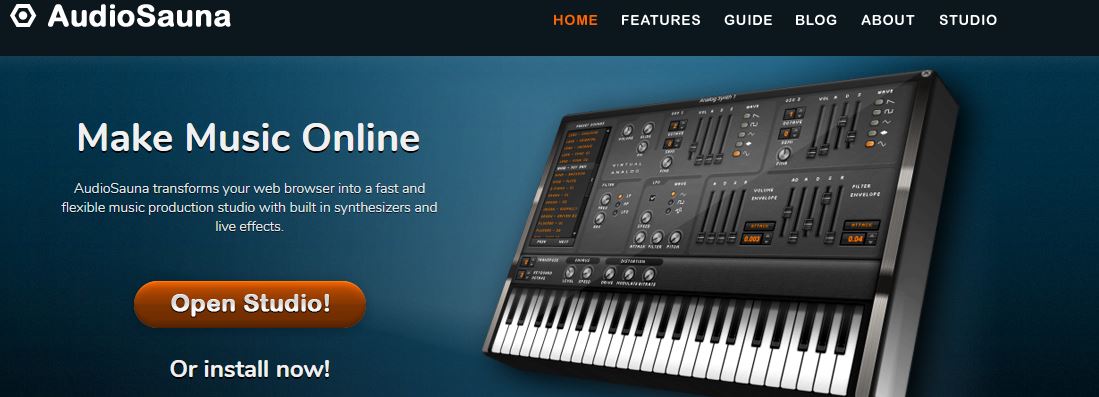
Image from Internet
AudioSauna seems to offer everything its users need to create inspiring music because it is equipped with frequency modulation synth, virtual analog synth and a sampler that provides layering features. Moreover, its intuitive interface makes the process of arranging the song structure or changing several note values simultaneously much easier. Creating an account on AudioSauna will enable to record all your projects and export them as audio files that can be uploaded to SoundCloud or any other audio distribution platform. AudioSauna is a perfect tool for skilled producers who want to create their music online.
4. Soundtrap
Price: Free trial available, subscription plans start at $3.99 per month

Image from Internet
Soundtrap offers a long list of features that enable professional musicians to create their music online. All you have to do is create an account and you will get access to the Sountrap’s studio that let you create new beat patterns, use a synthesizer or even invite friends to make music together. The platform also offers the possibility to connect your own instruments to the Soundtrap’s studio, so that you can record your music as you play it. This online platform also has an Education section where you can share your knowledge with others or learn valuable music lessons.
5. PatternSketch
Price: Free
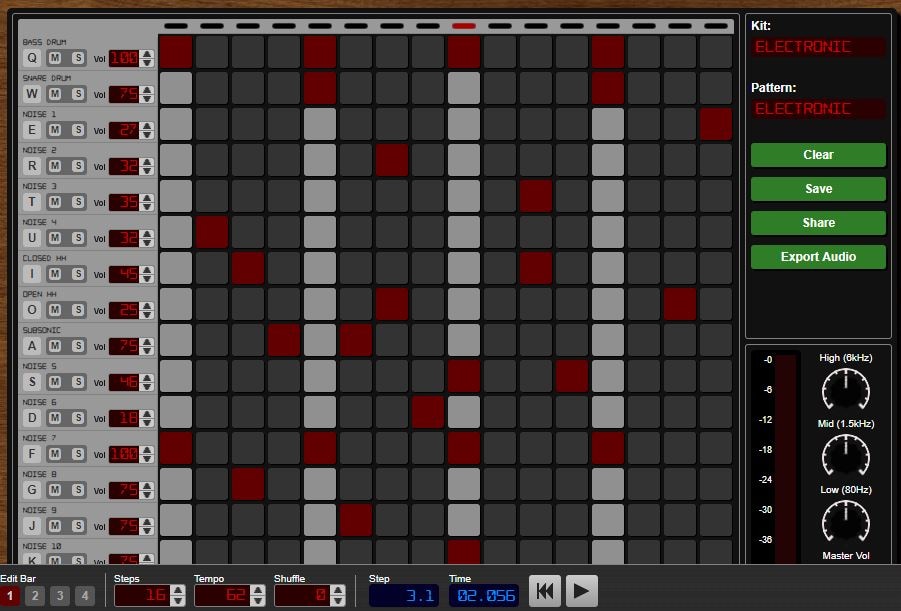
Image from Internet
This basic and yet effective drum machine can help you generate amazing beats for the songs you’re working on. Once you sign up, you will be able to choose from a number of different kits and patterns that are fully customizable or create your own original beats. After you create a pattern you like, you can save it with a single click or send it to your friends via email. Optionally, you can export all of your creations from PatternSketch and save them as wav, mp3 or ogg files, although in some cases mp3 audio files may not loop properly.
6. Soundation
Price: Free version available, pricing plans start at $1.99 per month

Image from Internet
If you choose to create music with the free version of Soundation, you’ll be able to work on up to ten projects, try out over 700 audio effects and loops, and export all your music in low quality. Purchasing the Intro pricing plan will enable you to work on an unlimited number of projects, make live audio recordings, import audio files smaller than 100MB or use an external midi controller. Moreover, opting for any of the annual or monthly subscription plans will allow you to export entire projects and audio files in high resolution from Soundation.
7. Text to Speech
Price: Free

online-music-maker-Text to Speech.jpg
Vocals are often overlooked in contemporary electronic music, but there are so many ways they can be used creatively. The platform lets you turn up to 50000 characters into speech at once, and it also offers several different voices you can choose from. Before you create an audio file you can determine how fast the text is going to be vocalized, so you should try different options and see which one fits your project the best. Text to Speech platform can be used during the process of creating a new song, but the tools it offers are not enough to make an entire song.
8. Looplabs
Price: Free
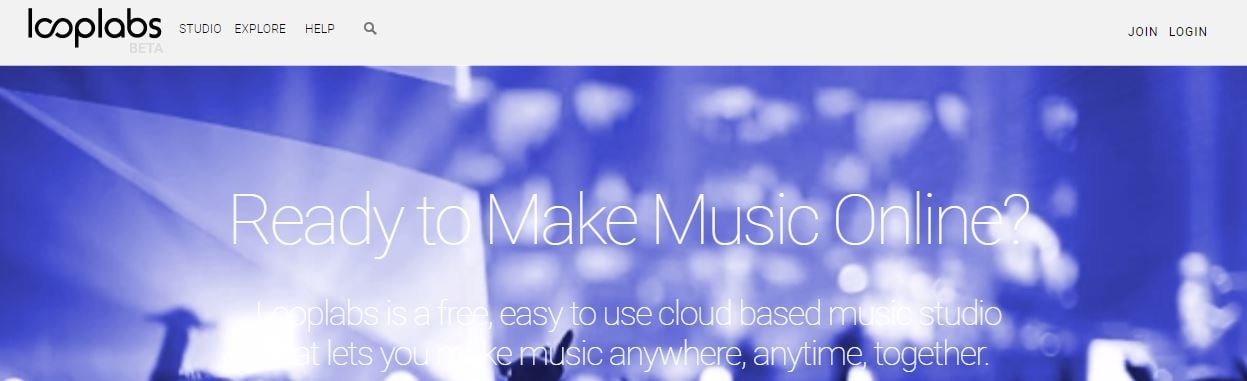
Music enthusiasts who would like to produce different genres of music online should definitely get familiar with Looplabs, as this online music maker lets its users remix songs or make music from scratch. Besides being one of the best places on the Internet to record music, Looplabs is also a community where you can meet people who like your music or discover artists whose work you admire. The Looplab’s studio features samples for a broad range of music genres and musical instruments, and you can use it to make Electro or Funk music equally effectively.
9. Online Sequencer
Price: Free
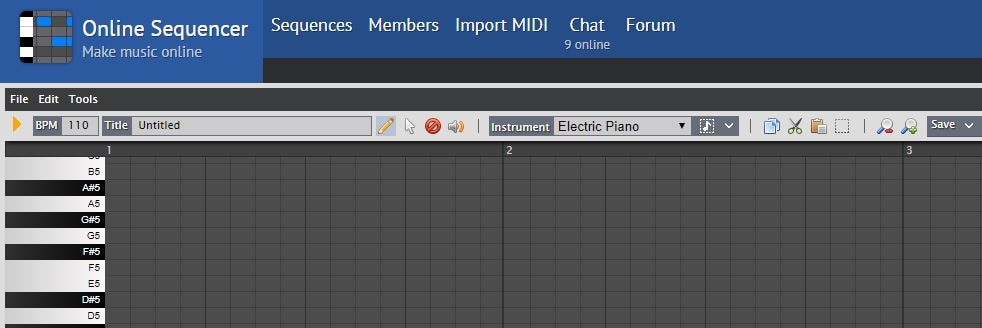
This is a perfect tool for developing an idea for a song, as you can create a sequence in just a few minutes. You can choose from Piano, Drums and Guitar categories of instruments or browse through a huge collection of fully customizable preset sequences that is updated on a daily basis. The platform also lets you import MIDI files and work on projects you’ve already started developing or you can export your sequences as MIDI files from the Online Sequencer and edit them with your DAW. Even though Online Sequencer is a useful tool for making music, the features it offers can’t really be compared with those on Soundation or AudioSauna.
10. Autochords
Price: Free
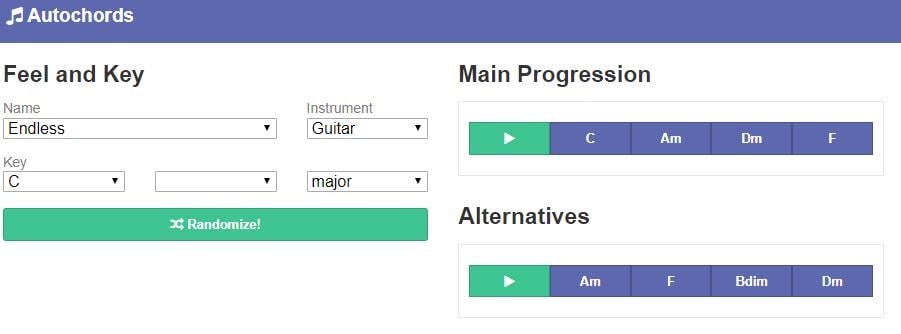
Finding new ideas for songs is often more difficult than it sounds, and if you ever face a creative block you should simply head over to Autochords. This platform suggests chord progressions based on the parameters you set, so you just have to select an instrument and the name of the song to set the feel, and the platform will show you the main progression and its alternatives. Rather than being an online music maker, Autochords is more a tool that helps piano and guitar players understand chord progressions better. iPhone and iPad users can download the Autochords app from the App Store for free.
Read More to Get : Best Free DAW for Windows and Mac for Beginners >>
Conclusion
You don’t have to be a professional musician in order to start making music online, you just have to love music, and an online music maker of your choice will take care of the rest. Do you use online music makers for entertainment or to express your creativity? Leave a comment below and share your opinions with us.
Benjamin Arango
Benjamin Arango is a writer and a lover of all things video.
Follow @Benjamin Arango
Benjamin Arango
Apr 26, 2024• Proven solutions
Expressing ideas through music was never easy, and even today in the age of powerful digital audio stations like Ableton Live or FruityLoops , producing original music requires a certain set of skills. However, online content producers often need music for their videos, but they neither have the time or the budget to hire a professional musician to create a soundtrack for their project in studio conditions. If you are looking for a quick way to make your own music online, then you should keep reading, because in this article we are going to take you through the ten best online music makers you should check out in 2021.
10 Best Online Music Makers in 2021
The music-making platforms that are currently available online are still not as nearly as powerful as professional software products for music producers. Nonetheless, this doesn’t mean that you can’t use them to create the music you like or just have fun with them. Here are the ten best online music makers in 2019.
1. Typeatone
Price: Free
Image from Internet
Have you ever wondered what your words would sound like if they were turned into music? Head over to the Typeatone platform if you want to find out since all you have to do in order to start creating your own music is type in the text. As you type, the platform will automatically start playing your words and once you’re done, you’ll be able to hear your new song. You can also choose between different instruments to make the process of creating music with Typeatone even more entertaining. You can share all of your creations with your friends on social media.
![]()
A cross-platform for making videos anywhere for all creators
Why your video editing isn’t good enough? How about some creative inspo?
- 100 Million+ Users
- 150+ Countries and Regions
- 4 Million+ Social Media Followers
- 5 Million+ Stock Media for Use
* Secure Download
2. Audiotool
Price: Free
Image from Internet
Electronic music producers who often use synthesizers like Roland TB-303 or Roland TR-909 are going to love the features this online collaborative platform offers. Audiotool hosts a huge music library, you can explore even if you are not a registered user. In order to access the platform’s music studio, you first have to create an account and make sure that you are signed in. Audiotool is also a community of like-minded people where you can meet artists whose work you appreciate or hear what others think about your work. The only downside is that Audiotool’s abundance of features can be overwhelming for the newcomers to the world of electronic music production.
3. AudioSauna
Price: Free
Image from Internet
AudioSauna seems to offer everything its users need to create inspiring music because it is equipped with frequency modulation synth, virtual analog synth and a sampler that provides layering features. Moreover, its intuitive interface makes the process of arranging the song structure or changing several note values simultaneously much easier. Creating an account on AudioSauna will enable to record all your projects and export them as audio files that can be uploaded to SoundCloud or any other audio distribution platform. AudioSauna is a perfect tool for skilled producers who want to create their music online.
4. Soundtrap
Price: Free trial available, subscription plans start at $3.99 per month
Image from Internet
Soundtrap offers a long list of features that enable professional musicians to create their music online. All you have to do is create an account and you will get access to the Sountrap’s studio that let you create new beat patterns, use a synthesizer or even invite friends to make music together. The platform also offers the possibility to connect your own instruments to the Soundtrap’s studio, so that you can record your music as you play it. This online platform also has an Education section where you can share your knowledge with others or learn valuable music lessons.
5. PatternSketch
Price: Free
Image from Internet
This basic and yet effective drum machine can help you generate amazing beats for the songs you’re working on. Once you sign up, you will be able to choose from a number of different kits and patterns that are fully customizable or create your own original beats. After you create a pattern you like, you can save it with a single click or send it to your friends via email. Optionally, you can export all of your creations from PatternSketch and save them as wav, mp3 or ogg files, although in some cases mp3 audio files may not loop properly.
6. Soundation
Price: Free version available, pricing plans start at $1.99 per month
Image from Internet
If you choose to create music with the free version of Soundation, you’ll be able to work on up to ten projects, try out over 700 audio effects and loops, and export all your music in low quality. Purchasing the Intro pricing plan will enable you to work on an unlimited number of projects, make live audio recordings, import audio files smaller than 100MB or use an external midi controller. Moreover, opting for any of the annual or monthly subscription plans will allow you to export entire projects and audio files in high resolution from Soundation.
7. Text to Speech
Price: Free

online-music-maker-Text to Speech.jpg
Vocals are often overlooked in contemporary electronic music, but there are so many ways they can be used creatively. The platform lets you turn up to 50000 characters into speech at once, and it also offers several different voices you can choose from. Before you create an audio file you can determine how fast the text is going to be vocalized, so you should try different options and see which one fits your project the best. Text to Speech platform can be used during the process of creating a new song, but the tools it offers are not enough to make an entire song.
8. Looplabs
Price: Free
Music enthusiasts who would like to produce different genres of music online should definitely get familiar with Looplabs, as this online music maker lets its users remix songs or make music from scratch. Besides being one of the best places on the Internet to record music, Looplabs is also a community where you can meet people who like your music or discover artists whose work you admire. The Looplab’s studio features samples for a broad range of music genres and musical instruments, and you can use it to make Electro or Funk music equally effectively.
9. Online Sequencer
Price: Free
This is a perfect tool for developing an idea for a song, as you can create a sequence in just a few minutes. You can choose from Piano, Drums and Guitar categories of instruments or browse through a huge collection of fully customizable preset sequences that is updated on a daily basis. The platform also lets you import MIDI files and work on projects you’ve already started developing or you can export your sequences as MIDI files from the Online Sequencer and edit them with your DAW. Even though Online Sequencer is a useful tool for making music, the features it offers can’t really be compared with those on Soundation or AudioSauna.
10. Autochords
Price: Free
Finding new ideas for songs is often more difficult than it sounds, and if you ever face a creative block you should simply head over to Autochords. This platform suggests chord progressions based on the parameters you set, so you just have to select an instrument and the name of the song to set the feel, and the platform will show you the main progression and its alternatives. Rather than being an online music maker, Autochords is more a tool that helps piano and guitar players understand chord progressions better. iPhone and iPad users can download the Autochords app from the App Store for free.
Read More to Get : Best Free DAW for Windows and Mac for Beginners >>
Conclusion
You don’t have to be a professional musician in order to start making music online, you just have to love music, and an online music maker of your choice will take care of the rest. Do you use online music makers for entertainment or to express your creativity? Leave a comment below and share your opinions with us.
Benjamin Arango
Benjamin Arango is a writer and a lover of all things video.
Follow @Benjamin Arango
ChorusSync: Uniting Voice Tracks Effortlessly in Premiere Pro’s Creative Suite [Premium 2023 Update]
PluralEyes: The Best Plug in to Sync Audio in Premiere Pro
Benjamin Arango
Mar 27, 2024• Proven solutions
Have you ever found the situation stressful when you need to sync audio in Premiere Pro? Well you are not merely one who find this task challenging. However, with the help of PluralEyes , this task can be simplified. PluralEyes is an outstanding third-party plug-in helpful in syncing audio. If you have started pondering over how to use it in Premiere Pro, we shall help you learn the same. The article today will be discussing about making your work easier by using PluralEyes. Let us begin without further ado.
Part 1: What is PluralEyes
PluraEyes is a plug-in from Red Giant that aims to ease the task of audio/video synchronization. With its user-friendly interface, it easily imports, syncs and edits the clips in a matter of minutes. Being helpful for all operating systems and supportive to all host apps, PlularEyes can be counted as the most appropriate tool when it comes to fast audio syncing. It has the ability to carefully scrutinize the clip and then make use of the best syncing options. There are various scenarios when you can work with PluralEyes like events including weddings , conference, music videos etc. It just maximizes the workflow and has faster setup with less complications and more efficiency.
Part 2: How to Use PluralEyes in Premiere Pro
Step 1: Import Video and Audio Files
To begin with, all you need is adding your video clip to the computer. Simply import the footage on your PC followed by opening Premiere Pro. Past it, customize the sequence settings as per your needs. Now, drag the footage and the preferred audio into the timeline. Next, you need to make sure of arranging the multiple cameras to their own level and keep the audio at bottom level. Also, keep the footage in back to back format.

Step 2: Click Open using PluralEyes
In order to open PluralEyes, head to “Window” and pick out the “Extensions” option. Now, select “PluralEyes”. By doing this, you will receive a small PluralEyes window in Premiere Pro. In case there are multiple timelines opened please ensure to select the one to be worked with.

Step 3: Start Syncing Audio
Subsequently, PluralEyes will begin to scan the footage and audio file you imported. Prior to syncing, you are supposed to wait till PluralEyes scans the files. After the scanning gets completed, get start with syncing. Now, the files will begin to get arranged and matched simultaneously. Followed by this, hit on “export” and you will see the fresh timeline that is synced, opened in Premiere Pro.

Conclusion
Using PluralEyes is the best choice if you want to get your audio/video synced in an accurate way. We have demonstrated how this tool works and how you can sync audio in Premiere Pro via PluaralEyes. Now, by the end of the topic, we hope that you are well acquainted with the know-how of PluralEyes and the steps involved in audio syncing. You can now work on your clips without any complications. Thank you for reading this and do share your views with us.
Benjamin Arango
Benjamin Arango is a writer and a lover of all things video.
Follow @Benjamin Arango
Benjamin Arango
Mar 27, 2024• Proven solutions
Have you ever found the situation stressful when you need to sync audio in Premiere Pro? Well you are not merely one who find this task challenging. However, with the help of PluralEyes , this task can be simplified. PluralEyes is an outstanding third-party plug-in helpful in syncing audio. If you have started pondering over how to use it in Premiere Pro, we shall help you learn the same. The article today will be discussing about making your work easier by using PluralEyes. Let us begin without further ado.
Part 1: What is PluralEyes
PluraEyes is a plug-in from Red Giant that aims to ease the task of audio/video synchronization. With its user-friendly interface, it easily imports, syncs and edits the clips in a matter of minutes. Being helpful for all operating systems and supportive to all host apps, PlularEyes can be counted as the most appropriate tool when it comes to fast audio syncing. It has the ability to carefully scrutinize the clip and then make use of the best syncing options. There are various scenarios when you can work with PluralEyes like events including weddings , conference, music videos etc. It just maximizes the workflow and has faster setup with less complications and more efficiency.
Part 2: How to Use PluralEyes in Premiere Pro
Step 1: Import Video and Audio Files
To begin with, all you need is adding your video clip to the computer. Simply import the footage on your PC followed by opening Premiere Pro. Past it, customize the sequence settings as per your needs. Now, drag the footage and the preferred audio into the timeline. Next, you need to make sure of arranging the multiple cameras to their own level and keep the audio at bottom level. Also, keep the footage in back to back format.
Step 2: Click Open using PluralEyes
In order to open PluralEyes, head to “Window” and pick out the “Extensions” option. Now, select “PluralEyes”. By doing this, you will receive a small PluralEyes window in Premiere Pro. In case there are multiple timelines opened please ensure to select the one to be worked with.
Step 3: Start Syncing Audio
Subsequently, PluralEyes will begin to scan the footage and audio file you imported. Prior to syncing, you are supposed to wait till PluralEyes scans the files. After the scanning gets completed, get start with syncing. Now, the files will begin to get arranged and matched simultaneously. Followed by this, hit on “export” and you will see the fresh timeline that is synced, opened in Premiere Pro.
Conclusion
Using PluralEyes is the best choice if you want to get your audio/video synced in an accurate way. We have demonstrated how this tool works and how you can sync audio in Premiere Pro via PluaralEyes. Now, by the end of the topic, we hope that you are well acquainted with the know-how of PluralEyes and the steps involved in audio syncing. You can now work on your clips without any complications. Thank you for reading this and do share your views with us.
Benjamin Arango
Benjamin Arango is a writer and a lover of all things video.
Follow @Benjamin Arango
“No Spending, No Sweat: The Ultimate List of Six Video to Audio Conversion Hacks “
If you have the footage in which only the sound has all the meat, you might want to remove the visuals from the clip and keep only the audio track to save some space on your storage media. Because the videos nowadays are usually in MP4 format, and the most commonly used audio type is MP3, it becomes imperative to learn how to convert MP4 to MP3.
It is also important to know which tools are best for such kind of conversion and what benefits and downsides they come with if installed on your PC.
That said, here, you will learn how to convert video to audio using six extremely popular and widely used programs.
| 1 - Filmora | 2 - VLC media player | 3 - Audacity |
|---|---|---|
| 4 - QuickTime | 5 - Media Converter | 6 - Video to MP3 Converter |
Watch a Video First to Take a Quick View of These Programs
For Win 7 or later (64-bit)
For macOS 10.14 or later


1 Filmora - [Windows, Mac, iPhone & Android]
A product by Wondershare that is one of the most versatile development organizations, Filmora , is available for Windows and Mac platforms. The tool is a full-fledged post-production program that many professionals use because it is lightweight and due to its simple UI and not-so-steep learning curve.
The instructions given below explain how to convert video to audio with Filmora:
Step 1: Import Source Media
Launch Wondershare Filmora (a Windows computer here used here), click anywhere inside the Media window present at the upper-left section, and select and import a source video file to the program.
For Win 7 or later (64-bit)
For macOS 10.14 or later

Step 2: Add Media to Timeline
Drag the imported footage to the Timeline at the bottom of the window. Optionally, right-click the media in the Timeline itself, and click Detach Audio to separate the audio track from the video. Trim off the unwanted sections from the clip if need be.

Step 3: Convert Video to Audio
Click EXPORT from the top-center of the window, go to the Video tab on the Export box, select MP3 from the bottom of the Format list in the left pane, choose other preferences by clicking the SETTINGS button from the right, and click EXPORT from the bottom-right corner.

Benefits of Using Filmora
Some of the advantages of using Filmora to convert video clips to audio are:
- Easy audio separation from the video
- Ability to export videos directly to audio
- Ability to adjust the audio and remove the background noise
- Ability to record voice and integrate it into the audio clip
Disadvantages: Doesn’t have many audio formats for exporting.
Supported Audio Formats: At the time of this writing, Filmora supports only MP3 audio format while exporting directly.
For Win 7 or later (64-bit)
For macOS 10.14 or later
2 VLC Media Player [Windows, Mac & Linux]
A well-known application that supports almost all media formats and is available for Windows, Mac, and Linux platforms, the VLC media player has its built-in Converter that can transcode your video clips to audio for free.
The steps given below explain how to convert video to audio with VLC media player:
Step 1: Import Source Video

Launch VLC media player, click Media from the menu bar at the top, and click Convert / Save from the menu. Make sure that the File tab is selected on the Open Media box, click Add from the right side of the File Selection field, and click Convert / Save from the bottom.

Step 2: Select Output Format and Preferences
On the Convert box, make sure that the Convert radio button is selected, choose an audio format from the Profile drop-down list, optionally click the Settings (Wrench) icon present next to the drop-down list itself, choose other output preferences for the audio and click Save to get back to the Convert box.
Step 3: Choose Output Folder and Convert

Click Browse from the Destination section to select an output folder, enter a name for the exported file in the Destination file field, and click Start to convert audio to video with VLC media player.
Benefits of Using VLC media player
Some advantages that VLC offers include:
- Doesn’t require any other application to be installed for conversion
- Makes the process quite simple and absolutely free
Disadvantages: Doesn’t have editing tools to manipulate the clips before converting.
Supported Audio Formats: VLC media player supports OGG (Vorbis), MP3, and FLAC format while exporting.
3 Audacity [Windows, Mac & Linux]
Audacity is yet another cross-platform tool that is specifically dedicated to audio formats and is also used by many professionals to produce industry-standard audio clips. Even though Audacity is an open-source and free program, some new users may find it challenging to understand the interface.
The steps are given below explain the process of converting video to audio with Audacity:
Step 1: Install Supported Tools
Assuming that Audacity is already installed on your PC, to import video files to the program, go to https://lame.buanzo.org/#lamewindl and download and install ffmpeg for Windows for Audacity if it is not already installed. You can do a quick online search for other platforms and see if your copy of Audacity needs the tools or plugins required to import the videos.
Step 2: Import Source Video
Go to file> Open from the menu bar and select and import the video that you want to convert to audio.
Step 3: Convert Video to Audio

Make the required manipulations to the audio, go to file> Export, and choose your preferred audio format from the list. Choose a destination folder and other output preferences on the Export Audio box, and click Save to convert video to audio with Audacity.
Benefits of Using Audacity
Some benefits that Audacity offers include:
- Granular editing and fine-tuning of audio tracks
- Wide range of output preferences
- Ability to produce industry-standard outputs
- Offers plethora of options and tools to add various effects to the sounds
Disadvantages: Some new users may find it challenging to understand the interface. Audacity also needs additional tools to be installed to support video files as inputs.
Supported Audio Formats: Audacity supports almost all major audio formats including MP3, OGG, WAV, etc.
4 QuickTime [Mac]
QuickTime is the default media player that comes along with macOS and is installed automatically. Being a proprietary of Apple Inc., QuickTime natively supports all the formats developed by the company, along with some other most popular file types such as MP4, MP3, etc.
To convert a video file to audio with QuickTime on Mac, you can follow the instructions given below:
Step 1: Import Source Video
Launch QuickTime on your Mac computer, go to file from the menu bar, click Open File, use the box that opens to locate and select the video that you want to convert, and click Open from the bottom-right corner.
Step 2: Convert to Audio

Click file again, go to Export this time, and then click audio Only from the sub menu that appears. On the next box, enter a name for the output file in the Export As field, choose a destination folder from the Where drop-down list, optionally click the drop-down button from the right side of the Where field to configure other preferences, and click Save to convert video to audio with QuickTime.
Benefits of Using QuickTime
Some advantages of using QuickTime to convert video to audio include:
- Mac users don’t need to install any third-party conversion tool or additional plugin
- Conversion process is easy and almost seamless
Disadvantages: Doesn’t give any option to choose an output format and doesn’t allow editing the clips either.
Supported Audio Formats: By default, QuickTime player converts videos files to M4A audio format.
5 Media Converter – video to mp3 [iPhone]
Among several iOS apps that have been developed for video to audio conversion, Media Converter – video to mp3 is one of those that has decent star ratings and user reviews. The app is around 66MB in size and can be obtained from the App Store.
The process on how to convert video to audio with Media Converter is explained below:
- Launch Media Converter
- Import the source video to the app
- Choose Extract Audio from the Conversion Type menu
- Select your preferred output audio format
- Begin the conversion process

Benefits of Using Media Converter
A couple of advantages of using Media Converter to convert video to audio are listed below:
- Eliminates the use of PC or laptop
- Can be obtained easily
- Can be used even while moving
Disadvantages: Doesn’t have the flexibility of granular editing as it is there when using a computer program.
Supported Audio Formats: The audio formats that Media Converter supports include MP3, M4A, OGG, WAV, FLAC, etc.
6 Video to MP3 Converter [Android]
With around 4.5-star rating on Play Store, Video to MP3 Converter is another app that can convert your video files to audio right on your Android smartphone. In addition, the app also allows basic video trimming that may come in handy while making the entire clip more informative by removing unwanted sections from it.

You can learn how to convert video to audio with Video to MP3 Converter by following the instructions given below:
- Launch Video to MP3 Converter
- Import the source video clip from your Android smart device’s storage
- Trim the footage to keep only the important part
- Set output preferences
- Extract the audio from the video
Benefits of Using Video to MP3 Converter
Some advantages of using Video to MP3 Converter include:
- It supports every popular video format such as MP4, 3GP, WMV, etc.
- Has simple UI
- Offers various audio bitrates to choose from while exporting
- Allows basic trimming
Disadvantages: Doesn’t have many editing options thus, no granular manipulations can be done to the media files while using the app.
Supported Audio Formats: Video to MP3 Converter supports MP3 formats at this writing.
Conclusion
Learning how to convert MP4 to MP3 is a simple process, and as long as you have a decent computer or an iOS or Android smartphone, you can extract the audio in the format of your choice from the video clips almost instantly. Furthermore, if you are a professional and want to prepare media clips for the clients or your channel, using advanced tools like Wondershare Filmora or Audacity would give you the best conversion experience.
For Win 7 or later (64-bit)
For macOS 10.14 or later
Watch a Video First to Take a Quick View of These Programs
For Win 7 or later (64-bit)
For macOS 10.14 or later
1 Filmora - [Windows, Mac, iPhone & Android]
A product by Wondershare that is one of the most versatile development organizations, Filmora , is available for Windows and Mac platforms. The tool is a full-fledged post-production program that many professionals use because it is lightweight and due to its simple UI and not-so-steep learning curve.
The instructions given below explain how to convert video to audio with Filmora:
Step 1: Import Source Media
Launch Wondershare Filmora (a Windows computer here used here), click anywhere inside the Media window present at the upper-left section, and select and import a source video file to the program.
For Win 7 or later (64-bit)
For macOS 10.14 or later
Step 2: Add Media to Timeline
Drag the imported footage to the Timeline at the bottom of the window. Optionally, right-click the media in the Timeline itself, and click Detach Audio to separate the audio track from the video. Trim off the unwanted sections from the clip if need be.
Step 3: Convert Video to Audio
Click EXPORT from the top-center of the window, go to the Video tab on the Export box, select MP3 from the bottom of the Format list in the left pane, choose other preferences by clicking the SETTINGS button from the right, and click EXPORT from the bottom-right corner.
Benefits of Using Filmora
Some of the advantages of using Filmora to convert video clips to audio are:
- Easy audio separation from the video
- Ability to export videos directly to audio
- Ability to adjust the audio and remove the background noise
- Ability to record voice and integrate it into the audio clip
Disadvantages: Doesn’t have many audio formats for exporting.
Supported Audio Formats: At the time of this writing, Filmora supports only MP3 audio format while exporting directly.
For Win 7 or later (64-bit)
For macOS 10.14 or later
2 VLC Media Player [Windows, Mac & Linux]
A well-known application that supports almost all media formats and is available for Windows, Mac, and Linux platforms, the VLC media player has its built-in Converter that can transcode your video clips to audio for free.
The steps given below explain how to convert video to audio with VLC media player:
Step 1: Import Source Video
Launch VLC media player, click Media from the menu bar at the top, and click Convert / Save from the menu. Make sure that the File tab is selected on the Open Media box, click Add from the right side of the File Selection field, and click Convert / Save from the bottom.
Step 2: Select Output Format and Preferences
On the Convert box, make sure that the Convert radio button is selected, choose an audio format from the Profile drop-down list, optionally click the Settings (Wrench) icon present next to the drop-down list itself, choose other output preferences for the audio and click Save to get back to the Convert box.
Step 3: Choose Output Folder and Convert
Click Browse from the Destination section to select an output folder, enter a name for the exported file in the Destination file field, and click Start to convert audio to video with VLC media player.
Benefits of Using VLC media player
Some advantages that VLC offers include:
- Doesn’t require any other application to be installed for conversion
- Makes the process quite simple and absolutely free
Disadvantages: Doesn’t have editing tools to manipulate the clips before converting.
Supported Audio Formats: VLC media player supports OGG (Vorbis), MP3, and FLAC format while exporting.
3 Audacity [Windows, Mac & Linux]
Audacity is yet another cross-platform tool that is specifically dedicated to audio formats and is also used by many professionals to produce industry-standard audio clips. Even though Audacity is an open-source and free program, some new users may find it challenging to understand the interface.
The steps are given below explain the process of converting video to audio with Audacity:
Step 1: Install Supported Tools
Assuming that Audacity is already installed on your PC, to import video files to the program, go to https://lame.buanzo.org/#lamewindl and download and install ffmpeg for Windows for Audacity if it is not already installed. You can do a quick online search for other platforms and see if your copy of Audacity needs the tools or plugins required to import the videos.
Step 2: Import Source Video
Go to file> Open from the menu bar and select and import the video that you want to convert to audio.
Step 3: Convert Video to Audio
Make the required manipulations to the audio, go to file> Export, and choose your preferred audio format from the list. Choose a destination folder and other output preferences on the Export Audio box, and click Save to convert video to audio with Audacity.
Benefits of Using Audacity
Some benefits that Audacity offers include:
- Granular editing and fine-tuning of audio tracks
- Wide range of output preferences
- Ability to produce industry-standard outputs
- Offers plethora of options and tools to add various effects to the sounds
Disadvantages: Some new users may find it challenging to understand the interface. Audacity also needs additional tools to be installed to support video files as inputs.
Supported Audio Formats: Audacity supports almost all major audio formats including MP3, OGG, WAV, etc.
4 QuickTime [Mac]
QuickTime is the default media player that comes along with macOS and is installed automatically. Being a proprietary of Apple Inc., QuickTime natively supports all the formats developed by the company, along with some other most popular file types such as MP4, MP3, etc.
To convert a video file to audio with QuickTime on Mac, you can follow the instructions given below:
Step 1: Import Source Video
Launch QuickTime on your Mac computer, go to file from the menu bar, click Open File, use the box that opens to locate and select the video that you want to convert, and click Open from the bottom-right corner.
Step 2: Convert to Audio
Click file again, go to Export this time, and then click audio Only from the sub menu that appears. On the next box, enter a name for the output file in the Export As field, choose a destination folder from the Where drop-down list, optionally click the drop-down button from the right side of the Where field to configure other preferences, and click Save to convert video to audio with QuickTime.
Benefits of Using QuickTime
Some advantages of using QuickTime to convert video to audio include:
- Mac users don’t need to install any third-party conversion tool or additional plugin
- Conversion process is easy and almost seamless
Disadvantages: Doesn’t give any option to choose an output format and doesn’t allow editing the clips either.
Supported Audio Formats: By default, QuickTime player converts videos files to M4A audio format.
5 Media Converter – video to mp3 [iPhone]
Among several iOS apps that have been developed for video to audio conversion, Media Converter – video to mp3 is one of those that has decent star ratings and user reviews. The app is around 66MB in size and can be obtained from the App Store.
The process on how to convert video to audio with Media Converter is explained below:
- Launch Media Converter
- Import the source video to the app
- Choose Extract Audio from the Conversion Type menu
- Select your preferred output audio format
- Begin the conversion process
Benefits of Using Media Converter
A couple of advantages of using Media Converter to convert video to audio are listed below:
- Eliminates the use of PC or laptop
- Can be obtained easily
- Can be used even while moving
Disadvantages: Doesn’t have the flexibility of granular editing as it is there when using a computer program.
Supported Audio Formats: The audio formats that Media Converter supports include MP3, M4A, OGG, WAV, FLAC, etc.
6 Video to MP3 Converter [Android]
With around 4.5-star rating on Play Store, Video to MP3 Converter is another app that can convert your video files to audio right on your Android smartphone. In addition, the app also allows basic video trimming that may come in handy while making the entire clip more informative by removing unwanted sections from it.
You can learn how to convert video to audio with Video to MP3 Converter by following the instructions given below:
- Launch Video to MP3 Converter
- Import the source video clip from your Android smart device’s storage
- Trim the footage to keep only the important part
- Set output preferences
- Extract the audio from the video
Benefits of Using Video to MP3 Converter
Some advantages of using Video to MP3 Converter include:
- It supports every popular video format such as MP4, 3GP, WMV, etc.
- Has simple UI
- Offers various audio bitrates to choose from while exporting
- Allows basic trimming
Disadvantages: Doesn’t have many editing options thus, no granular manipulations can be done to the media files while using the app.
Supported Audio Formats: Video to MP3 Converter supports MP3 formats at this writing.
Conclusion
Learning how to convert MP4 to MP3 is a simple process, and as long as you have a decent computer or an iOS or Android smartphone, you can extract the audio in the format of your choice from the video clips almost instantly. Furthermore, if you are a professional and want to prepare media clips for the clients or your channel, using advanced tools like Wondershare Filmora or Audacity would give you the best conversion experience.
For Win 7 or later (64-bit)
For macOS 10.14 or later
Also read:
- New Pure Visuals Techniques for Removing Video Soundtracks (Latest Edition)
- New In 2024, Your First Steps in Podcast Editing A Comprehensive Beginners Guide
- Uncovering Effects Mimicking Vocalized Metal Flutes for 2024
- Updated In 2024, Find The Finest Tools To Remove Background Noise Online
- In 2024, Unlock The Secrets How To Remove Wind Noise From Audio
- In 2024, Audio Division Made Simple Techniques for Cutting Sound Files
- Updated In 2024, Taming the Audible Ambiance Step-by-Step Techniques for Eradicating Hidden Harmonies
- Updated Top 8 DAW Compatible with Chromebooks for Music Creation
- Updated In 2024, Navigating Through Various Audio Recorders From Apowersoft Alternatives to Best Practices
- New Ultimate No-Cost, Low-Cost Mac Music Editor Software for 2024
- The Ultimate List of iPhone and iPad Audio Cutting Software
- New The Ultimate Guide to Free Mobile Applications Transforming Audio Into Captivating Visuals for iOS & Android Users for 2024
- Updated Must-Listen YouTube Podcasts and Songs
- 2024 Approved Top-Tier VOIP Games Conversation Tools
- In 2024, Unmissable Web-Based MP3 Metadata Manipulators – Heres the List
- 2024 Approved Getting Started in Recording Insights Into REAPERs Software Design
- Updated 2024 Approved Video Podcasts Everything You Need to Know
- Updated In 2024, Unlock the Full Potential of Online Gaming with Morphvox A Players Ultimate Manual to Mastering Changeable Voices
- 2024 Approved Astral Tunes Navigating Through the Top-Rated Software for Capturing Fretwork
- New The Complete Podcatchers Handbook Step-by-Step Computer Podcast Acquisition for 2024
- Demystifying Pexels.com The Ultimate Resource for Photographers and Designers
- Updated How to Change Your Voice on Audacity, In 2024
- Updated Timeless Tunes Selecting Melodies for Matrimonial Cinematography for 2024
- Updated Discovering Optimal Acoustic Ambiance Sets for Video Production
- The Art of Sound Manipulation Creating Engaging Audio Timelines Using Keyframes in Adobe Premiere Pro (Mac)
- Updated Expert Tips on Selecting and Merging Songs with Your iMovie Content
- Elevating Video Experience Perfecting the Mix of Music and Cinematography
- 2024 Approved Top 8 Multi-Subtitles Translators You Can Use
- In 2024, How to Fix iPhone 15 Pro Max Passcode not Working? | Dr.fone
- 2024 Approved Take Your Videos to the Next Level 3 Creative Transition Ideas in FCP
- New Produce High-Quality Videos on Your Mac Expert Techniques and Strategies
- Updated In 2024, Online Video Creation Made Simple WeVideos Easy Editor
- What is Geo-Blocking and How to Bypass it On Samsung Galaxy XCover 6 Pro Tactical Edition? | Dr.fone
- Identify missing hardware drivers with Windows Device Manager in Windows 10 & 7
- 2024 Approved Stay Current The Latest Aspect Ratio Requirements for Social Media
- How to Unlock a Network Locked Vivo Y100t Phone?
- iPogo will be the new iSpoofer On Nubia Red Magic 9 Pro? | Dr.fone
- Title: Innovations in Home Audio Engineering Analyzing the Best and Worst of the Top Digital Music Makers This Year for 2024
- Author: Paul
- Created at : 2024-05-20 01:48:23
- Updated at : 2024-05-21 01:48:23
- Link: https://voice-adjusting.techidaily.com/innovations-in-home-audio-engineering-analyzing-the-best-and-worst-of-the-top-digital-music-makers-this-year-for-2024/
- License: This work is licensed under CC BY-NC-SA 4.0.
