
:max_bytes(150000):strip_icc():format(webp)/is-kindle-unlimited-worth-it-fda01dceb923406a8524c64d2b72693e.jpg)
In 2024, Comprehensive Guide to the Top 8 Free Cartoon Sound Effect Downloads
Comprehensive Guide to the Top 8 Free Cartoon Sound Effect Downloads
8 Best Cartoon Sound Effects You Can Download

Benjamin Arango
Mar 27, 2024• Proven solutions
The sound plays a significant role in the videos. Without the right sound effects, your videos become dull. It doesn’t create an impact to grab the attention of the viewers. Especially when it comes to attracting the attention of kids while they watch cartoons.
Are you working on a cartoon video for kids or some animated action cartoons? Use the cartoon sound effects to add more intensity and emotions to the videos. Every time creating a new sound effect for your cartoon video becomes difficult.
If you are on a strict budget, producing new content becomes almost impossible. In such situations, free cartoon sound effects are the best way to enhance your cartoon videos.
In this article, you will learn eight best cartoon sound effects that you can download and make your videos perfect.
8 Best Cartoon Sound Effects Resources
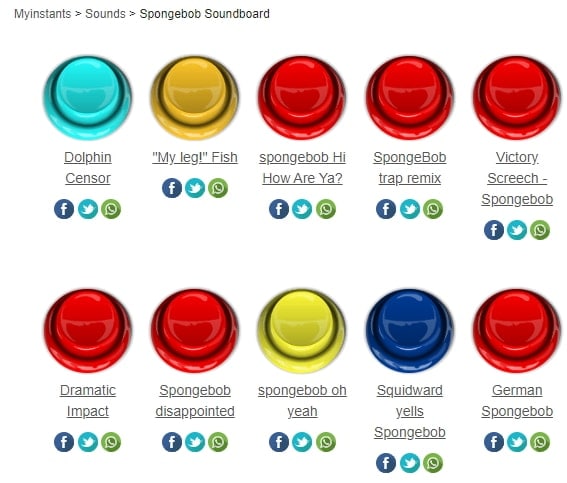
1. Spongebob Sound Effects
MyInstant’s Spongebob soundboard offers a range of cartoon sound effects that can be easily downloaded just by clicking on the Download mp3 sound effect button. You can listen to over 120 classic cartoon sound effects and download it for free. You can also copy the embed link and paste it to your website.
2. Hanna Barbera Sound Effects
From Sounddogs, Hanna Barbera sound effects library, you can find over 2200 cartoon sound effects that are divided into 4 CDs. It has almost all the legendary classic cartoon sound effects from the cartoon shows like Yogi Bear, Huckleberry Hound, the Flintstones, The Jetsons, Quick Draw McGraw, and all the rest of the gang.
You can download the mp3 cartoon sound effects completely free by clicking on the Download ID number mentioned at the right end of each link.
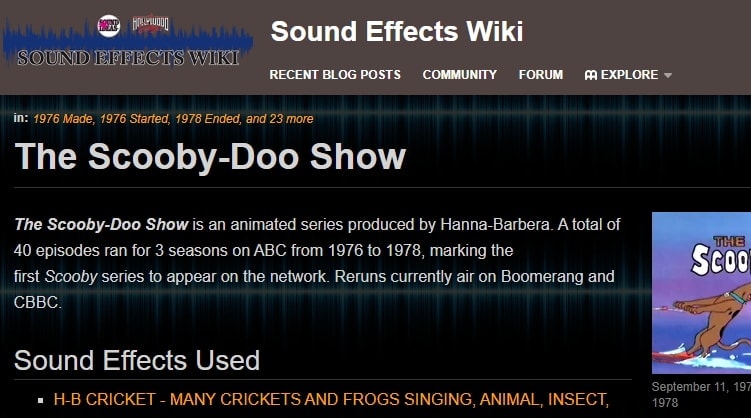
3. Scooby Doo Running Sound
Fandom’s Scooby Doo running sound effects offers all the ideas used in 40 episodes of Scooby Doo throughout the three seasons on ABC. It is over 37000 pages wiki that you can click and browse through the pages to find the right sound effect and download it for free.
4. Tom and Jerry Sound Effects
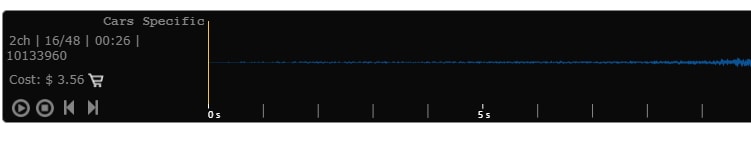
Pond5 offers 13 Tom and Jerry sound effects that you can listen by scrolling the cursor over the boxes and download the free preview of cartoon sound effects by clicking on Download Preview.
If you want to download the entire cartoon sound effect, you need to register, log in, and pay for it. There are filters like price, collections, duration, etc. to make your selection more precise.
5. Free SFX
In FreeSFX website, you can find a range of comical cartoon sound effects that includes classic effects like descend, boink, impact, pop, musical, running, rip and snap, bounce spring, slide whistle, squelch and splat, horn and loads more.
You need to log in to the website to download free cartoon sound effects.

6.GRSites
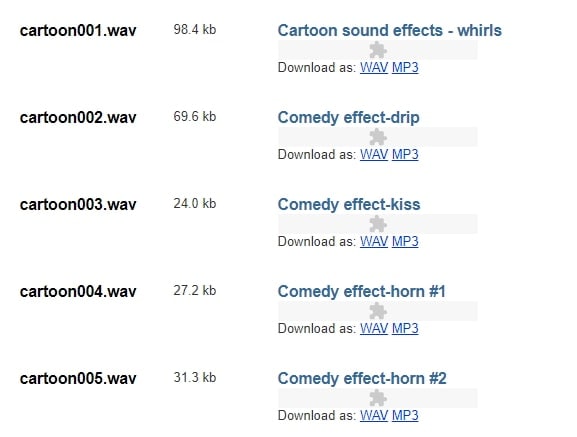
With over 1980 cartoon sound effects, the GRSites is one of the best free sites for downloading both mp3 and WAV files. You can browse from a range of categories to find the best cartoon sound effects for your videos.
7. Cartoon Running Sound Effect
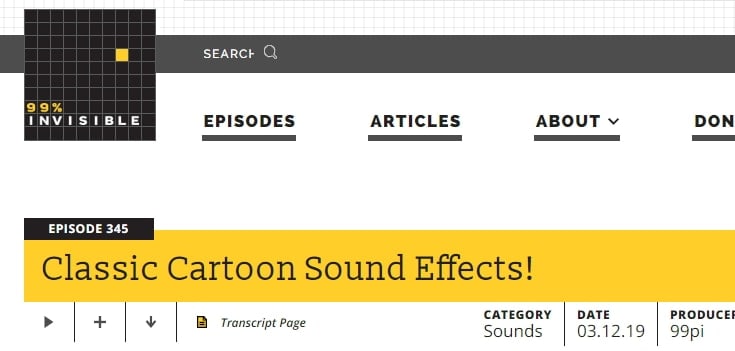
If you are looking for cartoon running sound effect, turn to Episode 345 in 99PercentInvisible. You can download the complete transcript page of around 30 minutes to use it in your video. Use the cartoon running sound effect produced by 99pi to enhance your video.
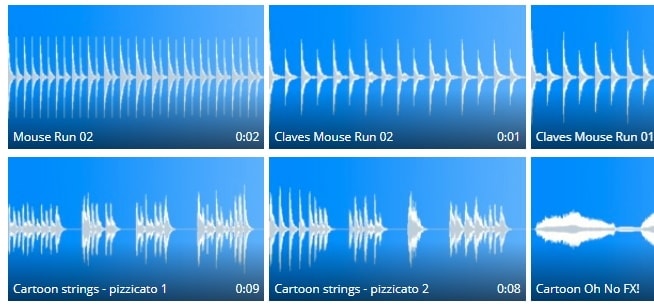
8. Big Fish Audio
The Big Fish Audio’s cartoon sound FX includes 23 free classic cartoon sound effects. The filters include a range of sound FX types, styles, format, brand, etc.
You can click on the cartoon sound effect and listen to it or add it to your playlist. But, if you wish to download the free cartoon sound effects, you need to register and pay to use the sound effect.

You may also like: How to Extract Audio from Videos on Win/Mac/Phone >>
Conclusion
Make your cartoon videos perfect with the fantastic free cartoon sound effects available for download completely free. With the range of free cartoon sound effects, you don’t need to worry about creating new sounds or expenses. You need to download the free sounds and beautifully enhance it with your creativity. There are several other sites for downloading free cartoon sound effects, but here you can check out some of the trusted ones to use.
Benjamin Arango
Benjamin Arango is a writer and a lover of all things video.
Follow @Benjamin Arango
Benjamin Arango
Mar 27, 2024• Proven solutions
The sound plays a significant role in the videos. Without the right sound effects, your videos become dull. It doesn’t create an impact to grab the attention of the viewers. Especially when it comes to attracting the attention of kids while they watch cartoons.
Are you working on a cartoon video for kids or some animated action cartoons? Use the cartoon sound effects to add more intensity and emotions to the videos. Every time creating a new sound effect for your cartoon video becomes difficult.
If you are on a strict budget, producing new content becomes almost impossible. In such situations, free cartoon sound effects are the best way to enhance your cartoon videos.
In this article, you will learn eight best cartoon sound effects that you can download and make your videos perfect.
8 Best Cartoon Sound Effects Resources
1. Spongebob Sound Effects
MyInstant’s Spongebob soundboard offers a range of cartoon sound effects that can be easily downloaded just by clicking on the Download mp3 sound effect button. You can listen to over 120 classic cartoon sound effects and download it for free. You can also copy the embed link and paste it to your website.
2. Hanna Barbera Sound Effects
From Sounddogs, Hanna Barbera sound effects library, you can find over 2200 cartoon sound effects that are divided into 4 CDs. It has almost all the legendary classic cartoon sound effects from the cartoon shows like Yogi Bear, Huckleberry Hound, the Flintstones, The Jetsons, Quick Draw McGraw, and all the rest of the gang.
You can download the mp3 cartoon sound effects completely free by clicking on the Download ID number mentioned at the right end of each link.
3. Scooby Doo Running Sound
Fandom’s Scooby Doo running sound effects offers all the ideas used in 40 episodes of Scooby Doo throughout the three seasons on ABC. It is over 37000 pages wiki that you can click and browse through the pages to find the right sound effect and download it for free.
4. Tom and Jerry Sound Effects
Pond5 offers 13 Tom and Jerry sound effects that you can listen by scrolling the cursor over the boxes and download the free preview of cartoon sound effects by clicking on Download Preview.
If you want to download the entire cartoon sound effect, you need to register, log in, and pay for it. There are filters like price, collections, duration, etc. to make your selection more precise.
5. Free SFX
In FreeSFX website, you can find a range of comical cartoon sound effects that includes classic effects like descend, boink, impact, pop, musical, running, rip and snap, bounce spring, slide whistle, squelch and splat, horn and loads more.
You need to log in to the website to download free cartoon sound effects.
6.GRSites
With over 1980 cartoon sound effects, the GRSites is one of the best free sites for downloading both mp3 and WAV files. You can browse from a range of categories to find the best cartoon sound effects for your videos.
7. Cartoon Running Sound Effect
If you are looking for cartoon running sound effect, turn to Episode 345 in 99PercentInvisible. You can download the complete transcript page of around 30 minutes to use it in your video. Use the cartoon running sound effect produced by 99pi to enhance your video.
8. Big Fish Audio
The Big Fish Audio’s cartoon sound FX includes 23 free classic cartoon sound effects. The filters include a range of sound FX types, styles, format, brand, etc.
You can click on the cartoon sound effect and listen to it or add it to your playlist. But, if you wish to download the free cartoon sound effects, you need to register and pay to use the sound effect.
You may also like: How to Extract Audio from Videos on Win/Mac/Phone >>
Conclusion
Make your cartoon videos perfect with the fantastic free cartoon sound effects available for download completely free. With the range of free cartoon sound effects, you don’t need to worry about creating new sounds or expenses. You need to download the free sounds and beautifully enhance it with your creativity. There are several other sites for downloading free cartoon sound effects, but here you can check out some of the trusted ones to use.
Benjamin Arango
Benjamin Arango is a writer and a lover of all things video.
Follow @Benjamin Arango
Free Audio Workflow with Audacity: Tips and Tricks for Effective Recording
Natural audio recording software, such as Voice Memos for Macs or Sound Recorder for Windows PCs, is included with every machine. These applications enable users to record audio using either the desktop’s internal or an external microphone, and they generally have basic audio editing features.
However, when you’re looking for a higher-quality recording program, Audacity is the way to go. Audacity is a free audio editor with a lot of cutting-edge features. More significantly, recording using Audacity is as simple as clicking a button.
In this Audacity Record Computer Audio guide, we will show you all the methods of recording internal audio on your computer and Mac.
In this article
01 Record Audio On Audacity with a Microphone
02 Record Sounds Playing on Your Computer Using Audacity on Win
03 Record Sounds Playing on Your Computer Using Audacity on Mac
04 Set up Audacity to Record as Schedule
Part 1: How to Record Audio On Audacity with a Microphone On Windows and Mac Computers?
For both Windows and Mac, the procedures for recording audio from a microphone are the same if you’re utilizing your desktop’s built-in mic or an external microphone. Here’s your step-by-step guide to audacity record using a microphone:
Step 1: Launch Audacity and get to know the Device Toolbar, situated underneath the playback controls. You may modify the Audio Host and the Recording and Playback Devices—all of which are required for Audacity recording.

Step 2: To begin, select Tracks under the Add New tab, Stereo Track, or Mono Track to create a new track.

Step 3: Select Recording Device from the options list. Select your microphone from the dropdown menu and hit the Record option.

Step 4: A soundwave emerges along the track as you talk into the speaker. The Recording Level may be found at the top of the display. To pause or stop the recording, click Stop or Pause until you select Record anew.

Step 5: With the mouse over any recording area, click the Delete button to cut out any portion of it quickly. Click Ctrl + A, then Delete to erase whatever you’ve just saved. Alternatively, press the X button to delete the track completely.

Part 2: How to Record Sounds Playing on Your Computer Using Audacity On Windows?
Unlike Mac, Windows makes it simple to capture audio from a movie or media file running on your desktop. There seem to be two primary methods for accomplishing audacity record desktop audio in this way:
1. Use MME as the Audio Host
Step 1: To use MME as your audio host, go to Tracks in the Add New tab in Stereo Track and create a new file.

Step 2: Change the Audio Host (to the left of Recording Device) to MME—this is the standard setting, so you might not have to change anything.

Step 3: Choose desired option from the Recording Device dropdown menu. Based on your configuration, this might be referred to as Wave Out or Loopback. When you’re uncertain, try it out.

Step 4: To record your audio source, click Record, then play it back.
2. Use WASAPI as the Audio Host
WASAPI provides higher-resolution digital recordings. If capturing audio from an external monitor, it’s also a good idea to utilize it.
Step 1: Convert the Audio Host from MME to Windows WASAPI after creating a fresh Stereo Track.

Step 2: Switch the Recording Device to Speaker (loopback). To display the entire label, you might have to slide the toolbar’s knobs outwards. Begin recording by pressing the red dot and then listen to the audio source. Audacity will capture the audio even if your PC is muted.
Part 3: How to Record Sounds Playing on Your Computer Using Audacity on Mac?
Unfortunately, there’s no ready-made method to record computer audio using Audacity on a Mac. Some alternative ways to use Audacity to record from Mac including using a loopback cable, or download and using a third-party software. You can try some Audacity alternatives to record the computer audio on Mac.
For Win 7 or later (64-bit)
For macOS 10.12 or later
If you have installed Filmora already, you can use it to record the sound playing on your Mac with some tricks.
Step 1: Luanch Filmora, and then click the Record button and select Record PC Screen.

Step 2: Set up the recording settings based on the need. Since we’re going to record the playing audio from the Mac computer, select Microphone and System Audio On and click the Red button to start.

Step 3: Now you have a screen captured video with sound included. Since we need th audio only, we can attache the audio from the video first and then do some editing such as adding fade in and fade out effect, or remove unwanted audio clip.

Part 4: How to Set up Audacity to Record as Schedule?
A streaming video recorder or cassette can be used to arrange a recording. All of those are identical to Time Recordings in that they are used to schedule recording. The Timer record configuration dialog box may be used to set the beginning and finish of the recording. This is how you do it:
Step 1: By definition, the recording’s Start Date and Time are set to the present time. It will begin recording on the present day and hour by default when you don’t alter it. There is no default setting for the End Date and Time. You must either choose a date and time to determine the end time.

Step 2: There is a Checkbox to Save the work immediately. By Ticking the option, you may choose the path or Folder where the file will be saved when the recording is finished.

Conclusion
Well, there you have it – your complete Audacity Record Computer Audio guide. One thing is for certain that Audacity allows some great ways of recording audio from internal and external components of your Windows and Mac. However, if your Audacity is having issues, we would highly recommend opting for another software, such as Wondershare Filmora.
Wondershare Filmora is the finest thing that has come out in recent years for recording audio from a desktop. It is intended not just for pros but also for any enthusiast videographer who desires to create a high-quality movie for their family and friends. Download it today to make your movie a delightful journey with high-quality audio recording.
02 Record Sounds Playing on Your Computer Using Audacity on Win
03 Record Sounds Playing on Your Computer Using Audacity on Mac
04 Set up Audacity to Record as Schedule
Part 1: How to Record Audio On Audacity with a Microphone On Windows and Mac Computers?
For both Windows and Mac, the procedures for recording audio from a microphone are the same if you’re utilizing your desktop’s built-in mic or an external microphone. Here’s your step-by-step guide to audacity record using a microphone:
Step 1: Launch Audacity and get to know the Device Toolbar, situated underneath the playback controls. You may modify the Audio Host and the Recording and Playback Devices—all of which are required for Audacity recording.
Step 2: To begin, select Tracks under the Add New tab, Stereo Track, or Mono Track to create a new track.
Step 3: Select Recording Device from the options list. Select your microphone from the dropdown menu and hit the Record option.
Step 4: A soundwave emerges along the track as you talk into the speaker. The Recording Level may be found at the top of the display. To pause or stop the recording, click Stop or Pause until you select Record anew.
Step 5: With the mouse over any recording area, click the Delete button to cut out any portion of it quickly. Click Ctrl + A, then Delete to erase whatever you’ve just saved. Alternatively, press the X button to delete the track completely.
Part 2: How to Record Sounds Playing on Your Computer Using Audacity On Windows?
Unlike Mac, Windows makes it simple to capture audio from a movie or media file running on your desktop. There seem to be two primary methods for accomplishing audacity record desktop audio in this way:
1. Use MME as the Audio Host
Step 1: To use MME as your audio host, go to Tracks in the Add New tab in Stereo Track and create a new file.
Step 2: Change the Audio Host (to the left of Recording Device) to MME—this is the standard setting, so you might not have to change anything.
Step 3: Choose desired option from the Recording Device dropdown menu. Based on your configuration, this might be referred to as Wave Out or Loopback. When you’re uncertain, try it out.
Step 4: To record your audio source, click Record, then play it back.
2. Use WASAPI as the Audio Host
WASAPI provides higher-resolution digital recordings. If capturing audio from an external monitor, it’s also a good idea to utilize it.
Step 1: Convert the Audio Host from MME to Windows WASAPI after creating a fresh Stereo Track.
Step 2: Switch the Recording Device to Speaker (loopback). To display the entire label, you might have to slide the toolbar’s knobs outwards. Begin recording by pressing the red dot and then listen to the audio source. Audacity will capture the audio even if your PC is muted.
Part 3: How to Record Sounds Playing on Your Computer Using Audacity on Mac?
Unfortunately, there’s no ready-made method to record computer audio using Audacity on a Mac. Some alternative ways to use Audacity to record from Mac including using a loopback cable, or download and using a third-party software. You can try some Audacity alternatives to record the computer audio on Mac.
For Win 7 or later (64-bit)
For macOS 10.12 or later
If you have installed Filmora already, you can use it to record the sound playing on your Mac with some tricks.
Step 1: Luanch Filmora, and then click the Record button and select Record PC Screen.
Step 2: Set up the recording settings based on the need. Since we’re going to record the playing audio from the Mac computer, select Microphone and System Audio On and click the Red button to start.
Step 3: Now you have a screen captured video with sound included. Since we need th audio only, we can attache the audio from the video first and then do some editing such as adding fade in and fade out effect, or remove unwanted audio clip.
Part 4: How to Set up Audacity to Record as Schedule?
A streaming video recorder or cassette can be used to arrange a recording. All of those are identical to Time Recordings in that they are used to schedule recording. The Timer record configuration dialog box may be used to set the beginning and finish of the recording. This is how you do it:
Step 1: By definition, the recording’s Start Date and Time are set to the present time. It will begin recording on the present day and hour by default when you don’t alter it. There is no default setting for the End Date and Time. You must either choose a date and time to determine the end time.
Step 2: There is a Checkbox to Save the work immediately. By Ticking the option, you may choose the path or Folder where the file will be saved when the recording is finished.
Conclusion
Well, there you have it – your complete Audacity Record Computer Audio guide. One thing is for certain that Audacity allows some great ways of recording audio from internal and external components of your Windows and Mac. However, if your Audacity is having issues, we would highly recommend opting for another software, such as Wondershare Filmora.
Wondershare Filmora is the finest thing that has come out in recent years for recording audio from a desktop. It is intended not just for pros but also for any enthusiast videographer who desires to create a high-quality movie for their family and friends. Download it today to make your movie a delightful journey with high-quality audio recording.
The Complete Manual of GarageBand Audio Sessions
Apple GarageBand is an in-built tool in Mac that lets you make incredible music with or without an instrument. The software acts as a music creation tool that enables you to record, mix, and master the music world. GarageBand recording has become popular due to a diverse range of editing functions. Essentially, do you want to know how to record on GarageBand? Be our guest! We have covered your basis.
In this article
01 What is GarageBand Recording Software?
02 How to Download and Install GarageBand Recording Software?
03 Tutorial for How to Record on GarageBand
Part 1: What is GarageBand Recording Software?
GarageBand for podcasting and GarageBand voice recording is the two phenomenal usages of Apple GarageBand . The Mac users have access to a sound library constituting synths, loops, and instrument presets. The user can add a song, start a track, and develop a musical career effortlessly.
The app is free for iOS, macOS, and iPadOS; sharing and creating music is effortless. Additionally, the Apple iCloud integration plays a pivotal role in adding tracks across devices. The workability is as easy as it can get. Willing to know how to record on GarageBand? Keep following us!
As far as the interface is concerned, it has been designed to make music easier and compatible with beginners. The “Quick Help” function can be enabled to get useful hints every time you have to hover over the cursor. The music artist can also get creative with Transform Pad Smart Control. It helps produce morph and tweak sounds as you deem necessary.

Along with this, there is a great collection of lessons for piano and guitar. It makes the user get right into the feels. One can also get instant feedback on your playing to hone the skills flawlessly.
So, are you with us? Let us begin! Now that we have established the performance of Apple GarageBand, let us look at its features.
Groove Track Feature
The Groove Track feature is considered a spell checker for rhythm. It adjusts and synchronizes the timing of the chosen track to the groove under action.
Smart Controls
The smart controls are designed to shape any sound in the library with a customized set of buttons, sliders, and knobs—the look of the smart control changes with each instrument.
Logic Remote
The logic remote helps navigate the song to browse the Sound Library and access smart controls. One can also use the tool by using multi-touch gestures.
Drummer Feature
The “Drummer” plays a pivotal role in adding the virtual session drummer and producing beats. There are around 33 players from genres, including Hip Hop, Rock, and EDM. The different groove and fill combinations make the process effortless.
Amps and Stompboxes
The Bass Amp designer helps dial-up modern and classic tones. One can also build their guitar rig via 25 legendary amps and cabinets. Moreover, there are 35 creative and fun stompbox effects.
Are you willing to know how to record voice on GarageBand? Should we? Let us first understand the procedure to download and install Apple GarageBand.
Part 2: How to Download and Install GarageBand Recording Software?
Do you need to make a GarageBand podcast? Before getting done with the process, ensure that your Mac computer completes the minimum system requirements. The Mac computer requires MacOS 11.0 or later. Apple GarageBand covers the size of 783.1 MB; therefore, you should have this storage.

Image alt: install apple garageband
MacOS 11 requires at least 20GB of free hard drive storage to handle the installation process. A 4GB RAM and 1.1 GHz processor are also system requirements to download Apple GarageBand . The software comes in-built with the macOS computer. However, if you don’t find it, install it through the following procedure:
Step 1: Launching App Store
To begin, launch App Store from your macOS computer. After that, go to the search bar and type “GarageBand.”
Step 2: Installing GarageBand
Click on Apple GarageBand from there. The “Get” option appears. Click on it and get done with the process.
Part 3: Tutorial for How to Record on GarageBand
Want to know how to record on GarageBand? Do you have a concern about how to record voice on GarageBand? Worry no more! We are here at your disposal!
Apple GarageBand may offer ease of use for musicians and artists. However, understanding how it works is mandatory. The section of the article reflects upon the complete procedure to record on Apple GarageBand to conclude the process. Henceforth, let us not wait any longer! Time to dive in!
Step 1: Initiating the Project
Tempo and time signature can also be tailored as per need. Launch Apple GarageBand from your Mac computer and then plug in your external microphone. As soon as the interface pops up, click on “Voice.” Expand the “Details” menu located in the bottom left corner of the project selection box. Tap “Input Device” and choose the microphone from your list. Moving on, click on “Choose” in the bottom right corner.

Step 2: Adding the New Track
Moving on, you are expected to add a new track. To do this, click on the button with (+), located in the top left corner of the tracks panel. GarageBand offers four tracks. Pick one as you deem necessary. Tap the “Audio” option and then plug in the external microphone or guitar. Hit the “Input” dropdown and choose the list. Click on “Create” afterward.

Step 3: Recording the Sound
Now, it is time to record the sound. Pick the track that you will be recording by clicking on the track panel. Use the square bottom to stop it. Hit red circle to begin recording.

Step 4: Recording the Multiple Tracks
Moreover, you can record multiple tracks as well. To begin, choose the track where the first track was recorded through the track header. Navigate the play head to the start of the original take. Tap the red circle to initiate the recording process. Now, click on the number in the recorded segment in the top left corner. Pick the take you have to keep and then “Delete Unused Takes to get rid of other takes.

Step 5: Exporting the File
After you are done, it is time to export the finished project. Navigate to the top bar and click on “Share.” Choose “ Export Song to Disk “ from the context menu that appears, choose “Export Song to Disk.” A dialogue box appears.

Step 6: Saving Process
Rename the file, enter the file location, format, and sound quality—hit “Export” when you are done. The project can be saved in MP3 , WAV, and AIFF.

Wrapping Up
There is a diverse range of voice recorders and music-creating software in the business, creating chaos. Apple GarageBand recording is one such Mac recording studio doing wonders in the market. With advanced features and multiple functions, one can count on the tool to create magic in the music fraternity. The users are expected to test the features first before making the call.
02 How to Download and Install GarageBand Recording Software?
03 Tutorial for How to Record on GarageBand
Part 1: What is GarageBand Recording Software?
GarageBand for podcasting and GarageBand voice recording is the two phenomenal usages of Apple GarageBand . The Mac users have access to a sound library constituting synths, loops, and instrument presets. The user can add a song, start a track, and develop a musical career effortlessly.
The app is free for iOS, macOS, and iPadOS; sharing and creating music is effortless. Additionally, the Apple iCloud integration plays a pivotal role in adding tracks across devices. The workability is as easy as it can get. Willing to know how to record on GarageBand? Keep following us!
As far as the interface is concerned, it has been designed to make music easier and compatible with beginners. The “Quick Help” function can be enabled to get useful hints every time you have to hover over the cursor. The music artist can also get creative with Transform Pad Smart Control. It helps produce morph and tweak sounds as you deem necessary.
Along with this, there is a great collection of lessons for piano and guitar. It makes the user get right into the feels. One can also get instant feedback on your playing to hone the skills flawlessly.
So, are you with us? Let us begin! Now that we have established the performance of Apple GarageBand, let us look at its features.
Groove Track Feature
The Groove Track feature is considered a spell checker for rhythm. It adjusts and synchronizes the timing of the chosen track to the groove under action.
Smart Controls
The smart controls are designed to shape any sound in the library with a customized set of buttons, sliders, and knobs—the look of the smart control changes with each instrument.
Logic Remote
The logic remote helps navigate the song to browse the Sound Library and access smart controls. One can also use the tool by using multi-touch gestures.
Drummer Feature
The “Drummer” plays a pivotal role in adding the virtual session drummer and producing beats. There are around 33 players from genres, including Hip Hop, Rock, and EDM. The different groove and fill combinations make the process effortless.
Amps and Stompboxes
The Bass Amp designer helps dial-up modern and classic tones. One can also build their guitar rig via 25 legendary amps and cabinets. Moreover, there are 35 creative and fun stompbox effects.
Are you willing to know how to record voice on GarageBand? Should we? Let us first understand the procedure to download and install Apple GarageBand.
Part 2: How to Download and Install GarageBand Recording Software?
Do you need to make a GarageBand podcast? Before getting done with the process, ensure that your Mac computer completes the minimum system requirements. The Mac computer requires MacOS 11.0 or later. Apple GarageBand covers the size of 783.1 MB; therefore, you should have this storage.
Image alt: install apple garageband
MacOS 11 requires at least 20GB of free hard drive storage to handle the installation process. A 4GB RAM and 1.1 GHz processor are also system requirements to download Apple GarageBand . The software comes in-built with the macOS computer. However, if you don’t find it, install it through the following procedure:
Step 1: Launching App Store
To begin, launch App Store from your macOS computer. After that, go to the search bar and type “GarageBand.”
Step 2: Installing GarageBand
Click on Apple GarageBand from there. The “Get” option appears. Click on it and get done with the process.
Part 3: Tutorial for How to Record on GarageBand
Want to know how to record on GarageBand? Do you have a concern about how to record voice on GarageBand? Worry no more! We are here at your disposal!
Apple GarageBand may offer ease of use for musicians and artists. However, understanding how it works is mandatory. The section of the article reflects upon the complete procedure to record on Apple GarageBand to conclude the process. Henceforth, let us not wait any longer! Time to dive in!
Step 1: Initiating the Project
Tempo and time signature can also be tailored as per need. Launch Apple GarageBand from your Mac computer and then plug in your external microphone. As soon as the interface pops up, click on “Voice.” Expand the “Details” menu located in the bottom left corner of the project selection box. Tap “Input Device” and choose the microphone from your list. Moving on, click on “Choose” in the bottom right corner.
Step 2: Adding the New Track
Moving on, you are expected to add a new track. To do this, click on the button with (+), located in the top left corner of the tracks panel. GarageBand offers four tracks. Pick one as you deem necessary. Tap the “Audio” option and then plug in the external microphone or guitar. Hit the “Input” dropdown and choose the list. Click on “Create” afterward.
Step 3: Recording the Sound
Now, it is time to record the sound. Pick the track that you will be recording by clicking on the track panel. Use the square bottom to stop it. Hit red circle to begin recording.
Step 4: Recording the Multiple Tracks
Moreover, you can record multiple tracks as well. To begin, choose the track where the first track was recorded through the track header. Navigate the play head to the start of the original take. Tap the red circle to initiate the recording process. Now, click on the number in the recorded segment in the top left corner. Pick the take you have to keep and then “Delete Unused Takes to get rid of other takes.
Step 5: Exporting the File
After you are done, it is time to export the finished project. Navigate to the top bar and click on “Share.” Choose “ Export Song to Disk “ from the context menu that appears, choose “Export Song to Disk.” A dialogue box appears.
Step 6: Saving Process
Rename the file, enter the file location, format, and sound quality—hit “Export” when you are done. The project can be saved in MP3 , WAV, and AIFF.
Wrapping Up
There is a diverse range of voice recorders and music-creating software in the business, creating chaos. Apple GarageBand recording is one such Mac recording studio doing wonders in the market. With advanced features and multiple functions, one can count on the tool to create magic in the music fraternity. The users are expected to test the features first before making the call.
Also read:
- Updated In 2024, 10 Most Popular MP3 Recorder for Windows and Mac
- New Beyond Default Modifying Siris Voice Across Apple Ecosystems for 2024
- In 2024, TuneWizard Pro Expertly Organize Your Music Library Across Windows/Mac Platforms
- New Essential Skills Setting Up Call Transcriptions in Google Voice
- New The Silence Shift A Comprehensive Look at How to Strip Sound From Digital Videos on the Web for 2024
- New Essential Listings for Authentic Copyright-Free Comic Audio Music Streams for 2024
- Updated Optimize Acoustic Balance Using Side-Chain Processing Methods for 2024
- Essential Video to Audio Converters Top Picks for Professional and Amateur Use for 2024
- 2024 Approved Intuitive Speech Alteration Capabilities Overview, Rules, & Substitutes
- Updated In-Depth Tips Utilizing Voxacells Voice Change Functionality for a More Dynamic Discord Interaction
- Siri Voice Changer How to Change Siri Voice on iPhone, iPad or Mac?
- New In 2024, The Sounds of Silence No More Three Fresh Strategies for Adding Audio to Videos
- In 2024, Amplifying Your Digital Footprint The Ins and Outs of Using Voxal Voice Changer on Discord
- New In 2024, Cutting-Edge Audio to Text Transcription Software of the Year, 2023 Edition
- New How to Use Voice Recorder on Samsung S10/S9?
- In 2024, A Complete Guide To OEM Unlocking on Samsung
- In 2024, 3 Solutions to Find Your Xiaomi Redmi Note 12 5G Current Location of a Mobile Number | Dr.fone
- How To Transfer WhatsApp From iPhone 12 to other iPhone 14 devices? | Dr.fone
- In 2024, How Can I Use a Fake GPS Without Mock Location On Vivo Y28 5G? | Dr.fone
- 2024 Approved Top Lego Animation Creators
- Why Is My Vivo S17 Offline? Troubleshooting Guide | Dr.fone
- In 2024, How To Unlock Samsung Galaxy M54 5G Phone Without Password?
- Top 15 Augmented Reality Games Like Pokémon GO To Play On Google Pixel Fold | Dr.fone
- How to Bypass Activation Lock on iPhone 15 Plus or iPad?
- In 2024, How To Fix Auto Lock Greyed Out on Apple iPhone 11 Pro
- In 2024, Unova Stone Pokémon Go Evolution List and How Catch Them For Nubia Z50 Ultra | Dr.fone
- Title: In 2024, Comprehensive Guide to the Top 8 Free Cartoon Sound Effect Downloads
- Author: Paul
- Created at : 2024-05-20 01:47:57
- Updated at : 2024-05-21 01:47:57
- Link: https://voice-adjusting.techidaily.com/in-2024-comprehensive-guide-to-the-top-8-free-cartoon-sound-effect-downloads/
- License: This work is licensed under CC BY-NC-SA 4.0.
