
Amplifying the Listener Experience Where to Obtain Professional Podcast Sound Effects

Amplifying the Listener Experience: Where to Obtain Professional Podcast Sound Effects
When people hear podcasting, they assume that it involves long speeches, but it is not so. For many creators, the concern for how to write podcast scripts that attract listeners involves adding sound effects. Doing so improves the quality of the audio content and appeals to listeners.
The dynamic sound effects for podcasts can help highlight specific moments/reactions/information, add to the atmospheric feel of the show, or prepare a unique intro tune. Different tools are useful for inserting the best sound effects into such shows. Let’s learn which ones they are and how they work.
Benefits of Adding Sound Effects in Podcasts
Before discussing what tools can help editors add sound effects to podcast episodes, we should refresh on why it is vital. Here are some of the best benefits you can expect from inserting sound effects for podcasts:
- Thematic or mood setting
With a sound effect, you can portray a specific theme for your podcast that gives the users an instant feel of your brand/channel. For example, if a podcaster is creating a podcast show for the True Crime genre, spooky and moody background sound effects set the mood. Comedy or commentary podcasts can use mood-based sound effects like a laugh track with their content.
- Point emphasis
Many podcasters utilize sound effects at pivotal moments of their content, e.g., to emphasize a cliffhanger in story-form podcast episodes. Like the boding and italicizing methods are useful in text documents to emphasize parts, you can adjust sound effects to do the same for your audio-based content. These can accentuate the dialogue and evoke specific emotional responses from the audience.
- Transition points
Most podcasters utilize the best sound effects for podcast shows to act as a transition between conversational segments. For example, some use these effects as outros or intros.
Now that you are clear about the expected benefits, which platform should you turn to for many quality sound effects? Here are some of the best solutions you can trust, starting with the most useful- Filmora.
1. Wondershare Filmora
If you want the best sound effects for podcast episodes, Wondershare Filmora is one notable solution to try out. You can use this software to record your audio, trim it, and add royalty-free sound effects in - all in one editor.
Free Download For Win 7 or later(64-bit)
Free Download For macOS 10.14 or later
Users can utilize Filmora to further enhance the sound quality using audio editing features like Denoise and Equalizer. Remove long silent parts with the Silence Detection mechanism, and sync the beats with voiceover using Auto Beat Sync. Plus, it has a simple UI with drag-and-drop functionality for an easier method of adding effects to specific sections.
Top Features to Try for Podcasters on Filmora:
- Optimize sound quality with audio editing tools like silence detection, audio synchronization, etc.
- Make your narration clear-sounding using the one-click Audio Ducking feature.
- Add AI-made voiceover if you want to avoid using your voice by adding text into the Text-to-Speech feature, which produces accurate voice narration.
- Utilize Speech-to-Text to transcribe your speech into text format in different languages, and add subtitles for your global listeners to read if you add a video version.
How to add Sound and Edit your Voiceovers for Podcasts with Filmora?
Step1 Download and launch the Wondershare Filmora 11 software on your PC or Mac device.
Step2 Plug a stable microphone you will use on the computer when you start. For the best voice quality during recording, it is best to utilize a high-grade external microphone model for professional-level sound capture.
Step3 Access the Filmora software after you launch it beforehand. On the homepage, click on the New Project option.
Step4 When the editor program opens, tap on the drop-down menu below the top-most toolbar for Record. From the options, select the “Record a Voiceover” choice.
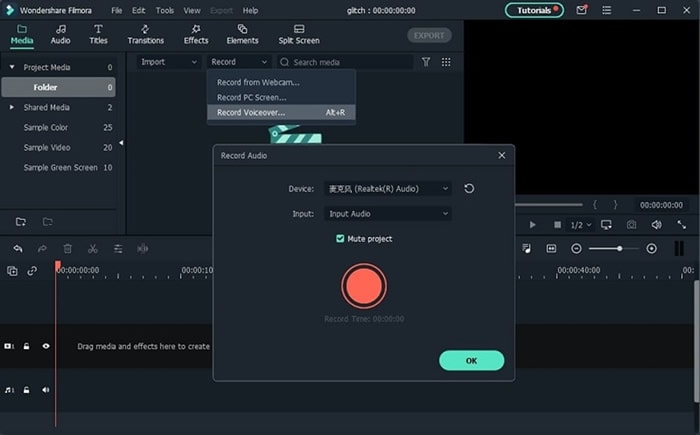
Step5 The recording pop-up window will open. Click on the big red record button after the input microphone/speaker settings, and start speaking. When you are done, click the square red stop button. Press OK to save.
Alternatively, you can click on the Microphone icon. Please wait 3 seconds and then start speaking into the microphone and click it again after you are done speaking. The newly recorded file will automatically come in the audio track timeline.
Step6 Click the audio track in the timeline. Among the settings, make changes as you prefer in Pitch, Volume, and Speed. Cut the sections of your voiceover recording you want to remove and add fade-in/fade-out effects. After making all changes, click OK.
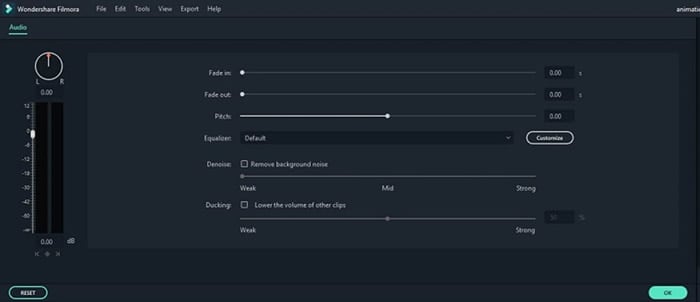
Step7 If you have the recording of the narration already available in other locations, like your phone or device, import it into the software.
Step8 Add transitions, effects, and titles from the respective tabs on the top toolbar.

Step9 To add sound effects, go to Media and acquire the new audio clip or effect to add. Go to Effects > choose Audio Effects. Download the sound effect you want to insert and drag it onto the clip in the timeline.
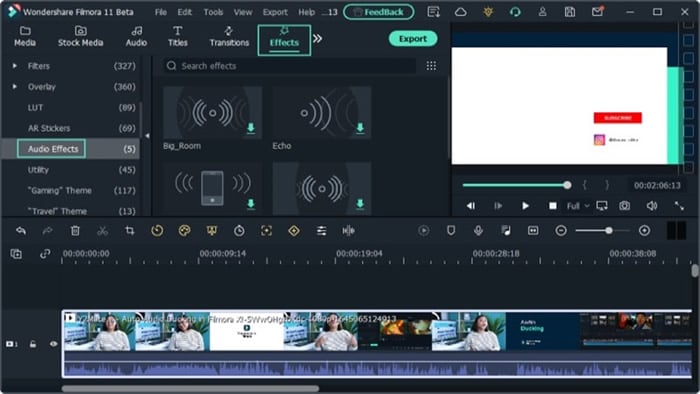
Step10 Choose sound effects like Echo, Small Room, Big Rooms, Lobby, etc. Download and drag the sound effect to the clip or press the Add icon. Play a preview to see how it worked.
Step11 After completing all the edits, click on the Export button at the top. In the next window, choose the file format and additional customizations through Settings. After everything is done, press the Export button to save offline.
Watch this video for a more detailed visual guide to podcast editing using Filmora.
2. YouTube Audio Library
One of the most user-friendly places online where you can find a wide range of high-quality sound effects is the YouTube Audio Library under YouTube Studio. Here, you can find genre-based sound effect choices useful for adding to YouTube videos. In terms of podcasting, you can also download the options offline and use them on your show.
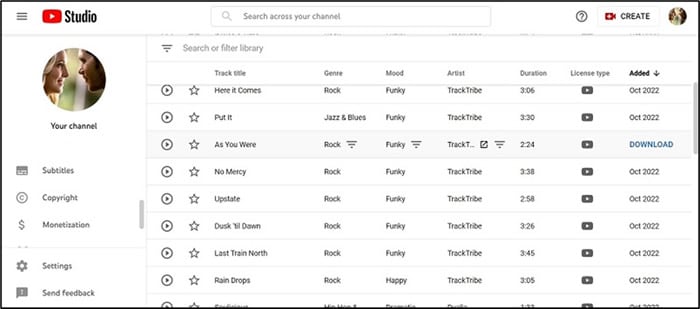
Price: Free
Features:
- Simple and fast downloading process.
- Clear and crisp sound quality.
- Various sizes of sound effects.
- Well-organized UI with liked songs under the starred section for easier access.
Pros
- Easy to browse through diverse sound effects.
- Directly filter the sound effect options by different components like length or genre to select.
- Directly search for sound clips with relevant keywords.
Cons
- You need to have a YouTube Studio account to get access to multiple free sound effects.
- Mainly for YouTube users.
3. Podcastle
Another top-level for podcasters for podcast effects is Podcastle. With this software, you can get AI support for intuitive editing of your episodes and even easily record interviews with up to 10 different speakers. Then, easily combine the different tracks with the editor here and add transition sound effects for optimized sound enhancement.
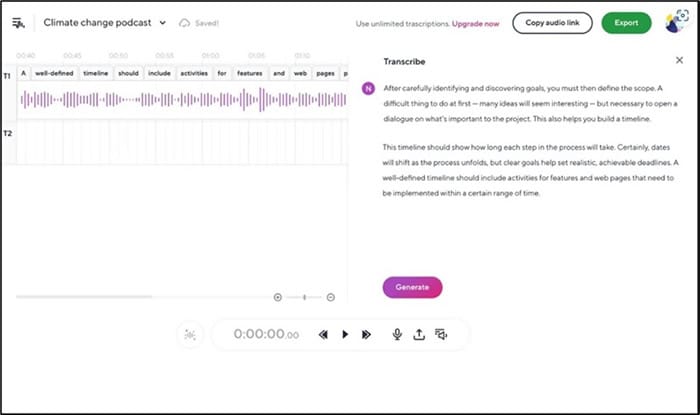
Price: Basic- Free, Storyteller- USD 3 per month, Pro- USD 8 per month
Features:
- Enhance speed in podcasts.
- AI features automatically remove broken sounds, unwanted noise, or silent parts.
- Use voice skins for text-to-speech benefits.
- Record your voiceover directly through this one platform.
Pros
- Royalty-free sound effects and music are available.
- Multi-track editing.
- Remoted interviewing benefits with the AI-powered app.
Cons
- Sound quality is not the best for free plan users.
- You have to upgrade to paid plans for more extensive free sound effects and music.
4. Freesound
If you want good free sound effects options, this is one of the oldest but most useful websites to trust for good-quality packs. The creators also edit and post their sound effects packs, which you can access easily. However, the learning curve of this site is slightly complicated, and it will take some time to learn how it works well.
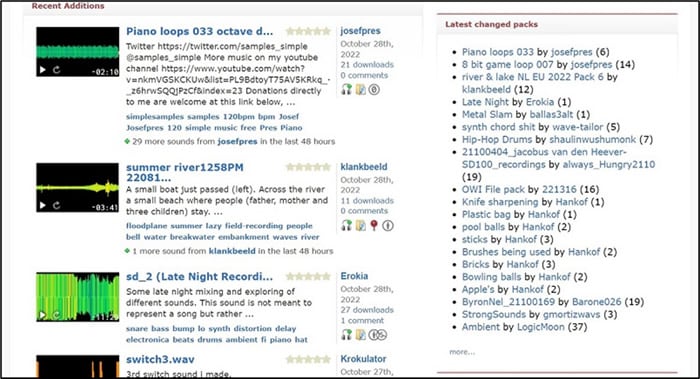
Price: Free
Features:
- The information is available to explain the sound packs.
- Various types of sound effects are available.
- Read comments and participate in forums with other creators.
- Register and download different packs of sound effects.
Pros
- Generate a random sound effect.
- Easily find sound effects packages from the list.
- Find song clips and effects via tags.
Cons
- Hard to navigate in the confusing interface.
- Strict licensing regulations are in place.
5. SoundBible
Another top-grade platform for sound effects that many podcasters trust is SoundBible. There are many types of suitable packs available that visitors can open and download. Previewing the sound effects first before downloading is easy to avoid choosing the wrong one.
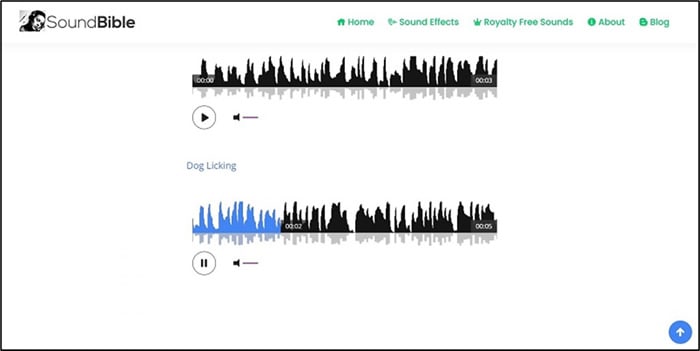
Price: Free
Features:
- Various styles of sound packs are available.
- Many royalty-free music options are available.
- Preview the sound clips before downloading.
- Fast downloading process.
Pros
- Download packs of sound effects based on type.
- Browse sound effects by tags or categories.
- Download sound effects in WAV and MP3 formats.
Cons
- Limited variety of options.
- Not the easiest browsing process to find relevant sound effects if you want genre-based choices.
6. Storyblocks
While trying out different apps and sites for dynamic music effect options, you should also give Storyblocks a chance. The platform offers different types of sound effects in its unlimited library. It is easy to search for them and preview the sound effect in your content with this app as well.
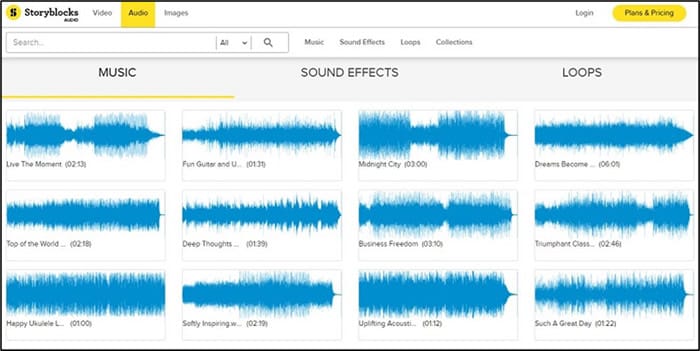
Price: Starter- USD 12.14 per month, Unlimited All Access- USD 24.29 per month, Pro- USD 29.35 per month
Features:
- Simple audio editor available.
- Preview what effects you will use and how they will work.
- Optimize sound quality and enhance sound.
- Get new content to choose from monthly.
Pros
- Fully stocked library of royalty-free sound clips.
- Diverse sound effects to choose from.
- Easily search for the type of effect you want to use in the app.
Cons
- No free version.
- Sound effects are available under higher-priced Pro and Unlimited All Access plans.
7. Music Radio Creative
If you want creative and customized voiceovers and intros for your podcast show, you will find many options in Music Radio Creative. Top creators, DJs, and music producers have created and distributed a variety of jingles and effects for users to try out and use for their podcasts. Plus, you will get AI-powered voiceover choices as well.
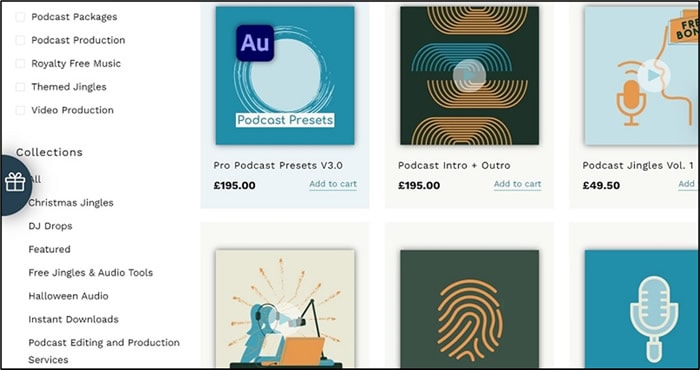
Price: Priced collections start at USD 40.
Features:
- Special offers for sound clips and effects.
- Different intro options for podcasts.
- Get themed jingles and effects.
- Collections of different theme-based options are available.
Pros
- Pre-made jingles are available for download.
- Free sound effects for different podcast styles.
- Pre-made voiceover choices.
Cons
- Very costly for complete beginners.
- Requires a strong and stable internet connection to download clips.
8. ZapSplat
Another user-friendly platform to try for free podcast sound effects is ZapSplat. The platform includes a wide range of sound effects you can hear and choose for your podcast episodes. The downloading process is simple, and you will get the final files in two commonly accessible audio formats for offline use.
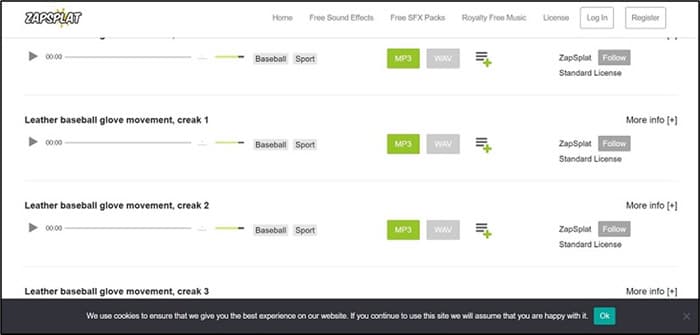
Price: Free
Features:
- Free sound effects for podcasts, recording and streaming.
- A categorized genre of different sound effect types.
- Download files in MP3 or WAV format.
- Preview the sound before downloading.
Pros
- Countless free sound effects.
- Many SFX options are available for free access.
- Well-organized list of sound effects for easier access and download.
Cons
- Sound effects of using here are only allowed for production-based usage.
- You cannot access and enable sound effects on the recorded files on other platforms.
9. Pixabay
If you want a straightforward user experience while choosing free sound effects for your podcast, Pixabay is a good choice. You will find different types of categorized sound effects, many of which are license-free. So, you can use them without worries of plagiarism in your content.
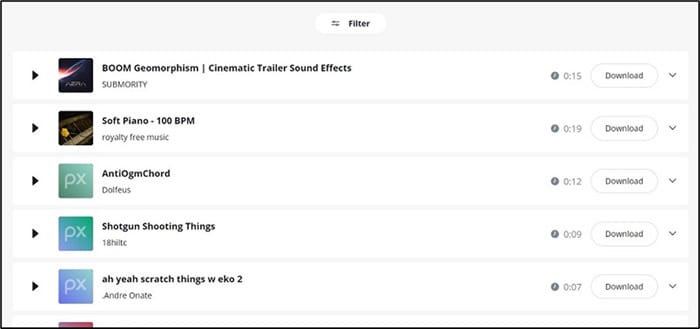
Price: Free
Features:
- Users can leave or read comments.
- Easily loads a new batch of royalty-free sound effects.
- Multiple genre options are available.
- Easy downloading process.
Pros
- Bookmark those you will download.
- Browse by tags.
- Play the sound effects to choose from.
Cons
- Need to register to get licensed content.
- Prompts appear after each download to promote the site.
10. Epidemic Sound
Another top-notch platform where you can find the best podcast transition sound effects is Epidemic Sound. This website has multiple styles of quality thematic and unique sound effects for users to try out. While the website is not free to use, you can easily find the best-quality sound effects for podcasts and publish them without hassle.
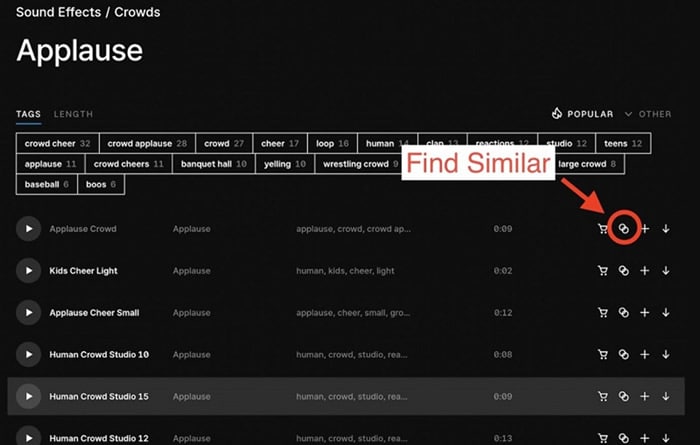
Price: Personal- USD 6/month, Commercial- USD 12/month, Enterprise- quoted cost from the brand.
Features:
- Monetize content across different social media platforms.
- Free trial of all features for 30 days.
- Easily publish your content on different sites.
- Thirty-five thousand track choices are available.
Pros
- Get 90,000 different sound effects to choose from.
- Get an unlimited number of downloads.
- Fast selection and downloading process.
Cons
- Support for music curation only for Enterprise plan users.
- The free first month is unavailable for enterprises or professionals using the biggest price plan.
11. Artlist
Another worthy option to trust for high-quality podcast sounds effects is Artlist. Users find it relatively simple to use this software to find different sound effects that will work for their podcast show theme. Plus, the website updates with new options daily, so you will not run out of options.
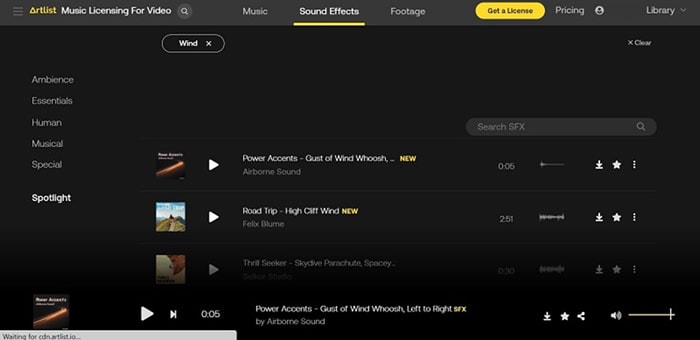
Price: Social Creator- USD 9.90/month, Creator Pro- USD 16.60/month, Enterprise- quoted cost, Team- USD 28.20/month
Features:
- Get new tracks and sound effects per day.
- The Pro license for users has a lifetime guarantee.
- Users can opt for customized pricing plans with customer team support.
- Diverse watermarked content is available for free plan users.
Pros
- Free sound effects licensed for different social media platforms.
- Podcast sound effects for free download under the Creator Pro plan.
- No copyright issues with the sound effects and music available for download here.
Cons
- Not possible to use the downloaded assets in multiple projects.
- Canceling the subscription and getting a refund are not available after 14 if you already downloaded the SFX options.
Free Download For Win 7 or later(64-bit)
Free Download For macOS 10.14 or later
Create Your Sound Effects As Last Resort
You will get different types of sound effects through the software and sites mentioned in this post. But do you want something different and more customized to your personal preferences for your podcast? The best solution, in that case, it to create your podcast sound effects.
The process will take a longer time. However, you will get a full license over the sound effects and save costs. Before doing so, you should research different content on creating podcast sound effects and add elements like echo effects online. Then, start the process.
Final Words
Different platforms are available for high-quality sound effects for podcast shows. You can use them to access countless free options or even prepare your own. However, if you want an overall high-grade user experience with one platform to record the podcast and add unique sound effects, Filmora is the best option for you.
Free Download For macOS 10.14 or later
Users can utilize Filmora to further enhance the sound quality using audio editing features like Denoise and Equalizer. Remove long silent parts with the Silence Detection mechanism, and sync the beats with voiceover using Auto Beat Sync. Plus, it has a simple UI with drag-and-drop functionality for an easier method of adding effects to specific sections.
Top Features to Try for Podcasters on Filmora:
- Optimize sound quality with audio editing tools like silence detection, audio synchronization, etc.
- Make your narration clear-sounding using the one-click Audio Ducking feature.
- Add AI-made voiceover if you want to avoid using your voice by adding text into the Text-to-Speech feature, which produces accurate voice narration.
- Utilize Speech-to-Text to transcribe your speech into text format in different languages, and add subtitles for your global listeners to read if you add a video version.
How to add Sound and Edit your Voiceovers for Podcasts with Filmora?
Step1 Download and launch the Wondershare Filmora 11 software on your PC or Mac device.
Step2 Plug a stable microphone you will use on the computer when you start. For the best voice quality during recording, it is best to utilize a high-grade external microphone model for professional-level sound capture.
Step3 Access the Filmora software after you launch it beforehand. On the homepage, click on the New Project option.
Step4 When the editor program opens, tap on the drop-down menu below the top-most toolbar for Record. From the options, select the “Record a Voiceover” choice.

Step5 The recording pop-up window will open. Click on the big red record button after the input microphone/speaker settings, and start speaking. When you are done, click the square red stop button. Press OK to save.
Alternatively, you can click on the Microphone icon. Please wait 3 seconds and then start speaking into the microphone and click it again after you are done speaking. The newly recorded file will automatically come in the audio track timeline.
Step6 Click the audio track in the timeline. Among the settings, make changes as you prefer in Pitch, Volume, and Speed. Cut the sections of your voiceover recording you want to remove and add fade-in/fade-out effects. After making all changes, click OK.

Step7 If you have the recording of the narration already available in other locations, like your phone or device, import it into the software.
Step8 Add transitions, effects, and titles from the respective tabs on the top toolbar.

Step9 To add sound effects, go to Media and acquire the new audio clip or effect to add. Go to Effects > choose Audio Effects. Download the sound effect you want to insert and drag it onto the clip in the timeline.

Step10 Choose sound effects like Echo, Small Room, Big Rooms, Lobby, etc. Download and drag the sound effect to the clip or press the Add icon. Play a preview to see how it worked.
Step11 After completing all the edits, click on the Export button at the top. In the next window, choose the file format and additional customizations through Settings. After everything is done, press the Export button to save offline.
Watch this video for a more detailed visual guide to podcast editing using Filmora.
2. YouTube Audio Library
One of the most user-friendly places online where you can find a wide range of high-quality sound effects is the YouTube Audio Library under YouTube Studio. Here, you can find genre-based sound effect choices useful for adding to YouTube videos. In terms of podcasting, you can also download the options offline and use them on your show.

Price: Free
Features:
- Simple and fast downloading process.
- Clear and crisp sound quality.
- Various sizes of sound effects.
- Well-organized UI with liked songs under the starred section for easier access.
Pros
- Easy to browse through diverse sound effects.
- Directly filter the sound effect options by different components like length or genre to select.
- Directly search for sound clips with relevant keywords.
Cons
- You need to have a YouTube Studio account to get access to multiple free sound effects.
- Mainly for YouTube users.
3. Podcastle
Another top-level for podcasters for podcast effects is Podcastle. With this software, you can get AI support for intuitive editing of your episodes and even easily record interviews with up to 10 different speakers. Then, easily combine the different tracks with the editor here and add transition sound effects for optimized sound enhancement.

Price: Basic- Free, Storyteller- USD 3 per month, Pro- USD 8 per month
Features:
- Enhance speed in podcasts.
- AI features automatically remove broken sounds, unwanted noise, or silent parts.
- Use voice skins for text-to-speech benefits.
- Record your voiceover directly through this one platform.
Pros
- Royalty-free sound effects and music are available.
- Multi-track editing.
- Remoted interviewing benefits with the AI-powered app.
Cons
- Sound quality is not the best for free plan users.
- You have to upgrade to paid plans for more extensive free sound effects and music.
4. Freesound
If you want good free sound effects options, this is one of the oldest but most useful websites to trust for good-quality packs. The creators also edit and post their sound effects packs, which you can access easily. However, the learning curve of this site is slightly complicated, and it will take some time to learn how it works well.

Price: Free
Features:
- The information is available to explain the sound packs.
- Various types of sound effects are available.
- Read comments and participate in forums with other creators.
- Register and download different packs of sound effects.
Pros
- Generate a random sound effect.
- Easily find sound effects packages from the list.
- Find song clips and effects via tags.
Cons
- Hard to navigate in the confusing interface.
- Strict licensing regulations are in place.
5. SoundBible
Another top-grade platform for sound effects that many podcasters trust is SoundBible. There are many types of suitable packs available that visitors can open and download. Previewing the sound effects first before downloading is easy to avoid choosing the wrong one.

Price: Free
Features:
- Various styles of sound packs are available.
- Many royalty-free music options are available.
- Preview the sound clips before downloading.
- Fast downloading process.
Pros
- Download packs of sound effects based on type.
- Browse sound effects by tags or categories.
- Download sound effects in WAV and MP3 formats.
Cons
- Limited variety of options.
- Not the easiest browsing process to find relevant sound effects if you want genre-based choices.
6. Storyblocks
While trying out different apps and sites for dynamic music effect options, you should also give Storyblocks a chance. The platform offers different types of sound effects in its unlimited library. It is easy to search for them and preview the sound effect in your content with this app as well.

Price: Starter- USD 12.14 per month, Unlimited All Access- USD 24.29 per month, Pro- USD 29.35 per month
Features:
- Simple audio editor available.
- Preview what effects you will use and how they will work.
- Optimize sound quality and enhance sound.
- Get new content to choose from monthly.
Pros
- Fully stocked library of royalty-free sound clips.
- Diverse sound effects to choose from.
- Easily search for the type of effect you want to use in the app.
Cons
- No free version.
- Sound effects are available under higher-priced Pro and Unlimited All Access plans.
7. Music Radio Creative
If you want creative and customized voiceovers and intros for your podcast show, you will find many options in Music Radio Creative. Top creators, DJs, and music producers have created and distributed a variety of jingles and effects for users to try out and use for their podcasts. Plus, you will get AI-powered voiceover choices as well.

Price: Priced collections start at USD 40.
Features:
- Special offers for sound clips and effects.
- Different intro options for podcasts.
- Get themed jingles and effects.
- Collections of different theme-based options are available.
Pros
- Pre-made jingles are available for download.
- Free sound effects for different podcast styles.
- Pre-made voiceover choices.
Cons
- Very costly for complete beginners.
- Requires a strong and stable internet connection to download clips.
8. ZapSplat
Another user-friendly platform to try for free podcast sound effects is ZapSplat. The platform includes a wide range of sound effects you can hear and choose for your podcast episodes. The downloading process is simple, and you will get the final files in two commonly accessible audio formats for offline use.

Price: Free
Features:
- Free sound effects for podcasts, recording and streaming.
- A categorized genre of different sound effect types.
- Download files in MP3 or WAV format.
- Preview the sound before downloading.
Pros
- Countless free sound effects.
- Many SFX options are available for free access.
- Well-organized list of sound effects for easier access and download.
Cons
- Sound effects of using here are only allowed for production-based usage.
- You cannot access and enable sound effects on the recorded files on other platforms.
9. Pixabay
If you want a straightforward user experience while choosing free sound effects for your podcast, Pixabay is a good choice. You will find different types of categorized sound effects, many of which are license-free. So, you can use them without worries of plagiarism in your content.

Price: Free
Features:
- Users can leave or read comments.
- Easily loads a new batch of royalty-free sound effects.
- Multiple genre options are available.
- Easy downloading process.
Pros
- Bookmark those you will download.
- Browse by tags.
- Play the sound effects to choose from.
Cons
- Need to register to get licensed content.
- Prompts appear after each download to promote the site.
10. Epidemic Sound
Another top-notch platform where you can find the best podcast transition sound effects is Epidemic Sound. This website has multiple styles of quality thematic and unique sound effects for users to try out. While the website is not free to use, you can easily find the best-quality sound effects for podcasts and publish them without hassle.

Price: Personal- USD 6/month, Commercial- USD 12/month, Enterprise- quoted cost from the brand.
Features:
- Monetize content across different social media platforms.
- Free trial of all features for 30 days.
- Easily publish your content on different sites.
- Thirty-five thousand track choices are available.
Pros
- Get 90,000 different sound effects to choose from.
- Get an unlimited number of downloads.
- Fast selection and downloading process.
Cons
- Support for music curation only for Enterprise plan users.
- The free first month is unavailable for enterprises or professionals using the biggest price plan.
11. Artlist
Another worthy option to trust for high-quality podcast sounds effects is Artlist. Users find it relatively simple to use this software to find different sound effects that will work for their podcast show theme. Plus, the website updates with new options daily, so you will not run out of options.

Price: Social Creator- USD 9.90/month, Creator Pro- USD 16.60/month, Enterprise- quoted cost, Team- USD 28.20/month
Features:
- Get new tracks and sound effects per day.
- The Pro license for users has a lifetime guarantee.
- Users can opt for customized pricing plans with customer team support.
- Diverse watermarked content is available for free plan users.
Pros
- Free sound effects licensed for different social media platforms.
- Podcast sound effects for free download under the Creator Pro plan.
- No copyright issues with the sound effects and music available for download here.
Cons
- Not possible to use the downloaded assets in multiple projects.
- Canceling the subscription and getting a refund are not available after 14 if you already downloaded the SFX options.
Free Download For Win 7 or later(64-bit)
Free Download For macOS 10.14 or later
Create Your Sound Effects As Last Resort
You will get different types of sound effects through the software and sites mentioned in this post. But do you want something different and more customized to your personal preferences for your podcast? The best solution, in that case, it to create your podcast sound effects.
The process will take a longer time. However, you will get a full license over the sound effects and save costs. Before doing so, you should research different content on creating podcast sound effects and add elements like echo effects online. Then, start the process.
Final Words
Different platforms are available for high-quality sound effects for podcast shows. You can use them to access countless free options or even prepare your own. However, if you want an overall high-grade user experience with one platform to record the podcast and add unique sound effects, Filmora is the best option for you.
Best Windows Speech Translation Software: A 2024 Roundup of Top Tools
Recently, technology has increased exponentially, and people are always on the computer, writing, or doing other tasks. People get tired of typing documents or clicking while playing a game at certain times. Or, some people are just too slow at typing to get any work done on time. This is where the speech to text software comes in.
Thanks to the advancements in technology, a speech to text software can be used to transcribe or convert audio to text. There is a multitude of such tools available online or as downloadable software.
Let us discuss some of the best tools to convert audio to text.
Top Recommendation: Wondershare Filmora
Wondershare Filmora Speech to Text is quite different with other STT service providers. Other STT platforms/stages require you to use the application to convert speech-to-text, save, and export into other third-party software. However, Wondershare Filmora allows you to directly convert your speech-to-text on an ongoing production. For example, you can convert speech into subtitles during a video production on Wondershare Filmora.
What’s more, now Filmora’s STT feature supports direct transcription of bilingual subtitles with up to 27 languages of transcription in Filmora version 13.
Top Adavantages of Filmora:
- 1. Support direct transcription of bilingual subtitles.
- 2. Allow to transcribe video speech to text in one click.
- 3. Boost editing efficiency by applying the STT feature.
Best STT Software for Windows
Save plenty of time on transcribing subtitles and boost your editing efficiency by applying Filmora Speech-To-Text.
Try STT Now Try STT Now Try STT Now

Best 10 Speech to Text Software for Windows
As every speech to text converter comes with a different set of key features and sometimes drawbacks, it is wise to review a few and choose the one that seems most suitable. Here is a list of the top 10 speech to text converters.
- 1. Windows Dictation
- 2. Window’s Speech Recognition
- 3. Dragon Professional Individual
- 4. Google Docs Voice Typing
- 5. NaturalReader
- 6. Braina Pro
- 7. Speechnotes
- 8. Sobolsoft
- 9. Bear File Converter
- 10. Voice Finger
1. Windows Dictation
Price: Free
Using the in-built Speech Recognition, Windows dictation easily converts everything you speak into text. It is super easy to use, and there are a variety of commands that can be used to control the text and write without accessing the keyboard and with stunning accuracy. To initiate this speech to text software, press **Windows icon+**H and enable the settings’ online speech recognition toggle. A toolbar will appear with a microphone icon. Say Start Dictating and click on the microphone to convert audio to text. By saying Stop Dictating, you can finish the process. However, you will need to have an active internet connection to use this dictator.
2. Window’s Speech Recognition (WSR)
Price: Free
Windows users can enjoy this voice-to-text software already built-in in the system and needs a quick and straightforward activation method to start. Through Window’s Speech Recognition software, users can convert audio to text on various programs, browsers, or applications. This can be used to open or close programs, set calendars, or even search and start a song. To activate, enter Windows Speech Recognition in the search bar. Go through the steps to help your computer recognize your voice, and you’re good to go.
3. Dragon Professional Individual
Price: $500 for professional and enterprise version/$49.99 for the basic version
As the name suggests, this speech to text software is a highly professional tool to make a writer’s life easier. It has loads of editing commands and 160 words per minute typing speed. It offers almost 99% accuracy and works on various programs as well as on the browser. After installation, you can easily activate and convert audio to text. Pre-recorded audios containing a single speaker can also be quickly transcribed through this tool.
4. Google Docs Voice Typing
Price: Free
The Google speech to text software is in-built in the Google Docs available on the browser. With this free and remarkable tool, you can work faster without having to type in anything. It has around 100 voice commands that help you make edits and formatting. Whether you want to enter bullet points, change lines, or underline a word, this voice to text software by Google is an excellent choice. It is available on the web, but it cannot be downloaded. To use this, hop onto Google Docs and click on Tools, tap on Voice Typing. Then, allow microphone use and start speaking.
5. NaturalReader
Price: Personal:$99.50(one-time payment)
NaturalReader is the kind of speech to text software that can read or narrate a variety of text and multiple document formats so that users do not have to strain their eyes. It helps to convert text into audio files such as MP3. You can even change the pronunciation of a word as you like. NaturalReader offers an online version, as well as a downloadable edition. A free version is also available, but with limited features.
6. Braina Pro
Price: $169/lifetime(limited time offer) or $59/annually
Braina Pro is not just a speech to text converter; rather, it works as a complete virtual assistant. It can set alarms, open or close files, or complete a multitude of tasks on your computer. This software also boasts a mobile app that can be used to control your PC without having to access it physically. Braina Pro supports more than 90 languages. But, you will need an active internet connection to do so. Just subscribe and download the app, open it and click on the microphone icon. Click and say ‘Enter dictation mode‘ and start using it.
7. Speechnotes
Price: Free
A very efficient and powerful speech to text converter is the Speechnotes tool. It is easily accessible as there is no need to download, register, or subscribe. By opening the Speechnotes online link on Chrome, you can click on the microphone icon and start dictating to convert audio to text. There are numerous, frequently used commands and shortcuts displayed on the left side of the screen. What’s more, Speechnotes automatically capitalizes sentence starters and autosaves documents. After completion, the text can be directly saved to the local files or exported to Google Drive.
8. Sobolsoft
Price: Free(500 minutes/month)
With Sobolsoft, you can easily and seamlessly convert audio to text files and save them. The free version allows 500 mins of audio conversion every month. After installation, you can upload the audio files and click on convert to start the process. Also, multiple audio files can be uploaded and converted to text simultaneously. After transcription, the text can be edited and saved. However, only MP3 files can be converted through this speech to text software.
9. Bear File Converter
Price: Free
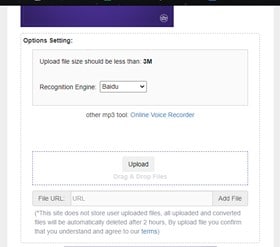
Bear File Converter is a comprehensive tool that offers a variety of services, including the speech to text converter. It is available online for free use. You can upload audio files that are no more than 3 megabytes in size and click on convert. This speech-to-text software supports the audio file formats supported by this speech to text software are MP3, OGG, WAV, WMA, and many more. You can also add audio files URL. Just click convert to start the process. The files are saved to the device in a word file.
10. Voice Finger
Price: $9.99
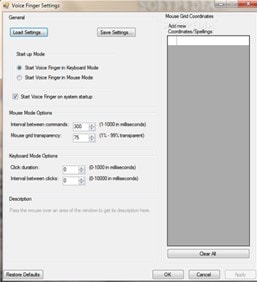
Voice Finger is an extremely powerful yet easy-to-use speech to text software that makes all kinds of computer tasks easier. With this tool, you can enjoy hands-free gaming or complete tasks without even touching the mouse. All clicks and holding special keys is also easily done by Voice Finger. This voice to text software is the ultimate solution for gamers or those with extensive writing tasks as it makes everything effortless. Whether you want to move the cursor, type documents, or click to shoot in a game, Voice Finger has got you covered. Just download the software and start using it. A free version is also available.
Conclusion
Before you go on to subscribe or purchase a random speech to text software, it is advisable to weigh out a few suitable options and then choose the one that best fits your needs. If you want to use the voice to text software while you are on the go and don’t have access to an internet connection, remember to check whether it works offline or not.
You can read our rendition of the quick review on the top speech to text software tools that can help save time and effort while maximizing productivity.
Transform Long Videos into Short Ones Instantly
Turn long videos into viral clips. Effortlessly transform lengthy videos into engaging, shareable clips.

Best STT Software for Windows
Save plenty of time on transcribing subtitles and boost your editing efficiency by applying Filmora Speech-To-Text.
Try STT Now Try STT Now Try STT Now

Best 10 Speech to Text Software for Windows
As every speech to text converter comes with a different set of key features and sometimes drawbacks, it is wise to review a few and choose the one that seems most suitable. Here is a list of the top 10 speech to text converters.
- 1. Windows Dictation
- 2. Window’s Speech Recognition
- 3. Dragon Professional Individual
- 4. Google Docs Voice Typing
- 5. NaturalReader
- 6. Braina Pro
- 7. Speechnotes
- 8. Sobolsoft
- 9. Bear File Converter
- 10. Voice Finger
1. Windows Dictation
Price: Free
Using the in-built Speech Recognition, Windows dictation easily converts everything you speak into text. It is super easy to use, and there are a variety of commands that can be used to control the text and write without accessing the keyboard and with stunning accuracy. To initiate this speech to text software, press **Windows icon+**H and enable the settings’ online speech recognition toggle. A toolbar will appear with a microphone icon. Say Start Dictating and click on the microphone to convert audio to text. By saying Stop Dictating, you can finish the process. However, you will need to have an active internet connection to use this dictator.
2. Window’s Speech Recognition (WSR)
Price: Free
Windows users can enjoy this voice-to-text software already built-in in the system and needs a quick and straightforward activation method to start. Through Window’s Speech Recognition software, users can convert audio to text on various programs, browsers, or applications. This can be used to open or close programs, set calendars, or even search and start a song. To activate, enter Windows Speech Recognition in the search bar. Go through the steps to help your computer recognize your voice, and you’re good to go.
3. Dragon Professional Individual
Price: $500 for professional and enterprise version/$49.99 for the basic version
As the name suggests, this speech to text software is a highly professional tool to make a writer’s life easier. It has loads of editing commands and 160 words per minute typing speed. It offers almost 99% accuracy and works on various programs as well as on the browser. After installation, you can easily activate and convert audio to text. Pre-recorded audios containing a single speaker can also be quickly transcribed through this tool.
4. Google Docs Voice Typing
Price: Free
The Google speech to text software is in-built in the Google Docs available on the browser. With this free and remarkable tool, you can work faster without having to type in anything. It has around 100 voice commands that help you make edits and formatting. Whether you want to enter bullet points, change lines, or underline a word, this voice to text software by Google is an excellent choice. It is available on the web, but it cannot be downloaded. To use this, hop onto Google Docs and click on Tools, tap on Voice Typing. Then, allow microphone use and start speaking.
5. NaturalReader
Price: Personal:$99.50(one-time payment)
NaturalReader is the kind of speech to text software that can read or narrate a variety of text and multiple document formats so that users do not have to strain their eyes. It helps to convert text into audio files such as MP3. You can even change the pronunciation of a word as you like. NaturalReader offers an online version, as well as a downloadable edition. A free version is also available, but with limited features.
6. Braina Pro
Price: $169/lifetime(limited time offer) or $59/annually
Braina Pro is not just a speech to text converter; rather, it works as a complete virtual assistant. It can set alarms, open or close files, or complete a multitude of tasks on your computer. This software also boasts a mobile app that can be used to control your PC without having to access it physically. Braina Pro supports more than 90 languages. But, you will need an active internet connection to do so. Just subscribe and download the app, open it and click on the microphone icon. Click and say ‘Enter dictation mode‘ and start using it.
7. Speechnotes
Price: Free
A very efficient and powerful speech to text converter is the Speechnotes tool. It is easily accessible as there is no need to download, register, or subscribe. By opening the Speechnotes online link on Chrome, you can click on the microphone icon and start dictating to convert audio to text. There are numerous, frequently used commands and shortcuts displayed on the left side of the screen. What’s more, Speechnotes automatically capitalizes sentence starters and autosaves documents. After completion, the text can be directly saved to the local files or exported to Google Drive.
8. Sobolsoft
Price: Free(500 minutes/month)
With Sobolsoft, you can easily and seamlessly convert audio to text files and save them. The free version allows 500 mins of audio conversion every month. After installation, you can upload the audio files and click on convert to start the process. Also, multiple audio files can be uploaded and converted to text simultaneously. After transcription, the text can be edited and saved. However, only MP3 files can be converted through this speech to text software.
9. Bear File Converter
Price: Free
Bear File Converter is a comprehensive tool that offers a variety of services, including the speech to text converter. It is available online for free use. You can upload audio files that are no more than 3 megabytes in size and click on convert. This speech-to-text software supports the audio file formats supported by this speech to text software are MP3, OGG, WAV, WMA, and many more. You can also add audio files URL. Just click convert to start the process. The files are saved to the device in a word file.

10. Voice Finger
Price: $9.99
Voice Finger is an extremely powerful yet easy-to-use speech to text software that makes all kinds of computer tasks easier. With this tool, you can enjoy hands-free gaming or complete tasks without even touching the mouse. All clicks and holding special keys is also easily done by Voice Finger. This voice to text software is the ultimate solution for gamers or those with extensive writing tasks as it makes everything effortless. Whether you want to move the cursor, type documents, or click to shoot in a game, Voice Finger has got you covered. Just download the software and start using it. A free version is also available.

Conclusion
Before you go on to subscribe or purchase a random speech to text software, it is advisable to weigh out a few suitable options and then choose the one that best fits your needs. If you want to use the voice to text software while you are on the go and don’t have access to an internet connection, remember to check whether it works offline or not.
You can read our rendition of the quick review on the top speech to text software tools that can help save time and effort while maximizing productivity.
Transform Long Videos into Short Ones Instantly
Turn long videos into viral clips. Effortlessly transform lengthy videos into engaging, shareable clips.

Best STT Software for Windows
Save plenty of time on transcribing subtitles and boost your editing efficiency by applying Filmora Speech-To-Text.
Try STT Now Try STT Now Try STT Now

Best 10 Speech to Text Software for Windows
As every speech to text converter comes with a different set of key features and sometimes drawbacks, it is wise to review a few and choose the one that seems most suitable. Here is a list of the top 10 speech to text converters.
- 1. Windows Dictation
- 2. Window’s Speech Recognition
- 3. Dragon Professional Individual
- 4. Google Docs Voice Typing
- 5. NaturalReader
- 6. Braina Pro
- 7. Speechnotes
- 8. Sobolsoft
- 9. Bear File Converter
- 10. Voice Finger
1. Windows Dictation
Price: Free
Using the in-built Speech Recognition, Windows dictation easily converts everything you speak into text. It is super easy to use, and there are a variety of commands that can be used to control the text and write without accessing the keyboard and with stunning accuracy. To initiate this speech to text software, press **Windows icon+**H and enable the settings’ online speech recognition toggle. A toolbar will appear with a microphone icon. Say Start Dictating and click on the microphone to convert audio to text. By saying Stop Dictating, you can finish the process. However, you will need to have an active internet connection to use this dictator.
2. Window’s Speech Recognition (WSR)
Price: Free
Windows users can enjoy this voice-to-text software already built-in in the system and needs a quick and straightforward activation method to start. Through Window’s Speech Recognition software, users can convert audio to text on various programs, browsers, or applications. This can be used to open or close programs, set calendars, or even search and start a song. To activate, enter Windows Speech Recognition in the search bar. Go through the steps to help your computer recognize your voice, and you’re good to go.
3. Dragon Professional Individual
Price: $500 for professional and enterprise version/$49.99 for the basic version
As the name suggests, this speech to text software is a highly professional tool to make a writer’s life easier. It has loads of editing commands and 160 words per minute typing speed. It offers almost 99% accuracy and works on various programs as well as on the browser. After installation, you can easily activate and convert audio to text. Pre-recorded audios containing a single speaker can also be quickly transcribed through this tool.
4. Google Docs Voice Typing
Price: Free
The Google speech to text software is in-built in the Google Docs available on the browser. With this free and remarkable tool, you can work faster without having to type in anything. It has around 100 voice commands that help you make edits and formatting. Whether you want to enter bullet points, change lines, or underline a word, this voice to text software by Google is an excellent choice. It is available on the web, but it cannot be downloaded. To use this, hop onto Google Docs and click on Tools, tap on Voice Typing. Then, allow microphone use and start speaking.
5. NaturalReader
Price: Personal:$99.50(one-time payment)
NaturalReader is the kind of speech to text software that can read or narrate a variety of text and multiple document formats so that users do not have to strain their eyes. It helps to convert text into audio files such as MP3. You can even change the pronunciation of a word as you like. NaturalReader offers an online version, as well as a downloadable edition. A free version is also available, but with limited features.
6. Braina Pro
Price: $169/lifetime(limited time offer) or $59/annually
Braina Pro is not just a speech to text converter; rather, it works as a complete virtual assistant. It can set alarms, open or close files, or complete a multitude of tasks on your computer. This software also boasts a mobile app that can be used to control your PC without having to access it physically. Braina Pro supports more than 90 languages. But, you will need an active internet connection to do so. Just subscribe and download the app, open it and click on the microphone icon. Click and say ‘Enter dictation mode‘ and start using it.
7. Speechnotes
Price: Free
A very efficient and powerful speech to text converter is the Speechnotes tool. It is easily accessible as there is no need to download, register, or subscribe. By opening the Speechnotes online link on Chrome, you can click on the microphone icon and start dictating to convert audio to text. There are numerous, frequently used commands and shortcuts displayed on the left side of the screen. What’s more, Speechnotes automatically capitalizes sentence starters and autosaves documents. After completion, the text can be directly saved to the local files or exported to Google Drive.
8. Sobolsoft
Price: Free(500 minutes/month)
With Sobolsoft, you can easily and seamlessly convert audio to text files and save them. The free version allows 500 mins of audio conversion every month. After installation, you can upload the audio files and click on convert to start the process. Also, multiple audio files can be uploaded and converted to text simultaneously. After transcription, the text can be edited and saved. However, only MP3 files can be converted through this speech to text software.
9. Bear File Converter
Price: Free
Bear File Converter is a comprehensive tool that offers a variety of services, including the speech to text converter. It is available online for free use. You can upload audio files that are no more than 3 megabytes in size and click on convert. This speech-to-text software supports the audio file formats supported by this speech to text software are MP3, OGG, WAV, WMA, and many more. You can also add audio files URL. Just click convert to start the process. The files are saved to the device in a word file.

10. Voice Finger
Price: $9.99
Voice Finger is an extremely powerful yet easy-to-use speech to text software that makes all kinds of computer tasks easier. With this tool, you can enjoy hands-free gaming or complete tasks without even touching the mouse. All clicks and holding special keys is also easily done by Voice Finger. This voice to text software is the ultimate solution for gamers or those with extensive writing tasks as it makes everything effortless. Whether you want to move the cursor, type documents, or click to shoot in a game, Voice Finger has got you covered. Just download the software and start using it. A free version is also available.

Conclusion
Before you go on to subscribe or purchase a random speech to text software, it is advisable to weigh out a few suitable options and then choose the one that best fits your needs. If you want to use the voice to text software while you are on the go and don’t have access to an internet connection, remember to check whether it works offline or not.
You can read our rendition of the quick review on the top speech to text software tools that can help save time and effort while maximizing productivity.
Transform Long Videos into Short Ones Instantly
Turn long videos into viral clips. Effortlessly transform lengthy videos into engaging, shareable clips.

Best STT Software for Windows
Save plenty of time on transcribing subtitles and boost your editing efficiency by applying Filmora Speech-To-Text.
Try STT Now Try STT Now Try STT Now

Best 10 Speech to Text Software for Windows
As every speech to text converter comes with a different set of key features and sometimes drawbacks, it is wise to review a few and choose the one that seems most suitable. Here is a list of the top 10 speech to text converters.
- 1. Windows Dictation
- 2. Window’s Speech Recognition
- 3. Dragon Professional Individual
- 4. Google Docs Voice Typing
- 5. NaturalReader
- 6. Braina Pro
- 7. Speechnotes
- 8. Sobolsoft
- 9. Bear File Converter
- 10. Voice Finger
1. Windows Dictation
Price: Free
Using the in-built Speech Recognition, Windows dictation easily converts everything you speak into text. It is super easy to use, and there are a variety of commands that can be used to control the text and write without accessing the keyboard and with stunning accuracy. To initiate this speech to text software, press **Windows icon+**H and enable the settings’ online speech recognition toggle. A toolbar will appear with a microphone icon. Say Start Dictating and click on the microphone to convert audio to text. By saying Stop Dictating, you can finish the process. However, you will need to have an active internet connection to use this dictator.
2. Window’s Speech Recognition (WSR)
Price: Free
Windows users can enjoy this voice-to-text software already built-in in the system and needs a quick and straightforward activation method to start. Through Window’s Speech Recognition software, users can convert audio to text on various programs, browsers, or applications. This can be used to open or close programs, set calendars, or even search and start a song. To activate, enter Windows Speech Recognition in the search bar. Go through the steps to help your computer recognize your voice, and you’re good to go.
3. Dragon Professional Individual
Price: $500 for professional and enterprise version/$49.99 for the basic version
As the name suggests, this speech to text software is a highly professional tool to make a writer’s life easier. It has loads of editing commands and 160 words per minute typing speed. It offers almost 99% accuracy and works on various programs as well as on the browser. After installation, you can easily activate and convert audio to text. Pre-recorded audios containing a single speaker can also be quickly transcribed through this tool.
4. Google Docs Voice Typing
Price: Free
The Google speech to text software is in-built in the Google Docs available on the browser. With this free and remarkable tool, you can work faster without having to type in anything. It has around 100 voice commands that help you make edits and formatting. Whether you want to enter bullet points, change lines, or underline a word, this voice to text software by Google is an excellent choice. It is available on the web, but it cannot be downloaded. To use this, hop onto Google Docs and click on Tools, tap on Voice Typing. Then, allow microphone use and start speaking.
5. NaturalReader
Price: Personal:$99.50(one-time payment)
NaturalReader is the kind of speech to text software that can read or narrate a variety of text and multiple document formats so that users do not have to strain their eyes. It helps to convert text into audio files such as MP3. You can even change the pronunciation of a word as you like. NaturalReader offers an online version, as well as a downloadable edition. A free version is also available, but with limited features.
6. Braina Pro
Price: $169/lifetime(limited time offer) or $59/annually
Braina Pro is not just a speech to text converter; rather, it works as a complete virtual assistant. It can set alarms, open or close files, or complete a multitude of tasks on your computer. This software also boasts a mobile app that can be used to control your PC without having to access it physically. Braina Pro supports more than 90 languages. But, you will need an active internet connection to do so. Just subscribe and download the app, open it and click on the microphone icon. Click and say ‘Enter dictation mode‘ and start using it.
7. Speechnotes
Price: Free
A very efficient and powerful speech to text converter is the Speechnotes tool. It is easily accessible as there is no need to download, register, or subscribe. By opening the Speechnotes online link on Chrome, you can click on the microphone icon and start dictating to convert audio to text. There are numerous, frequently used commands and shortcuts displayed on the left side of the screen. What’s more, Speechnotes automatically capitalizes sentence starters and autosaves documents. After completion, the text can be directly saved to the local files or exported to Google Drive.
8. Sobolsoft
Price: Free(500 minutes/month)
With Sobolsoft, you can easily and seamlessly convert audio to text files and save them. The free version allows 500 mins of audio conversion every month. After installation, you can upload the audio files and click on convert to start the process. Also, multiple audio files can be uploaded and converted to text simultaneously. After transcription, the text can be edited and saved. However, only MP3 files can be converted through this speech to text software.
9. Bear File Converter
Price: Free
Bear File Converter is a comprehensive tool that offers a variety of services, including the speech to text converter. It is available online for free use. You can upload audio files that are no more than 3 megabytes in size and click on convert. This speech-to-text software supports the audio file formats supported by this speech to text software are MP3, OGG, WAV, WMA, and many more. You can also add audio files URL. Just click convert to start the process. The files are saved to the device in a word file.

10. Voice Finger
Price: $9.99
Voice Finger is an extremely powerful yet easy-to-use speech to text software that makes all kinds of computer tasks easier. With this tool, you can enjoy hands-free gaming or complete tasks without even touching the mouse. All clicks and holding special keys is also easily done by Voice Finger. This voice to text software is the ultimate solution for gamers or those with extensive writing tasks as it makes everything effortless. Whether you want to move the cursor, type documents, or click to shoot in a game, Voice Finger has got you covered. Just download the software and start using it. A free version is also available.

Conclusion
Before you go on to subscribe or purchase a random speech to text software, it is advisable to weigh out a few suitable options and then choose the one that best fits your needs. If you want to use the voice to text software while you are on the go and don’t have access to an internet connection, remember to check whether it works offline or not.
You can read our rendition of the quick review on the top speech to text software tools that can help save time and effort while maximizing productivity.
Transform Long Videos into Short Ones Instantly
Turn long videos into viral clips. Effortlessly transform lengthy videos into engaging, shareable clips.

The Truth About Digital Studios: Separating Myths From DAW Reality
What Is DAW (Digital Audio Workstation) -Myth Solved 
Benjamin Arango
Mar 27, 2024• Proven solutions
If you’re just starting in the field of music production, you must have heard about DAW. Every YouTube tutorial on music production talks about choosing the right DAW software before everything else.
So, what does DAW mean, and more importantly, why do you need DAW for music production? If you’re also struggling to find answers to these questions, let us help. In this guide, we’re going to explain what DAW is and how it can help a music producer in his career.
- Part 1: What is DAW
- Part 2: Types of DAW
- Part 3: How to Choose DAW
- Part 4: Which One is the Best DAW
Part 1: What is DAW
DAW stands for Digital Audio Workstation . It is a dedicated software that’s designed to handle various tasks associated with music production, including instrument recording, audio editing, audio mixing, looping, etc.
While many people compare DAW to audio editors, that’s not true. Audio editors are only used to edit an audio file. A DAW, on the other hand, can be used to record different audio tracks and mix them to compile a full song.
Digital Audio Workstations are used by the most popular DJs and music producers in the world, mainly for composing hip-hop and EDM tracks. Today, the market is stacked with dozens of Digital Audio Workstations, ranging from novice to professional level.
And, these tools are available for Windows as well as Mac operating systems. It means that regardless of your PC’s operating system, you have the liberty to choose the right DAW from a wide variety of options.
Part 2: Types of DAW
Now that you know what a DAW is in music let’s take a look at how DAW software first came into the picture and why they ended up becoming a vital tool for every music producer.
In the earlier years, there wasn’t a dedicated software for compiling the entire track. Usually, four different types of tools were used to perform different operations on a single music track. These four programs included:
- Digital Audio Processor (Used to record, edit, and mix audio files)
- MIDI Sequencer (Used to Record, edit, and mix MIDI information)
- Music Notation Editor (Used to put different notes on the digital audio sheet)
- Virtual Instrument (Used to record sounds from different virtual instruments by decoding the MIDI information)
For any music composer, these four tools were essential to compile a single track. However, with time tech-giants decided to compile these four different programs into a unique software and name it DAW (Digital Audio Workstation).
As a result, DAW became a one-stop-solution to create, edit, mix, record different audio tracks without having to manage four different stand-alone tools. Over the years, several companies have released their DAW tools, boasting an extensive range of features to help creators compile a full audio track with minimal efforts.
Part 3: How to Choose DAW
Since there are too many options to choose from, it is most likely to get confusing while choosing the right DAW for composing music. So, here are a couple of golden rules that you should always remember while choosing a Digital Audio Workstation from such full availability.
- First of all, it’s imperative to understand that every DAW will do the same thing at the end, i.e., produce music tracks. What separates these tools from each other is their set of features and the workflow. While some of these tools have a straightforward workflow, others have a steep learning curve. So, it’s better to familiarize yourself with the workflow and features of different DAWs and then make the right decision accordingly.
- For beginners, ease of use will also be one of the significant factors while deciding what DAW software that’ll help them compose tracks without going through too much hassle is. If you’re a beginner, it’s better to choose a DAW that offers a user-friendly interface and a smooth workflow.
- If you’re not sure, it’s better to use the free demo to decide if a particular DAW will be suitable for your requirements or not.
Part 4: Which One is the Best DAW?
Again, deciding which is the best DAW will depend on your objectives. Anyhow, here are the top three Digital Audio Workstations that offers an easy-to-use interface and a hassle-free workflow.
Free DAW Software
If you’re a beginner, it’s better to choose a free DAW software and get familiar with the features and work process of composing music. While these free tools don’t have advanced features, they’re perfect for people who want to compose music for hobby or want to learn the basics first. Since free software won’t have clutter like an advanced DAW, it would become easier to implement different functions and compile a 3-minute long track.
Some of the best free DAW software include:
- Garageband
- Cakewalk by BandLab
- Cubase LE
- Ableton 9 Lite
- Pro Tools First
1. Logic Pro X
Logic Pro X is one of the most popular DAWs, designed by Apple, which is exclusively available for Mac. If you’re a Mac user, there’s nothing that comes closer to the features of Logic Pro X.
With this software, Apple has focused on boosting the idea of automation, and that’s why the tech giant has added hundreds of built-in plug-ins. You can add these plug-ins to your audio tracks and directly add different sound effects.
Moreover, Logic Pro X offers a seamless workflow, thanks to its intuitive design, which makes it extremely easy for the user to work with different modules at the same time.

2. Avid Pro Tools
Avid Pro Tools is one of the earliest commercialized DAWs in the market. However, even after a long life-span, the tool remains a popular choice, especially in the world of hip-hop. From Dr. Dre to Kanye West, many iconic music producers use Pro Tools to place their beats and compose heart-touching audio tracks.
If you’re looking to enter the professional world and want to give your songs a professional-touch, there’s nothing more suitable than Avid Pro Tools.
Conclusion
We hope that the above guide helped you understand what does DAW mean. Although it’s important to understand that music production isn’t a piece of cake. It takes dedication, hard work, and creativity to compose an iconic music track. Of course, having the best DAW software will ease-out the process of compiling the entire track. So, analyze your requirements and choose the most appropriate DAW accordingly.

Benjamin Arango
Benjamin Arango is a writer and a lover of all things video.
Follow @Benjamin Arango
Benjamin Arango
Mar 27, 2024• Proven solutions
If you’re just starting in the field of music production, you must have heard about DAW. Every YouTube tutorial on music production talks about choosing the right DAW software before everything else.
So, what does DAW mean, and more importantly, why do you need DAW for music production? If you’re also struggling to find answers to these questions, let us help. In this guide, we’re going to explain what DAW is and how it can help a music producer in his career.
- Part 1: What is DAW
- Part 2: Types of DAW
- Part 3: How to Choose DAW
- Part 4: Which One is the Best DAW
Part 1: What is DAW
DAW stands for Digital Audio Workstation . It is a dedicated software that’s designed to handle various tasks associated with music production, including instrument recording, audio editing, audio mixing, looping, etc.
While many people compare DAW to audio editors, that’s not true. Audio editors are only used to edit an audio file. A DAW, on the other hand, can be used to record different audio tracks and mix them to compile a full song.
Digital Audio Workstations are used by the most popular DJs and music producers in the world, mainly for composing hip-hop and EDM tracks. Today, the market is stacked with dozens of Digital Audio Workstations, ranging from novice to professional level.
And, these tools are available for Windows as well as Mac operating systems. It means that regardless of your PC’s operating system, you have the liberty to choose the right DAW from a wide variety of options.
Part 2: Types of DAW
Now that you know what a DAW is in music let’s take a look at how DAW software first came into the picture and why they ended up becoming a vital tool for every music producer.
In the earlier years, there wasn’t a dedicated software for compiling the entire track. Usually, four different types of tools were used to perform different operations on a single music track. These four programs included:
- Digital Audio Processor (Used to record, edit, and mix audio files)
- MIDI Sequencer (Used to Record, edit, and mix MIDI information)
- Music Notation Editor (Used to put different notes on the digital audio sheet)
- Virtual Instrument (Used to record sounds from different virtual instruments by decoding the MIDI information)
For any music composer, these four tools were essential to compile a single track. However, with time tech-giants decided to compile these four different programs into a unique software and name it DAW (Digital Audio Workstation).
As a result, DAW became a one-stop-solution to create, edit, mix, record different audio tracks without having to manage four different stand-alone tools. Over the years, several companies have released their DAW tools, boasting an extensive range of features to help creators compile a full audio track with minimal efforts.
Part 3: How to Choose DAW
Since there are too many options to choose from, it is most likely to get confusing while choosing the right DAW for composing music. So, here are a couple of golden rules that you should always remember while choosing a Digital Audio Workstation from such full availability.
- First of all, it’s imperative to understand that every DAW will do the same thing at the end, i.e., produce music tracks. What separates these tools from each other is their set of features and the workflow. While some of these tools have a straightforward workflow, others have a steep learning curve. So, it’s better to familiarize yourself with the workflow and features of different DAWs and then make the right decision accordingly.
- For beginners, ease of use will also be one of the significant factors while deciding what DAW software that’ll help them compose tracks without going through too much hassle is. If you’re a beginner, it’s better to choose a DAW that offers a user-friendly interface and a smooth workflow.
- If you’re not sure, it’s better to use the free demo to decide if a particular DAW will be suitable for your requirements or not.
Part 4: Which One is the Best DAW?
Again, deciding which is the best DAW will depend on your objectives. Anyhow, here are the top three Digital Audio Workstations that offers an easy-to-use interface and a hassle-free workflow.
Free DAW Software
If you’re a beginner, it’s better to choose a free DAW software and get familiar with the features and work process of composing music. While these free tools don’t have advanced features, they’re perfect for people who want to compose music for hobby or want to learn the basics first. Since free software won’t have clutter like an advanced DAW, it would become easier to implement different functions and compile a 3-minute long track.
Some of the best free DAW software include:
- Garageband
- Cakewalk by BandLab
- Cubase LE
- Ableton 9 Lite
- Pro Tools First
1. Logic Pro X
Logic Pro X is one of the most popular DAWs, designed by Apple, which is exclusively available for Mac. If you’re a Mac user, there’s nothing that comes closer to the features of Logic Pro X.
With this software, Apple has focused on boosting the idea of automation, and that’s why the tech giant has added hundreds of built-in plug-ins. You can add these plug-ins to your audio tracks and directly add different sound effects.
Moreover, Logic Pro X offers a seamless workflow, thanks to its intuitive design, which makes it extremely easy for the user to work with different modules at the same time.

2. Avid Pro Tools
Avid Pro Tools is one of the earliest commercialized DAWs in the market. However, even after a long life-span, the tool remains a popular choice, especially in the world of hip-hop. From Dr. Dre to Kanye West, many iconic music producers use Pro Tools to place their beats and compose heart-touching audio tracks.
If you’re looking to enter the professional world and want to give your songs a professional-touch, there’s nothing more suitable than Avid Pro Tools.
Conclusion
We hope that the above guide helped you understand what does DAW mean. Although it’s important to understand that music production isn’t a piece of cake. It takes dedication, hard work, and creativity to compose an iconic music track. Of course, having the best DAW software will ease-out the process of compiling the entire track. So, analyze your requirements and choose the most appropriate DAW accordingly.

Benjamin Arango
Benjamin Arango is a writer and a lover of all things video.
Follow @Benjamin Arango
Benjamin Arango
Mar 27, 2024• Proven solutions
If you’re just starting in the field of music production, you must have heard about DAW. Every YouTube tutorial on music production talks about choosing the right DAW software before everything else.
So, what does DAW mean, and more importantly, why do you need DAW for music production? If you’re also struggling to find answers to these questions, let us help. In this guide, we’re going to explain what DAW is and how it can help a music producer in his career.
- Part 1: What is DAW
- Part 2: Types of DAW
- Part 3: How to Choose DAW
- Part 4: Which One is the Best DAW
Part 1: What is DAW
DAW stands for Digital Audio Workstation . It is a dedicated software that’s designed to handle various tasks associated with music production, including instrument recording, audio editing, audio mixing, looping, etc.
While many people compare DAW to audio editors, that’s not true. Audio editors are only used to edit an audio file. A DAW, on the other hand, can be used to record different audio tracks and mix them to compile a full song.
Digital Audio Workstations are used by the most popular DJs and music producers in the world, mainly for composing hip-hop and EDM tracks. Today, the market is stacked with dozens of Digital Audio Workstations, ranging from novice to professional level.
And, these tools are available for Windows as well as Mac operating systems. It means that regardless of your PC’s operating system, you have the liberty to choose the right DAW from a wide variety of options.
Part 2: Types of DAW
Now that you know what a DAW is in music let’s take a look at how DAW software first came into the picture and why they ended up becoming a vital tool for every music producer.
In the earlier years, there wasn’t a dedicated software for compiling the entire track. Usually, four different types of tools were used to perform different operations on a single music track. These four programs included:
- Digital Audio Processor (Used to record, edit, and mix audio files)
- MIDI Sequencer (Used to Record, edit, and mix MIDI information)
- Music Notation Editor (Used to put different notes on the digital audio sheet)
- Virtual Instrument (Used to record sounds from different virtual instruments by decoding the MIDI information)
For any music composer, these four tools were essential to compile a single track. However, with time tech-giants decided to compile these four different programs into a unique software and name it DAW (Digital Audio Workstation).
As a result, DAW became a one-stop-solution to create, edit, mix, record different audio tracks without having to manage four different stand-alone tools. Over the years, several companies have released their DAW tools, boasting an extensive range of features to help creators compile a full audio track with minimal efforts.
Part 3: How to Choose DAW
Since there are too many options to choose from, it is most likely to get confusing while choosing the right DAW for composing music. So, here are a couple of golden rules that you should always remember while choosing a Digital Audio Workstation from such full availability.
- First of all, it’s imperative to understand that every DAW will do the same thing at the end, i.e., produce music tracks. What separates these tools from each other is their set of features and the workflow. While some of these tools have a straightforward workflow, others have a steep learning curve. So, it’s better to familiarize yourself with the workflow and features of different DAWs and then make the right decision accordingly.
- For beginners, ease of use will also be one of the significant factors while deciding what DAW software that’ll help them compose tracks without going through too much hassle is. If you’re a beginner, it’s better to choose a DAW that offers a user-friendly interface and a smooth workflow.
- If you’re not sure, it’s better to use the free demo to decide if a particular DAW will be suitable for your requirements or not.
Part 4: Which One is the Best DAW?
Again, deciding which is the best DAW will depend on your objectives. Anyhow, here are the top three Digital Audio Workstations that offers an easy-to-use interface and a hassle-free workflow.
Free DAW Software
If you’re a beginner, it’s better to choose a free DAW software and get familiar with the features and work process of composing music. While these free tools don’t have advanced features, they’re perfect for people who want to compose music for hobby or want to learn the basics first. Since free software won’t have clutter like an advanced DAW, it would become easier to implement different functions and compile a 3-minute long track.
Some of the best free DAW software include:
- Garageband
- Cakewalk by BandLab
- Cubase LE
- Ableton 9 Lite
- Pro Tools First
1. Logic Pro X
Logic Pro X is one of the most popular DAWs, designed by Apple, which is exclusively available for Mac. If you’re a Mac user, there’s nothing that comes closer to the features of Logic Pro X.
With this software, Apple has focused on boosting the idea of automation, and that’s why the tech giant has added hundreds of built-in plug-ins. You can add these plug-ins to your audio tracks and directly add different sound effects.
Moreover, Logic Pro X offers a seamless workflow, thanks to its intuitive design, which makes it extremely easy for the user to work with different modules at the same time.

2. Avid Pro Tools
Avid Pro Tools is one of the earliest commercialized DAWs in the market. However, even after a long life-span, the tool remains a popular choice, especially in the world of hip-hop. From Dr. Dre to Kanye West, many iconic music producers use Pro Tools to place their beats and compose heart-touching audio tracks.
If you’re looking to enter the professional world and want to give your songs a professional-touch, there’s nothing more suitable than Avid Pro Tools.
Conclusion
We hope that the above guide helped you understand what does DAW mean. Although it’s important to understand that music production isn’t a piece of cake. It takes dedication, hard work, and creativity to compose an iconic music track. Of course, having the best DAW software will ease-out the process of compiling the entire track. So, analyze your requirements and choose the most appropriate DAW accordingly.

Benjamin Arango
Benjamin Arango is a writer and a lover of all things video.
Follow @Benjamin Arango
Benjamin Arango
Mar 27, 2024• Proven solutions
If you’re just starting in the field of music production, you must have heard about DAW. Every YouTube tutorial on music production talks about choosing the right DAW software before everything else.
So, what does DAW mean, and more importantly, why do you need DAW for music production? If you’re also struggling to find answers to these questions, let us help. In this guide, we’re going to explain what DAW is and how it can help a music producer in his career.
- Part 1: What is DAW
- Part 2: Types of DAW
- Part 3: How to Choose DAW
- Part 4: Which One is the Best DAW
Part 1: What is DAW
DAW stands for Digital Audio Workstation . It is a dedicated software that’s designed to handle various tasks associated with music production, including instrument recording, audio editing, audio mixing, looping, etc.
While many people compare DAW to audio editors, that’s not true. Audio editors are only used to edit an audio file. A DAW, on the other hand, can be used to record different audio tracks and mix them to compile a full song.
Digital Audio Workstations are used by the most popular DJs and music producers in the world, mainly for composing hip-hop and EDM tracks. Today, the market is stacked with dozens of Digital Audio Workstations, ranging from novice to professional level.
And, these tools are available for Windows as well as Mac operating systems. It means that regardless of your PC’s operating system, you have the liberty to choose the right DAW from a wide variety of options.
Part 2: Types of DAW
Now that you know what a DAW is in music let’s take a look at how DAW software first came into the picture and why they ended up becoming a vital tool for every music producer.
In the earlier years, there wasn’t a dedicated software for compiling the entire track. Usually, four different types of tools were used to perform different operations on a single music track. These four programs included:
- Digital Audio Processor (Used to record, edit, and mix audio files)
- MIDI Sequencer (Used to Record, edit, and mix MIDI information)
- Music Notation Editor (Used to put different notes on the digital audio sheet)
- Virtual Instrument (Used to record sounds from different virtual instruments by decoding the MIDI information)
For any music composer, these four tools were essential to compile a single track. However, with time tech-giants decided to compile these four different programs into a unique software and name it DAW (Digital Audio Workstation).
As a result, DAW became a one-stop-solution to create, edit, mix, record different audio tracks without having to manage four different stand-alone tools. Over the years, several companies have released their DAW tools, boasting an extensive range of features to help creators compile a full audio track with minimal efforts.
Part 3: How to Choose DAW
Since there are too many options to choose from, it is most likely to get confusing while choosing the right DAW for composing music. So, here are a couple of golden rules that you should always remember while choosing a Digital Audio Workstation from such full availability.
- First of all, it’s imperative to understand that every DAW will do the same thing at the end, i.e., produce music tracks. What separates these tools from each other is their set of features and the workflow. While some of these tools have a straightforward workflow, others have a steep learning curve. So, it’s better to familiarize yourself with the workflow and features of different DAWs and then make the right decision accordingly.
- For beginners, ease of use will also be one of the significant factors while deciding what DAW software that’ll help them compose tracks without going through too much hassle is. If you’re a beginner, it’s better to choose a DAW that offers a user-friendly interface and a smooth workflow.
- If you’re not sure, it’s better to use the free demo to decide if a particular DAW will be suitable for your requirements or not.
Part 4: Which One is the Best DAW?
Again, deciding which is the best DAW will depend on your objectives. Anyhow, here are the top three Digital Audio Workstations that offers an easy-to-use interface and a hassle-free workflow.
Free DAW Software
If you’re a beginner, it’s better to choose a free DAW software and get familiar with the features and work process of composing music. While these free tools don’t have advanced features, they’re perfect for people who want to compose music for hobby or want to learn the basics first. Since free software won’t have clutter like an advanced DAW, it would become easier to implement different functions and compile a 3-minute long track.
Some of the best free DAW software include:
- Garageband
- Cakewalk by BandLab
- Cubase LE
- Ableton 9 Lite
- Pro Tools First
1. Logic Pro X
Logic Pro X is one of the most popular DAWs, designed by Apple, which is exclusively available for Mac. If you’re a Mac user, there’s nothing that comes closer to the features of Logic Pro X.
With this software, Apple has focused on boosting the idea of automation, and that’s why the tech giant has added hundreds of built-in plug-ins. You can add these plug-ins to your audio tracks and directly add different sound effects.
Moreover, Logic Pro X offers a seamless workflow, thanks to its intuitive design, which makes it extremely easy for the user to work with different modules at the same time.

2. Avid Pro Tools
Avid Pro Tools is one of the earliest commercialized DAWs in the market. However, even after a long life-span, the tool remains a popular choice, especially in the world of hip-hop. From Dr. Dre to Kanye West, many iconic music producers use Pro Tools to place their beats and compose heart-touching audio tracks.
If you’re looking to enter the professional world and want to give your songs a professional-touch, there’s nothing more suitable than Avid Pro Tools.
Conclusion
We hope that the above guide helped you understand what does DAW mean. Although it’s important to understand that music production isn’t a piece of cake. It takes dedication, hard work, and creativity to compose an iconic music track. Of course, having the best DAW software will ease-out the process of compiling the entire track. So, analyze your requirements and choose the most appropriate DAW accordingly.

Benjamin Arango
Benjamin Arango is a writer and a lover of all things video.
Follow @Benjamin Arango
Also read:
- Discover the Best 8 Rain Sound Archives for Free Download - A Complete List for 2024
- Updated Tailoring Voice Effects A Comprehensive Instruction for Audacity Users on Autotune Use
- Updated In 2024, Chorus Cutter Suite Construct Individualized Musical Backdrops
- New Top 3 Premier Audio Amplification Websites for MP3s for 2024
- 2024S Premier Voice Transformation Tools
- Updated In 2024, Navigating Through the Maze Choosing Top-Tier Audio Formats Explained
- Updated Locating High-Pitched Shattering Noises in Audio
- New 2024 Approved Ranking the Best 6 Apps to Transform Your Voice in Seconds
- New 2024 Approved Mastering the Calm Techniques for Dilating Tempo with Unchanged Frequency
- New Behind the Scenes A Detailed Guide to Setting Up and Recording with GarageBand
- In 2024, Elevate Your Films Soundtrack Top iMovie Audio Editing Secrets Revealed
- 2024 Approved Mastering the Visual Identity Crafting Compelling Podcast Covers
- 2024 Approved The Ultimate Guide to Disabling TikTok Sounds for Focused Viewing
- Updated Supercharge Your Windows PCs Sound Output with These Top 10 Volumetric Enhancers
- 2024 Approved Top 5 Free Audio Manipulation Tools Available on Windows Platform - Updated List
- New 2024 Approved Ultimate Source Locations for Obtaining Lofi Picture Collections and Songs
- Best Voice Over Generators
- 2024 Approved Online Anomalies Sound Bank - Legal, Free Access
- Updated The Art of Sound Alteration A Critical Review of Leading Instant Voice Transformation Software for 2024
- New In 2024, Comprehensive Guide to Nero WaveAudio Editor
- New 2024 Approved The Ultimate Guide 8 Premium Rain Impact Noises for Creative Projects
- The Essential Software Catalog for Isolating Audio From Videos As
- New Demystifying Clubhouse Understanding the Social Networks Foundation, Purpose, and Potential Impact for 2024
- 2024 Approved The Essential List 6 High-Performance Voice Alteration Apps
- Updated Removing Background Music and Sounds From New AVI Files for 2024
- Updated Crucial Elements When Choosing an Audio Editor for Apple Computers for 2024
- Updated 2024 Approved Compilation of the Best 8 Rain Styled Sounds for Digital Acquisition - Updated
- New Premier Percussive Pace Collaboration Software for Videos, 2023 Edition
- How To Transfer Data From Apple iPhone 12 Pro To Other iPhone 12 Pro Max devices? | Dr.fone
- New In 2024, Unlock Great Sound A Comprehensive Guide to FCP Audio Editing
- Remove Samsung Lock Screen without Password(Samsung Galaxy A54 5G)
- Complete Tutorial to Use VPNa to Fake GPS Location On Apple iPhone SE (2020) | Dr.fone
- Hassle-Free Ways to Remove FRP Lock from Realme C53 Phones with/without a PC
- How to Transfer Photos from Nokia G42 5G to Laptop Without USB | Dr.fone
- New Convert Image to Cartoon Style for 2024
- Simple Solutions to Fix Android SystemUI Has Stopped Error For Xiaomi 13 Ultra | Dr.fone
- How to Show Wi-Fi Password on Xiaomi Redmi A2+
- A Step-by-Step Guide on Using ADB and Fastboot to Remove FRP Lock on your Infinix Smart 8 Plus
- How to identify missing or malfunctioning your hardware drivers with Windows Device Manager in Windows 11 & 10 & 7
- Updated In 2024, Top 10 Online Tools to Resize Images Proportionally
- Updated In 2024, No-Cost Video Editing Top Online Solutions Ranked
- Ultimate Guide to Free PPTP VPN For Beginners On Samsung Galaxy S21 FE 5G (2023) | Dr.fone
- Title: Amplifying the Listener Experience Where to Obtain Professional Podcast Sound Effects
- Author: Paul
- Created at : 2024-06-26 12:39:32
- Updated at : 2024-06-27 12:39:32
- Link: https://voice-adjusting.techidaily.com/amplifying-the-listener-experience-where-to-obtain-professional-podcast-sound-effects/
- License: This work is licensed under CC BY-NC-SA 4.0.


