
:max_bytes(150000):strip_icc():format(webp)/best-time-of-day-to-instagram-3485858-1-5bb3cc9046e0fb002612537d.jpg)
2024 Approved The Comprehensive Guide to WaveEdit Pro
The Comprehensive Guide to WaveEdit Pro [2024 Edition]
There are a lot of audio editors that you can use. The levels of expertise required for using different editing software are different; where, expertise level changes with experience and time. There are a lot of powerful audio editors, but they are difficult to use. With being difficult to use, they are not free and require the user to purchase them.
Have you ever used a simple yet powerful audio editor? Let us introduce you to Nero WaveEditor. It is the most useful free software that you might find. Start reading ahead for more useful information!
In this article
01 Introduction about Nero WaveEditor
02 Key Features of Nero WaveEditor
03 Pros and Cons of Nero WaveEditor
04 How to Use Nero WaveEditor?
05 Alternatives for Nero WaveEditor
Part 1. Introduction about Nero WaveEditor
Nero WaveEditor is a simple and powerful editor that anyone can use. It can edit pre-recorded audios along with recording new audios. Nero WaveEditor is capable of editing all major audio editing formats. You can use it to apply filters and optimize sounds. It can also apply effects and save the file. The on-set saving option makes it non-destructive and can be edited freely without making detrimental changes.

Nero WaveEditor is available for use in multiple languages, including German, Dutch, and French. It has a file size of 170MB. You get multiple audio editing options that provide full user control of the audio that is being edited.
Part 2. Key Features of Nero WaveEditor
For quick and easy editing and recording of audio files, Nero WaveEditor is a great option. This editor has simple yet very effective tools for manipulating audio files. It is free to use and works perfectly with different audio file formats. Some other key features of Nero WaveEditor are discussed below:
· View Options
No other audio editor offers this many view options as you get from Nero WaveEditor. From the top toolbar, you have to access the ‘View’ tab, where you will find different options. For instance, you’ll have access to the Wave display, Spectrogram display, and also Wavelet display.
· Tools
Do you have any idea about the different tools Nero WaveEditor offers? This editor has some very powerful editing tools, like Stereo Processor, Noise Gate, Equalizer, Pitch Tuning, and so much more. Access the ‘Tools’ tab to use these tools.
· Editing Options
Nero WaveEditor not only offers advanced editing tools but also provides some general editing options. For instance, you can Cut, Delete, Crop, Copy, etc. Options like Convert Sample Format, Reverse, and Insert Track Split are also offered.
· Enhancement Features
Is editing enough to enhance your audio? Try Enhancement features from Nero WaveEditor to completely transform your audio file. You get options like Noise Analysis, Noise Reduction, etc.
Part 3. Pros and Cons of Nero WaveEditor
Nero WaveEditor has some impressive features that instantly attract users. This editor is great for quick audio editing. To learn more about it, read the following section as we are about to share the benefits and drawbacks of Nero WaveEditor.
Benefits
- No matter where you belong, Nero WaveEditoris still usable as it supports different languages like Danish, Greek, Czech, Spanish, Russian, and others.
- A great thing about this wave editor is its support for plugins. For example, Nero supports VST and DirectX.
- Nero WaveEditor is not just an audio editor; it’s also an audio recorder. You can either import media files from your device or else record them on the spot.
- What else is great about Nero WaveEditor? This editor provides non-destructive editing. Nero offers full Preview and Undo features.
Drawbacks
- The main drawback of Nero WaveEditoris its interface. The offered interface is very outdated. The design and UI are not updated according to the latest Windows version.
Part 4. How to Use Nero WaveEditor?
Have you ever used Nero WaveEditor before? Or heard about it? If none is your case, this section will provide great help to you. We are about to share Nero WaveEditor’s step-by-step guideline with you for better working and understanding. Let’s begin!
Step 1: After installing the editor, launch it. Head to the ‘File’ tab and select the ‘Open’ option to import audio files from your respective device. Or else, you can also select the option to ‘Record’ from the toolbar.

Step 2: Start editing by firstly moving to the ‘Edit’ tab. There, you will find different editing options like; Cut, Crop, Copy, Delete, Reverse, and others.

Step 3: In case you are interested in using the Fade In and Fade Out features, head to the ‘Volume’ section. Not just this, you also get other options, for instance, Normalize, Volume change, and Mute.

Step 4: Who doesn’t add effects while editing? Try the amazing effects offered by Nero WaveEditor from the ‘Effects’ tab. You can select from the provided options like Distortion, Loudness, Reverb, Delay, and others.

Step 5: For enhancing your audio file, head to the ‘Enhancements’ section to use the offered options. For example, get your hands-on features like Noise Reduction, Noise Analysis, etc.

Step 6: Once everything is done, save the edited audio file to your device. For this, move to the ‘File’ tab and select the ‘Save As’ an option to save the file in your desired file format.

Part 5. Alternatives for Nero WaveEditor
People might not be able to use Nero WaveEditor as beginners. You can use other software to learn audio editing. We are suggesting two alternative editors to Nero WaveEditor so that you can use the following discussed alternatively for editing purposes.
Wave Editor
Wave Editor is a fast and easy-to-use editing software that is a great alternative for Nero WaveEditor download. This editor is powerful and best for those who are trying to learn audio editing. Wave Editor allows a maximum file size of 2GB. It has a simple user interface that boosts your speed and accuracy while using the editor.
What is its compatibility? Wave Editor is compatible with Windows. Moreover, it allows the user to use multiple audio formats, including MP3, WAV, and WMA, along with many more. Wave Editor can do basic editing along with amplifying audios to their maximum limit.

Audacity
Audacity is recording software along with audio editing software. It can do basic editing like cut, copy, paste, and delete, along with merging different audios. What else is great about Audacity? You can use the editor entirely through the keyboard with a large number of shortcuts. Audacity is widely used as exchange software against Nero WaveEditor.
Audacity supports plug-ins; you can either modify plug-ins or even write your own plug-ins. Audacity is free and open-source software with easy editing and multi-track audio editing. What about its compatibility? Audacity is compatible with Windows, Mac, and also Linux.

Final Thoughts
Nero WaveEditor is a free editor and very easy to use. For speedy editing, this is an ideal tool. This article talked about its features, advantages and we also shared a step-by-step guideline for your help. Moving on, are you interested in learning about another audio editor? We are talking about Wondershare Filmora Audio Editor , a platform with endless options.
This editing software is easily downloaded, and you don’t need any technical skills to use it. Its simple yet intuitive interface provides various tabs like Effects, Elements, etc. You can get different sound effects from Filmora. Furthermore, some of its advanced audio editing tools are Audio Equalizer, Audio Ducking, Add Voiceovers, Detach Audio from Video, and so many other options.
Wondershare Filmora
Get started easily with Filmora’s powerful performance, intuitive interface, and countless effects!
Try It Free Try It Free Try It Free Learn More >

02 Key Features of Nero WaveEditor
03 Pros and Cons of Nero WaveEditor
04 How to Use Nero WaveEditor?
05 Alternatives for Nero WaveEditor
Part 1. Introduction about Nero WaveEditor
Nero WaveEditor is a simple and powerful editor that anyone can use. It can edit pre-recorded audios along with recording new audios. Nero WaveEditor is capable of editing all major audio editing formats. You can use it to apply filters and optimize sounds. It can also apply effects and save the file. The on-set saving option makes it non-destructive and can be edited freely without making detrimental changes.
Nero WaveEditor is available for use in multiple languages, including German, Dutch, and French. It has a file size of 170MB. You get multiple audio editing options that provide full user control of the audio that is being edited.
Part 2. Key Features of Nero WaveEditor
For quick and easy editing and recording of audio files, Nero WaveEditor is a great option. This editor has simple yet very effective tools for manipulating audio files. It is free to use and works perfectly with different audio file formats. Some other key features of Nero WaveEditor are discussed below:
· View Options
No other audio editor offers this many view options as you get from Nero WaveEditor. From the top toolbar, you have to access the ‘View’ tab, where you will find different options. For instance, you’ll have access to the Wave display, Spectrogram display, and also Wavelet display.
· Tools
Do you have any idea about the different tools Nero WaveEditor offers? This editor has some very powerful editing tools, like Stereo Processor, Noise Gate, Equalizer, Pitch Tuning, and so much more. Access the ‘Tools’ tab to use these tools.
· Editing Options
Nero WaveEditor not only offers advanced editing tools but also provides some general editing options. For instance, you can Cut, Delete, Crop, Copy, etc. Options like Convert Sample Format, Reverse, and Insert Track Split are also offered.
· Enhancement Features
Is editing enough to enhance your audio? Try Enhancement features from Nero WaveEditor to completely transform your audio file. You get options like Noise Analysis, Noise Reduction, etc.
Part 3. Pros and Cons of Nero WaveEditor
Nero WaveEditor has some impressive features that instantly attract users. This editor is great for quick audio editing. To learn more about it, read the following section as we are about to share the benefits and drawbacks of Nero WaveEditor.
Benefits
- No matter where you belong, Nero WaveEditoris still usable as it supports different languages like Danish, Greek, Czech, Spanish, Russian, and others.
- A great thing about this wave editor is its support for plugins. For example, Nero supports VST and DirectX.
- Nero WaveEditor is not just an audio editor; it’s also an audio recorder. You can either import media files from your device or else record them on the spot.
- What else is great about Nero WaveEditor? This editor provides non-destructive editing. Nero offers full Preview and Undo features.
Drawbacks
- The main drawback of Nero WaveEditoris its interface. The offered interface is very outdated. The design and UI are not updated according to the latest Windows version.
Part 4. How to Use Nero WaveEditor?
Have you ever used Nero WaveEditor before? Or heard about it? If none is your case, this section will provide great help to you. We are about to share Nero WaveEditor’s step-by-step guideline with you for better working and understanding. Let’s begin!
Step 1: After installing the editor, launch it. Head to the ‘File’ tab and select the ‘Open’ option to import audio files from your respective device. Or else, you can also select the option to ‘Record’ from the toolbar.
Step 2: Start editing by firstly moving to the ‘Edit’ tab. There, you will find different editing options like; Cut, Crop, Copy, Delete, Reverse, and others.
Step 3: In case you are interested in using the Fade In and Fade Out features, head to the ‘Volume’ section. Not just this, you also get other options, for instance, Normalize, Volume change, and Mute.
Step 4: Who doesn’t add effects while editing? Try the amazing effects offered by Nero WaveEditor from the ‘Effects’ tab. You can select from the provided options like Distortion, Loudness, Reverb, Delay, and others.
Step 5: For enhancing your audio file, head to the ‘Enhancements’ section to use the offered options. For example, get your hands-on features like Noise Reduction, Noise Analysis, etc.
Step 6: Once everything is done, save the edited audio file to your device. For this, move to the ‘File’ tab and select the ‘Save As’ an option to save the file in your desired file format.
Part 5. Alternatives for Nero WaveEditor
People might not be able to use Nero WaveEditor as beginners. You can use other software to learn audio editing. We are suggesting two alternative editors to Nero WaveEditor so that you can use the following discussed alternatively for editing purposes.
Wave Editor
Wave Editor is a fast and easy-to-use editing software that is a great alternative for Nero WaveEditor download. This editor is powerful and best for those who are trying to learn audio editing. Wave Editor allows a maximum file size of 2GB. It has a simple user interface that boosts your speed and accuracy while using the editor.
What is its compatibility? Wave Editor is compatible with Windows. Moreover, it allows the user to use multiple audio formats, including MP3, WAV, and WMA, along with many more. Wave Editor can do basic editing along with amplifying audios to their maximum limit.
Audacity
Audacity is recording software along with audio editing software. It can do basic editing like cut, copy, paste, and delete, along with merging different audios. What else is great about Audacity? You can use the editor entirely through the keyboard with a large number of shortcuts. Audacity is widely used as exchange software against Nero WaveEditor.
Audacity supports plug-ins; you can either modify plug-ins or even write your own plug-ins. Audacity is free and open-source software with easy editing and multi-track audio editing. What about its compatibility? Audacity is compatible with Windows, Mac, and also Linux.
Final Thoughts
Nero WaveEditor is a free editor and very easy to use. For speedy editing, this is an ideal tool. This article talked about its features, advantages and we also shared a step-by-step guideline for your help. Moving on, are you interested in learning about another audio editor? We are talking about Wondershare Filmora Audio Editor , a platform with endless options.
This editing software is easily downloaded, and you don’t need any technical skills to use it. Its simple yet intuitive interface provides various tabs like Effects, Elements, etc. You can get different sound effects from Filmora. Furthermore, some of its advanced audio editing tools are Audio Equalizer, Audio Ducking, Add Voiceovers, Detach Audio from Video, and so many other options.
Wondershare Filmora
Get started easily with Filmora’s powerful performance, intuitive interface, and countless effects!
Try It Free Try It Free Try It Free Learn More >
“Demystifying Reaper’s Audio World: A Comprehensive Review of Its Tools and Tutorials”
DAW stands for Digital Audio Workstation. It is where you can record, edit, mix or even master your music. You always need good DAW software to help you with the job to produce music or live recording musicians.
A good DAW software must have a multi-track audio recording , virtual instruments, MIDI sequencer, excellent mixing capabilities, and plug-in processor hosting. The software is found for all major operating systems such as Linux , Windows, and Mac. If you want to learn more about DAW, then stay with us. The article will discuss in detail REAPER Recording Software.
In this article
01 What Is REAPER Recording Software?
02 How to Download and Install REAPER Software?
03 Tutorial for Using REAPER Recording Software
Part 1. What Is REAPER Recording Software?
Recording software like REAPER records computer audio is used to produce music, edit it, transform, and customize your music. With REAPER Recording Software , you can record multi-layer audio and MIDI in various formats. REAPER has the easiest interface that allows you to drag and drop to import, split, move and do many other tasks.

This is just one feature of REAPER that sounds very interesting. In this section, we will talk about more of its features.
1. Record and Edit
You can easily record the audio and (MIDI) Musical Instrumental Digital Interface with REAPER recording software. It lets you edit and customize everything. You can record and edit things limitlessly. When it comes to recording, it’s not at all difficult for REAPER software to record various instruments or vocals.
2. Mixing
Initially, the mixer might seem inflexible, but in reality, REAPER has a lot to offer you. It has great automated capabilities for instrument and effect parameters. It doesn’t matter if you are working because you can still bounce or freeze tracks while working.
The mixer is very flexible. With REAPERs mixer, you just have to drag and drop your recordings so that you can create tracks, and also, you can customize the arrangements by moving the portions.
3. Interface
While looking at the interface, you might question yourself about how to use its interface. Some people love to learn about new things, such as the REAPER Recording Software. Whereas, some people seem least interested because the half-empty interface is not intuitive to them.
Whereas, the best thing about its interface is that you can customize it. REAPER allows you to add different wallpapers and layouts to your software interface.
4. Strong Stability
REAPER Recording Software has very strong stability. This is one of its strongest features as compared to other competitors. The RAM is rarely affected by the load time and the used resources. Moreover, the software offers a wide range of languages. You can select your desired language to run the software.
Part 2. How to Download and Install REAPER Software?
REAPER is a Digital Audio Workstation. The perfect platform where you can manipulate and transform your audio. With REAPER Record Computer audio, you can work efficiently in a resource-friendly studio with saving your time. Stay tuned if you plan to learn more about its pricing and requirements.

Pricing of REAPER Software
A reaper is a brilliant software. It has a 60-day trial period. REAPER costs $60 in total to register. It has complete MIDI sequencing. You can also get a discounted license if REAPER is the best private option for you or has commercial usage. You can set the equal license key on every computer for someone with multiple computers.
System Requirements
The recording software has uncountable features. REAPER software facilitates its users at every level by giving the best audio manipulating platform. The best thing about REAPER Recording Software is its compatibility with different operating systems. Let us add more to your knowledge on this.
Windows
REAPER software is available for Windows 7, 8, 10, XP, and Vista. The version of REAPER for Windows is 6.42. This is for Windows 64-bit whereas, a download package is also available for Windows 32-bit.
macOS
For macOS 64-bit, REAPER has a 6.42 version. This version is compatible with macOS 10.5 – 10.14. Whereas, for macOS 10.15+, the available version of REAPER is 6.42 with a 15MB file size.
Linux
REAPER Recording Software is also compatible with Linux x86_64. The REAPER version is 6.42 with an 11 MB file size. This version can also work on AMD64 64-bit.
Downloading and Installing REAPER
Now that REAPER Record Computer Audio has impressed you a lot. You must be thinking about how to download it. If this is on your mind, then we got you. Allow us to share its steps that will guide you to download the software easily.
Step 1: To install REAPER software, first of all, visit its official website. Then locate and head over to its download section.
Step 2: Click on ‘Download REAPER from the download section.’ For Windows users, they can download the Windows installation package. At the same time, Linux and macOS users can select their installation packages.
Step 3: Lastly, after you have downloaded your systems compatible installation package, you simply have to run it and then install it according to your respective operating system.
Part 3. Tutorial for Using REAPER Recording Software
After its attractive features and detailed downloading procedure, it is finally the time to talk about its works. This section of the article will explain to you more about REAPER Recording Software as we are now going to present a tutorial on how to use the software.
Understand the Layout
Understanding and knowing the layout of your software before you start working on it is essential. The crucial components of REAPER software include the Timeline, Arrangement Window, Track Panel, Toolbar, and lastly, Transport.

The Arrangement window holds all the added items. The items are played from left to right order, similar to their timeline arrangement. You can also zoom in and out. Then comes the transport toolbar, which holds the functions to stop, rewind, play, fast forward, adjust the timeline speed, etc. The toolbar holds all the toggle buttons. You can also customize your toolbar.
New Track Creation
For creating a new track on REAPER, go to the Track menu and hit Insert New Track. A track is like another layer to your audio. Multiple layers and tracks make your work complex yet interesting as you can play all the different tracks at the same time. By double-clicking in the Track Control Panel, you can set a name for the added track.

Audio Hardware Settings for Audio Recording
It is best suggested always to check your audio hardware settings before you start to record, edit or mix with REAPER Recording Software. Your primary focus should be on the recording device’s devices should be set as Input Device, whereas the listening device should be set as the Output Device.
For this, you have to select Preferences from the Options menu. A window will appear in front of you, the REAPER Preference window. You have to select the correct Input and Output devices from the dropdown menu from this window.

Arm your Track
Arming your track is very important. For this, head over to the Track Control Panel, and next to your track name, hit the red circle. If you have various tracks, you should solo this track and mute the other tracks.
As soon as the track is armed, a Gain Meter will activate on the side. From this, you can check if you have properly set the microphone or not. This could be tested by tapping on the microphone.

Record
After all, the hardware settings are done, and your track is armed, it’s time to start the recording. For that, just tap on the Record button in the Transport toolbar. A yellow line in the timeline will indicate the end of the recording.

To end the recording, tap on the Stop button from the Transport Toolbar. Lastly, REAPER Recording Software will ask you to save the file. In case you don’t want it, you can also delete it.
Create and Manipulate Clips
Things like manipulation get a lot easier if you split the clips in REAPER. From the items menu, you have to select the option of Split Item on Cursor. This divides your clip into two clips on each side of the cursor. You can also remove the clips by going to the Items Menu. From there, you just have to hit the Remove Item option, or else, simply press the Delete key on your keyboard.

Removing clips will create a gap in the arrangement window that can be filled by dragging forward the remaining clip.
Volume Adjustments – Normalize
By double-clicking on the item or by selecting ‘Item Properties’ from a right-click, you can normalize the item. A new window will appear as Media Item Properties, from where you have to locate the Volume Settings and then select the option of Normalize.
If your item is already loud, then nothing will happen, but if it is not, then the slider will change from 0.00 dB showing an increase in the volume. Lastly, hit the ‘Apply’ or ‘OK’ button to imply the changes.
Fade in/out
With the Media Properties, you can also adjust a Fade in and a Fade out. For this, you simply have to set an end time for the Fade in, whereas a start time is entered for Fade out. Hit the ‘Ok’ or ‘Apply’ button to apply the changes.
From the Arrangement window, fades can be adjusted. For adjusting the fades, hover with your mouse over the red line. You will see a newly shaped cursor. Just drag on the timeline to play and adjust the Fade with this new cursor.

Automate Changes
With REAPER, you can also automate changes in track parameters. We will guide about automation from Track Envelopes. From Track Control Panel, hit the Trim option. A new Envelopes window will open at this point from where you have to check the Volume box.
A new Volume Track will open up. Here, you have to set new Envelope points. That could be done by holding the shift key, right-clicking on the point, and then selecting Create New Point. A green circle will indicate the new point.
By dragging the Envelope point, you can also adjust the volume. Dragging it towards the top will increase the volume, whereas dragging it towards the bottom will eventually decrease.

Finalize the Audio – Render
After all the above steps have been completed to set the order and adjust your desired volume, the last step comes to render your project file. For that, move to the File menu and select the ‘Render’ option. A window will be opened as ‘Render to File.’ Now, from the dropdown menu, select your desired Output Format.
Lastly, hit the Render 1 File button, and then REAPER will export your project. You can immediately listen to it by selecting the ‘Launch File’ option.

Concluding Thoughts
This article is everything you need to learn about REAPER Recording Software. The article that started from an introduction on DAW took you on a roller coaster ride. Everything about REAPER software has been shared.
We hope that this article helps you in all possible ways. The attractive features impress you, and its pricing and system specifications increase your knowledge. Along with that, the shared tutorial will guide you thoroughly on how to use it.
02 How to Download and Install REAPER Software?
03 Tutorial for Using REAPER Recording Software
Part 1. What Is REAPER Recording Software?
Recording software like REAPER records computer audio is used to produce music, edit it, transform, and customize your music. With REAPER Recording Software , you can record multi-layer audio and MIDI in various formats. REAPER has the easiest interface that allows you to drag and drop to import, split, move and do many other tasks.
This is just one feature of REAPER that sounds very interesting. In this section, we will talk about more of its features.
1. Record and Edit
You can easily record the audio and (MIDI) Musical Instrumental Digital Interface with REAPER recording software. It lets you edit and customize everything. You can record and edit things limitlessly. When it comes to recording, it’s not at all difficult for REAPER software to record various instruments or vocals.
2. Mixing
Initially, the mixer might seem inflexible, but in reality, REAPER has a lot to offer you. It has great automated capabilities for instrument and effect parameters. It doesn’t matter if you are working because you can still bounce or freeze tracks while working.
The mixer is very flexible. With REAPERs mixer, you just have to drag and drop your recordings so that you can create tracks, and also, you can customize the arrangements by moving the portions.
3. Interface
While looking at the interface, you might question yourself about how to use its interface. Some people love to learn about new things, such as the REAPER Recording Software. Whereas, some people seem least interested because the half-empty interface is not intuitive to them.
Whereas, the best thing about its interface is that you can customize it. REAPER allows you to add different wallpapers and layouts to your software interface.
4. Strong Stability
REAPER Recording Software has very strong stability. This is one of its strongest features as compared to other competitors. The RAM is rarely affected by the load time and the used resources. Moreover, the software offers a wide range of languages. You can select your desired language to run the software.
Part 2. How to Download and Install REAPER Software?
REAPER is a Digital Audio Workstation. The perfect platform where you can manipulate and transform your audio. With REAPER Record Computer audio, you can work efficiently in a resource-friendly studio with saving your time. Stay tuned if you plan to learn more about its pricing and requirements.
Pricing of REAPER Software
A reaper is a brilliant software. It has a 60-day trial period. REAPER costs $60 in total to register. It has complete MIDI sequencing. You can also get a discounted license if REAPER is the best private option for you or has commercial usage. You can set the equal license key on every computer for someone with multiple computers.
System Requirements
The recording software has uncountable features. REAPER software facilitates its users at every level by giving the best audio manipulating platform. The best thing about REAPER Recording Software is its compatibility with different operating systems. Let us add more to your knowledge on this.
Windows
REAPER software is available for Windows 7, 8, 10, XP, and Vista. The version of REAPER for Windows is 6.42. This is for Windows 64-bit whereas, a download package is also available for Windows 32-bit.
macOS
For macOS 64-bit, REAPER has a 6.42 version. This version is compatible with macOS 10.5 – 10.14. Whereas, for macOS 10.15+, the available version of REAPER is 6.42 with a 15MB file size.
Linux
REAPER Recording Software is also compatible with Linux x86_64. The REAPER version is 6.42 with an 11 MB file size. This version can also work on AMD64 64-bit.
Downloading and Installing REAPER
Now that REAPER Record Computer Audio has impressed you a lot. You must be thinking about how to download it. If this is on your mind, then we got you. Allow us to share its steps that will guide you to download the software easily.
Step 1: To install REAPER software, first of all, visit its official website. Then locate and head over to its download section.
Step 2: Click on ‘Download REAPER from the download section.’ For Windows users, they can download the Windows installation package. At the same time, Linux and macOS users can select their installation packages.
Step 3: Lastly, after you have downloaded your systems compatible installation package, you simply have to run it and then install it according to your respective operating system.
Part 3. Tutorial for Using REAPER Recording Software
After its attractive features and detailed downloading procedure, it is finally the time to talk about its works. This section of the article will explain to you more about REAPER Recording Software as we are now going to present a tutorial on how to use the software.
Understand the Layout
Understanding and knowing the layout of your software before you start working on it is essential. The crucial components of REAPER software include the Timeline, Arrangement Window, Track Panel, Toolbar, and lastly, Transport.
The Arrangement window holds all the added items. The items are played from left to right order, similar to their timeline arrangement. You can also zoom in and out. Then comes the transport toolbar, which holds the functions to stop, rewind, play, fast forward, adjust the timeline speed, etc. The toolbar holds all the toggle buttons. You can also customize your toolbar.
New Track Creation
For creating a new track on REAPER, go to the Track menu and hit Insert New Track. A track is like another layer to your audio. Multiple layers and tracks make your work complex yet interesting as you can play all the different tracks at the same time. By double-clicking in the Track Control Panel, you can set a name for the added track.
Audio Hardware Settings for Audio Recording
It is best suggested always to check your audio hardware settings before you start to record, edit or mix with REAPER Recording Software. Your primary focus should be on the recording device’s devices should be set as Input Device, whereas the listening device should be set as the Output Device.
For this, you have to select Preferences from the Options menu. A window will appear in front of you, the REAPER Preference window. You have to select the correct Input and Output devices from the dropdown menu from this window.
Arm your Track
Arming your track is very important. For this, head over to the Track Control Panel, and next to your track name, hit the red circle. If you have various tracks, you should solo this track and mute the other tracks.
As soon as the track is armed, a Gain Meter will activate on the side. From this, you can check if you have properly set the microphone or not. This could be tested by tapping on the microphone.
Record
After all, the hardware settings are done, and your track is armed, it’s time to start the recording. For that, just tap on the Record button in the Transport toolbar. A yellow line in the timeline will indicate the end of the recording.
To end the recording, tap on the Stop button from the Transport Toolbar. Lastly, REAPER Recording Software will ask you to save the file. In case you don’t want it, you can also delete it.
Create and Manipulate Clips
Things like manipulation get a lot easier if you split the clips in REAPER. From the items menu, you have to select the option of Split Item on Cursor. This divides your clip into two clips on each side of the cursor. You can also remove the clips by going to the Items Menu. From there, you just have to hit the Remove Item option, or else, simply press the Delete key on your keyboard.
Removing clips will create a gap in the arrangement window that can be filled by dragging forward the remaining clip.
Volume Adjustments – Normalize
By double-clicking on the item or by selecting ‘Item Properties’ from a right-click, you can normalize the item. A new window will appear as Media Item Properties, from where you have to locate the Volume Settings and then select the option of Normalize.
If your item is already loud, then nothing will happen, but if it is not, then the slider will change from 0.00 dB showing an increase in the volume. Lastly, hit the ‘Apply’ or ‘OK’ button to imply the changes.
Fade in/out
With the Media Properties, you can also adjust a Fade in and a Fade out. For this, you simply have to set an end time for the Fade in, whereas a start time is entered for Fade out. Hit the ‘Ok’ or ‘Apply’ button to apply the changes.
From the Arrangement window, fades can be adjusted. For adjusting the fades, hover with your mouse over the red line. You will see a newly shaped cursor. Just drag on the timeline to play and adjust the Fade with this new cursor.
Automate Changes
With REAPER, you can also automate changes in track parameters. We will guide about automation from Track Envelopes. From Track Control Panel, hit the Trim option. A new Envelopes window will open at this point from where you have to check the Volume box.
A new Volume Track will open up. Here, you have to set new Envelope points. That could be done by holding the shift key, right-clicking on the point, and then selecting Create New Point. A green circle will indicate the new point.
By dragging the Envelope point, you can also adjust the volume. Dragging it towards the top will increase the volume, whereas dragging it towards the bottom will eventually decrease.
Finalize the Audio – Render
After all the above steps have been completed to set the order and adjust your desired volume, the last step comes to render your project file. For that, move to the File menu and select the ‘Render’ option. A window will be opened as ‘Render to File.’ Now, from the dropdown menu, select your desired Output Format.
Lastly, hit the Render 1 File button, and then REAPER will export your project. You can immediately listen to it by selecting the ‘Launch File’ option.
Concluding Thoughts
This article is everything you need to learn about REAPER Recording Software. The article that started from an introduction on DAW took you on a roller coaster ride. Everything about REAPER software has been shared.
We hope that this article helps you in all possible ways. The attractive features impress you, and its pricing and system specifications increase your knowledge. Along with that, the shared tutorial will guide you thoroughly on how to use it.
Top 11 No-Cost Audio Transformation Apps for iOS Devices
Best Voice Changer Apps for iPhone and Android

Benjamin Arango
Mar 27, 2024• Proven solutions
Have you ever wondered what your voice would sound like if you were a cartoon character, a robot, or an older version of yourself? Changing how your voice sounds has never been easier, regardless of the Smartphone model you have, since voice changer apps can be used on both iPhone and Android devices.
Even though there is nothing wrong with modulating your voice to have fun with your friends, using voice changer apps to pull malicious pranks or bully strangers online is far from acceptable. Read on if you would like to find out more about the best voice changer apps for iPhone and Android devices and discover the one you enjoy using the most.
Best Voice Changer Apps for iPhone and Android
Creating a new ringtone, making a voice recording, or having fun with your friends are only a few reasons why so many people choose to try out voice changer apps. The vast majority of these apps feature well-equipped audio effects libraries that enable users to have fun with their friends and hear how they would sound if they were drunk or after inhaling helium. So, let’s take a look at some of the best voice changer apps on the market.


Changing video voice on Windows and Mac with Wondershare Filmora
Do you want to change the voice in video on Windows and Mac and don’t know which software can meet this requirement? Try Filmra video editor , which provides several ways to change voice over, such as changing the voice speed or changing the pitch. Download the trial version below and find out more possibility in video creation with Filmora.
1. Celebrity Voice Changer – Face
Price: Free, but offers in-app purchases
Compatibility: iOS 9.0 or later
User Rating: 4.0
In case you would like to sound like your favorite movie star of TV host, then Celebrity Voice Changer is one of the best choices you can make. Besides the standard set of options, the app also lets you request new voices since its machine learning technology can mimic virtually anyone’s voice. However, Celebrity Voice Changer is currently only available in English and it cannot modulate speech in other languages. In addition, you must make an in-app purchase in order to gain access to all of the app’s features or unlock the unlimited usage of the app.
Pros
- Automatic voice modulation
- Huge selection of voice filters
- The app generates video files that are better adjusted to the audience on social media than audio files
- Excellent impressions of celebrities
Cons
- Unreasonably expensive
- The app’s Deep Learning technology still has a lot of room for improvement
2. Snapchat
Price: Free, but offers in-app purchases
Compatibility: iOS 10.0 or later, Android 4.4 or up
User Rating: 3.8
With more than 203 million daily users, Snapchat is one of the largest messaging platforms on the market. Previously, we’ve shared how to change gender on Snapchat , beside that, the app lets its users capture short moments or the so-called Snaps and share them with friends. In addition to hundreds of video filters , Snapchat also features a broad spectrum of voice changing effects that make Snaps more entertaining. Even so, the audio recording options Snapchat offers are far from ideal, because the app doesn’t allow you to edit the files you create with it. Using Snapchat will drain your battery quickly, which is why you must pay attention to how frequently you use this app.
Pros
- The easy voice modulation process
- Excellent messaging options
- Grants you access to a large community of likeminded people
- Lenses and filters are updated on a daily basis
Cons
- Editing voice changes after you create a Snap is not possible
- Snapchat is not primarily a voice changer app
Check the detailed information about How to Change Voice on Snapchat with 2 Easy Methods >>
3. Voice Changer
Price: Free
Compatibility: Android 4.1 and up
User Rating: 4.3

Changing your voice with this app won’t take more than a few moments of your time. You just have to launch the app and hit the microphone button to record a message or a joke you would like to modulate. Once you’re happy with the audio recording you made, you can proceed to choose from more than twenty voice effects that will make you sound like a dwarf, a robot, or an alien. The app’s file-sharing capabilities enable you to post your audio recordings to any social media platform of your choosing or store your files and use them as many times as you want.
Pros
- Entertaining and easy to use
- The simple three-step voice modulation process
- Good selection of voice filters
- Excellent file sharing options
Cons
- The app displays ads
- No audio editing tools
4. Voicy: Celebrity Voice Changer
**Price:**Free, but offers in-app purchases
Compatibility: iOS 10 or later
User Rating: 4.3

Impersonating your favorite celebrity can be a fun way to prank your friends on social media. Voicy features a broad selection of celebrity voice impersonations you can use to make you sound like a famous actress or TV personality. The app utilizes a machine learning technology that can generate more than forty avatars and allows the users to experiment with different voice effects. The free version of the app offers only limited capabilities, so if you want to gain access to all of the Voicy’s features, you must choose a weekly, monthly or an annual subscription.
Pros
- Equipped with a powerful machine learning technology
- Offers a vast selection of voice avatars
- The quick voice modification process
- A great choice if you want to make a parody
Cons
- More expensive than the competition
- Support only the English language
5. Video Voice Changer – Fun Editor
Price: Free, but offers in-app purchases
Compatibility: iOS 8.0 or later
User Rating: 4.4

Changing the voices in the videos you record with your iPhones or iPads is a straightforward process that takes a minimum amount of effort. You can either use this iOS-based app to capture videos you’re going to dub or import them from the albums in which they are stored. The Video Voice Changer app is a great option if you want to dub videos directly from your phone because it enables you to change the voices in your videos and make them sound like mice, bears or ghosts. There are over thirty voice effects to choose from, so you can easily pick the one that best fits the video you’re editing.
Pros
- Equipped with video recording tools
- Excellent dubbing features
- A rich selection of voice effects
- Allows users to share their creations on Facebook, Instagram, and other social media platforms
Cons
- You must make an in-app purchase to unlock all of the app’s features
- No audio mixing options
6. Video Voice Changer FX
**Price:**Free, but offers in-app purchases
Compatibility: Android 4.1 and up
User Rating: 4.1

This is a simple app, anyone can use to change the voices in a video. Simply upload a video file from an SD card in your phone and choose an audio effect you want to apply. The app’s collection of funny voices includes options like echo, squirrel, space ship or chipmunk. As soon as you select the voice effect you want to add to a video, the app will start generating a new video that will be saved to your phone. Sharing the videos you edit with Video Voice Changer FX to social media directly from the app is not an option.
Pros
- Fun and easy to use
- Great price to performance ratio
- Changing a voice requires just a few taps
- Allows users to switch between effects while the video is playing
Cons
- No audio or video recording capability
- Doesn’t support social media sharing
7. Squeak Voice Changer
**Price:**Free, but offers in-app purchases
Compatibility: Android 4.3 and up
User Rating: 3.9

Every joke you want to share with your online friends is going to be a little funnier if you record it with Squeak Voice Changer. You just have to tap on the Record button and choose one of the available effects. Each voice changing effect this app offers is represented by a character so you should select Jamie the Jolly if you want to make your voice sound like you’re at a party or Bruce the Sentimental Bot if you want your voice to sound artificial. All the recordings you make with Squeak Voice Changer can be easily shared on social media.
Pros
- Equipped with audio recording options
- Cute and memorable characters that represent voice effects
- Inexpensive and fun to use
- Functional app design
Cons
- Poor selection of voice effects
- The AI only recognizes the English language
8. Voice Changer with Effects
**Price:**Free
Compatibility: Android 4.1 and up
User Rating: 4.5
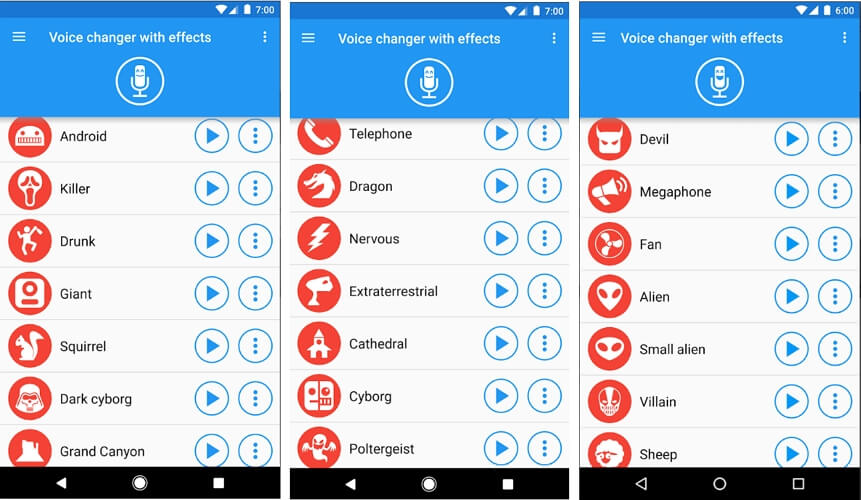
This Android-based app is designed to make fun and easy since voice modulation features enable you to play voice recording backward or change your voice to sound robotic or even alien. Besides recording your voice, the app also lets you modulate pre-recorded sounds and save them to your phone or use them as ringtones or notification sounds. Furthermore, the app lets you add sounds to images and share them to Facebook. The Voice Changer with Effects enables you to share all audio files you process with it to any of the most popular social media platforms.
Pros
- The app has over 50,000,000 installs
- Equipped with a text to voice feature
- Setting a new ringtone with this app is easy
- Supports editing of pre-recorded audio files
Cons
- Contains ads
- No audio or video editing options
9. Voice Changer
**Price:**Free
Compatibility: Android 4.1 and up
User Rating: 4.4

If you are looking for an Android app that lets you modulate your voice quickly and effortlessly, then Voice Changer may be one of the best options you can find on the market. You can record your voice by simply tapping on the microphone and speaking into your phone’s speaker and then apply one of the audio effects this app offers. Optionally, you can import an audio file you already recorded into the app and then apply Martian, Foreigner, Giant or Child effects to your voice recording. The best part is that you can apply each effect to the audio files you’re editing as many times as you want.
Pros
- Loads of funny effects
- Simple audio recording setup
- Intuitive and modernly designed interface
- Enables users to share audio files via Bluetooth or social media platforms
Cons
- No video editing tools
- The quality of output audio files can vary
10. Voice FX
**Price:**Free, but offers in-app purchases
Compatibility: Android 4.0.3 and up
User Rating: 3.8

Modulating voices in all types of audio files is a straightforward and fun process that can be completed in just a few taps. During the audio recording session, you can apply all voice effects to the sound you are recording and stream it live to your web browsers or media players you’re using. Voice FX changes your voice in real time, which enables you to preview your results before deciding if you want to save them. All files you export from this app will be saved in the MP3 format so you can use them as ringtones on your Android device.
Pros
- Allows users to modulate pre-recorded audio files
- Voice effects are applied in real time
- Offers live streaming features
- Exports files in the MP3 format
Cons
- Prone to glitches
- A limited selection of voice effects
11. Voice Changer Plus
**Price:**Free, but offers in-app purchases
Compatibility: iOS 8.0 or later
User Rating: 4.8
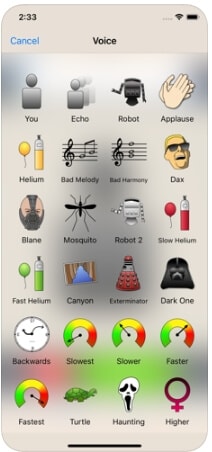
iPhone and iPad owners in need of a voice changer app that grants them complete creative freedom over the modulation of the voices they record, should consider using the Voice Changer Plus. The app features more than fifty voice effects and it provides support for voiceover recordings. Moreover, you can edit all your audio files even after you saved them, enabling you to find new ways to improve your recordings over time. Voice Changer Plus is also equipped with trim controls, so you can remove all parts of your audio files you don’t want to share with your friends on social media.
Pros
- Offers more voice effects than most of its competitors
- Provides voiceover recording options
- Users can trim their audio files
- All audio recordings can be edited after the voice modulation
Cons
- In-app purchase is required in order to unlock all of the app’s features
- Modulating audio in video files is not an option
Below is a quick comparison table among these voice changer apps, hope it will be helpful.
| App | Supported OS | User Rating | Voice Templates |
|---|---|---|---|
| Celebrity Voice Changer - Face | iOS 9.0 or later | 4.0 | Yes |
| Snapchat | iOS 10.0 or later, Android 4.4 or up | 3.8 | No |
| Voice Changer by e3games | Android 4.1 and up | 4.3 | Yes |
| Voicy: Celebrity Voice Changer | iOS 10 or later | 4.3 | Yes |
| Video Voice Changer – Fun Editor | iOS 8.0 or later | 4.4 | Yes |
| Video Voice Changer FX | Android 4.1 and up | 4.1 | Yes |
| Squeak Voice Changer | Android 4.3 and up | 3.9 | Yes |
| Voice Changer with Effects | Android 4.1 and up | 4.5 | Yes |
| Voice Changer | Android 4.1 and up | 4.4 | Yes |
| Voice FX | Android 4.0.3 and up | 3.8 | Yes |
| Voice Changer Plus | iOS 8.0 or later | 4.8 | Yes |
Conclusion
Everybody enjoys a good joke, and the apps we featured in this article enable you to have a lot of fun while experimenting with different voice modulation options. All of the voice effects these apps offer can change a voice automatically, but if you would like to alter the voices in your videos you must choose an app that supports this option. Which of the best voice changer apps for iPhone and Android devices are you going to choose? Leave a comment, and share your opinions with us.
Benjamin Arango
Benjamin Arango is a writer and a lover of all things video.
Follow @Benjamin Arango
Benjamin Arango
Mar 27, 2024• Proven solutions
Have you ever wondered what your voice would sound like if you were a cartoon character, a robot, or an older version of yourself? Changing how your voice sounds has never been easier, regardless of the Smartphone model you have, since voice changer apps can be used on both iPhone and Android devices.
Even though there is nothing wrong with modulating your voice to have fun with your friends, using voice changer apps to pull malicious pranks or bully strangers online is far from acceptable. Read on if you would like to find out more about the best voice changer apps for iPhone and Android devices and discover the one you enjoy using the most.
Best Voice Changer Apps for iPhone and Android
Creating a new ringtone, making a voice recording, or having fun with your friends are only a few reasons why so many people choose to try out voice changer apps. The vast majority of these apps feature well-equipped audio effects libraries that enable users to have fun with their friends and hear how they would sound if they were drunk or after inhaling helium. So, let’s take a look at some of the best voice changer apps on the market.
Changing video voice on Windows and Mac with Wondershare Filmora
Do you want to change the voice in video on Windows and Mac and don’t know which software can meet this requirement? Try Filmra video editor , which provides several ways to change voice over, such as changing the voice speed or changing the pitch. Download the trial version below and find out more possibility in video creation with Filmora.
1. Celebrity Voice Changer – Face
Price: Free, but offers in-app purchases
Compatibility: iOS 9.0 or later
User Rating: 4.0
In case you would like to sound like your favorite movie star of TV host, then Celebrity Voice Changer is one of the best choices you can make. Besides the standard set of options, the app also lets you request new voices since its machine learning technology can mimic virtually anyone’s voice. However, Celebrity Voice Changer is currently only available in English and it cannot modulate speech in other languages. In addition, you must make an in-app purchase in order to gain access to all of the app’s features or unlock the unlimited usage of the app.
Pros
- Automatic voice modulation
- Huge selection of voice filters
- The app generates video files that are better adjusted to the audience on social media than audio files
- Excellent impressions of celebrities
Cons
- Unreasonably expensive
- The app’s Deep Learning technology still has a lot of room for improvement
2. Snapchat
Price: Free, but offers in-app purchases
Compatibility: iOS 10.0 or later, Android 4.4 or up
User Rating: 3.8
With more than 203 million daily users, Snapchat is one of the largest messaging platforms on the market. Previously, we’ve shared how to change gender on Snapchat , beside that, the app lets its users capture short moments or the so-called Snaps and share them with friends. In addition to hundreds of video filters , Snapchat also features a broad spectrum of voice changing effects that make Snaps more entertaining. Even so, the audio recording options Snapchat offers are far from ideal, because the app doesn’t allow you to edit the files you create with it. Using Snapchat will drain your battery quickly, which is why you must pay attention to how frequently you use this app.
Pros
- The easy voice modulation process
- Excellent messaging options
- Grants you access to a large community of likeminded people
- Lenses and filters are updated on a daily basis
Cons
- Editing voice changes after you create a Snap is not possible
- Snapchat is not primarily a voice changer app
Check the detailed information about How to Change Voice on Snapchat with 2 Easy Methods >>
3. Voice Changer
Price: Free
Compatibility: Android 4.1 and up
User Rating: 4.3
Changing your voice with this app won’t take more than a few moments of your time. You just have to launch the app and hit the microphone button to record a message or a joke you would like to modulate. Once you’re happy with the audio recording you made, you can proceed to choose from more than twenty voice effects that will make you sound like a dwarf, a robot, or an alien. The app’s file-sharing capabilities enable you to post your audio recordings to any social media platform of your choosing or store your files and use them as many times as you want.
Pros
- Entertaining and easy to use
- The simple three-step voice modulation process
- Good selection of voice filters
- Excellent file sharing options
Cons
- The app displays ads
- No audio editing tools
4. Voicy: Celebrity Voice Changer
**Price:**Free, but offers in-app purchases
Compatibility: iOS 10 or later
User Rating: 4.3
Impersonating your favorite celebrity can be a fun way to prank your friends on social media. Voicy features a broad selection of celebrity voice impersonations you can use to make you sound like a famous actress or TV personality. The app utilizes a machine learning technology that can generate more than forty avatars and allows the users to experiment with different voice effects. The free version of the app offers only limited capabilities, so if you want to gain access to all of the Voicy’s features, you must choose a weekly, monthly or an annual subscription.
Pros
- Equipped with a powerful machine learning technology
- Offers a vast selection of voice avatars
- The quick voice modification process
- A great choice if you want to make a parody
Cons
- More expensive than the competition
- Support only the English language
5. Video Voice Changer – Fun Editor
Price: Free, but offers in-app purchases
Compatibility: iOS 8.0 or later
User Rating: 4.4
Changing the voices in the videos you record with your iPhones or iPads is a straightforward process that takes a minimum amount of effort. You can either use this iOS-based app to capture videos you’re going to dub or import them from the albums in which they are stored. The Video Voice Changer app is a great option if you want to dub videos directly from your phone because it enables you to change the voices in your videos and make them sound like mice, bears or ghosts. There are over thirty voice effects to choose from, so you can easily pick the one that best fits the video you’re editing.
Pros
- Equipped with video recording tools
- Excellent dubbing features
- A rich selection of voice effects
- Allows users to share their creations on Facebook, Instagram, and other social media platforms
Cons
- You must make an in-app purchase to unlock all of the app’s features
- No audio mixing options
6. Video Voice Changer FX
**Price:**Free, but offers in-app purchases
Compatibility: Android 4.1 and up
User Rating: 4.1
This is a simple app, anyone can use to change the voices in a video. Simply upload a video file from an SD card in your phone and choose an audio effect you want to apply. The app’s collection of funny voices includes options like echo, squirrel, space ship or chipmunk. As soon as you select the voice effect you want to add to a video, the app will start generating a new video that will be saved to your phone. Sharing the videos you edit with Video Voice Changer FX to social media directly from the app is not an option.
Pros
- Fun and easy to use
- Great price to performance ratio
- Changing a voice requires just a few taps
- Allows users to switch between effects while the video is playing
Cons
- No audio or video recording capability
- Doesn’t support social media sharing
7. Squeak Voice Changer
**Price:**Free, but offers in-app purchases
Compatibility: Android 4.3 and up
User Rating: 3.9
Every joke you want to share with your online friends is going to be a little funnier if you record it with Squeak Voice Changer. You just have to tap on the Record button and choose one of the available effects. Each voice changing effect this app offers is represented by a character so you should select Jamie the Jolly if you want to make your voice sound like you’re at a party or Bruce the Sentimental Bot if you want your voice to sound artificial. All the recordings you make with Squeak Voice Changer can be easily shared on social media.
Pros
- Equipped with audio recording options
- Cute and memorable characters that represent voice effects
- Inexpensive and fun to use
- Functional app design
Cons
- Poor selection of voice effects
- The AI only recognizes the English language
8. Voice Changer with Effects
**Price:**Free
Compatibility: Android 4.1 and up
User Rating: 4.5
This Android-based app is designed to make fun and easy since voice modulation features enable you to play voice recording backward or change your voice to sound robotic or even alien. Besides recording your voice, the app also lets you modulate pre-recorded sounds and save them to your phone or use them as ringtones or notification sounds. Furthermore, the app lets you add sounds to images and share them to Facebook. The Voice Changer with Effects enables you to share all audio files you process with it to any of the most popular social media platforms.
Pros
- The app has over 50,000,000 installs
- Equipped with a text to voice feature
- Setting a new ringtone with this app is easy
- Supports editing of pre-recorded audio files
Cons
- Contains ads
- No audio or video editing options
9. Voice Changer
**Price:**Free
Compatibility: Android 4.1 and up
User Rating: 4.4
If you are looking for an Android app that lets you modulate your voice quickly and effortlessly, then Voice Changer may be one of the best options you can find on the market. You can record your voice by simply tapping on the microphone and speaking into your phone’s speaker and then apply one of the audio effects this app offers. Optionally, you can import an audio file you already recorded into the app and then apply Martian, Foreigner, Giant or Child effects to your voice recording. The best part is that you can apply each effect to the audio files you’re editing as many times as you want.
Pros
- Loads of funny effects
- Simple audio recording setup
- Intuitive and modernly designed interface
- Enables users to share audio files via Bluetooth or social media platforms
Cons
- No video editing tools
- The quality of output audio files can vary
10. Voice FX
**Price:**Free, but offers in-app purchases
Compatibility: Android 4.0.3 and up
User Rating: 3.8
Modulating voices in all types of audio files is a straightforward and fun process that can be completed in just a few taps. During the audio recording session, you can apply all voice effects to the sound you are recording and stream it live to your web browsers or media players you’re using. Voice FX changes your voice in real time, which enables you to preview your results before deciding if you want to save them. All files you export from this app will be saved in the MP3 format so you can use them as ringtones on your Android device.
Pros
- Allows users to modulate pre-recorded audio files
- Voice effects are applied in real time
- Offers live streaming features
- Exports files in the MP3 format
Cons
- Prone to glitches
- A limited selection of voice effects
11. Voice Changer Plus
**Price:**Free, but offers in-app purchases
Compatibility: iOS 8.0 or later
User Rating: 4.8
iPhone and iPad owners in need of a voice changer app that grants them complete creative freedom over the modulation of the voices they record, should consider using the Voice Changer Plus. The app features more than fifty voice effects and it provides support for voiceover recordings. Moreover, you can edit all your audio files even after you saved them, enabling you to find new ways to improve your recordings over time. Voice Changer Plus is also equipped with trim controls, so you can remove all parts of your audio files you don’t want to share with your friends on social media.
Pros
- Offers more voice effects than most of its competitors
- Provides voiceover recording options
- Users can trim their audio files
- All audio recordings can be edited after the voice modulation
Cons
- In-app purchase is required in order to unlock all of the app’s features
- Modulating audio in video files is not an option
Below is a quick comparison table among these voice changer apps, hope it will be helpful.
| App | Supported OS | User Rating | Voice Templates |
|---|---|---|---|
| Celebrity Voice Changer - Face | iOS 9.0 or later | 4.0 | Yes |
| Snapchat | iOS 10.0 or later, Android 4.4 or up | 3.8 | No |
| Voice Changer by e3games | Android 4.1 and up | 4.3 | Yes |
| Voicy: Celebrity Voice Changer | iOS 10 or later | 4.3 | Yes |
| Video Voice Changer – Fun Editor | iOS 8.0 or later | 4.4 | Yes |
| Video Voice Changer FX | Android 4.1 and up | 4.1 | Yes |
| Squeak Voice Changer | Android 4.3 and up | 3.9 | Yes |
| Voice Changer with Effects | Android 4.1 and up | 4.5 | Yes |
| Voice Changer | Android 4.1 and up | 4.4 | Yes |
| Voice FX | Android 4.0.3 and up | 3.8 | Yes |
| Voice Changer Plus | iOS 8.0 or later | 4.8 | Yes |
Conclusion
Everybody enjoys a good joke, and the apps we featured in this article enable you to have a lot of fun while experimenting with different voice modulation options. All of the voice effects these apps offer can change a voice automatically, but if you would like to alter the voices in your videos you must choose an app that supports this option. Which of the best voice changer apps for iPhone and Android devices are you going to choose? Leave a comment, and share your opinions with us.
Benjamin Arango
Benjamin Arango is a writer and a lover of all things video.
Follow @Benjamin Arango
Also read:
- Updated Freeware Harmonies to Accentuate Photo Stories
- Updated Uncovering Places Known for Thunderous Tribute Sounds for 2024
- New REAPER 101 A Comprehensive Overview of Features and Functionality
- In 2024, The Comprehensive Guide to Adjusting Siris Voice in iOS Devices
- New The Quintessential Guide to Optimal Free Audio Loudness Tuners for 2024
- New Sonic Clarity Mastering Silence in Recorded Sound with Wondershare Filmora for 2024
- Updated In 2024, Tactical Cut Discarding Audible Elements From Multimedia Files (MP4, MKV, AVI, MOV, WMV)
- In 2024, Converting Audio to Text
- Enhancing Editing Precision with Final Cut Pro Techniques for Displaying Audio Graphs & Animating Sound Tracks for 2024
- 2024 Approved Mastering Voice Removal Techniques in Adobe Audition An Experts Guide to 6 Essential Steps
- New 2024 Approved Acoustic Enhancement Strategies Cutting Down Background Noise in Audio Recordings, Both Offline & Online
- Essential Websites & Applications for Supercharging Your Videography with Captivating Audio Tracks Pros, Cons, and More for 2024
- Updated Elevating Your Home Films Auditory Impact A 2023 Perspective
- The Ultimate Fish Communication Handbook Implementing Clownfish-Like Sounds in Skype Conversations for 2024
- New The Ultimate Guide Top 7 Preamps Elevating Online Audio Quality for 2024
- Straightforward Voice Customization Techniques Summary of Features, Protocols, and Alternative Solutions
- New The Uninitiateds Guide to Finding Rhythmic Foundations for Rap Lyrics for 2024
- Updated Funny Phone Talks Made Simple Exploring the Best Vocal Techniques for Entertainment
- New 8 Best DAW For Recording, Mixing and Mastering
- Updated In 2024, Incorporating Sound Techniques for Embedding Audio in QuickTime Media
- In 2024, Comprehensive Overview Discover the Best macOS-Based Music Editors Ranked Top 4
- New 2024 Approved Rhythm & Resolution Leading Applications for Seamless Beat Integration Into Videos, 2023 Edition
- Updated The Quintessential Guide to Websites That Whisper Peace Into Your Psyche for 2024
- New Optimize M4A Playback on Android Devices with These Strategies
- New In 2024, Easy Steps to Get and Remove Audacity on Ubuntu Linux - 2023 Edition
- New 2024 Approved Exploring Options for Authentic Gaseous Sounds in Audio Production
- 2024 Approved Harmonizing MP4 Visuals with Top-Tier Music Selection Methods
- In 2024, Discovering Realistic Insectoid Noise Samples
- In 2024, Perfecting Music Syncs with Gifs on a Windows Device
- How to Add Audio in After Effects
- Legends Awakened A Library of Mythical Creatures Sounds for 2024
- Updated In 2024, How to Seamlessly Convert Your Podcast Into the Universal MP3 Format
- Updated Mastering the Art of Music Video Creation Expert Advice for 2024
- New 2024 Approved Creative Ways to Modify Your Tone 9 Strategies for Humorous Phone Interactions
- Elevating Music Management The Best-Rated Platforms for MP3 File Metadata Editing for 2024
- 2024 Approved Essential Skills Setting Up Call Transcriptions in Google Voice
- Updated The Insiders Selection Top 8 High-Quality Rain Sound Packs
- New In 2024, AMR Audio Converter Complete Guide to AMR Files
- New In 2024, Advanced Protocols for Adding Melodies to Instagram Live Streams
- New Advanced Voice Communication Technology for Gamers Interaction
- Tips and Tricks for Apple ID Locked Issue From Apple iPhone XS
- In 2024, Apple iPhone 14 Backup Password Never Set But Still Asking? Heres the Fix | Dr.fone
- In 2024, Easy Steps on How To Create a New Apple ID Account On iPhone 15 Pro Max | Dr.fone
- 11 Best Location Changers for Nokia C210 | Dr.fone
- In 2024, Vivo Y78t ADB Format Tool for PC vs. Other Unlocking Tools Which One is the Best?
- How to Turn Off Google Location to Stop Tracking You on Apple iPhone 7 | Dr.fone
- Pokémon Go Cooldown Chart On Realme 11 Pro | Dr.fone
- In 2024, How To Use Allshare Cast To Turn On Screen Mirroring On Huawei Nova Y71 | Dr.fone
- In 2024, Two Ways to Track My Boyfriends Vivo Y77t without Him Knowing | Dr.fone
- In 2024, 4 Feasible Ways to Fake Location on Facebook For your Realme C53 | Dr.fone
- How to Remove MDM from iPhone 12 mini without Apple ID?
- Updated Best Video Editors for Windows 11 Free and Paid for 2024
- 2024 Approved Trim Videos Like a Pro 10 Free Online Editors 2023 Guide
- In 2024, 4 Feasible Ways to Fake Location on Facebook For your Samsung Galaxy F34 5G | Dr.fone
- Stuck at Android System Recovery Of Itel P55T ? Fix It Easily | Dr.fone
- Ways to stop parent tracking your Oppo A2 | Dr.fone
- How to Mirror Apple iPhone SE to Other iPhone? | Dr.fone
- How to recover deleted pictures from A38.
- Updated 2024 Approved Demystifying Screen Proportions 5 Must-Knows About 16X9 Calculators
- Updated In 2024, 6 Instant Mp4 to GIF Online Tools for You
- 3 Ways for Android Pokemon Go Spoofing On Nubia Red Magic 8S Pro+ | Dr.fone
- New FCPX 2024 Essentials Synchronizing Audio and Video for Professional Results
- In 2024, 5 Ways to Move Contacts From Samsung Galaxy A14 5G to iPhone (13/14/15) | Dr.fone
- How to Unlock Oppo A2 Phone with Broken Screen
- In 2024, What Does Enter PUK Code Mean And Why Did The Sim Get PUK Blocked On Vivo X Flip Device
- In 2024, A Working Guide For Pachirisu Pokemon Go Map On Vivo T2 Pro 5G | Dr.fone
- How can I get more stardust in pokemon go On Samsung Galaxy Z Fold 5? | Dr.fone
- 2024 Approved The Article Below Will Help You Find the Best Game Video Editors
- Updated Top Animation Software for Gaming Intros on PC and Mac for 2024
- New In 2024, Types of Cartoon Styles You May Use for Your Next Marketing Project
- Title: 2024 Approved The Comprehensive Guide to WaveEdit Pro
- Author: Paul
- Created at : 2024-05-05 05:34:23
- Updated at : 2024-05-06 05:34:23
- Link: https://voice-adjusting.techidaily.com/2024-approved-the-comprehensive-guide-to-waveedit-pro/
- License: This work is licensed under CC BY-NC-SA 4.0.
