
:max_bytes(150000):strip_icc():format(webp)/how-to-view-instagram-without-an-account-5271416-505eeceaf0e142ed8674d2ce2244a8be.jpg)
2024 Approved Embark on a Complimentary Audacity Adventure Capturing Every Note
Embark on a Complimentary Audacity Adventure: Capturing Every Note
Natural audio recording software, such as Voice Memos for Macs or Sound Recorder for Windows PCs, is included with every machine. These applications enable users to record audio using either the desktop’s internal or an external microphone, and they generally have basic audio editing features.
However, when you’re looking for a higher-quality recording program, Audacity is the way to go. Audacity is a free audio editor with a lot of cutting-edge features. More significantly, recording using Audacity is as simple as clicking a button.
In this Audacity Record Computer Audio guide, we will show you all the methods of recording internal audio on your computer and Mac.
In this article
01 Record Audio On Audacity with a Microphone
02 Record Sounds Playing on Your Computer Using Audacity on Win
03 Record Sounds Playing on Your Computer Using Audacity on Mac
04 Set up Audacity to Record as Schedule
Part 1: How to Record Audio On Audacity with a Microphone On Windows and Mac Computers?
For both Windows and Mac, the procedures for recording audio from a microphone are the same if you’re utilizing your desktop’s built-in mic or an external microphone. Here’s your step-by-step guide to audacity record using a microphone:
Step 1: Launch Audacity and get to know the Device Toolbar, situated underneath the playback controls. You may modify the Audio Host and the Recording and Playback Devices—all of which are required for Audacity recording.

Step 2: To begin, select Tracks under the Add New tab, Stereo Track, or Mono Track to create a new track.

Step 3: Select Recording Device from the options list. Select your microphone from the dropdown menu and hit the Record option.

Step 4: A soundwave emerges along the track as you talk into the speaker. The Recording Level may be found at the top of the display. To pause or stop the recording, click Stop or Pause until you select Record anew.

Step 5: With the mouse over any recording area, click the Delete button to cut out any portion of it quickly. Click Ctrl + A, then Delete to erase whatever you’ve just saved. Alternatively, press the X button to delete the track completely.

Part 2: How to Record Sounds Playing on Your Computer Using Audacity On Windows?
Unlike Mac, Windows makes it simple to capture audio from a movie or media file running on your desktop. There seem to be two primary methods for accomplishing audacity record desktop audio in this way:
1. Use MME as the Audio Host
Step 1: To use MME as your audio host, go to Tracks in the Add New tab in Stereo Track and create a new file.

Step 2: Change the Audio Host (to the left of Recording Device) to MME—this is the standard setting, so you might not have to change anything.

Step 3: Choose desired option from the Recording Device dropdown menu. Based on your configuration, this might be referred to as Wave Out or Loopback. When you’re uncertain, try it out.

Step 4: To record your audio source, click Record, then play it back.
2. Use WASAPI as the Audio Host
WASAPI provides higher-resolution digital recordings. If capturing audio from an external monitor, it’s also a good idea to utilize it.
Step 1: Convert the Audio Host from MME to Windows WASAPI after creating a fresh Stereo Track.

Step 2: Switch the Recording Device to Speaker (loopback). To display the entire label, you might have to slide the toolbar’s knobs outwards. Begin recording by pressing the red dot and then listen to the audio source. Audacity will capture the audio even if your PC is muted.
Part 3: How to Record Sounds Playing on Your Computer Using Audacity on Mac?
Unfortunately, there’s no ready-made method to record computer audio using Audacity on a Mac. Some alternative ways to use Audacity to record from Mac including using a loopback cable, or download and using a third-party software. You can try some Audacity alternatives to record the computer audio on Mac.
For Win 7 or later (64-bit)
For macOS 10.12 or later
If you have installed Filmora already, you can use it to record the sound playing on your Mac with some tricks.
Step 1: Luanch Filmora, and then click the Record button and select Record PC Screen.

Step 2: Set up the recording settings based on the need. Since we’re going to record the playing audio from the Mac computer, select Microphone and System Audio On and click the Red button to start.

Step 3: Now you have a screen captured video with sound included. Since we need th audio only, we can attache the audio from the video first and then do some editing such as adding fade in and fade out effect, or remove unwanted audio clip.

Part 4: How to Set up Audacity to Record as Schedule?
A streaming video recorder or cassette can be used to arrange a recording. All of those are identical to Time Recordings in that they are used to schedule recording. The Timer record configuration dialog box may be used to set the beginning and finish of the recording. This is how you do it:
Step 1: By definition, the recording’s Start Date and Time are set to the present time. It will begin recording on the present day and hour by default when you don’t alter it. There is no default setting for the End Date and Time. You must either choose a date and time to determine the end time.

Step 2: There is a Checkbox to Save the work immediately. By Ticking the option, you may choose the path or Folder where the file will be saved when the recording is finished.

Conclusion
Well, there you have it – your complete Audacity Record Computer Audio guide. One thing is for certain that Audacity allows some great ways of recording audio from internal and external components of your Windows and Mac. However, if your Audacity is having issues, we would highly recommend opting for another software, such as Wondershare Filmora.
Wondershare Filmora is the finest thing that has come out in recent years for recording audio from a desktop. It is intended not just for pros but also for any enthusiast videographer who desires to create a high-quality movie for their family and friends. Download it today to make your movie a delightful journey with high-quality audio recording.
02 Record Sounds Playing on Your Computer Using Audacity on Win
03 Record Sounds Playing on Your Computer Using Audacity on Mac
04 Set up Audacity to Record as Schedule
Part 1: How to Record Audio On Audacity with a Microphone On Windows and Mac Computers?
For both Windows and Mac, the procedures for recording audio from a microphone are the same if you’re utilizing your desktop’s built-in mic or an external microphone. Here’s your step-by-step guide to audacity record using a microphone:
Step 1: Launch Audacity and get to know the Device Toolbar, situated underneath the playback controls. You may modify the Audio Host and the Recording and Playback Devices—all of which are required for Audacity recording.
Step 2: To begin, select Tracks under the Add New tab, Stereo Track, or Mono Track to create a new track.
Step 3: Select Recording Device from the options list. Select your microphone from the dropdown menu and hit the Record option.
Step 4: A soundwave emerges along the track as you talk into the speaker. The Recording Level may be found at the top of the display. To pause or stop the recording, click Stop or Pause until you select Record anew.
Step 5: With the mouse over any recording area, click the Delete button to cut out any portion of it quickly. Click Ctrl + A, then Delete to erase whatever you’ve just saved. Alternatively, press the X button to delete the track completely.
Part 2: How to Record Sounds Playing on Your Computer Using Audacity On Windows?
Unlike Mac, Windows makes it simple to capture audio from a movie or media file running on your desktop. There seem to be two primary methods for accomplishing audacity record desktop audio in this way:
1. Use MME as the Audio Host
Step 1: To use MME as your audio host, go to Tracks in the Add New tab in Stereo Track and create a new file.
Step 2: Change the Audio Host (to the left of Recording Device) to MME—this is the standard setting, so you might not have to change anything.
Step 3: Choose desired option from the Recording Device dropdown menu. Based on your configuration, this might be referred to as Wave Out or Loopback. When you’re uncertain, try it out.
Step 4: To record your audio source, click Record, then play it back.
2. Use WASAPI as the Audio Host
WASAPI provides higher-resolution digital recordings. If capturing audio from an external monitor, it’s also a good idea to utilize it.
Step 1: Convert the Audio Host from MME to Windows WASAPI after creating a fresh Stereo Track.
Step 2: Switch the Recording Device to Speaker (loopback). To display the entire label, you might have to slide the toolbar’s knobs outwards. Begin recording by pressing the red dot and then listen to the audio source. Audacity will capture the audio even if your PC is muted.
Part 3: How to Record Sounds Playing on Your Computer Using Audacity on Mac?
Unfortunately, there’s no ready-made method to record computer audio using Audacity on a Mac. Some alternative ways to use Audacity to record from Mac including using a loopback cable, or download and using a third-party software. You can try some Audacity alternatives to record the computer audio on Mac.
For Win 7 or later (64-bit)
For macOS 10.12 or later
If you have installed Filmora already, you can use it to record the sound playing on your Mac with some tricks.
Step 1: Luanch Filmora, and then click the Record button and select Record PC Screen.
Step 2: Set up the recording settings based on the need. Since we’re going to record the playing audio from the Mac computer, select Microphone and System Audio On and click the Red button to start.
Step 3: Now you have a screen captured video with sound included. Since we need th audio only, we can attache the audio from the video first and then do some editing such as adding fade in and fade out effect, or remove unwanted audio clip.
Part 4: How to Set up Audacity to Record as Schedule?
A streaming video recorder or cassette can be used to arrange a recording. All of those are identical to Time Recordings in that they are used to schedule recording. The Timer record configuration dialog box may be used to set the beginning and finish of the recording. This is how you do it:
Step 1: By definition, the recording’s Start Date and Time are set to the present time. It will begin recording on the present day and hour by default when you don’t alter it. There is no default setting for the End Date and Time. You must either choose a date and time to determine the end time.
Step 2: There is a Checkbox to Save the work immediately. By Ticking the option, you may choose the path or Folder where the file will be saved when the recording is finished.
Conclusion
Well, there you have it – your complete Audacity Record Computer Audio guide. One thing is for certain that Audacity allows some great ways of recording audio from internal and external components of your Windows and Mac. However, if your Audacity is having issues, we would highly recommend opting for another software, such as Wondershare Filmora.
Wondershare Filmora is the finest thing that has come out in recent years for recording audio from a desktop. It is intended not just for pros but also for any enthusiast videographer who desires to create a high-quality movie for their family and friends. Download it today to make your movie a delightful journey with high-quality audio recording.
The Symphony of Applause: Finding the Peak Sound Effects
Versatile Video Editor - Wondershare Filmora
An easy yet powerful editor
Numerous effects to choose from
Detailed tutorials provided by the official channel
Sound is pretty essential in almost every video. But why? It engages the audience and gives an awakening to emotional responses. It generally helps you create a mood for your entire video. Suppose you have an elevator scene, you may want to make it look realistic by adding the ding sound to give your whole set some effect. Looking for applause sound effect to create a fun element in your videos or presentation? Well, you have come to the right place.
Ever wonder why some videos on YouTube get massive views even with average content? Applause audio is mostly used in presentations or videos to create a sense of motivation. It can make the scenes on the screen more alive and enjoyable. But how do you find the perfect audio that matches your requirement? The key is to use sound to tell your audience a story.
This article will discuss different ways of downloading sound effects and one particular software that caters to all your video editing needs. Sounds interesting? Then without wasting any more time, let’s get into it.
In this article
01 [Ways to Download All Kinds of Sound Effect](#Part 1)
02 [Use Filmora to Add Background Music to Your Video](#Part 2)
Part 1 Ways to Download All Kinds of Sound Effect
Method 1: Download Using YouTube Downloader
Y2 Mate is an effective working website and gives you the option to convert YouTube videos to mp3. Y2mate allows you to convert & download videos from YouTube, Facebook, Video, Dailymotion, etc., to Mp3 and MP4 in HD quality. Y2mate supports downloading all video formats such as MP4, M4V, 3GP, MP3, etc. You can easily download thousands of videos from YouTube and other sites. All you have to do is –
Step 1: Go to Youtube.com from your web browser.
Step 2: Search the type of Applause/Crowd music you require and click on that.
Step 3: Copy the link to the video.
Step 4: Go to https://www.y2mate.com/en142 .

Step 5: Paste the link of the copied YouTube Video and click enter.
Step 6: There will be a conversion to the mp3 button for your applause sound effect.
Click “Start” to begin the converting procedure.
Step 7: After mp3 conversion, click download, and it will automatically be downloaded and saved to your desktop.
Method 2: Make an Applause Sound Effect Yourself
You cannot always pick and choose ready-made sound effects from the internet. Sometimes, you need custom sounds specific to the context of your video. Regardless of thousands of options you find on YouTube or sound software. Your applause sound effect might not sync with the visuals in your video. You need to create your sounds and be your foley artist.
Shocking, isn’t it? But, this method is proven to be extremely realistic. Not everybody gives it a thought, but most of the sounds you hear in your favorite movies or TV shows are created artificially. For example, a creaking door sound or a slap on a character’s face are created by foley artists using different objects. Similarly, for an applause or crowd sound, gather a group of people, make a proper audience setting, and record them clapping. And that’s when you get your sound effect which is realistic to the extreme.
If you need sound effects for a professional purpose rather than personal use, we recommend using a dedicated audio recorder. The recorder allows you to save the files and edit or omit anything you want. Once you use it, you will notice how it unfolds all the details, even in a simple sound. You can use the original zoom H4N and pack it up with a shotgun microphone.
I guess you have decided which tool you will be using. Here are some things for you to remember –
- Going to lecture halls is a great way of recording clear audience applause sound effects. Normally, people behave well in the lobby and don’t scream or yell while clapping.
- If you want crowd applause sound effects with lots of cheering and booing, you should go to a football stadium. Whenever a team scores a goal, one side of the stadium will mourn, but the other will explode with applause and laughter.
- You can try different games to get a variety of sounds. Normally the crowd size and game type determine how the applause sounds will be. So choose accordingly.
- Suppose the video shows a scene of the ocean like the photo above. Then don’t just use the sound of waves and get it over with. Layer it with some other subtle sounds like the chirping of birds and breezes. Covering one sound over another is a great way to make the viewer fully immerse into the video.
Method 3: Use Royalty-Free Websites
Thankfully now we have websites with huge collections of audio snippets and recordings. It will require another article to talk about only the popular free sites. But let’s talk about two highly incredible websites. The first one is Freesound. You already guessed what it does from the name. More than 500k sound clips are at your disposal for free.
And the second website is Avosound. Everything is categorized and arranged under a label. So that it is easier for you to find anything you want, you can just log in and use the files for personal use however you like. But remember to give credit to the original artist if you are using it in a video. The only copyright claim that Freesound demands are when you try to sell it to another party.
If you want to download several yet similar sounds,99sounds is your best choice. 99Sounds is a directory that offers royalty-free themed collections of different sounds.

You can check out this small tutorial for downloading sound clips from these websites.
Step 1: Go to the website. Log in using your username and accept their terms and conditions.
Step 2: You will enter into the big library of sound samples.
Search for your desired one using a keyword like” applause sound effect”.
Step 3: The results will narrow down to the only relevant ones.
Play them one by one and select the appropriate one.
Step 4: Next, go to the import section and send it to your media library.
The applause sound effect mp3 file is downloaded. It’s as easy as this.
Method 4: Outsource Sound Effects
The last method is a paid one. Yes, sometimes we value our time more than money. You might not have the time and patience to create the sound effect you want. The easier way is to get it done by sound artists. There are plenty of SFX experts waiting for you in the marketplace. All you have to do is post the task and the time limit and budget. You will easily find freelancers who offer such services at an affordable price.
The best thing about outsourcing is that you are not confined to a specific location. You can make use of the best talents across the world.

Part 2 Use Filmora to Add Background Music to Your Video
Filmora is a video editor that gives a pinch of extra creativity and magic to your videos. It gives you amazing effects, transitions, music, and sound effects. It’s perfect for those who aspire to be filmmakers and love to do post-production work. Wonder-share Filmora is one of the best video editing software with cool features compared to other competing video editing software. We’ve got you all covered, from the best features to techniques of using them. This is a complete guide about the Filmora App available on Apple Mac/Windows and your iPhone device app store.
Features
- You get to edit and export your videos at resolutions up to 4K.
- Removal of background noise easily.
- Perfect adjustment of White balance and dynamic range of clips.
- Pan and zoom movement option available.
- You can add up to 5 text tracks and ten music tracks to the timeline.
Guideline for How to Add Sound Effects to Video with Filmora:
Step 1 Import Already Downloaded Applause sound mp3 File
Download the app from the official site if you have not). Launch and bring the audio file to the Filmora app by clicking MEDIA and the IMPORT button below the menu bar. From the drop-down menu, select ‘Import Media Files’ to select the video clip, and then repeat the process to choose the applause sound audio file.
For Win 7 or later (64-bit)
For macOS 10.12 or later

Step 2 Edit the Audio File
You can modify the music by double-tapping the audio on the timeline. It will display the audio panel at the top of the screen. You may arrange the audio to fade in or out, adjust the pitch, speed, and volume, and select the suitable equalization.

Step 3 Merge the Audio File with Video
Drag and drop the audio over the video you are editing on the timeline to merge them.
Step 4 Exporting the Edited Video
After you’ve made the necessary adjustments to your movie and added the dog bark audio, click the ‘EXPORT’ option on the toolbar to export it. The produced file may be saved in.MP4 and.WMV formats, also rename and set your desired resolution.

Wondershare Filmora
Get started easily with Filmora’s powerful performance, intuitive interface, and countless effects!
Try It Free Try It Free Try It Free Learn More about Filmora>

AI Portrait – The best feature of Wondershare Filmora for gameplay editing
The AI Portrait is a new add-on in Wondershare Filmora. It can easily remove video backgrounds without using a green screen or chroma key, allowing you to add borders, glitch effects, pixelated, noise, or segmentation video effects.

Conclusion
Using sound effects that make a scene relatable is nothing less than art. This article has surely cleared your confusion about applause sound effects and how to get them easily. With the help of our guidelines, you can download or create applaud sound effects and then add these effects into the video by using Filmora. We think Filmora has all the toolkits built to assist you in your projects. It is so simple to use, and the result is always top-notch. No wonder it is so loved by amateurs and pro editors worldwide.
Sound is pretty essential in almost every video. But why? It engages the audience and gives an awakening to emotional responses. It generally helps you create a mood for your entire video. Suppose you have an elevator scene, you may want to make it look realistic by adding the ding sound to give your whole set some effect. Looking for applause sound effect to create a fun element in your videos or presentation? Well, you have come to the right place.
Ever wonder why some videos on YouTube get massive views even with average content? Applause audio is mostly used in presentations or videos to create a sense of motivation. It can make the scenes on the screen more alive and enjoyable. But how do you find the perfect audio that matches your requirement? The key is to use sound to tell your audience a story.
This article will discuss different ways of downloading sound effects and one particular software that caters to all your video editing needs. Sounds interesting? Then without wasting any more time, let’s get into it.
In this article
01 [Ways to Download All Kinds of Sound Effect](#Part 1)
02 [Use Filmora to Add Background Music to Your Video](#Part 2)
Part 1 Ways to Download All Kinds of Sound Effect
Method 1: Download Using YouTube Downloader
Y2 Mate is an effective working website and gives you the option to convert YouTube videos to mp3. Y2mate allows you to convert & download videos from YouTube, Facebook, Video, Dailymotion, etc., to Mp3 and MP4 in HD quality. Y2mate supports downloading all video formats such as MP4, M4V, 3GP, MP3, etc. You can easily download thousands of videos from YouTube and other sites. All you have to do is –
Step 1: Go to Youtube.com from your web browser.
Step 2: Search the type of Applause/Crowd music you require and click on that.
Step 3: Copy the link to the video.
Step 4: Go to https://www.y2mate.com/en142 .
Step 5: Paste the link of the copied YouTube Video and click enter.
Step 6: There will be a conversion to the mp3 button for your applause sound effect.
Click “Start” to begin the converting procedure.
Step 7: After mp3 conversion, click download, and it will automatically be downloaded and saved to your desktop.
Method 2: Make an Applause Sound Effect Yourself
You cannot always pick and choose ready-made sound effects from the internet. Sometimes, you need custom sounds specific to the context of your video. Regardless of thousands of options you find on YouTube or sound software. Your applause sound effect might not sync with the visuals in your video. You need to create your sounds and be your foley artist.
Shocking, isn’t it? But, this method is proven to be extremely realistic. Not everybody gives it a thought, but most of the sounds you hear in your favorite movies or TV shows are created artificially. For example, a creaking door sound or a slap on a character’s face are created by foley artists using different objects. Similarly, for an applause or crowd sound, gather a group of people, make a proper audience setting, and record them clapping. And that’s when you get your sound effect which is realistic to the extreme.
If you need sound effects for a professional purpose rather than personal use, we recommend using a dedicated audio recorder. The recorder allows you to save the files and edit or omit anything you want. Once you use it, you will notice how it unfolds all the details, even in a simple sound. You can use the original zoom H4N and pack it up with a shotgun microphone.
I guess you have decided which tool you will be using. Here are some things for you to remember –
- Going to lecture halls is a great way of recording clear audience applause sound effects. Normally, people behave well in the lobby and don’t scream or yell while clapping.
- If you want crowd applause sound effects with lots of cheering and booing, you should go to a football stadium. Whenever a team scores a goal, one side of the stadium will mourn, but the other will explode with applause and laughter.
- You can try different games to get a variety of sounds. Normally the crowd size and game type determine how the applause sounds will be. So choose accordingly.
- Suppose the video shows a scene of the ocean like the photo above. Then don’t just use the sound of waves and get it over with. Layer it with some other subtle sounds like the chirping of birds and breezes. Covering one sound over another is a great way to make the viewer fully immerse into the video.
Method 3: Use Royalty-Free Websites
Thankfully now we have websites with huge collections of audio snippets and recordings. It will require another article to talk about only the popular free sites. But let’s talk about two highly incredible websites. The first one is Freesound. You already guessed what it does from the name. More than 500k sound clips are at your disposal for free.
And the second website is Avosound. Everything is categorized and arranged under a label. So that it is easier for you to find anything you want, you can just log in and use the files for personal use however you like. But remember to give credit to the original artist if you are using it in a video. The only copyright claim that Freesound demands are when you try to sell it to another party.
If you want to download several yet similar sounds,99sounds is your best choice. 99Sounds is a directory that offers royalty-free themed collections of different sounds.
You can check out this small tutorial for downloading sound clips from these websites.
Step 1: Go to the website. Log in using your username and accept their terms and conditions.
Step 2: You will enter into the big library of sound samples.
Search for your desired one using a keyword like” applause sound effect”.
Step 3: The results will narrow down to the only relevant ones.
Play them one by one and select the appropriate one.
Step 4: Next, go to the import section and send it to your media library.
The applause sound effect mp3 file is downloaded. It’s as easy as this.
Method 4: Outsource Sound Effects
The last method is a paid one. Yes, sometimes we value our time more than money. You might not have the time and patience to create the sound effect you want. The easier way is to get it done by sound artists. There are plenty of SFX experts waiting for you in the marketplace. All you have to do is post the task and the time limit and budget. You will easily find freelancers who offer such services at an affordable price.
The best thing about outsourcing is that you are not confined to a specific location. You can make use of the best talents across the world.
Part 2 Use Filmora to Add Background Music to Your Video
Filmora is a video editor that gives a pinch of extra creativity and magic to your videos. It gives you amazing effects, transitions, music, and sound effects. It’s perfect for those who aspire to be filmmakers and love to do post-production work. Wonder-share Filmora is one of the best video editing software with cool features compared to other competing video editing software. We’ve got you all covered, from the best features to techniques of using them. This is a complete guide about the Filmora App available on Apple Mac/Windows and your iPhone device app store.
Features
- You get to edit and export your videos at resolutions up to 4K.
- Removal of background noise easily.
- Perfect adjustment of White balance and dynamic range of clips.
- Pan and zoom movement option available.
- You can add up to 5 text tracks and ten music tracks to the timeline.
Guideline for How to Add Sound Effects to Video with Filmora:
Step 1 Import Already Downloaded Applause sound mp3 File
Download the app from the official site if you have not). Launch and bring the audio file to the Filmora app by clicking MEDIA and the IMPORT button below the menu bar. From the drop-down menu, select ‘Import Media Files’ to select the video clip, and then repeat the process to choose the applause sound audio file.
For Win 7 or later (64-bit)
For macOS 10.12 or later
Step 2 Edit the Audio File
You can modify the music by double-tapping the audio on the timeline. It will display the audio panel at the top of the screen. You may arrange the audio to fade in or out, adjust the pitch, speed, and volume, and select the suitable equalization.
Step 3 Merge the Audio File with Video
Drag and drop the audio over the video you are editing on the timeline to merge them.
Step 4 Exporting the Edited Video
After you’ve made the necessary adjustments to your movie and added the dog bark audio, click the ‘EXPORT’ option on the toolbar to export it. The produced file may be saved in.MP4 and.WMV formats, also rename and set your desired resolution.
Wondershare Filmora
Get started easily with Filmora’s powerful performance, intuitive interface, and countless effects!
Try It Free Try It Free Try It Free Learn More about Filmora>
AI Portrait – The best feature of Wondershare Filmora for gameplay editing
The AI Portrait is a new add-on in Wondershare Filmora. It can easily remove video backgrounds without using a green screen or chroma key, allowing you to add borders, glitch effects, pixelated, noise, or segmentation video effects.
Conclusion
Using sound effects that make a scene relatable is nothing less than art. This article has surely cleared your confusion about applause sound effects and how to get them easily. With the help of our guidelines, you can download or create applaud sound effects and then add these effects into the video by using Filmora. We think Filmora has all the toolkits built to assist you in your projects. It is so simple to use, and the result is always top-notch. No wonder it is so loved by amateurs and pro editors worldwide.
“The Definitive Collection of FREE Online Tools for Listening to Text Files”
10+ Free Online Audio to Text Converters

Shanoon Cox
Mar 27, 2024• Proven solutions
An audio-to-text converter is a tool that can convert audio files to texts or even record any audio and produce the text of it simultaneously. Audio files are one of the most used methods of storing information. From online classes and long lectures to big business meetings and product information, audio is being shared a lot across the world.
But accessing information from a long audio file can be difficult and time-consuming, which is why there is a need to convert audio to text. Information in the form of text can easily be fully or partly accessed and edited whenever needed. And texts can also easily be shared with whomever you want.
So let’s have a look at some of the best audio-to-text converters that might be of use to you.


10+ Free Online Audio to Text Converters
There is number of audio text converters available in the online market that can help you while studying, researching, or even in your business. Some of these recorders can convert any audio file to texts while some others can record and convert to text at the same time. Here we will talk about the top 11 free applications that can be used to convert audio to text.
| 1 - Filmora | 2 - Audext | 3 - Sonix.ai |
|---|---|---|
| 4 - Virtualspeech.com | 5 - Speechnotes | 6 - SpeechTexter |
| 7 - Textfromtospeech.com | 8 - Dictation.io | 9 - Voice Note |
| 10 - Voice Notebook | 11 - NaturalReaders |
1. Wondershare Filmora
Filmora’s Speech To Text (STT) function allows you to transcript audio/voice to subtitles/text in one click. it can save your plenty of time on transcribing subtitles and boost your editing efficiency by applying speech-to-text.
What you need to do is download the software and subsribe for its plan.
Features
- Built-in function to transcribe subtitles and captions for your video
- High accuracy in generating text, allows you to edit text by yourself
- Supports up to 26 languages of transcription to engage more users all around the world
- Offers various tools for editing your videos and audio
2. Audext
Audext is a free online application that can help you to save a lot of time while transcribing any audio to text. The transcription to text is done with the use of an advanced AI and hence produces faster and more accurate results.
Audext is used by people from different sectors like education, marketing, media, consulting, healthcare, etc. for their work purposes.

Features
- An inbuilt editor for editing the text while transcribing
- Identifies the speaker easily
- Supports a variety of audio and video formats like MP3, WAV, MP4, etc.
- Offers an option of easy upload and export of files
Pricing
- Free
- Transcription costs for one hour are $12
- Or with the subscription $5
3. Sonix.ai
Sonix is a fast and accurate application that can be used to convert audio to text for any purpose. This application offers a 30-minute free transcription after which an affordable amount may be charged.
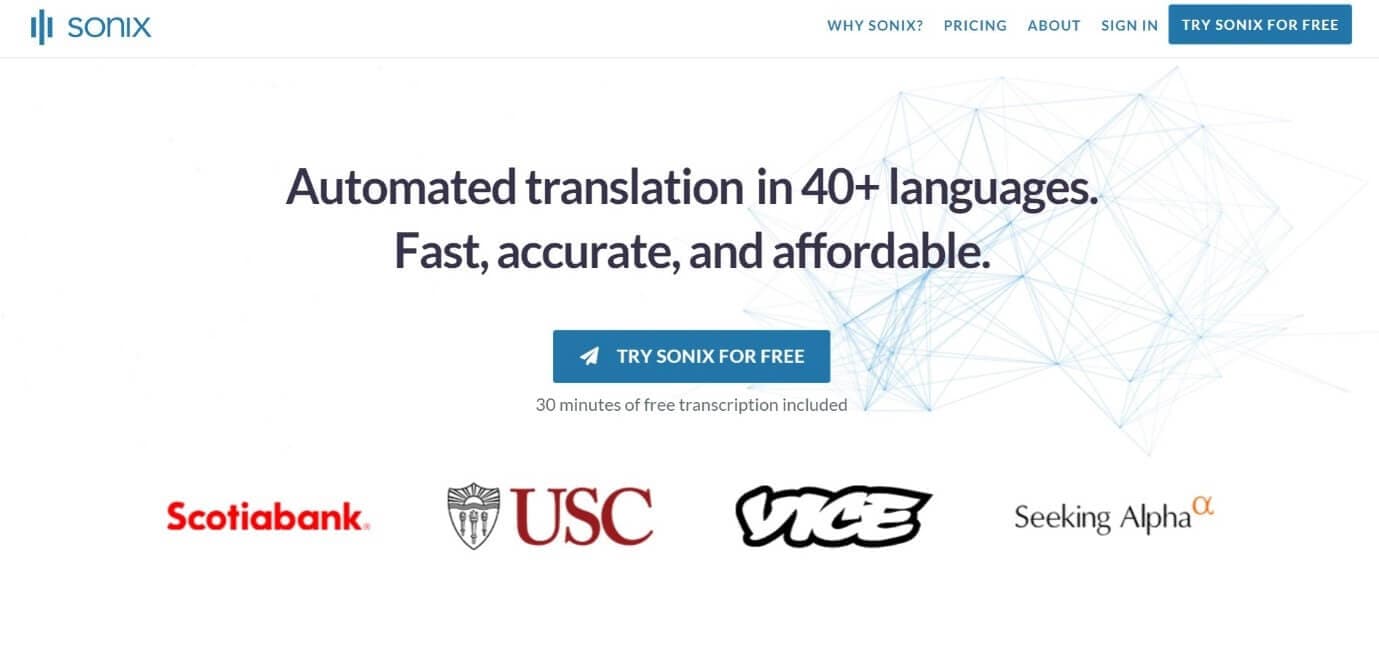
Features
- Automatic transcription of files and accessibility of these files from any device
- Advanced translation of these devices into 30 different languages
- Addition of subtitles into any video for easy understanding
- A Sonix media player that allows to share and publish files easily
Pricing
- Free
- Standard subscription - $10 per hour
- Premium subscription - $5 per hour, and an addition of $22 per month
4. Virtualspeech.com
Virtualspeech is an online tool that can transcribe audio to text free. It is a very simple application that allows fats conversion of audio files to texts. After conversion, the file will be emailed to the user from where it can be downloaded and saved.
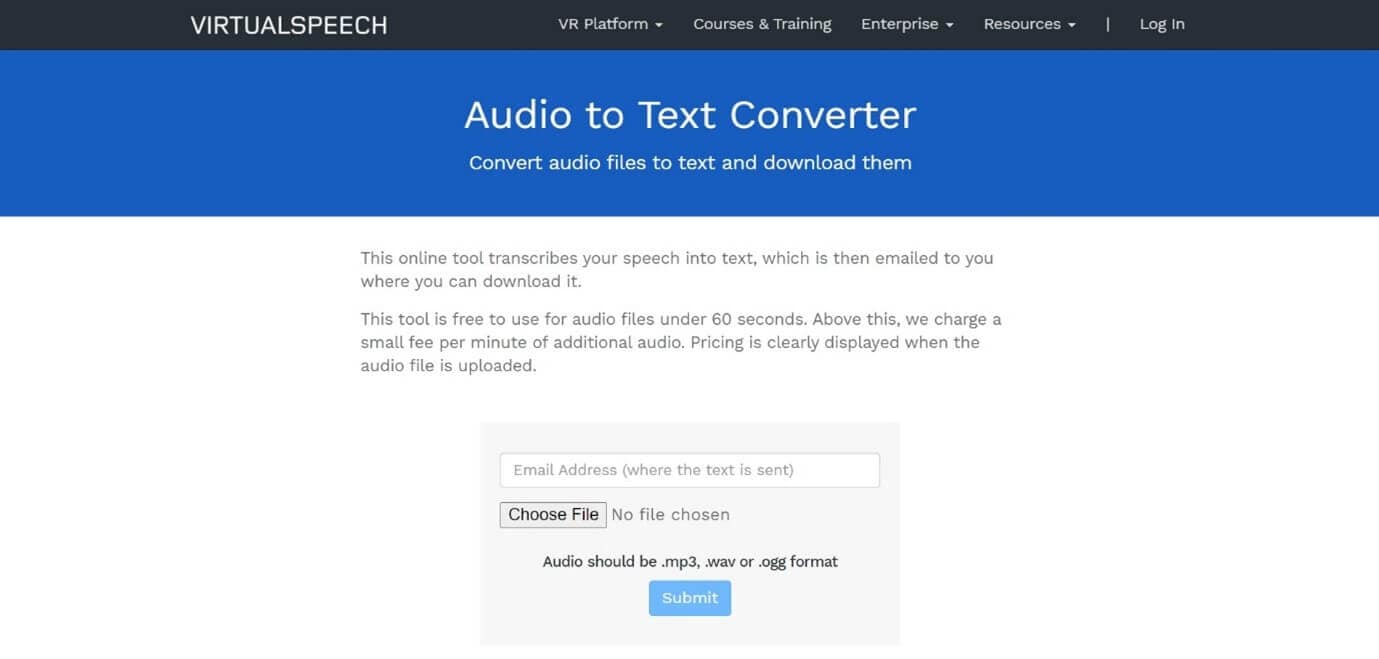
Features
- Free conversion of any audio files under 1 minute.
- Conversion of audio files of formats Mp3, Wav, or Ogg.
- Provides security as the no files are stored on the server and the site is secured with a b SSL
- Speech to text converter within the site
Pricing
- $0.50 per minute after the free minute
Filmora Audio to Text Converter
Filmora - Audio to Text Converter
• Enables you to convert video speech to text in one click
• Extremely accurate in video speech recognition
• Cross-platform supported - (Windows, Mac, iOS, Android)
Transcribe Audio to Text Free Transcribe Audio to Text Free Transcribe Audio to Text Free Learn More >
5. Speechnotes
Speechnotes is a powerful online notepad that can easily convert audio to text. This tool has implemented an efficient and clean design that makes conversion and editing very easy.
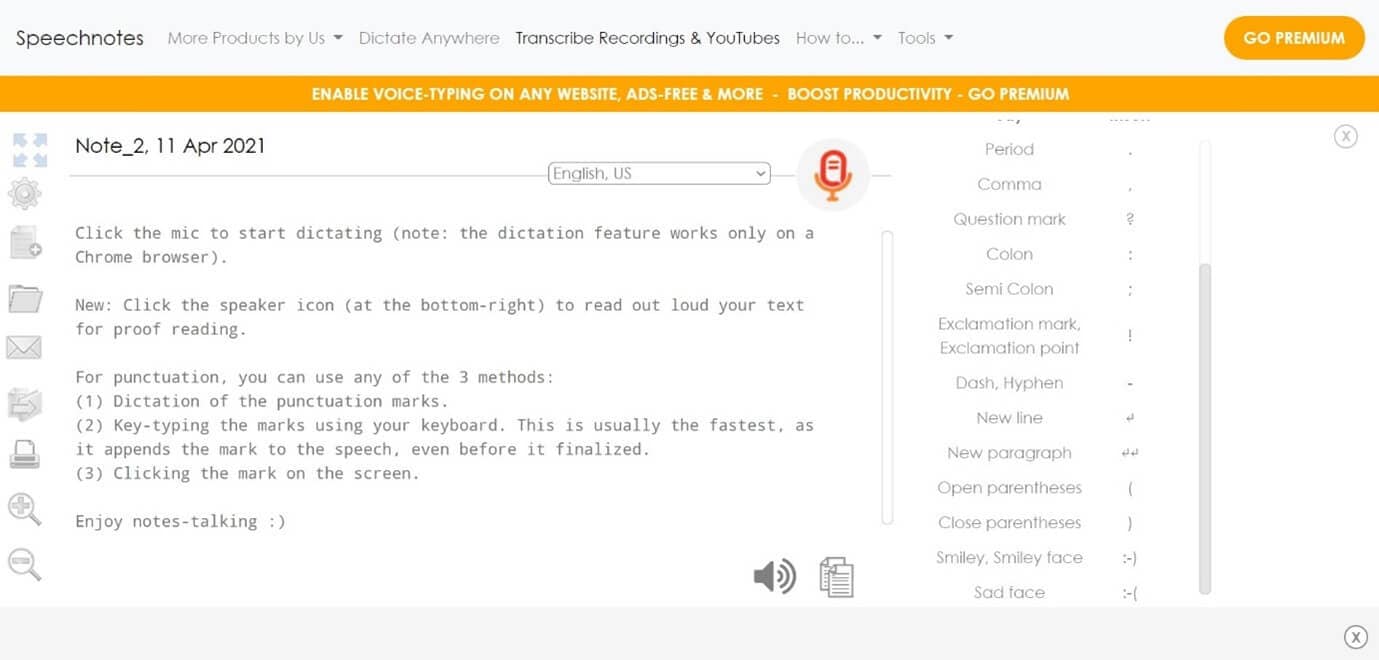
Features
- Best results with an advanced speech recognition technology
- Built-in tools that allow easy editing and correction of the converted text
- Fast working on any web browser and no installation apps required
- Autosave feature that ensures that your data is not lost
- Export to Google Drive option for easy accessibility from any device
Pricing
- Free
- Premium version with the addition of some extra features
6. SpeechTexter
SpeechTexter is a multilingual application that can help you transcribe any type of book, document, blog posts, etc. by using your audio. This tool has a custom dictionary that allows adding short commands for adding frequently used data like phone numbers, punctuation marks, addresses, etc.

Features
- Offers accuracy rate of 90 to 95% percent
- Can be used to increase your fluency in English
- Offers powerful real-time speech recognition
- Easy creation of emails, text notes, blog posts, etc.
- A custom dictionary that can be customized according to the individual use
- Supports more than 60 languages
- Available on both chrome browser and android
Pricing
- Free
7. Textfromtospeech.com
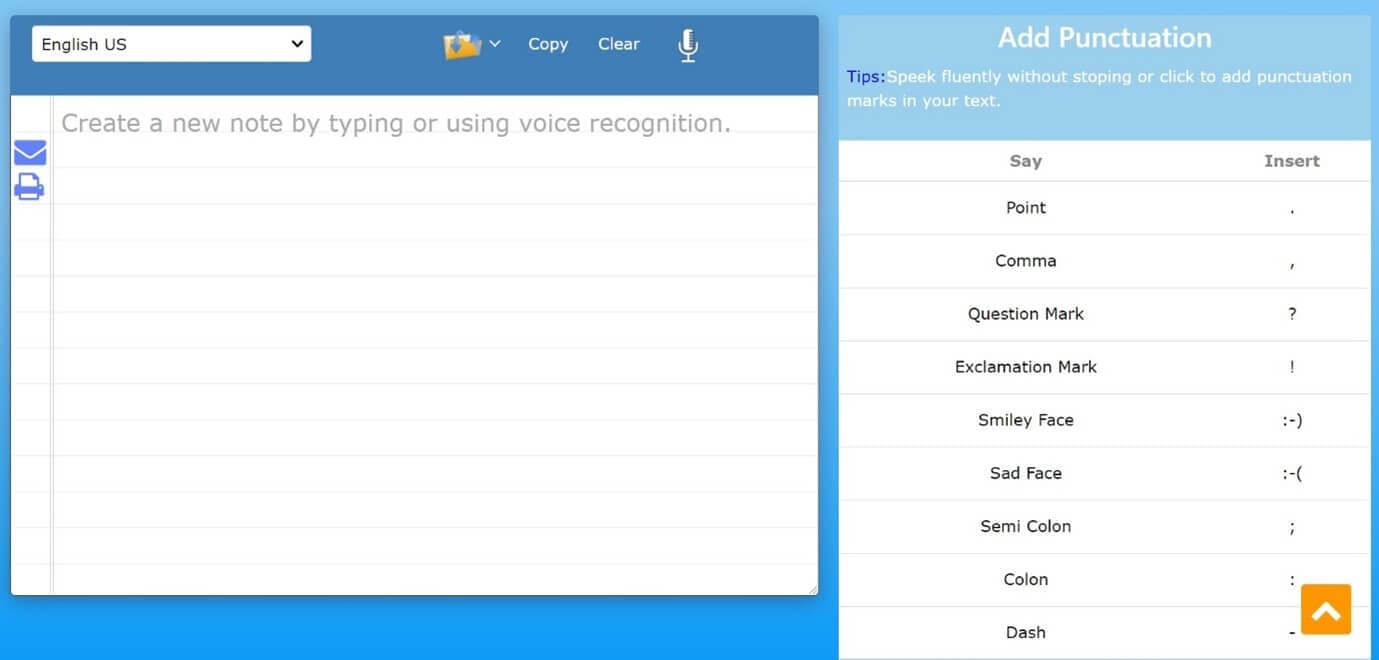
Textfromtospeech is a free online tool that allows you to easily convert audio to text without the need for registration downloading or installation. It has a very simple interface that can record and convert your speech into text with a single click.
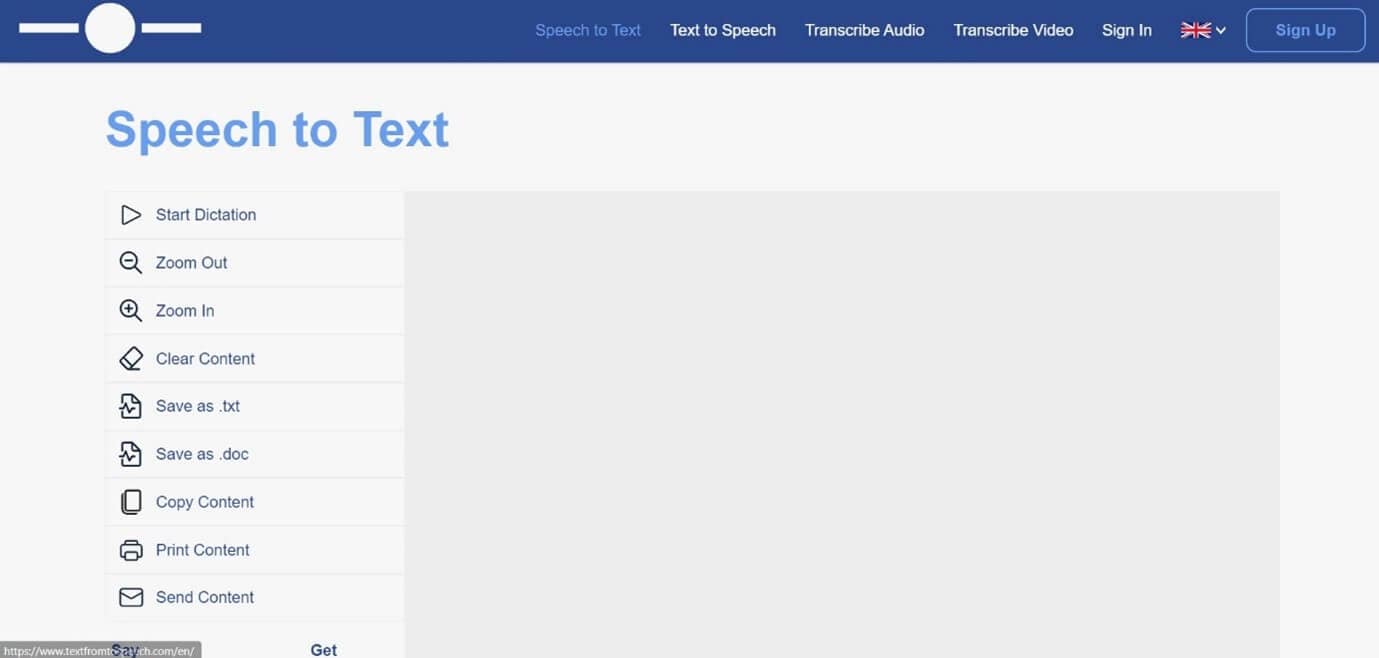
Features
- Free and online text recognition and transcription
- Supports many languages
- Pause and record option while converting large files
- Can use voice commands for insertion of symbols like “comma”, “full stop”, etc.
- Smart capitalization
- Easy saving, copying, and sharing of the dictated text
- Available on mobile devices, tablet, and computer
Pricing
- Free
![]()
A cross-platform for making videos anywhere for all creators

Why your video editing isn’t good enough? How about some creative inspo?
- 100 Million+ Users
- 150+ Countries and Regions
- 4 Million+ Social Media Followers
- 5 Million+ Stock Media for Use
* Secure Download

8. Dictation.io
Dictation is a free and simple tool that offers fast conversion of audio to text. Its interface is like that of a very simple notepad and allows the conversion of audio to text for a number of languages including English, Español, Français, Italiano, Português, and more.

Features
- Advanced speech recognition
- Easy editing within the notes
- Easy sharing to mail, tweets, etc.
- No storing of any data and hence offers the necessary security
Pricing
- Free
9. Voice Note
Voice Note is an online speech recognition tool that can automatically record and type anything including speech, interview, etc. This tool can convert any audio file into text format which can easily be opened in Microsoft Word.
Features
- No saving of data in any servers
- Customizable options for audio and text
- A number of languages to choose from while converting audio to text
- Easy copying and exporting options
- Direct Print option from the site
Price
- Free
10. Voice Notebook
Voice Notebook is a speech recognition app that can also convert audio files to text. This application is compatible with a wide range of devices like Mac, Windows, Linux OS, Android, and iOS.
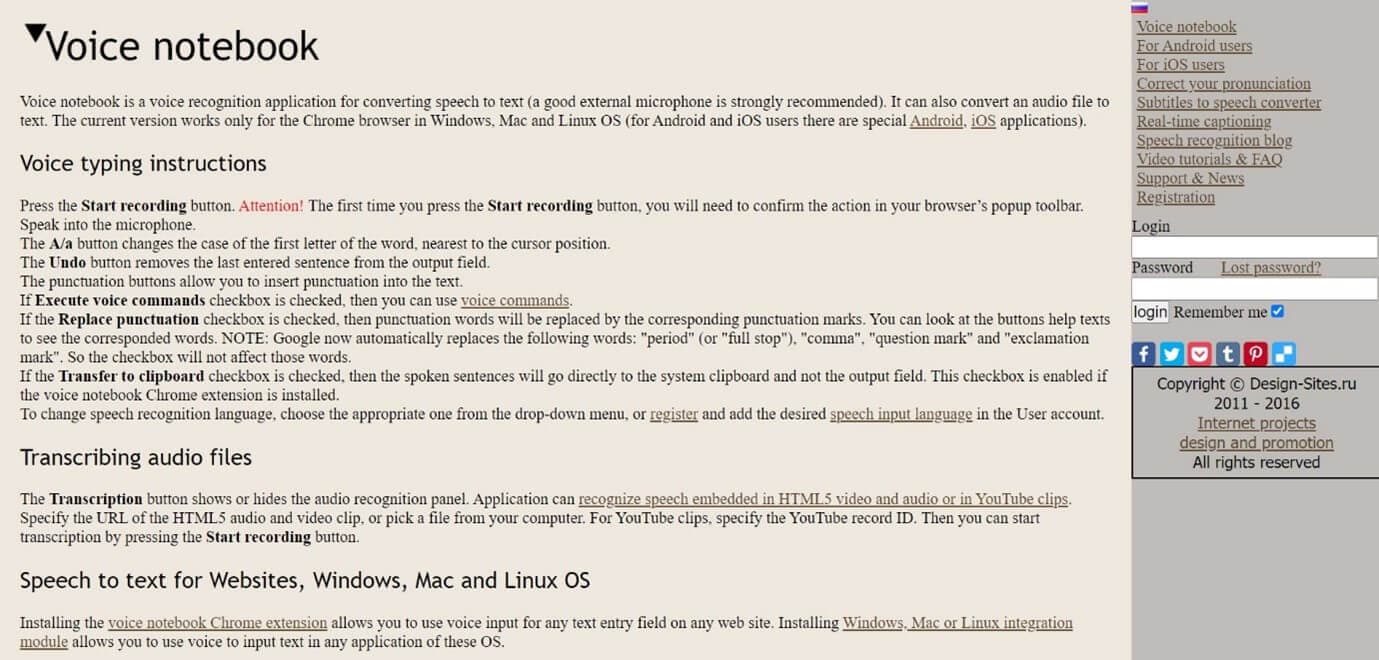
Features
- Voice commands are available when you transcribe audio to text
- Has the ability to recognize any speech embedded in YouTube clips or HTML5 audio or video
- Simple interface and easy editing of text
- An option to download into TXT format is available
Price
- Free
11. NaturalReaders
Natural Readers is a professional program that can convert any text into spoken words. This program offers a lot of features like adjusting the speed of audio, conversion into mp3, selection of voice, etc.
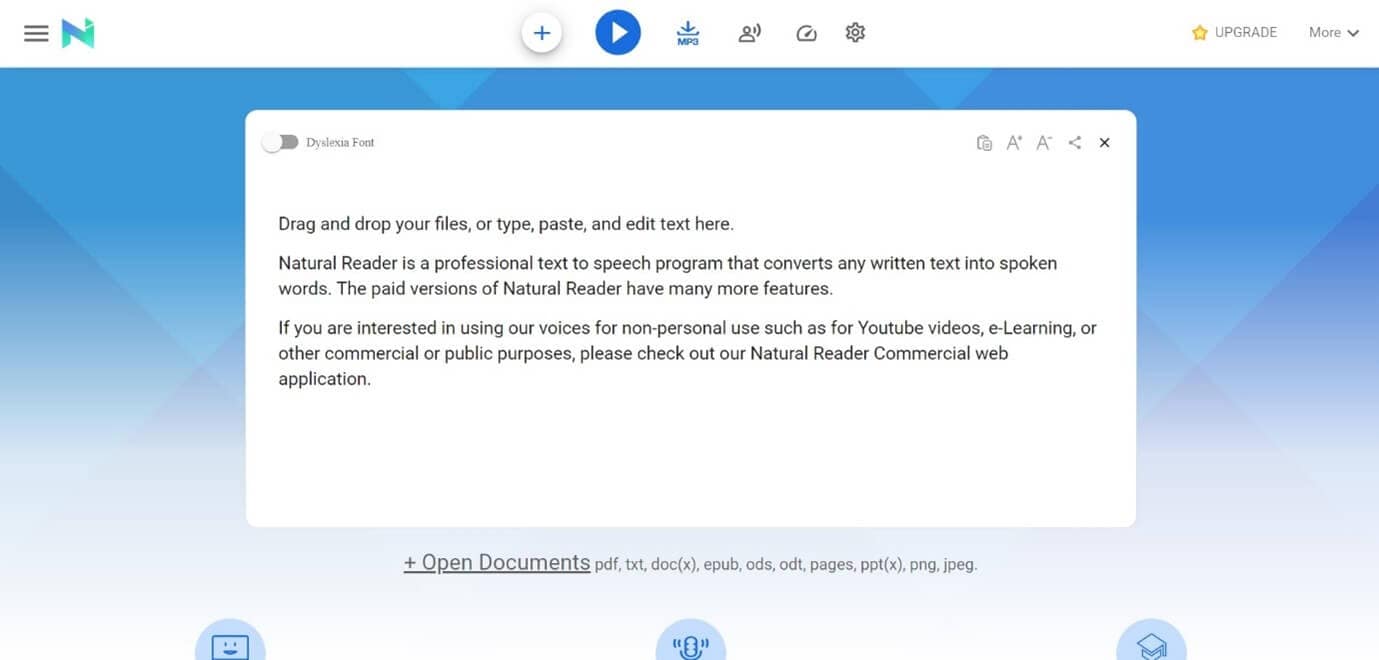
Features
- A font option available for dyslexic people
- Supports formats like pdf, txt, docs, epub, ods, ppt, png, jpeg
- App versions of this online tool are available both for android and apple devices
Pricing
- Free
- Premium plan - $9.99 per month, $59.88 per year
- Plus plan - $19.00 per month, $110.00 per year
Filmora Audio to Text Converter
Filmora - Audio to Text Converter
• Enables you to convert video speech to text in one click
• Extremely accurate in video speech recognition
• Cross-platform supported - (Windows, Mac, iOS, Android)
Transcribe Audio to Text Free Transcribe Audio to Text Free Transcribe Audio to Text Free Learn More >
Conclusion
We have listed above the top 11 tools that can be used to convert audio to text on any device using a browser. Converting audio to text allows you to easily access the required information, edit it, or even share it fully or partially with anyone you wish,
The applications we have listed are free and some of them might charge for the extra features they provide. So no matter what your profession is if you are looking for an app to convert audio to text or record and produce the text of the recordings, choose any one of the listed above applications.
We hope our suggestions help you reduce effort and save time. Please leave your valuable feedback in the comment box below, thank you.
Transform Long Videos into Short Ones Instantly
Turn long videos into viral clips. Effortlessly transform lengthy videos into engaging, shareable clips.

Shanoon Cox
Shanoon Cox is a writer and a lover of all things video.
Follow @Shanoon Cox
Shanoon Cox
Mar 27, 2024• Proven solutions
An audio-to-text converter is a tool that can convert audio files to texts or even record any audio and produce the text of it simultaneously. Audio files are one of the most used methods of storing information. From online classes and long lectures to big business meetings and product information, audio is being shared a lot across the world.
But accessing information from a long audio file can be difficult and time-consuming, which is why there is a need to convert audio to text. Information in the form of text can easily be fully or partly accessed and edited whenever needed. And texts can also easily be shared with whomever you want.
So let’s have a look at some of the best audio-to-text converters that might be of use to you.
10+ Free Online Audio to Text Converters
There is number of audio text converters available in the online market that can help you while studying, researching, or even in your business. Some of these recorders can convert any audio file to texts while some others can record and convert to text at the same time. Here we will talk about the top 11 free applications that can be used to convert audio to text.
| 1 - Filmora | 2 - Audext | 3 - Sonix.ai |
|---|---|---|
| 4 - Virtualspeech.com | 5 - Speechnotes | 6 - SpeechTexter |
| 7 - Textfromtospeech.com | 8 - Dictation.io | 9 - Voice Note |
| 10 - Voice Notebook | 11 - NaturalReaders |
1. Wondershare Filmora
Filmora’s Speech To Text (STT) function allows you to transcript audio/voice to subtitles/text in one click. it can save your plenty of time on transcribing subtitles and boost your editing efficiency by applying speech-to-text.
What you need to do is download the software and subsribe for its plan.
Features
- Built-in function to transcribe subtitles and captions for your video
- High accuracy in generating text, allows you to edit text by yourself
- Supports up to 26 languages of transcription to engage more users all around the world
- Offers various tools for editing your videos and audio
2. Audext
Audext is a free online application that can help you to save a lot of time while transcribing any audio to text. The transcription to text is done with the use of an advanced AI and hence produces faster and more accurate results.
Audext is used by people from different sectors like education, marketing, media, consulting, healthcare, etc. for their work purposes.
Features
- An inbuilt editor for editing the text while transcribing
- Identifies the speaker easily
- Supports a variety of audio and video formats like MP3, WAV, MP4, etc.
- Offers an option of easy upload and export of files
Pricing
- Free
- Transcription costs for one hour are $12
- Or with the subscription $5
3. Sonix.ai
Sonix is a fast and accurate application that can be used to convert audio to text for any purpose. This application offers a 30-minute free transcription after which an affordable amount may be charged.
Features
- Automatic transcription of files and accessibility of these files from any device
- Advanced translation of these devices into 30 different languages
- Addition of subtitles into any video for easy understanding
- A Sonix media player that allows to share and publish files easily
Pricing
- Free
- Standard subscription - $10 per hour
- Premium subscription - $5 per hour, and an addition of $22 per month
4. Virtualspeech.com
Virtualspeech is an online tool that can transcribe audio to text free. It is a very simple application that allows fats conversion of audio files to texts. After conversion, the file will be emailed to the user from where it can be downloaded and saved.
Features
- Free conversion of any audio files under 1 minute.
- Conversion of audio files of formats Mp3, Wav, or Ogg.
- Provides security as the no files are stored on the server and the site is secured with a b SSL
- Speech to text converter within the site
Pricing
- $0.50 per minute after the free minute
Filmora Audio to Text Converter
Filmora - Audio to Text Converter
• Enables you to convert video speech to text in one click
• Extremely accurate in video speech recognition
• Cross-platform supported - (Windows, Mac, iOS, Android)
Transcribe Audio to Text Free Transcribe Audio to Text Free Transcribe Audio to Text Free Learn More >
5. Speechnotes
Speechnotes is a powerful online notepad that can easily convert audio to text. This tool has implemented an efficient and clean design that makes conversion and editing very easy.
Features
- Best results with an advanced speech recognition technology
- Built-in tools that allow easy editing and correction of the converted text
- Fast working on any web browser and no installation apps required
- Autosave feature that ensures that your data is not lost
- Export to Google Drive option for easy accessibility from any device
Pricing
- Free
- Premium version with the addition of some extra features
6. SpeechTexter
SpeechTexter is a multilingual application that can help you transcribe any type of book, document, blog posts, etc. by using your audio. This tool has a custom dictionary that allows adding short commands for adding frequently used data like phone numbers, punctuation marks, addresses, etc.
Features
- Offers accuracy rate of 90 to 95% percent
- Can be used to increase your fluency in English
- Offers powerful real-time speech recognition
- Easy creation of emails, text notes, blog posts, etc.
- A custom dictionary that can be customized according to the individual use
- Supports more than 60 languages
- Available on both chrome browser and android
Pricing
- Free
7. Textfromtospeech.com
Textfromtospeech is a free online tool that allows you to easily convert audio to text without the need for registration downloading or installation. It has a very simple interface that can record and convert your speech into text with a single click.
Features
- Free and online text recognition and transcription
- Supports many languages
- Pause and record option while converting large files
- Can use voice commands for insertion of symbols like “comma”, “full stop”, etc.
- Smart capitalization
- Easy saving, copying, and sharing of the dictated text
- Available on mobile devices, tablet, and computer
Pricing
- Free
![]()
A cross-platform for making videos anywhere for all creators
Why your video editing isn’t good enough? How about some creative inspo?
- 100 Million+ Users
- 150+ Countries and Regions
- 4 Million+ Social Media Followers
- 5 Million+ Stock Media for Use
* Secure Download
8. Dictation.io
Dictation is a free and simple tool that offers fast conversion of audio to text. Its interface is like that of a very simple notepad and allows the conversion of audio to text for a number of languages including English, Español, Français, Italiano, Português, and more.
Features
- Advanced speech recognition
- Easy editing within the notes
- Easy sharing to mail, tweets, etc.
- No storing of any data and hence offers the necessary security
Pricing
- Free
9. Voice Note
Voice Note is an online speech recognition tool that can automatically record and type anything including speech, interview, etc. This tool can convert any audio file into text format which can easily be opened in Microsoft Word.
Features
- No saving of data in any servers
- Customizable options for audio and text
- A number of languages to choose from while converting audio to text
- Easy copying and exporting options
- Direct Print option from the site
Price
- Free
10. Voice Notebook
Voice Notebook is a speech recognition app that can also convert audio files to text. This application is compatible with a wide range of devices like Mac, Windows, Linux OS, Android, and iOS.
Features
- Voice commands are available when you transcribe audio to text
- Has the ability to recognize any speech embedded in YouTube clips or HTML5 audio or video
- Simple interface and easy editing of text
- An option to download into TXT format is available
Price
- Free
11. NaturalReaders
Natural Readers is a professional program that can convert any text into spoken words. This program offers a lot of features like adjusting the speed of audio, conversion into mp3, selection of voice, etc.
Features
- A font option available for dyslexic people
- Supports formats like pdf, txt, docs, epub, ods, ppt, png, jpeg
- App versions of this online tool are available both for android and apple devices
Pricing
- Free
- Premium plan - $9.99 per month, $59.88 per year
- Plus plan - $19.00 per month, $110.00 per year
Filmora Audio to Text Converter
Filmora - Audio to Text Converter
• Enables you to convert video speech to text in one click
• Extremely accurate in video speech recognition
• Cross-platform supported - (Windows, Mac, iOS, Android)
Transcribe Audio to Text Free Transcribe Audio to Text Free Transcribe Audio to Text Free Learn More >
Conclusion
We have listed above the top 11 tools that can be used to convert audio to text on any device using a browser. Converting audio to text allows you to easily access the required information, edit it, or even share it fully or partially with anyone you wish,
The applications we have listed are free and some of them might charge for the extra features they provide. So no matter what your profession is if you are looking for an app to convert audio to text or record and produce the text of the recordings, choose any one of the listed above applications.
We hope our suggestions help you reduce effort and save time. Please leave your valuable feedback in the comment box below, thank you.
Transform Long Videos into Short Ones Instantly
Turn long videos into viral clips. Effortlessly transform lengthy videos into engaging, shareable clips.
Shanoon Cox
Shanoon Cox is a writer and a lover of all things video.
Follow @Shanoon Cox
Also read:
- 9 Free Voice Generators Online-Generate Voice From Text
- Ultimate DJ Streaming Repository
- The Ultimate Guide Accessing High-Quality Audio Without Costs for 2024
- Updated In 2024, Revolutionary Tools The Top 5 Breakthroughs in Live Speech Manipulation Technologies
- Updated In 2024, The Quintessential Compilation 3 A+ Online Services for Elevated Sound in Media
- New 2024 Approved Mastering Sound on Mac Navigating Through The Top 5 Audio Mixer Choices
- Updated Enhancing Recordings with Autotune on Audacity Detailed Instructions Ready to Go for 2024
- New In 2024, Mastering OBS Audio Levels Techniques for Dynamic Ducking and Lifting
- New 2024 Approved The Hush Technique Audio Removal Expertise for MP4, MKV, AVI, MOV, WMV Video Files
- New Step-by-Step Tutorial Incorporating Autotune Plugins Into Your Audacity Projects for 2024
- New Unlock Your Phones Potential with These Top 10 Voice Recorder Apps (iOS) for 2024
- 2024 Approved Precision Audio Cleanup Advanced Methods to Eradicate Echo and Hum
- New In 2024, In-Depth Analysis of Sound Forges Audio Processing Features
- In 2024, Streamline Your Sound Four Cutting-Edge Methods to Enhance Video Audio Quality
- Updated Harmony Hush Helper Innovative Sound Cleaner for Android & iPhone Enthusiasts, Unveiled
- New Innovative Strategies for Enhancing Your Music Videos for 2024
- 2024 Approved Subtle Soundscape Selection for Video Creators
- Updated In 2024, Unleash the Power of Your Voice In-Depth Tutorial for Voice Change Using Audacity
- New In 2024, Revolutionizing Your Vocal Identity Top 10 High-Tech Pitch Adjustment Tools
- Harmonizing with Audacity Methods for Shifting Pitch Without Losing Clarity
- Updated How to Separate Audio From Video in iMovie on Mac?
- Updated 2024 Approved Beyond Audacity A Comprehensive List of Cross-Platform Audio Editors Excelling in Performance and Features
- Updated 2024 Approved Utilizing the Clownfish Vocal Alteration Feature in Online Gaming Platforms and Video Conferencing Apps
- In 2024, Unlock iPhone 15 Without Passcode Easily
- In 2024, Is pgsharp legal when you are playing pokemon On Motorola G54 5G? | Dr.fone
- Updated In 2024, FCPX Not Responding? Get Back to Editing with These Fixes
- Invitation Video Creation Made Easy 10 Free Online Tools
- How to Stop Life360 from Tracking You On Xiaomi Redmi Note 12T Pro? | Dr.fone
- How to Transfer Data from Honor X9b to Samsung Phone | Dr.fone
- Is GSM Flasher ADB Legit? Full Review To Bypass Your Xiaomi Redmi 13C 5G Phone FRP Lock
- 2024 Approved How to Create Free Photo Collage Frame in Minutes?
- 10 Fake GPS Location Apps on Android Of your Oppo Find N3 | Dr.fone
- In 2024, 3 Ways for Android Pokemon Go Spoofing On Huawei P60 | Dr.fone
- In 2024, Your Account Has Been Disabled in the App Store and iTunes On Apple iPhone SE (2020)?
- Title: 2024 Approved Embark on a Complimentary Audacity Adventure Capturing Every Note
- Author: Paul
- Created at : 2024-05-20 01:48:06
- Updated at : 2024-05-21 01:48:06
- Link: https://voice-adjusting.techidaily.com/2024-approved-embark-on-a-complimentary-audacity-adventure-capturing-every-note/
- License: This work is licensed under CC BY-NC-SA 4.0.
