

2024 Approved Demystifying the Functionality of Googles Audio Streaming Feature Podcast Edition
Demystifying the Functionality of Google’s Audio Streaming Feature: Podcast Edition
Google’s proprietary podcast-listening app, Google Podcast, is one of the few podcast apps on the Play Store, with an audience base of more than 100 million. And for a good reason: Google Podcast does podcasts as YouTube does with videos. It’s simple to use, free to all, and features podcasts on the news, captivating stories, and educational content that resonate with all.
Read on to find answers to questions like what is Google Podcast App? How does Google Podcast work? Its features, interface, and some of the best podcasts are featured on the platform. As a bonus, we will also provide a step-by-step guide on creating your own podcast and submitting it to Google Podcasts.
- Best Podcast on Art & Culture
- Best Tech Podcasts
- Best Talkshow and Interview Podcasts
- Best Health Podcast
- Best History Podcast
- Best Informative Podcast
- Best News & Politics Podcast
- Best Sports Podcasts
- Miscellaneous Podcasts
- Movies, Music, and TV Podcasts
Part 1. What is Google Podcast App?
Google Podcast (formerly Google Play Podcast) is Google’s proprietary podcast-listening app. It comes pre-installed on some Android smartphones and all Pixel editions. Even Apple users can install Google Podcasts via the App Store. It’s free and lets you discover, stream, and download podcasts.
Google Podcast has already hit 100 million downloads, an indication of its rising popularity both among content creators and users. Users prefer it for its navigable, search-aligned, minimalist interface. And prominent podcast creators are focusing on the app to make their episodes accessible to millions of Android users.
Part 2: Google Podcasts Features
Compatible with Android, iOS, macOS, Windows, Blackberry, and ChromeOS, Google Podcast is relatively a novice compared to dedicated podcast services. Still, Google Podcast seamlessly incorporates nearly every feature one needs to listen to podcasts.
Search and Personalized Recommendations
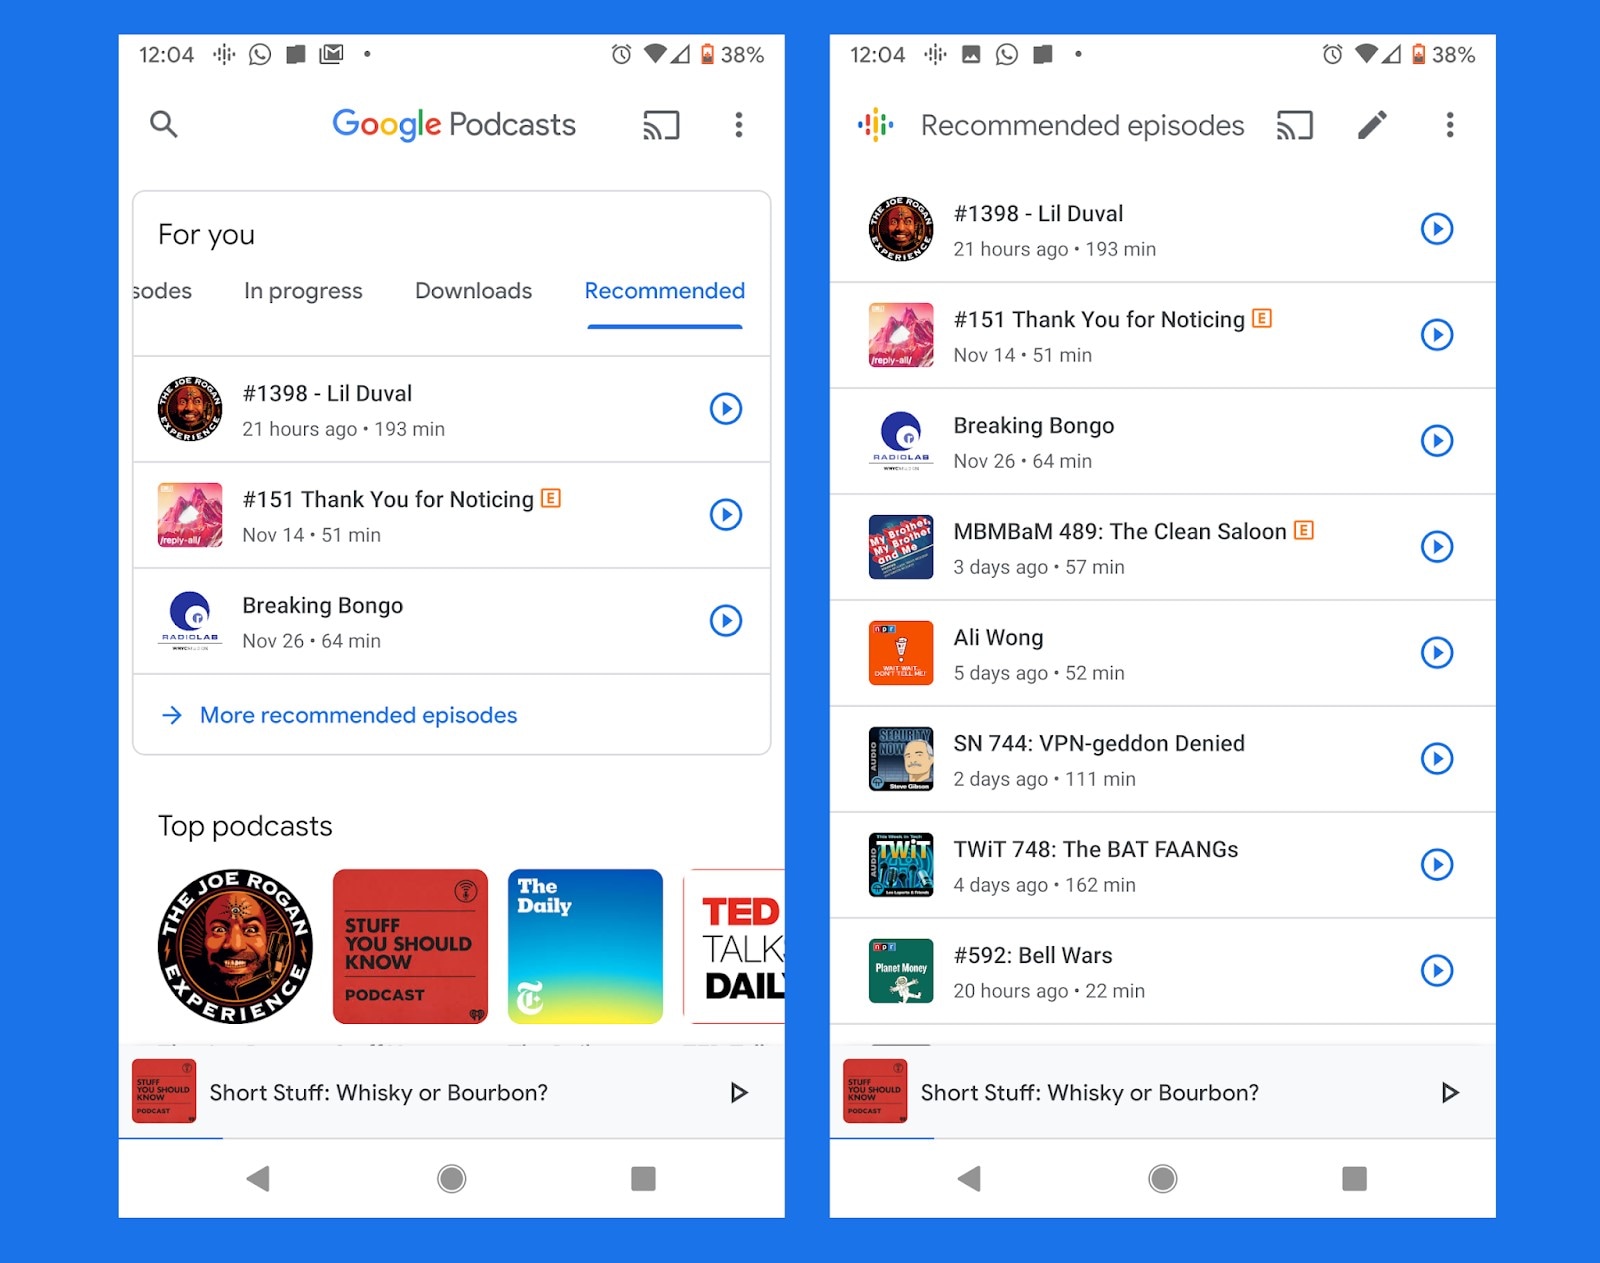
The most significant feature of Google Podcast is its algorithm-based recommendations that connect users with shows that suit their listening habits. As a new user, you might want to explore new topics and taste new concepts, and that’s where Google Podcast will impress you. But even more than that, it will automatically recommend suitable podcasts depending on your interest and previous engagements with the platform.
Google Podcast app covers a plethora of podcasts, so you do not have to switch to other platforms to discover something new or topics you love.
Free and Ad-free Experience
Google Podcast is completely free in a world where podcast platforms demand high charges for an ad-free and high-quality experience. All you need is a Google account to register and listen to anything available on the platform. In addition, podcast creators have to qualify to Google’s standards before submitting the podcast on the forum, ensuring you will listen to the podcast in high quality.
Clean UI
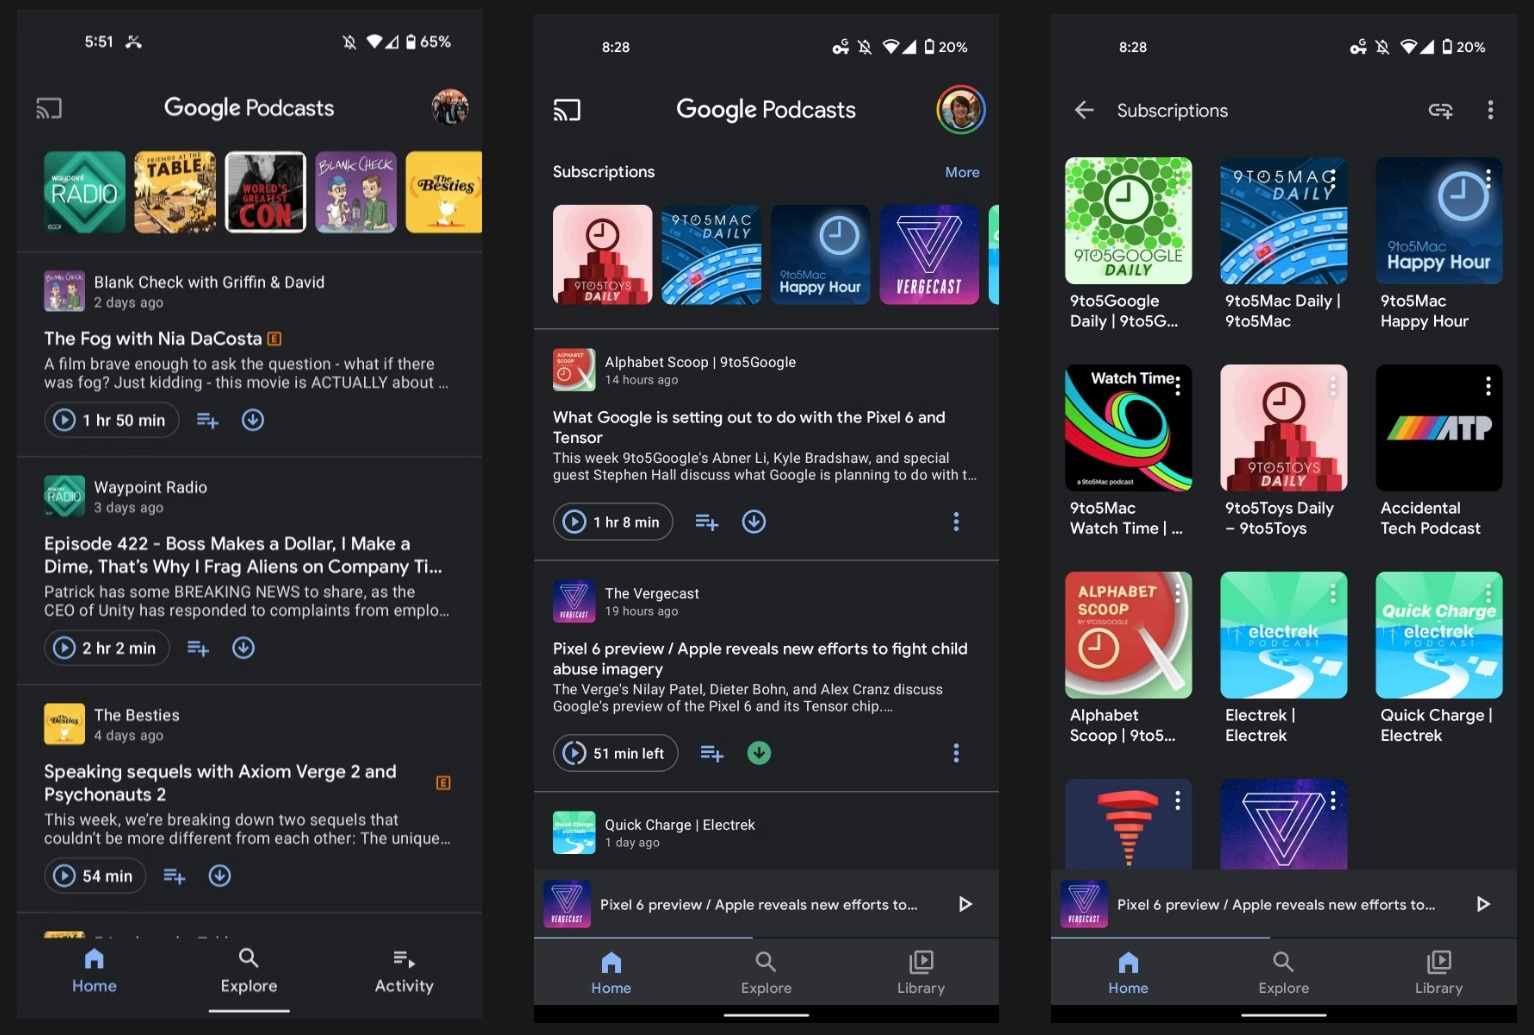
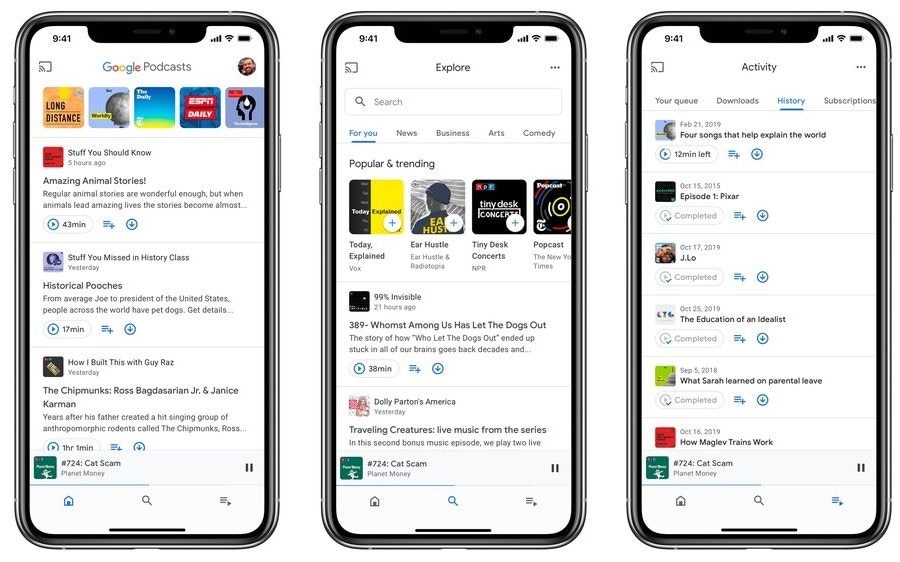
Whether you’ve used a podcast platform before or not, the Google Podcast platform will seem familiar. Once you sign up, the interface will welcome you with podcasts covering all genres arranged neatly in a grid view for convenience.
In line with simplicity, the Settings option in the Google Platform app is as basic as basic gets. Plus, it allows you to conveniently organize your subscriptions and downloads via the Library tab.
One more thing: although Google Podcast is primarily designed for Android users, its counterparts on other OS, like Apple, Web, and macOS, remain simple and easy to use.
Auto-downloads, Sleep Timer, and Seamless Switch Between Devices
Google Podcast automatically downloads the podcasts you love and removes them after you’ve listened to the particular episodes.
Another significant characteristic of the Google Podcast platform is its intuitiveness. For instance, many podcast platforms do not automatically switch to the next episode, but you do not have to worry about such aspects with Google Podcast. You can also put a sleep timer.
Given that it’s available on all primary OS, you can seamlessly switch from one device to another. Not to forget, you can search for the podcasts using Google search or your Voice Assitant.
Part 3: How Does Google Podcast Work?
Now that you know the Google Podcast app and its features, here’s how to use the platform. Assuming you have downloaded the Google Podcast platform on your device and signed in using your Google account, we will now show you how to search and start listening to podcasts on the platform:
Step1 Add Your Favorites
Once you register on the Google Podcast platform, the app will ask you to explore popular shows or search for your favorites. Once you click on the Explore option, a new screen with categories listed will be shown in the top menu, like For You, News, Culture, Education, Comedy, Technology, and more. Tap on the categories to view the features of podcasts in each category.
Step2 Search Podcasts Manually
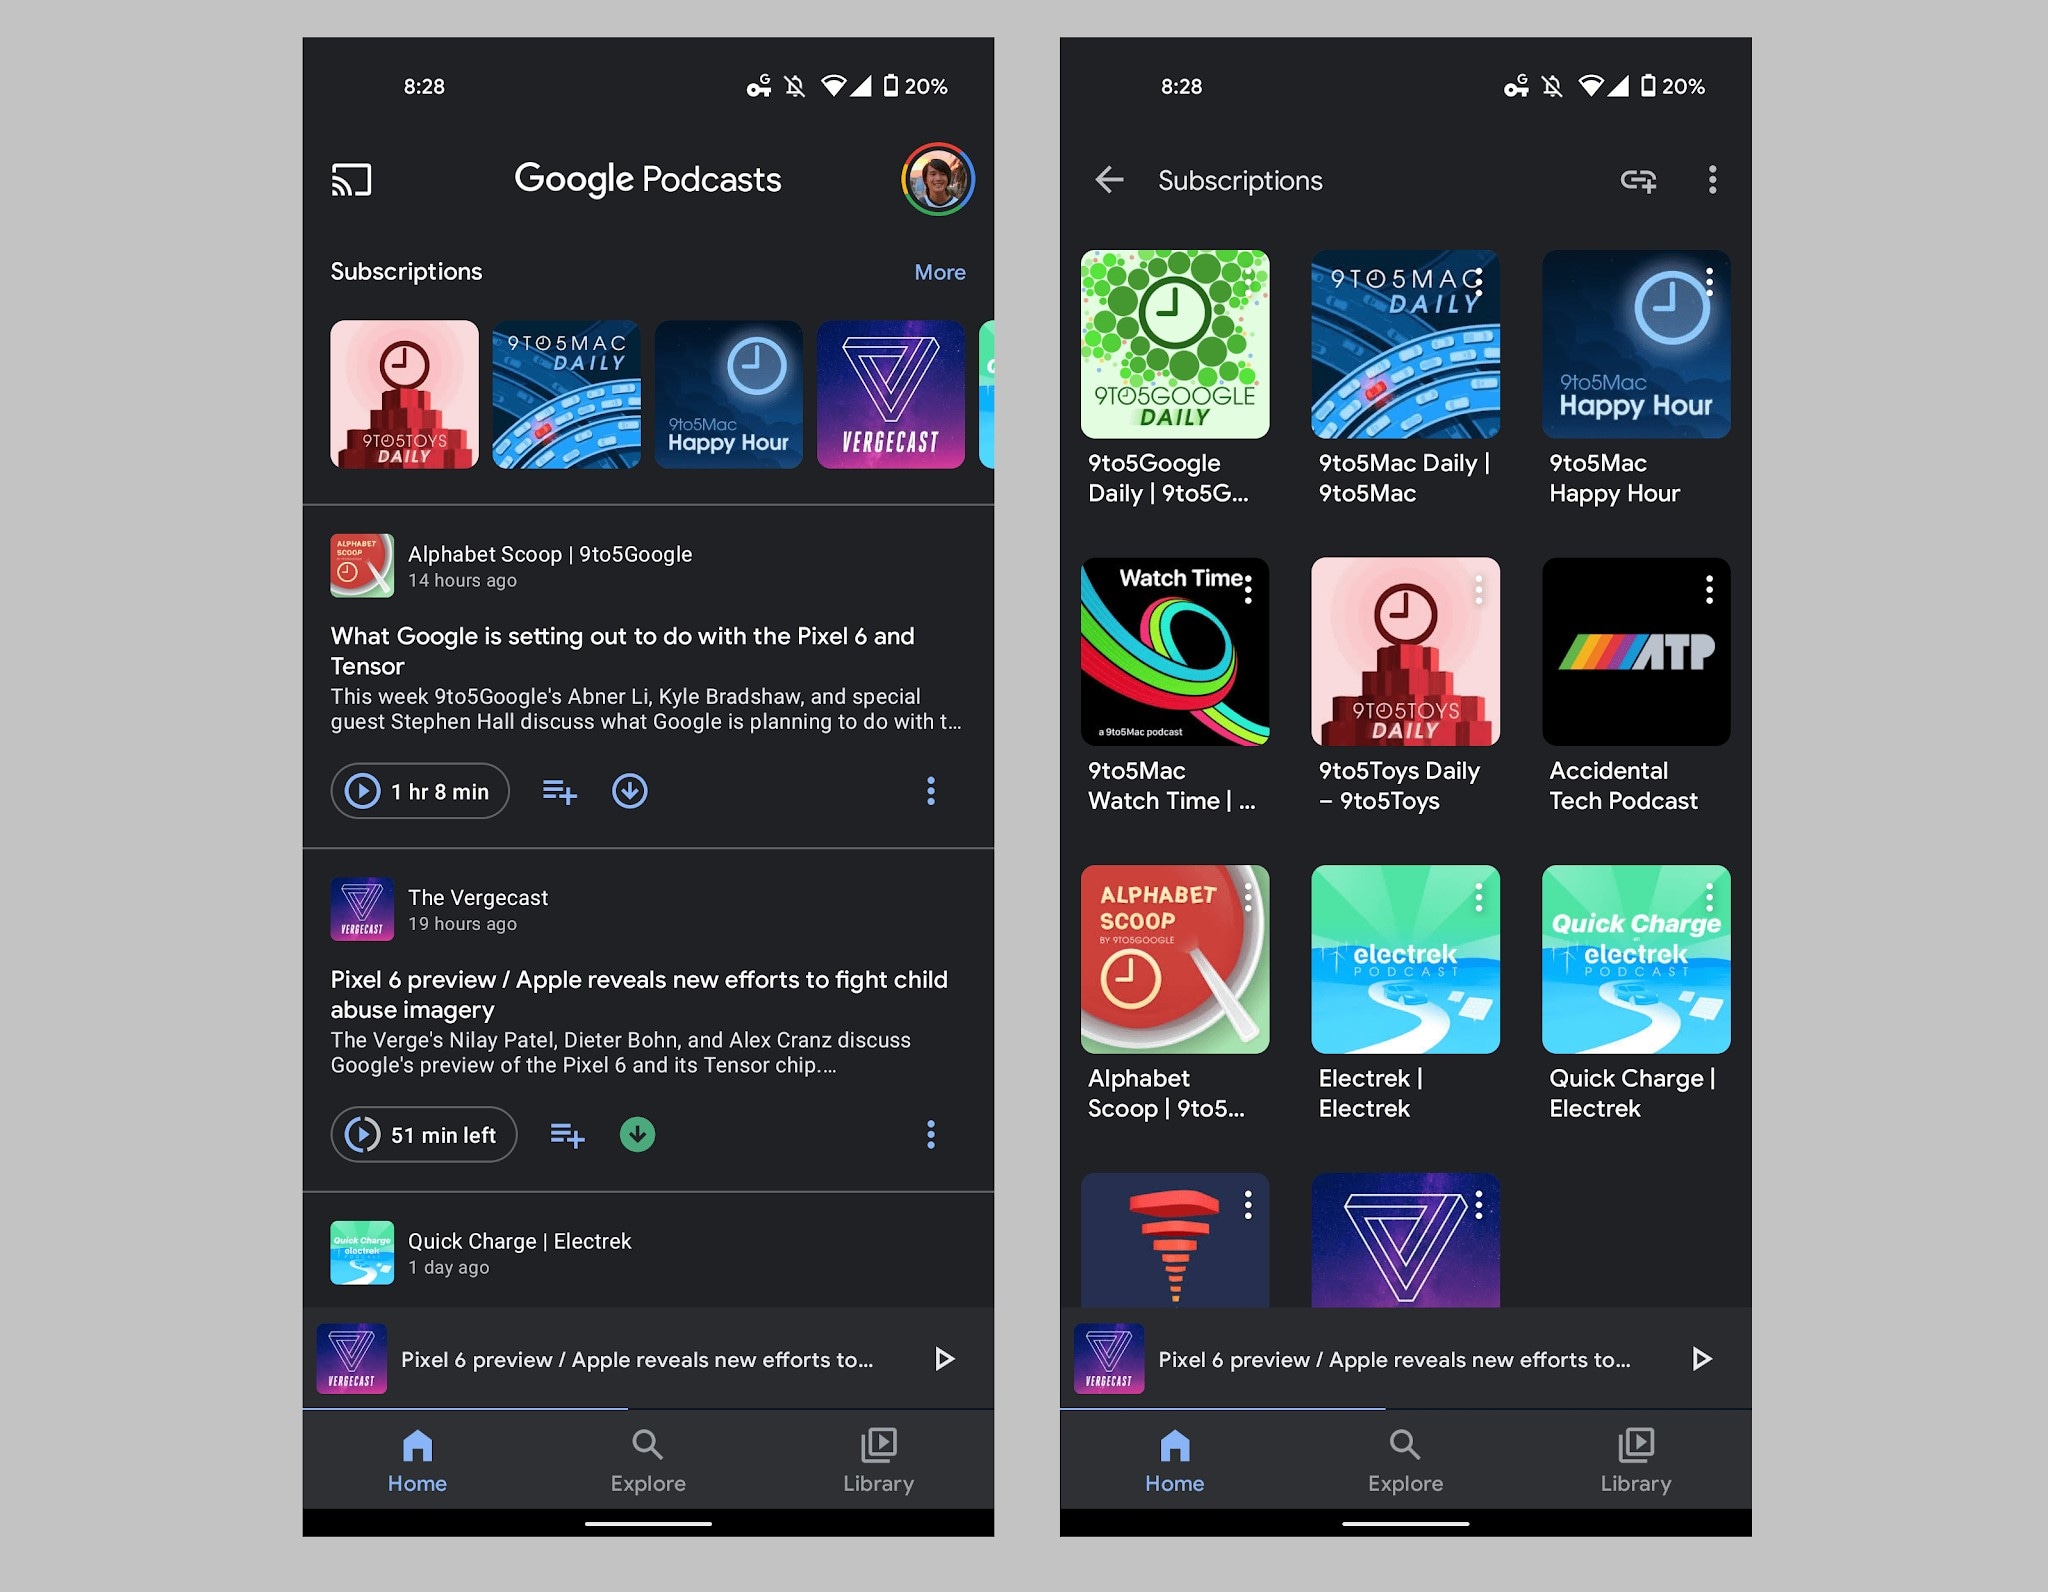
Click on the Search icon and then start typing the name of the podcasts you follow to locate them quickly. Next, tap on the desired podcasts from the search results and scroll down to view individual episodes. Finally, you can click the Subscribe button to follow the channel. The Play icon allows you to listen to the episodes.
Step3 Controls in the Google Podcast app
Once you play an episode on the Google Podcast platform, you will be taken to full-view mode. The Pause icon allows you to interrupt the episode. Plus, the 10 seconds rewind button allows you to go back and listen to something again.
Whereas the 30 seconds forward button will enable you to jump 30 seconds ahead in the episode, you can use this icon during the introduction or in-episode ads. The Speed icon lets you change the playback speed from 0.5x to 3x.
The “half-moon” icon allows you to set a sleep timer. And the “Info.” icon allows you to read about the individual podcasts (if published by the creators). The “ellipsis” icon (three dots) enables you to mark the episode as played, so it will not recommend the particular episode again. And the share button allows you to share the episode with others.
Step4 Queues and Downloads menu in the Google Podcast App
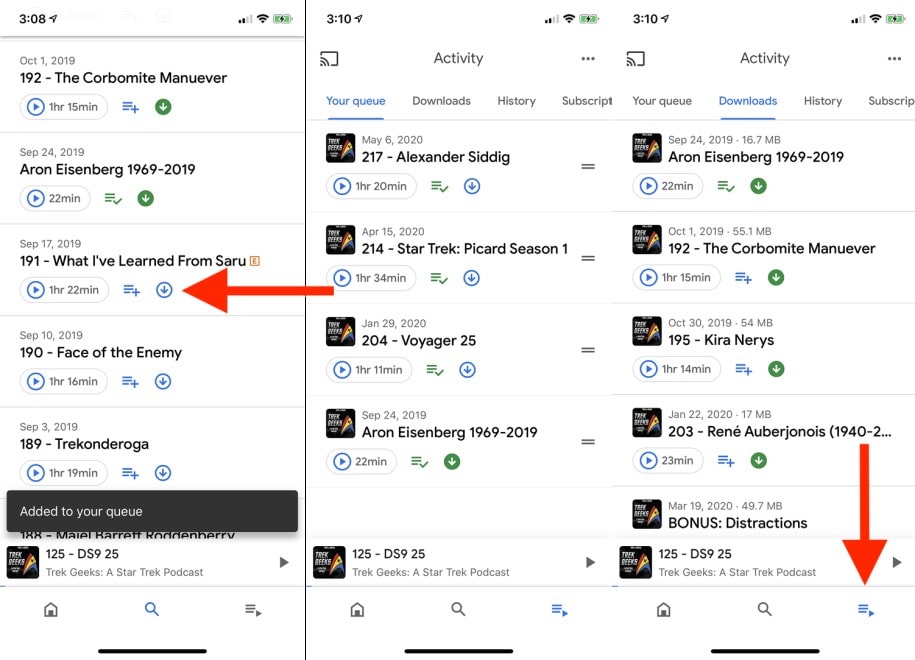
Given that the Google Podcast is a free platform, you can download all the episodes and listen to them offline. To download the episodes, click on the Download button. Once downloaded, you can access them via the three-lined icon from the bottom-right of the interface. Within the Library tab, you will also find the History tab, which allows you to access all the episodes you’ve previously listened to.
Step5 Settings in the Google Podcast platform
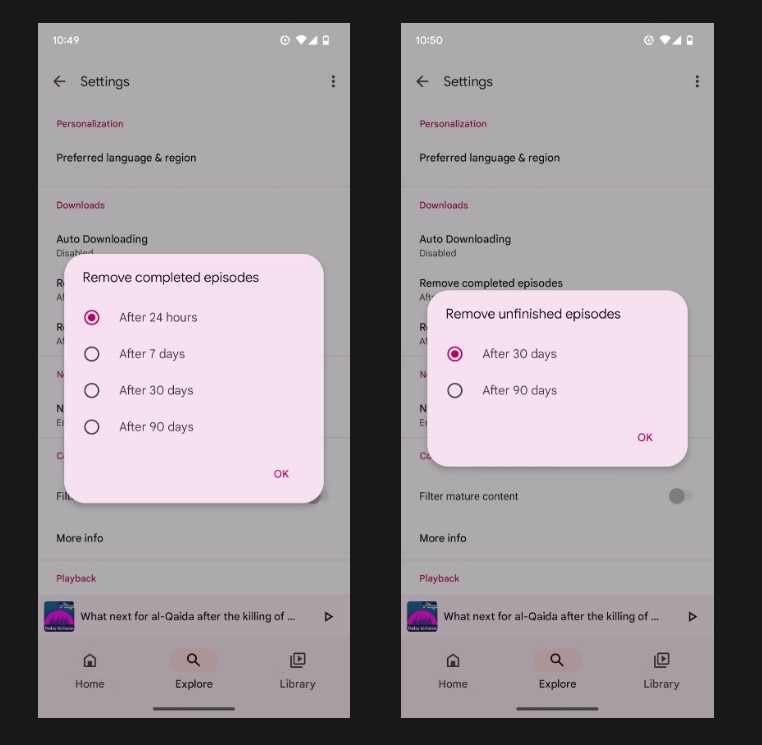
Click on your image at the top-right corner to access the Settings in the Google Podcast app. Under the Google Podcast Settings page, you will find options for Downloads, Notifications, Playback, and more. For instance, Auto-downloads allow you to control the quality of the downloads and when to download (like over mobile data or Wi-Fi).
Plus, you can choose when to auto-delete the episodes, like after a week, and so on. Other options like Playback allow you to decide whether to Auto-play the next episode or not.
Video Tutorial of the Google Podcast App
Here’s a video tutorial 6 Months Later Review Channel: How to Use the New Google Podcasts (2020)
In the video, Josh Teder familiarizes you with Settings, Browse, Library, Subscriptions, and other features of the Google Podcast platform.
Part 4: 10 Popular & Trending Podcasts on Google Podcast App
Now that you have a complete idea about the Google Podcast app, here are some of the best podcasts featured on the platform. Of course, given the popularity of podcasts, the choices are endless. But it is vital to retain that with great options comes great mediocrity.
That is why we asked all our team members to contribute and came up with this short list of best podcasts on the Google Podcast app that covers all genres. So, whether your interests lie in tech, true crime, pop culture, or comedy, you will find something that educates and entertains you.
1. Best Podcast on Art & Culture
Host: Jennifer Dasal
Number of Episodes on ArtCurious: More than 100.
Episodes Duration: 15-25 minutes
Upload Frequency: Weekly
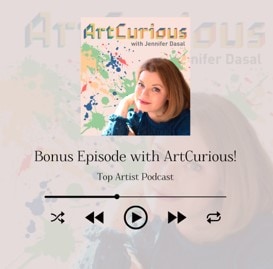
Discussing the unexpected, the slightly odd, and the strangely wonderful in Art History, ArtCurious is nothing like an art class where terminologies are thrown and linear perspective is discussed. Instead, it discusses the juicy stuff!
On ArtCurious, you will find hidden truths about famous artists and creators, like why Van Gogh committed suicide. In addition, you will learn about the strange habits of revolutionary artists. If you are an art enthusiast and want to explore the unseen corners of art history, ArtCurious will fill your thirst.
2. Best Tech Podcasts
Host: Dan Moren and Mikah Sargent + 2 Guests (every week)
Number of Episodes on Clockwise: More than 400.
Episode duration: 30 minutes
Upload Frequency: Weekly
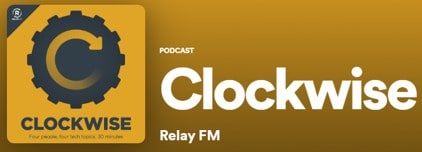
Dan Moren and Mikah Sargent invite two guests each week to discuss tech-related topics to inform, educate, and make aware of the not-so-tech generation. If you struggle with technology, like creating a good password, optimizing screen time, etc. Also, Clockwise is one podcast that can be the cure. It is important to note that Clockwise does not necessarily discuss heavy-tech stuff; instead, it is intended for the tech illiterates to make their life easier.
3. Best Talkshow and Interview Podcasts
Host: Terry Gross
Number of Episodes on Fresh Air: Daily since 1993.
Episodes duration: 45 minutes
Upload Frequency: Daily
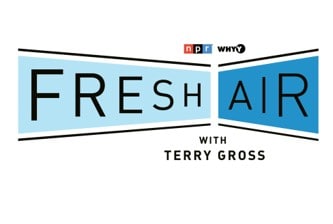
Terry Gross, a famed-journalists and talk show host since the 90s, continues to feature weekly episodes covering present-day musicians, actors, producers, athletes, and artists.
On Fresh Air, you will discover exciting stuff about celebrities and find answers like how fame is a challenge in the social sphere and many more unusual things that you won’t find on any other talk show. Terry Gross interviews a single guest for about 45 minutes daily and indulges audiences with what’s happening worldwide.
4. Best Health Podcast
Host: Andrew Huberman
Number of Episodes on Fresh Air: More than 100.
Episode duration: 2 hours to 4 hours.
Upload Frequency: Weekly

Andrew Huberman, Professor of Neurobiology and Ophthalmology at Stanford School of Medicine, discusses the brain and its connection with body control. The episodes of Huberman Lab are long, ranging from 2 to 4 hours. So, if you want to change your habits and learn about nutrition, how to sleep, and more, Huberman Lab is the perfect addition to your Monday schedule.
5. Best History Podcast
The Bowery Boys New York City History
Host: Tom Meyers, Greg Young
Number of Episodes on Fresh Air: More than 400.
Episode duration: 1 to 2 hours.
Upload Frequency: 15 days.

American history is deeply rooted in the streets of New York City. The Underground Railroad, the elevated railroad, and the Hudson River: Host Tom Meyers and Greg Young discuss the 400 years of History of New York City. It discusses the famous leaders, the strange, and the myths created over the years and presents these stories via action-packed episodes.
6. Best Informative Podcast
Host: Stephen J. Dubner
Number of Episodes on Fresh Air: More than 500.
Episode duration: 30 to 60 minutes.
Upload Frequency: Weekly
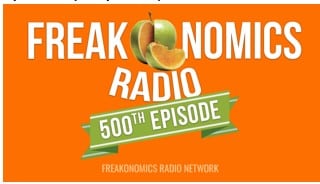
Hosted by Dr. Stephen J. Dubner, Freakonomics Radio reveals the hidden sides of things. The things you think you know or you think you do not have to know, Freakonomics Radio will introduce topics that are typical for you and tell interesting stuff that amazes you.
It also informs you about things you might ignore and makes you more aware of everything. The best thing is Dubner invites Nobel laureates and provocateurs, intellectuals and entrepreneurs, and even underachievers to learn about things from all perspectives.
7. Best News & Politics Podcast
Host: Nate Silver
Number of Episodes on Fresh Air: More than 500.
Episode duration: 30 to 60 minutes.
Upload Frequency: Weekly
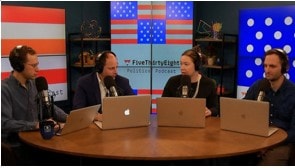
A subsidiary of ABC News, FiveThirtyEight Politics uses data and evidence-based knowledge to inform, educate, and make people aware of the current political situation across the 50 States. It’s suitable for anyone interested in knowing the truth of today’s American politics and the difference between the real truth and the created truth.
8. Best Sports Podcasts
Host: Bill Simmons
Number of Episodes on Fresh Air: More than 100.
Episode duration: 30 to 60 minutes.
Upload Frequency: Monthly
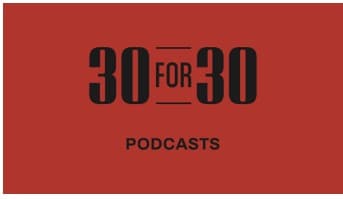
30 for 30 comes from the acclaimed makers of the 30-for-30 film series. Like documentaries, the 30 for 30 podcasts discuss sports legends, their stories, and unheard things about them. Beyond being informative, 30 for 30 also teaches you to explore sports and adventures. Even if you do not like sports or are not a football fan, you will surely enjoy tuning in to 30 for 30 episodes and getting lost in the busy lives of the sports legends.
9. Miscellaneous Podcasts
Host: Dan Schreiber, James Harkin, Andrew Hunter Murray, and Anna Ptaszynski.
Number of Episodes on Fresh Air: More than 400.
Episode duration: 1 hour.
Upload Frequency: Weekly

An award-winning podcast, No Such Thing As a Fish, comes from QI Offices and is about fun topics or something the creators have recently discovered. If you are looking for something fun yet interesting that informs and educates you, No Such Thing As a Fish is a perfect weekly podcast. The episodes are brief yet action-packed. And you will learn just about anything, from gorillas to caterpillars, on the podcast.
10. Movies, Music, and TV Podcasts
Host: Eric Molinsky
Number of Episodes on Fresh Air: More than 400.
Episode duration: 40 minutes.
Upload Frequency: Bi-weekly.

A podcast on science fiction, fantasy, and other genres, Eric Molinsky on Imaginary Worlds invite comic book artists, game designers, novelists, screenwriters, and filmmakers to discuss their crafts. Imaginary Worlds is just about what it sounds like, i.e., creating fictional worlds.
However, instead of just informing, it also guides artists and writers on how to form an imaginary world. A bi-weekly podcast, Imaginary Worlds is perfect for anyone interested in exploring new possibilities and imagining via different lenses.
Part 5: How to Record Your Podcast Show for Google Podcast App?
Google Podcast platform also allows individual creators to upload their podcasts to the platform and share it with the world. Given its popularity and user base, it’s one of the best ways to rise in the podcast realm and get that edge over others.
So, if you are interested in creating podcasts, here’s how to get started. For recording a podcast, you will have to use a third-party tool like Wondershare Filmora. Unlike Apple Podcasts, Google Podcasts does not provide a web studio to create a podcast on the platform.
Google Podcast is a podcasting directory; it does not store any audio files. Instead:
- It would help if you created the podcast somewhere else, like using Wondershare Filmora for recording.
- Upload it or store it in another location, like a Website. Or you can create a podcast-only RSS feed.
- And then submit the RSS feed to the Google Podcast Manager.
So, let’s first learn how to record podcasts using Wondershare Filmora.
Free Download For Win 7 or later(64-bit)
Free Download For macOS 10.14 or later
Wondershare’s Filmora is one of the best platforms to seamlessly record audio and video podcasts. Its straightforward and self-explanatory user interface allows even novices to record podcasts without going through any learning curve.
Besides recording, Filmora also allows you to edit audio and video. For instance, you will find dedicated toggles to limit background interferences, enhance microphone sound, fade in/out effects, and give access to several such features to create podcasts like a professional. You can also export the audio in the format that Google Podcast requires, like M4A, MP3, OGG, and WAV.
Key Features of Wondershare Filmora
- AI-based Silence Detection: remove moments of silence from the podcast with one click.
- Text to speech: transcript your text files into speech for the podcast.
- Speech to Text: transcribe their voice to subtitles in several languages. It increases accessibility, and users worldwide can understand your podcast seamlessly.
- Audio Ducking: Add background music to your podcast and manage the sound levels to create podcasts like professionals.
- Audio Visualizer: enhance your podcast episodes through audio-visualizing effects.
Here’s How to Create Your Own Podcast Using Wondershare Filmora?
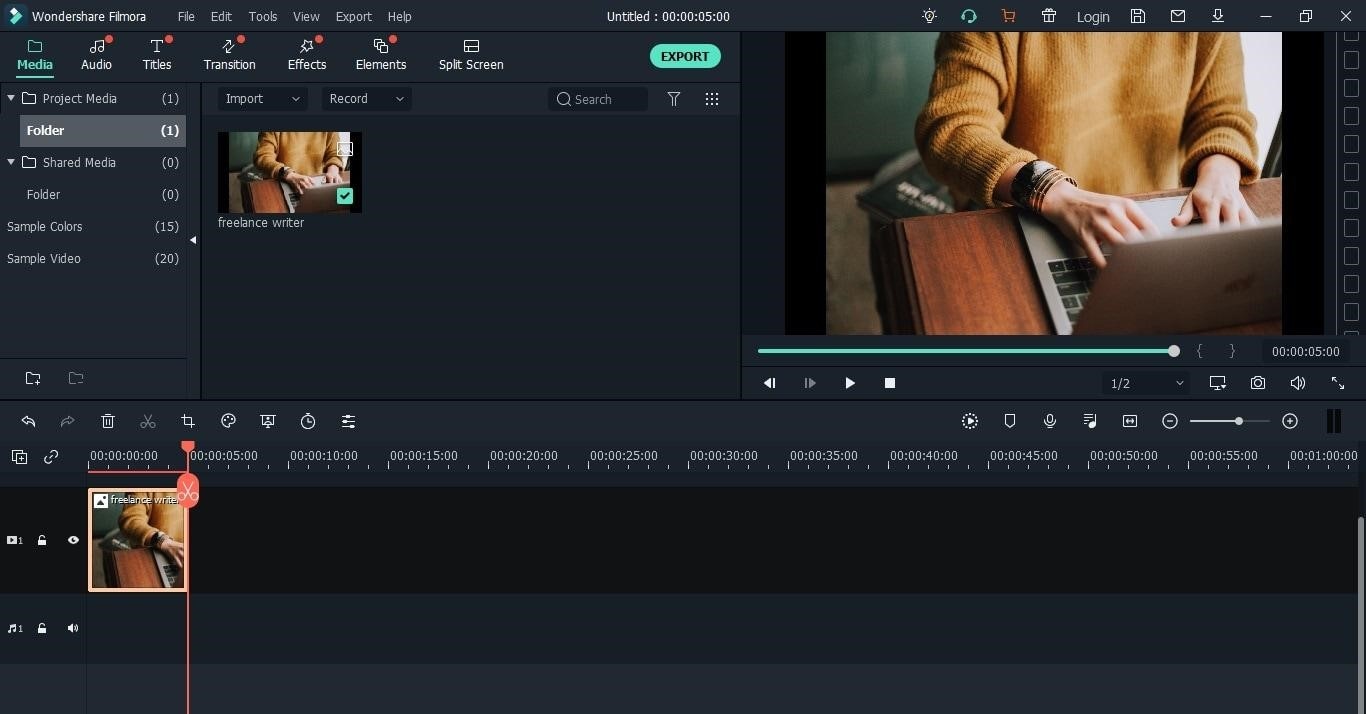
Step1 Create a New Project
- Download the Filmora application.
- Choose to Create a New Project from the main interface.
- Import an image or stock footage from the library. (You can later download the podcast in audio format).
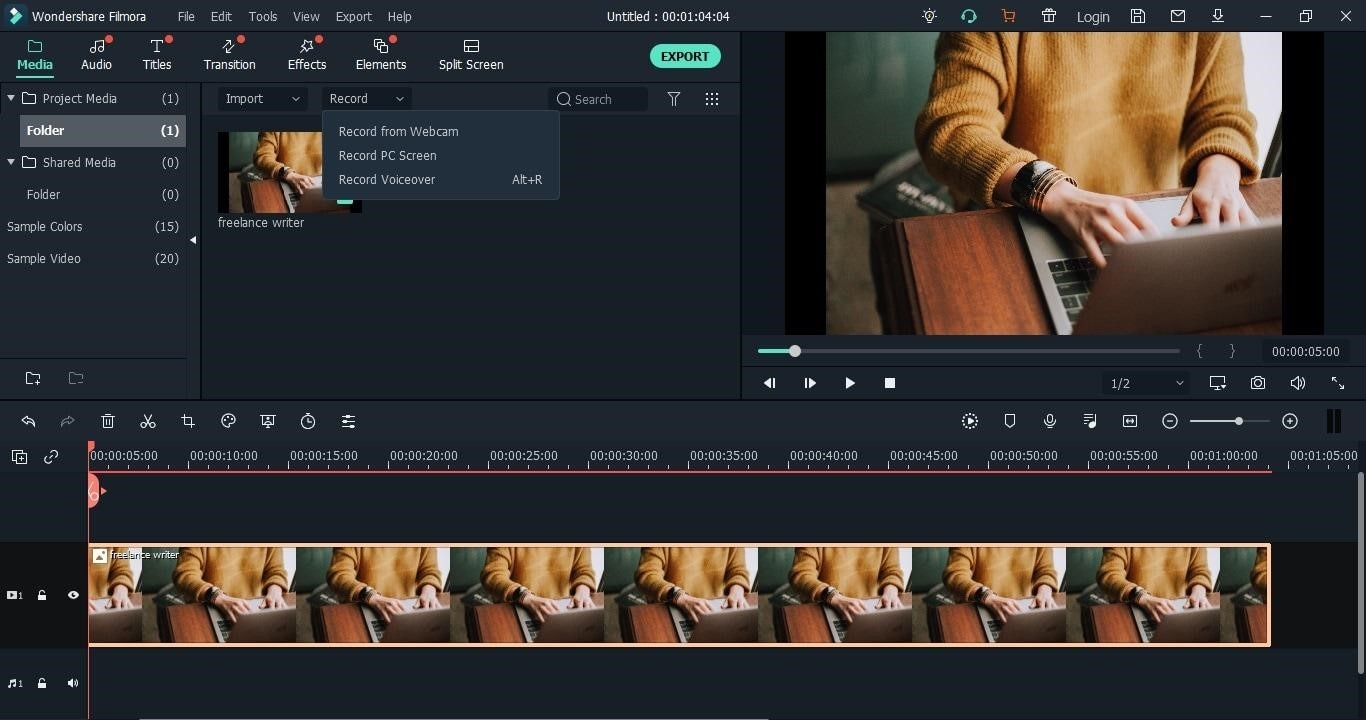
Step2 Start Recording
- Drag the media into the timeline and click the Record button to start recording.
- Click on Record Voiceover from the options.
Step3 Set Microphone
- Connect your Microphone to the computer.
- Select the Microphone device.
- And click on the Red dot button to confirm the Voiceover recording.
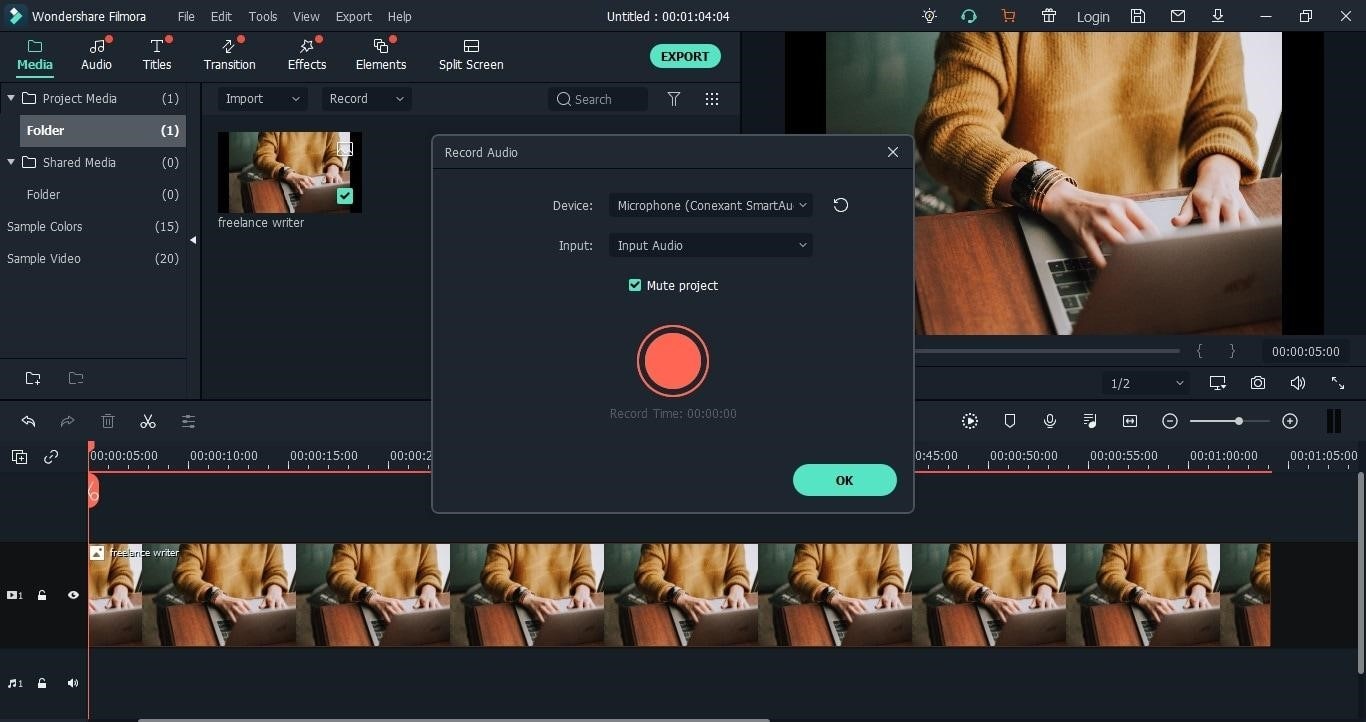
Step4 Record the Podcast
- Click on OK to proceed to record the podcast.
- Go through the outline you’ve prepared and discuss the topics for the podcast episode.

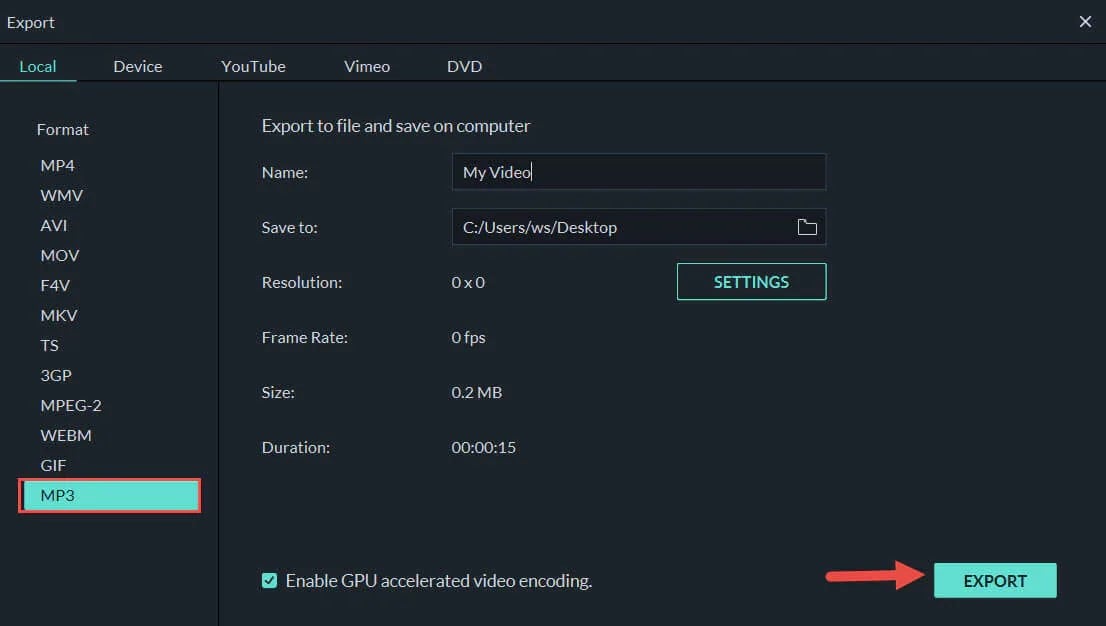
Step5 Export audio
Click on the Export button to download your project from Wondershare Filmora.
Now that you’ve recorded the podcast episode, you must create your podcast’s RSS feed. And submit the podcast RSS feed to Google Podcast Manager.
Hot FAQs on the Google Podcast App
1. Is Google Play the same as Google Podcast?
Earlier, Google featured podcasts on the Google Play platform (hence the name, Google Play Podcast). However, today Google Play does not feature any podcasts. So, you will have to choose Google Podcast
2. Where did Google Music Podcasts go?
Google shut down Google Music on February 24, 2021. However, it allowed users to move their podcasts and music files from Google Music to YouTube before that date. So, there’s a good chance you can find the earlier podcasts available on Google Music on YouTube.
3. Is Google Podcasts Ad-free?
Yes. Google Podcast app is entirely ad-free, and there is no subscription either. So you might see in-episode promotions that individual creators present, but there are no ads in the Google Podcast app.
Final Words
Hopefully, you now know the Google Podcast app and what you will find on the Google Podcast platform. As promised, we have also shown you how to use the Google Podcast app. Retain that you can use the Google Podcast app on all primary OS, including Apple and Android devices. The podcast recommendations in this guide are written to inform users about the great shows that resonate with them.
Another significant aspect of this guide on the Google Podcast app is creating your podcast and submitting it to the platform. Google Podcast, a directory, requires you to create your own podcast and submit the podcasts via RSS feeds. So, even if you want to make your podcast, you can use tools like Filmora and then publish it on Google Podcast to share it with the world.
Part 1. What is Google Podcast App?
Google Podcast (formerly Google Play Podcast) is Google’s proprietary podcast-listening app. It comes pre-installed on some Android smartphones and all Pixel editions. Even Apple users can install Google Podcasts via the App Store. It’s free and lets you discover, stream, and download podcasts.
Google Podcast has already hit 100 million downloads, an indication of its rising popularity both among content creators and users. Users prefer it for its navigable, search-aligned, minimalist interface. And prominent podcast creators are focusing on the app to make their episodes accessible to millions of Android users.
Part 2: Google Podcasts Features
Compatible with Android, iOS, macOS, Windows, Blackberry, and ChromeOS, Google Podcast is relatively a novice compared to dedicated podcast services. Still, Google Podcast seamlessly incorporates nearly every feature one needs to listen to podcasts.
Search and Personalized Recommendations
The most significant feature of Google Podcast is its algorithm-based recommendations that connect users with shows that suit their listening habits. As a new user, you might want to explore new topics and taste new concepts, and that’s where Google Podcast will impress you. But even more than that, it will automatically recommend suitable podcasts depending on your interest and previous engagements with the platform.
Google Podcast app covers a plethora of podcasts, so you do not have to switch to other platforms to discover something new or topics you love.
Free and Ad-free Experience
Google Podcast is completely free in a world where podcast platforms demand high charges for an ad-free and high-quality experience. All you need is a Google account to register and listen to anything available on the platform. In addition, podcast creators have to qualify to Google’s standards before submitting the podcast on the forum, ensuring you will listen to the podcast in high quality.
Clean UI
Whether you’ve used a podcast platform before or not, the Google Podcast platform will seem familiar. Once you sign up, the interface will welcome you with podcasts covering all genres arranged neatly in a grid view for convenience.
In line with simplicity, the Settings option in the Google Platform app is as basic as basic gets. Plus, it allows you to conveniently organize your subscriptions and downloads via the Library tab.
One more thing: although Google Podcast is primarily designed for Android users, its counterparts on other OS, like Apple, Web, and macOS, remain simple and easy to use.
Auto-downloads, Sleep Timer, and Seamless Switch Between Devices
Google Podcast automatically downloads the podcasts you love and removes them after you’ve listened to the particular episodes.
Another significant characteristic of the Google Podcast platform is its intuitiveness. For instance, many podcast platforms do not automatically switch to the next episode, but you do not have to worry about such aspects with Google Podcast. You can also put a sleep timer.
Given that it’s available on all primary OS, you can seamlessly switch from one device to another. Not to forget, you can search for the podcasts using Google search or your Voice Assitant.
Part 3: How Does Google Podcast Work?
Now that you know the Google Podcast app and its features, here’s how to use the platform. Assuming you have downloaded the Google Podcast platform on your device and signed in using your Google account, we will now show you how to search and start listening to podcasts on the platform:
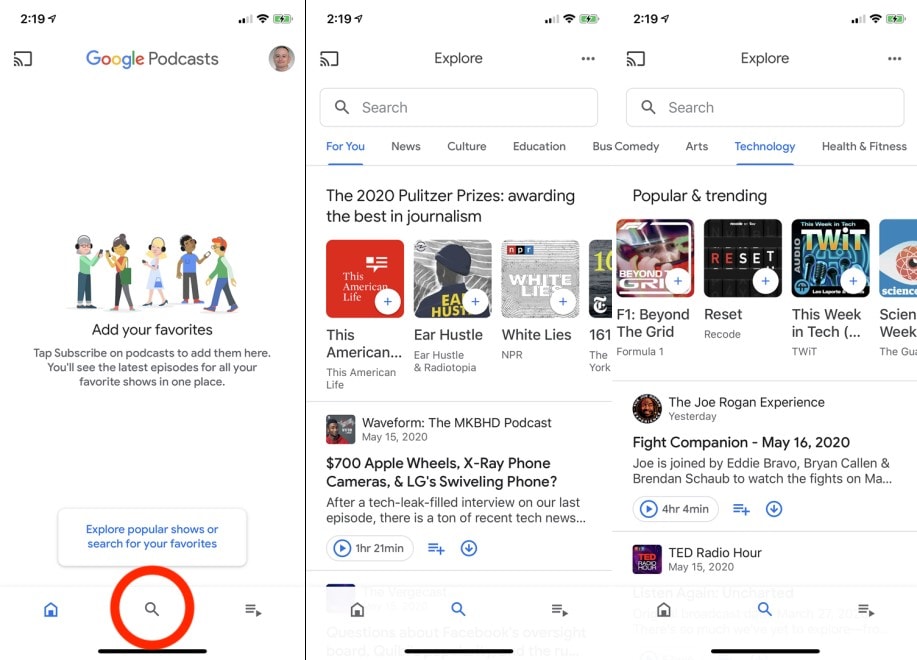
Step1 Add Your Favorites
Once you register on the Google Podcast platform, the app will ask you to explore popular shows or search for your favorites. Once you click on the Explore option, a new screen with categories listed will be shown in the top menu, like For You, News, Culture, Education, Comedy, Technology, and more. Tap on the categories to view the features of podcasts in each category.
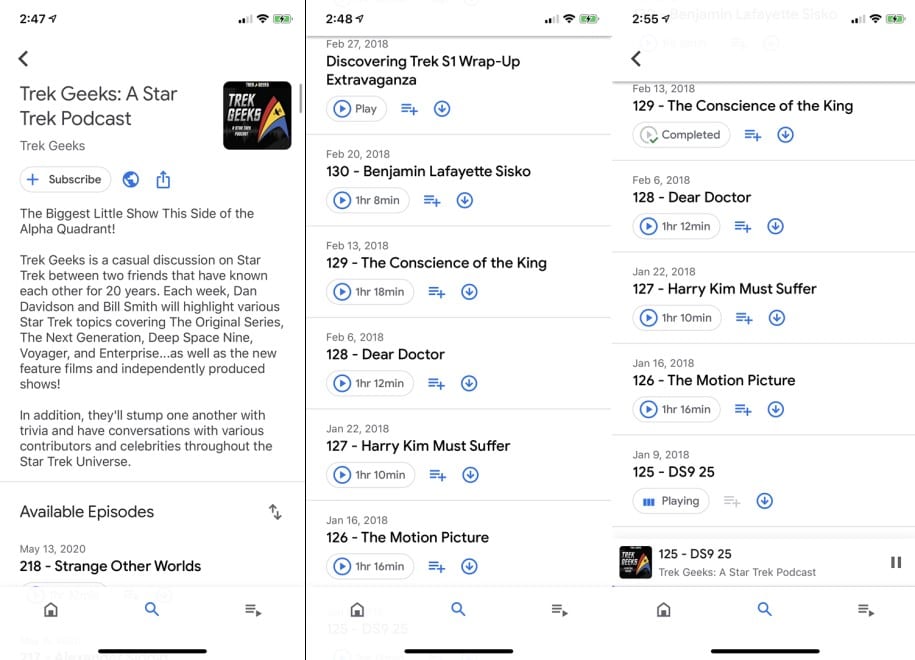
Step2 Search Podcasts Manually
Click on the Search icon and then start typing the name of the podcasts you follow to locate them quickly. Next, tap on the desired podcasts from the search results and scroll down to view individual episodes. Finally, you can click the Subscribe button to follow the channel. The Play icon allows you to listen to the episodes.
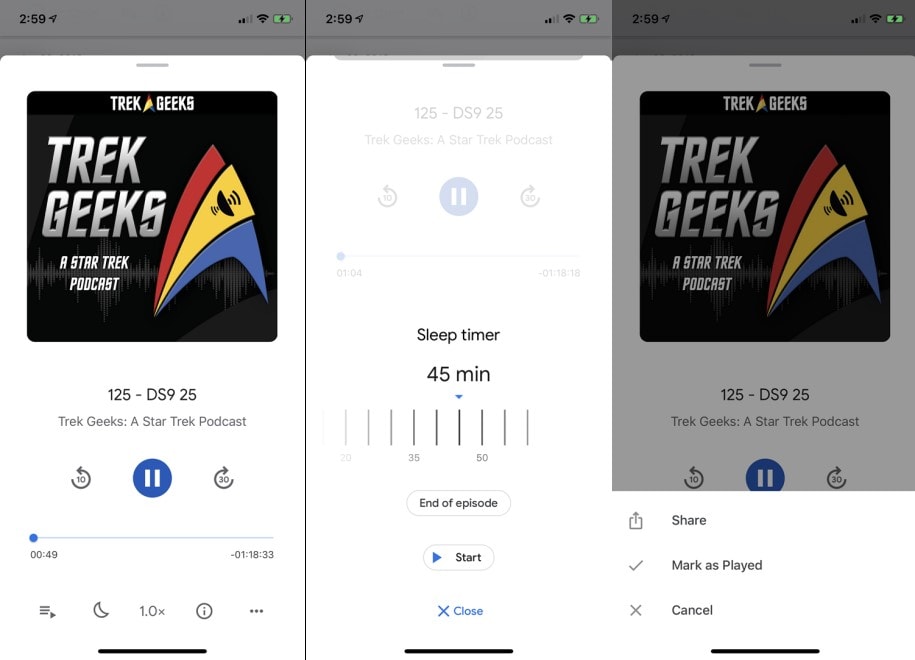
Step3 Controls in the Google Podcast app
Once you play an episode on the Google Podcast platform, you will be taken to full-view mode. The Pause icon allows you to interrupt the episode. Plus, the 10 seconds rewind button allows you to go back and listen to something again.
Whereas the 30 seconds forward button will enable you to jump 30 seconds ahead in the episode, you can use this icon during the introduction or in-episode ads. The Speed icon lets you change the playback speed from 0.5x to 3x.
The “half-moon” icon allows you to set a sleep timer. And the “Info.” icon allows you to read about the individual podcasts (if published by the creators). The “ellipsis” icon (three dots) enables you to mark the episode as played, so it will not recommend the particular episode again. And the share button allows you to share the episode with others.
Step4 Queues and Downloads menu in the Google Podcast App
Given that the Google Podcast is a free platform, you can download all the episodes and listen to them offline. To download the episodes, click on the Download button. Once downloaded, you can access them via the three-lined icon from the bottom-right of the interface. Within the Library tab, you will also find the History tab, which allows you to access all the episodes you’ve previously listened to.
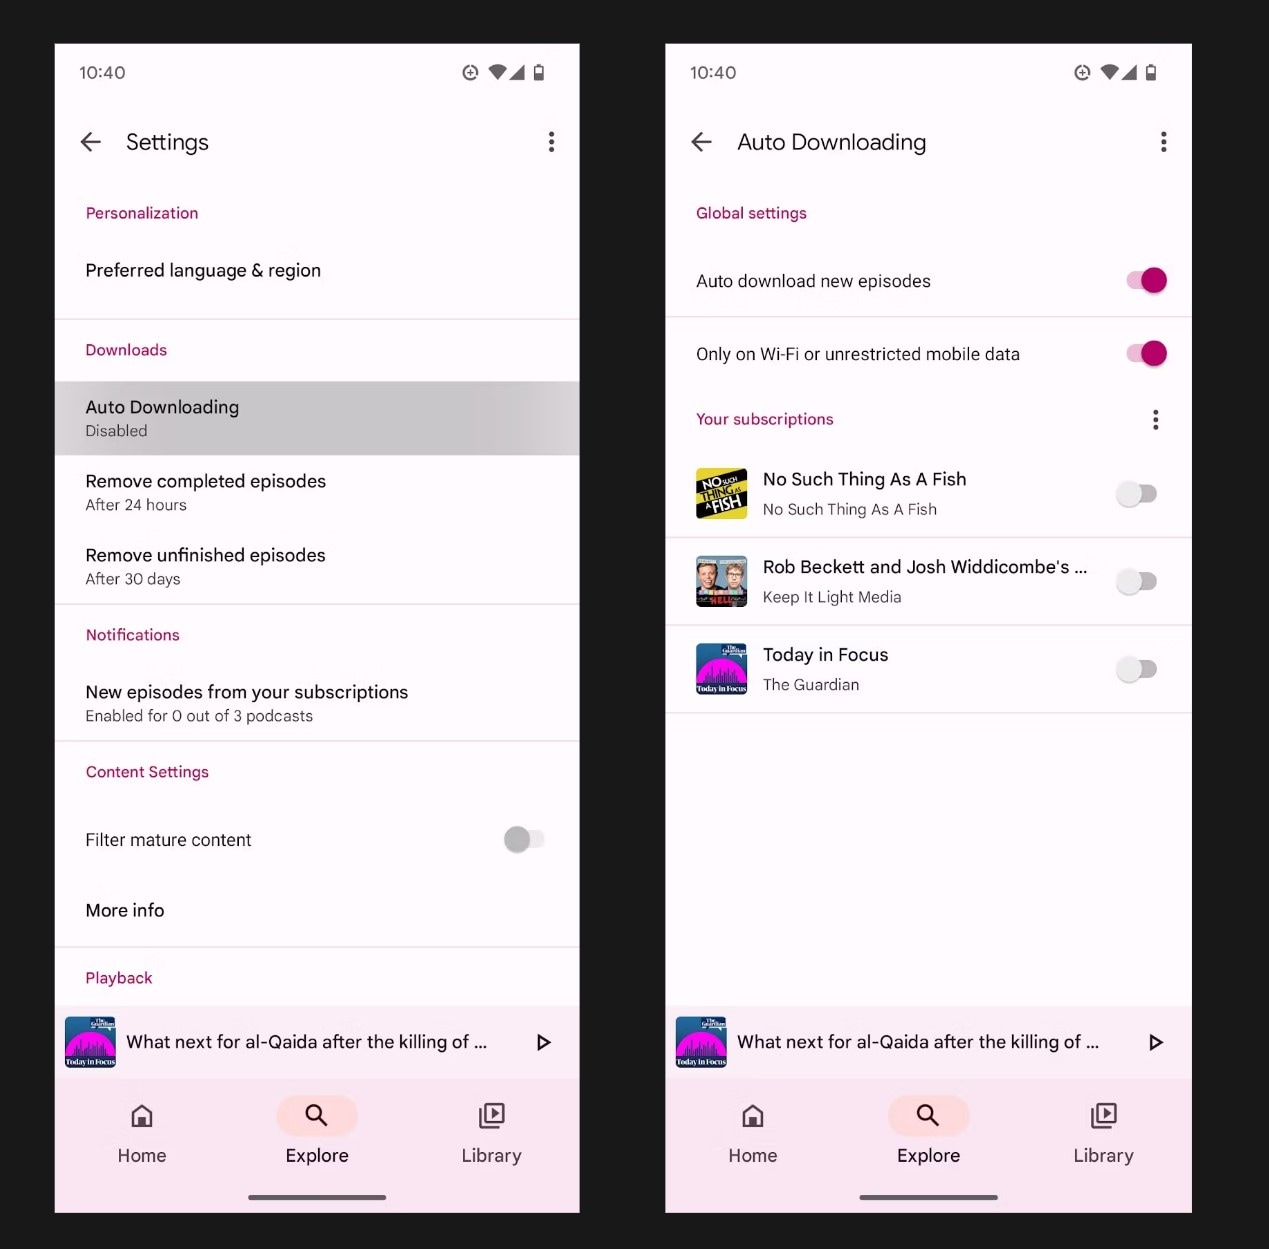
Step5 Settings in the Google Podcast platform
Click on your image at the top-right corner to access the Settings in the Google Podcast app. Under the Google Podcast Settings page, you will find options for Downloads, Notifications, Playback, and more. For instance, Auto-downloads allow you to control the quality of the downloads and when to download (like over mobile data or Wi-Fi).
Plus, you can choose when to auto-delete the episodes, like after a week, and so on. Other options like Playback allow you to decide whether to Auto-play the next episode or not.
Video Tutorial of the Google Podcast App
Here’s a video tutorial 6 Months Later Review Channel: How to Use the New Google Podcasts (2020)
In the video, Josh Teder familiarizes you with Settings, Browse, Library, Subscriptions, and other features of the Google Podcast platform.
Part 4: 10 Popular & Trending Podcasts on Google Podcast App
Now that you have a complete idea about the Google Podcast app, here are some of the best podcasts featured on the platform. Of course, given the popularity of podcasts, the choices are endless. But it is vital to retain that with great options comes great mediocrity.
That is why we asked all our team members to contribute and came up with this short list of best podcasts on the Google Podcast app that covers all genres. So, whether your interests lie in tech, true crime, pop culture, or comedy, you will find something that educates and entertains you.
1. Best Podcast on Art & Culture
Host: Jennifer Dasal
Number of Episodes on ArtCurious: More than 100.
Episodes Duration: 15-25 minutes
Upload Frequency: Weekly
Discussing the unexpected, the slightly odd, and the strangely wonderful in Art History, ArtCurious is nothing like an art class where terminologies are thrown and linear perspective is discussed. Instead, it discusses the juicy stuff!
On ArtCurious, you will find hidden truths about famous artists and creators, like why Van Gogh committed suicide. In addition, you will learn about the strange habits of revolutionary artists. If you are an art enthusiast and want to explore the unseen corners of art history, ArtCurious will fill your thirst.
2. Best Tech Podcasts
Host: Dan Moren and Mikah Sargent + 2 Guests (every week)
Number of Episodes on Clockwise: More than 400.
Episode duration: 30 minutes
Upload Frequency: Weekly
Dan Moren and Mikah Sargent invite two guests each week to discuss tech-related topics to inform, educate, and make aware of the not-so-tech generation. If you struggle with technology, like creating a good password, optimizing screen time, etc. Also, Clockwise is one podcast that can be the cure. It is important to note that Clockwise does not necessarily discuss heavy-tech stuff; instead, it is intended for the tech illiterates to make their life easier.
3. Best Talkshow and Interview Podcasts
Host: Terry Gross
Number of Episodes on Fresh Air: Daily since 1993.
Episodes duration: 45 minutes
Upload Frequency: Daily
Terry Gross, a famed-journalists and talk show host since the 90s, continues to feature weekly episodes covering present-day musicians, actors, producers, athletes, and artists.
On Fresh Air, you will discover exciting stuff about celebrities and find answers like how fame is a challenge in the social sphere and many more unusual things that you won’t find on any other talk show. Terry Gross interviews a single guest for about 45 minutes daily and indulges audiences with what’s happening worldwide.
4. Best Health Podcast
Host: Andrew Huberman
Number of Episodes on Fresh Air: More than 100.
Episode duration: 2 hours to 4 hours.
Upload Frequency: Weekly
Andrew Huberman, Professor of Neurobiology and Ophthalmology at Stanford School of Medicine, discusses the brain and its connection with body control. The episodes of Huberman Lab are long, ranging from 2 to 4 hours. So, if you want to change your habits and learn about nutrition, how to sleep, and more, Huberman Lab is the perfect addition to your Monday schedule.
5. Best History Podcast
The Bowery Boys New York City History
Host: Tom Meyers, Greg Young
Number of Episodes on Fresh Air: More than 400.
Episode duration: 1 to 2 hours.
Upload Frequency: 15 days.
American history is deeply rooted in the streets of New York City. The Underground Railroad, the elevated railroad, and the Hudson River: Host Tom Meyers and Greg Young discuss the 400 years of History of New York City. It discusses the famous leaders, the strange, and the myths created over the years and presents these stories via action-packed episodes.
6. Best Informative Podcast
Host: Stephen J. Dubner
Number of Episodes on Fresh Air: More than 500.
Episode duration: 30 to 60 minutes.
Upload Frequency: Weekly
Hosted by Dr. Stephen J. Dubner, Freakonomics Radio reveals the hidden sides of things. The things you think you know or you think you do not have to know, Freakonomics Radio will introduce topics that are typical for you and tell interesting stuff that amazes you.
It also informs you about things you might ignore and makes you more aware of everything. The best thing is Dubner invites Nobel laureates and provocateurs, intellectuals and entrepreneurs, and even underachievers to learn about things from all perspectives.
7. Best News & Politics Podcast
Host: Nate Silver
Number of Episodes on Fresh Air: More than 500.
Episode duration: 30 to 60 minutes.
Upload Frequency: Weekly
A subsidiary of ABC News, FiveThirtyEight Politics uses data and evidence-based knowledge to inform, educate, and make people aware of the current political situation across the 50 States. It’s suitable for anyone interested in knowing the truth of today’s American politics and the difference between the real truth and the created truth.
8. Best Sports Podcasts
Host: Bill Simmons
Number of Episodes on Fresh Air: More than 100.
Episode duration: 30 to 60 minutes.
Upload Frequency: Monthly
30 for 30 comes from the acclaimed makers of the 30-for-30 film series. Like documentaries, the 30 for 30 podcasts discuss sports legends, their stories, and unheard things about them. Beyond being informative, 30 for 30 also teaches you to explore sports and adventures. Even if you do not like sports or are not a football fan, you will surely enjoy tuning in to 30 for 30 episodes and getting lost in the busy lives of the sports legends.
9. Miscellaneous Podcasts
Host: Dan Schreiber, James Harkin, Andrew Hunter Murray, and Anna Ptaszynski.
Number of Episodes on Fresh Air: More than 400.
Episode duration: 1 hour.
Upload Frequency: Weekly
An award-winning podcast, No Such Thing As a Fish, comes from QI Offices and is about fun topics or something the creators have recently discovered. If you are looking for something fun yet interesting that informs and educates you, No Such Thing As a Fish is a perfect weekly podcast. The episodes are brief yet action-packed. And you will learn just about anything, from gorillas to caterpillars, on the podcast.
10. Movies, Music, and TV Podcasts
Host: Eric Molinsky
Number of Episodes on Fresh Air: More than 400.
Episode duration: 40 minutes.
Upload Frequency: Bi-weekly.
A podcast on science fiction, fantasy, and other genres, Eric Molinsky on Imaginary Worlds invite comic book artists, game designers, novelists, screenwriters, and filmmakers to discuss their crafts. Imaginary Worlds is just about what it sounds like, i.e., creating fictional worlds.
However, instead of just informing, it also guides artists and writers on how to form an imaginary world. A bi-weekly podcast, Imaginary Worlds is perfect for anyone interested in exploring new possibilities and imagining via different lenses.
Part 5: How to Record Your Podcast Show for Google Podcast App?
Google Podcast platform also allows individual creators to upload their podcasts to the platform and share it with the world. Given its popularity and user base, it’s one of the best ways to rise in the podcast realm and get that edge over others.
So, if you are interested in creating podcasts, here’s how to get started. For recording a podcast, you will have to use a third-party tool like Wondershare Filmora. Unlike Apple Podcasts, Google Podcasts does not provide a web studio to create a podcast on the platform.
Google Podcast is a podcasting directory; it does not store any audio files. Instead:
- It would help if you created the podcast somewhere else, like using Wondershare Filmora for recording.
- Upload it or store it in another location, like a Website. Or you can create a podcast-only RSS feed.
- And then submit the RSS feed to the Google Podcast Manager.
So, let’s first learn how to record podcasts using Wondershare Filmora.
Free Download For Win 7 or later(64-bit)
Free Download For macOS 10.14 or later
Wondershare’s Filmora is one of the best platforms to seamlessly record audio and video podcasts. Its straightforward and self-explanatory user interface allows even novices to record podcasts without going through any learning curve.
Besides recording, Filmora also allows you to edit audio and video. For instance, you will find dedicated toggles to limit background interferences, enhance microphone sound, fade in/out effects, and give access to several such features to create podcasts like a professional. You can also export the audio in the format that Google Podcast requires, like M4A, MP3, OGG, and WAV.
Key Features of Wondershare Filmora
- AI-based Silence Detection: remove moments of silence from the podcast with one click.
- Text to speech: transcript your text files into speech for the podcast.
- Speech to Text: transcribe their voice to subtitles in several languages. It increases accessibility, and users worldwide can understand your podcast seamlessly.
- Audio Ducking: Add background music to your podcast and manage the sound levels to create podcasts like professionals.
- Audio Visualizer: enhance your podcast episodes through audio-visualizing effects.
Here’s How to Create Your Own Podcast Using Wondershare Filmora?
Step1 Create a New Project
- Download the Filmora application.
- Choose to Create a New Project from the main interface.
- Import an image or stock footage from the library. (You can later download the podcast in audio format).
Step2 Start Recording
- Drag the media into the timeline and click the Record button to start recording.
- Click on Record Voiceover from the options.
Step3 Set Microphone
- Connect your Microphone to the computer.
- Select the Microphone device.
- And click on the Red dot button to confirm the Voiceover recording.
Step4 Record the Podcast
- Click on OK to proceed to record the podcast.
- Go through the outline you’ve prepared and discuss the topics for the podcast episode.
Step5 Export audio
Click on the Export button to download your project from Wondershare Filmora.
Now that you’ve recorded the podcast episode, you must create your podcast’s RSS feed. And submit the podcast RSS feed to Google Podcast Manager.
Hot FAQs on the Google Podcast App
1. Is Google Play the same as Google Podcast?
Earlier, Google featured podcasts on the Google Play platform (hence the name, Google Play Podcast). However, today Google Play does not feature any podcasts. So, you will have to choose Google Podcast
2. Where did Google Music Podcasts go?
Google shut down Google Music on February 24, 2021. However, it allowed users to move their podcasts and music files from Google Music to YouTube before that date. So, there’s a good chance you can find the earlier podcasts available on Google Music on YouTube.
3. Is Google Podcasts Ad-free?
Yes. Google Podcast app is entirely ad-free, and there is no subscription either. So you might see in-episode promotions that individual creators present, but there are no ads in the Google Podcast app.
Final Words
Hopefully, you now know the Google Podcast app and what you will find on the Google Podcast platform. As promised, we have also shown you how to use the Google Podcast app. Retain that you can use the Google Podcast app on all primary OS, including Apple and Android devices. The podcast recommendations in this guide are written to inform users about the great shows that resonate with them.
Another significant aspect of this guide on the Google Podcast app is creating your podcast and submitting it to the platform. Google Podcast, a directory, requires you to create your own podcast and submit the podcasts via RSS feeds. So, even if you want to make your podcast, you can use tools like Filmora and then publish it on Google Podcast to share it with the world.
Embedding Audio Layers Into Moving Image Projects with Premiere Pro
Versatile Video Editor - Wondershare Filmora
An easy yet powerful editor
Numerous effects to choose from
Detailed tutorials provided by the official channel
Look at any of the spot commercials, wedding videos, or even some family candid videos. Adding audio makes them appealing and likable. To catch a potential customer or create an emotional connection with the viewer combination of audio and video is a must. This makes the footage attractive and exceptional.
Read on to know more about the step-by-step approach how to add audio to video in Adobe Premiere Pro.
In this article
01 [How to add audio to video in Premiere Pro](#Part 1)
02 [How to adjust audio in Premiere Pro](#Part 2)
03 [Adding Audio to Video files](#Part 3)
Part 1 How to add audio to video in Premiere Pro
Some essential pointers for all would-be videographers are:
● Before you add audio to video in Premiere Pro, be ready to see your file size increase to a large extent. If you add a background score of 15MB, your total video file size will increase by the same amount of 15MB. The best way to take care of such a problem is to use additional compression techniques to get a suitable file size.
● Most videographers use lots of software tools to add audio to video professionally. One such trending software tool is the Adobe Premiere Pro. Its simple to add audio to video in Premiere Pro, edit your audio and video, and fine-tune the audio volume of each video project.
Let’s learn how.

Step1 Find out the Audio option
Navigate to the Audio workspace, select Audio at the top on the tools bar
Step2 Choose the Workspace
Click Window select Workspace click on Audio
Step3 Check toolbar
Within Audio, click on Choose Window Media Browser to show the Media Browser toolbar.
Step4 Select audio files
Go to your audio file; for Windows OS, right-click or control-click the selected audio file for macOS.
Step5 Import and add
Please select the desired audio file, then click import to add it to your Project.
An important tip is to keep the Ingest box selected if you want to copy your audio file concurrently to your project folder.
Adding audio to your series

Step1 Go to the Project panel
Select Window, click on Project to open the Project panel.
Step2 Select audio file
Click on the audio file you imported to select it.
Step3 Check the waveform
Double click the file to open it in the Source panel to check the sound and waveform.
Step4 Check sounds
Play the audio file if you want to check the audio quality, volume, and overall sound.
Step5 Add audio to the video track
Hold the left click on your mouse to drag the audio file to the series in the Timeline panel. You can add any audio file to the video track listed in the panel window in this step.
Step6 Trim audio file
Select the Trim option to trim your audio file the same way you will edit the video file in the final step.
Part 2 How to adjust audio in Premiere Pro
Now that you have understood how to add audio to video in Adobe Premier Pro. Let’s know how to adjust audio in Premier Pro.

Step1 Activate the series
Press on the spacebar to activate your series in the Program panel (appears in the top right of the panel)
Step2 Stop playback
To stop the playback, press the space bar again.
Step3 Choose starting point of playback
Press down the left mouse button to hold and drag the Blue colored play head to wherever you desire the playback to start.
If you feel the audio track is mild or too harsh compared to the rest of the audio series, change each audio track’s volume separately.
Step1 Select Audio Track Mixer
Click Window selects Audio Track Mixer from the menu.
Step2 Click the series name to see the audio mixer
Click the series name of your audio file to show the audio mixer for your series.
Step3 Choose playback to play the audio
At the bottom of the panel is the Audio Track Mixer. Click on playback to star, pause or play your audio in-ring sequence.
Step4 Click on the slider
When your audio file plays or loops, click on the slider to move up or down. It will increase or reduce the volume of each separate audio track in your audio series.
Step5 Adjust the volume
Use the slider to adjust the overall audio volume
Tips
Always keep the audio projects within the -6 to 3 dB volume range to get the best quality of the audio effect. Any lower you won’t be able to hear the sound, or if it’s higher, the sound will hurt the listeners’ ears.
Professional advice to all beginner-level videographers is that as Premiere Pro is complex so you need more straightforward tools like Filmora for all your video editing work. Filmora is easy to use and much cheaper than Premiere Pro.
You may think now why or how Filmora can be the best as an alternative on how to add audio to video using Premiere Pro. Well! It will help you to transform your video into a piece of art incredibly by offering simple drag and drop options, including an easy-to-use interface and powerful editing tools. You can:
● Edit and create your videos with minimal effort
● Get a Music Library to add comedy, fear, tension, and love to every scene
● Get several royalty-free songs and sound effects
● Create videos with up to 800 stunning effects
● Unleash your creativity with its offered Hollywood effects
● Import and export in almost any type of video format
How to use Filmora to add audio to video
Adding sound to any video file enhances its viewability and the whole experience of watching any video. To do this, you need to add audio to video. The same can be done quickly in Filmora, a 3rd-party video editing software tool now the hot favorite of amateur and professional video editors. Below we describe how to add audio to video in Filmora.
Import Media
To start the process of adding audio to video follow these steps.
Step1 Select the audio, add using the Import option or drag and select
Import selected audio using the Filmora Media Panel and add it to your timeline. You can also choose and drag the audio file from the source folder to the Media Panel. Filmora supports multiple audio file formats to ease adding audio to video. The supported audio files are MP3, M4V, MPA, WAV, WMA.

Step2 Add and make the audio file
Adding the audio file to Filmora Media Panel makes it a media asset and can now be used multiple times in future projects. The original file remains as Filmora doesn’t change the original audio file.
Step3 Copying or deleting an audio file
In Filmora, using the feature of copying or deleting an audio file, you can work on the audio and video from any computer or remote PC.
Part 3 Adding Audio to Video files
Using Filmora, it is easy to sync or add audio to the video, which is separately recorded and stored on your device.
Using Filmora, it is easy to sync or add audio to the video, which is separately recorded and stored on your device.
Step1 Click on Import in the Media Panel
Select the audio and video files to import them into Filmora.
Step2 Click on the video file to add audio
Press the Ctrl key (Windows) or Cmd key (Mac OS) and click on the audio file.
Step3 Add audio to video
Right-click on the files selected and choose the Merge audio & video option to add audio to the video.
Filmora analyzes audio and video files and replaces the existing audio with the newly selected audio file. Once the synchronization process is over, the new merged file will be available in the Media Panel for future processing.
The synchronized file will have the same terminology as the original video file with a difference. It will get an extension Merged to its name.
The original file will not get affected in Filmora. This software tool only references the files to generate a new file. The new file created when you add audio to the video can now be added to the timeline and exported.
Wondershare Filmora
Get started easily with Filmora’s powerful performance, intuitive interface, and countless effects!
Try It Free Try It Free Try It Free Learn More about Filmora>

Conclusion
So, this article listed how to add audio to video in Premiere Pro via a step-by-step guide. The guide lets you know the easy method of adding audio to video in Adobe Premiere Pro to all potential videographers. Thus, you can now start your journey of video edition by putting your best click forward!
Look at any of the spot commercials, wedding videos, or even some family candid videos. Adding audio makes them appealing and likable. To catch a potential customer or create an emotional connection with the viewer combination of audio and video is a must. This makes the footage attractive and exceptional.
Read on to know more about the step-by-step approach how to add audio to video in Adobe Premiere Pro.
In this article
01 [How to add audio to video in Premiere Pro](#Part 1)
02 [How to adjust audio in Premiere Pro](#Part 2)
03 [Adding Audio to Video files](#Part 3)
Part 1 How to add audio to video in Premiere Pro
Some essential pointers for all would-be videographers are:
● Before you add audio to video in Premiere Pro, be ready to see your file size increase to a large extent. If you add a background score of 15MB, your total video file size will increase by the same amount of 15MB. The best way to take care of such a problem is to use additional compression techniques to get a suitable file size.
● Most videographers use lots of software tools to add audio to video professionally. One such trending software tool is the Adobe Premiere Pro. Its simple to add audio to video in Premiere Pro, edit your audio and video, and fine-tune the audio volume of each video project.
Let’s learn how.
Step1 Find out the Audio option
Navigate to the Audio workspace, select Audio at the top on the tools bar
Step2 Choose the Workspace
Click Window select Workspace click on Audio
Step3 Check toolbar
Within Audio, click on Choose Window Media Browser to show the Media Browser toolbar.
Step4 Select audio files
Go to your audio file; for Windows OS, right-click or control-click the selected audio file for macOS.
Step5 Import and add
Please select the desired audio file, then click import to add it to your Project.
An important tip is to keep the Ingest box selected if you want to copy your audio file concurrently to your project folder.
Adding audio to your series
Step1 Go to the Project panel
Select Window, click on Project to open the Project panel.
Step2 Select audio file
Click on the audio file you imported to select it.
Step3 Check the waveform
Double click the file to open it in the Source panel to check the sound and waveform.
Step4 Check sounds
Play the audio file if you want to check the audio quality, volume, and overall sound.
Step5 Add audio to the video track
Hold the left click on your mouse to drag the audio file to the series in the Timeline panel. You can add any audio file to the video track listed in the panel window in this step.
Step6 Trim audio file
Select the Trim option to trim your audio file the same way you will edit the video file in the final step.
Part 2 How to adjust audio in Premiere Pro
Now that you have understood how to add audio to video in Adobe Premier Pro. Let’s know how to adjust audio in Premier Pro.
Step1 Activate the series
Press on the spacebar to activate your series in the Program panel (appears in the top right of the panel)
Step2 Stop playback
To stop the playback, press the space bar again.
Step3 Choose starting point of playback
Press down the left mouse button to hold and drag the Blue colored play head to wherever you desire the playback to start.
If you feel the audio track is mild or too harsh compared to the rest of the audio series, change each audio track’s volume separately.
Step1 Select Audio Track Mixer
Click Window selects Audio Track Mixer from the menu.
Step2 Click the series name to see the audio mixer
Click the series name of your audio file to show the audio mixer for your series.
Step3 Choose playback to play the audio
At the bottom of the panel is the Audio Track Mixer. Click on playback to star, pause or play your audio in-ring sequence.
Step4 Click on the slider
When your audio file plays or loops, click on the slider to move up or down. It will increase or reduce the volume of each separate audio track in your audio series.
Step5 Adjust the volume
Use the slider to adjust the overall audio volume
Tips
Always keep the audio projects within the -6 to 3 dB volume range to get the best quality of the audio effect. Any lower you won’t be able to hear the sound, or if it’s higher, the sound will hurt the listeners’ ears.
Professional advice to all beginner-level videographers is that as Premiere Pro is complex so you need more straightforward tools like Filmora for all your video editing work. Filmora is easy to use and much cheaper than Premiere Pro.
You may think now why or how Filmora can be the best as an alternative on how to add audio to video using Premiere Pro. Well! It will help you to transform your video into a piece of art incredibly by offering simple drag and drop options, including an easy-to-use interface and powerful editing tools. You can:
● Edit and create your videos with minimal effort
● Get a Music Library to add comedy, fear, tension, and love to every scene
● Get several royalty-free songs and sound effects
● Create videos with up to 800 stunning effects
● Unleash your creativity with its offered Hollywood effects
● Import and export in almost any type of video format
How to use Filmora to add audio to video
Adding sound to any video file enhances its viewability and the whole experience of watching any video. To do this, you need to add audio to video. The same can be done quickly in Filmora, a 3rd-party video editing software tool now the hot favorite of amateur and professional video editors. Below we describe how to add audio to video in Filmora.
Import Media
To start the process of adding audio to video follow these steps.
Step1 Select the audio, add using the Import option or drag and select
Import selected audio using the Filmora Media Panel and add it to your timeline. You can also choose and drag the audio file from the source folder to the Media Panel. Filmora supports multiple audio file formats to ease adding audio to video. The supported audio files are MP3, M4V, MPA, WAV, WMA.
Step2 Add and make the audio file
Adding the audio file to Filmora Media Panel makes it a media asset and can now be used multiple times in future projects. The original file remains as Filmora doesn’t change the original audio file.
Step3 Copying or deleting an audio file
In Filmora, using the feature of copying or deleting an audio file, you can work on the audio and video from any computer or remote PC.
Part 3 Adding Audio to Video files
Using Filmora, it is easy to sync or add audio to the video, which is separately recorded and stored on your device.
Using Filmora, it is easy to sync or add audio to the video, which is separately recorded and stored on your device.
Step1 Click on Import in the Media Panel
Select the audio and video files to import them into Filmora.
Step2 Click on the video file to add audio
Press the Ctrl key (Windows) or Cmd key (Mac OS) and click on the audio file.
Step3 Add audio to video
Right-click on the files selected and choose the Merge audio & video option to add audio to the video.
Filmora analyzes audio and video files and replaces the existing audio with the newly selected audio file. Once the synchronization process is over, the new merged file will be available in the Media Panel for future processing.
The synchronized file will have the same terminology as the original video file with a difference. It will get an extension Merged to its name.
The original file will not get affected in Filmora. This software tool only references the files to generate a new file. The new file created when you add audio to the video can now be added to the timeline and exported.
Wondershare Filmora
Get started easily with Filmora’s powerful performance, intuitive interface, and countless effects!
Try It Free Try It Free Try It Free Learn More about Filmora>
Conclusion
So, this article listed how to add audio to video in Premiere Pro via a step-by-step guide. The guide lets you know the easy method of adding audio to video in Adobe Premiere Pro to all potential videographers. Thus, you can now start your journey of video edition by putting your best click forward!
Audiophile’s Roadmap: The Seventh Generation of Acoustic Modifications
7 Types of Audio Effects You Should Know

Benjamin Arango
Mar 27, 2024• Proven solutions
When it comes to producing music, audio effects are a next-level creative tool that you can make use of to create highly enthralling and creative music/videos.
You can either create audio effects of your own or make use of a predefined royalty-free audio effects template (if you don’t wish to invest, as a beginner).
Audio effects have the power to transform any so-so music into a superior finished track.
For this reason, we’ve specifically tailored this post to help you understand the insights of audio effects. Moreover, we’re also going to get familiar with 7 audio effects that must be known! So, let’s not delay any further and start exploring.
- Part 1: The Definition of Audio Effects
- Part 2: Audio effects - Reverb
- Part 3: Audio effects - Panning
- Part 4: Audio effects - Equalization
- Part 5: Audio effects - Delay and Echo
- Part 6: Audio effects - Distortion
- Part 7: Audio effects - Chorus
- Part 8: Audio effects - Filters
Part 1: The Definition of Audio Effects
Before we get our hands on the different core types of audio effects, we should first understand what audio effects are!
Basically, the audio effects are generated by software or hardware devices by manipulating how an audio signal sounds. One can control the Effects with the help of several parameters.
For instance, rate, drive, or feedback. They come in handy as studio tools during the mixing or recording of music or while playing live.
Here are some core types of audio effects we will discover further in the article.
- Time-based effects include “Reverb” and “Delay and Echo.”
- Spectral effects include the “Equalization (EQ)” and “Panning.”
- Dynamic effects include “Distortion.”
- Modulation effects include “Chorus.”
- And “Filters.”
Part 2: Audio effects - Reverb
Reverb is nothing but an audio effect of many echoes occurring simultaneously.
In other words, sound reaches your ears in two ways. One that directly reaches your eardrums without any obstacles or surfaces.
And the other, a bunch of sound waves that reach your ears after getting bounced off different surfaces. This set of echoes reach your eardrums later and is quieter (due to lesser energy).

You may experience different types of reverb audio effects for different kinds of spaces. Basically, Reverb stands for Reverberation. It happens quite always in our daily life, but we hardly notice it.
For instance, Reverb at tunnels or caves is different from the reverb audio effect of cathedrals or halls.
Reverb audio effects can be generated digitally with the help of reverb plugins to create multiple echoes algorithmically and by manipulating the Delay, level, or frequency response.
Part 3: Audio effects - Panning
The panning audio effect is generally created to cast an illusion that the source of the sound is moving from one position of the stage to another. This is achieved by distributing the sound signal in a multichannel or a stereo field.
Panning audio effect is highly helpful when you need to avoid muddiness or masking (when two tracks/sounds overlap) in your mix. You can position the sound artificially to a specific area of your stereo field.

With the help of an auto-pan, you can define the time span during which the sound must sweep across the stereo field.
Usually, the lead elements like vocals or the low-frequency elements like bassline drums panned to the center. This is because the center is the busiest, and also these sound elements ground your mix.
Part 4: Audio effects - Equalization
The sound frequency that falls into the range from 20 to 20,000 Hz is the audible sound spectrum of human ears. With the EQ technique, this spectrum is split into different sections referred to as bands.
These bands are then used to subdue or enhance a mixed track’s fragments.

Remember, EQ-ing works on the existing spectrum only by altering the fragments to create novel-sounding effects. EQ audio effects are majorly used to define a character or tone of the soundtrack.
Moreover, you can define different types of sound characters with the help of different EQ audio effects. For instance, a digital plugin EQ is far more transparent sounding when compared to a vintage EQ.
Part 5: Audio effects - Delay and Echo
Delay is yet another type of audio effect that falls under the Time-based category. Adding layers can significantly provide more complexity and depth to a soundtrack.
The foundation to add Reverb or chorus-like other audio effects is furnished by Delay. Hence, it is prominently utilized by several mixing engineers.

The echo also falls under the time-based audio effect, which is developed due to the Delay audio effect. An echoing effect is simulated at various intervals when Delay audio effect features playback heads or “taps” that are heard apart.
If you want to edit audios like a pro, you should use Filmora . It is the best video editor for different users. You can add echo to audio by directly dragging the effect onto the timeline. Download it now to have a try (Free)!


Part 6: Audio effects - Distortion
When an audio circuit is overloaded, it ultimately leads to a clip the signal is termed as Distortion.
This audio effect can be a highly creative tool if used correctly. Distortion pushes the sound to compress and clip by manipulating the original audio signal.

By manipulating the bit rate or the sampling rate, Bit-crushing is achieved. This, eventually, adds harmony to the sound.
Usually, the electric guitars make use of Distortion audio effect but more progressively it is being used over Synths.
Distortion can be acquired using effects units, rackmounts, pedals, VSTs, or at times, built-in amplifiers and pre-amps. Distortion adds complexity and body to your track by making it fatter and fuller.
Part 7: Audio effects - Chorus
Chorus audio effect is referred to the varying sounds that are similar and are heard as one.
For instance, recording the same note piled over each other and is timed and tuned slightly off each other.
This as a whole, creates a chorus effect. In simple words, a group of singers is voicing a song while creating a special sound effect.
The chorus, too, adds complexity and depth to your soundtracks. It is generally used to enhance the harmony or load up the particular track, making the track fuller and layered.
Part 8: Audio effects - Filters
An audio signal’s frequency range can be altered using the Audio filters. With the help of an audio filter, you can easily amplify or boost the frequency range.
Or, can even cut or attenuate a frequency range too. When it comes to categorizing the Audio Filters, they fall under 3 units; HPF (High-pass filters), LPF (Low-pass filters), BPF (Band-pass filters).

Every other filter has a well-defined threshold for boosting or cutting a frequency. They are then categorized depending on the alterations that have been made above or below this threshold.
An Audio filter is a prominent tool used to correct problems and significantly enhance tracks. You can effectively make dramatic effects or add character to the soundtrack with filters.
Conclusion
With this comprehensive discussion on audio effects and various core types of audio effects, it’s now time to conclude this topic. We now believe you have a full understanding of these core audio effects and can effectively use them as per your needs.
Benjamin Arango
Benjamin Arango is a writer and a lover of all things video.
Follow @Benjamin Arango
Benjamin Arango
Mar 27, 2024• Proven solutions
When it comes to producing music, audio effects are a next-level creative tool that you can make use of to create highly enthralling and creative music/videos.
You can either create audio effects of your own or make use of a predefined royalty-free audio effects template (if you don’t wish to invest, as a beginner).
Audio effects have the power to transform any so-so music into a superior finished track.
For this reason, we’ve specifically tailored this post to help you understand the insights of audio effects. Moreover, we’re also going to get familiar with 7 audio effects that must be known! So, let’s not delay any further and start exploring.
- Part 1: The Definition of Audio Effects
- Part 2: Audio effects - Reverb
- Part 3: Audio effects - Panning
- Part 4: Audio effects - Equalization
- Part 5: Audio effects - Delay and Echo
- Part 6: Audio effects - Distortion
- Part 7: Audio effects - Chorus
- Part 8: Audio effects - Filters
Part 1: The Definition of Audio Effects
Before we get our hands on the different core types of audio effects, we should first understand what audio effects are!
Basically, the audio effects are generated by software or hardware devices by manipulating how an audio signal sounds. One can control the Effects with the help of several parameters.
For instance, rate, drive, or feedback. They come in handy as studio tools during the mixing or recording of music or while playing live.
Here are some core types of audio effects we will discover further in the article.
- Time-based effects include “Reverb” and “Delay and Echo.”
- Spectral effects include the “Equalization (EQ)” and “Panning.”
- Dynamic effects include “Distortion.”
- Modulation effects include “Chorus.”
- And “Filters.”
Part 2: Audio effects - Reverb
Reverb is nothing but an audio effect of many echoes occurring simultaneously.
In other words, sound reaches your ears in two ways. One that directly reaches your eardrums without any obstacles or surfaces.
And the other, a bunch of sound waves that reach your ears after getting bounced off different surfaces. This set of echoes reach your eardrums later and is quieter (due to lesser energy).
You may experience different types of reverb audio effects for different kinds of spaces. Basically, Reverb stands for Reverberation. It happens quite always in our daily life, but we hardly notice it.
For instance, Reverb at tunnels or caves is different from the reverb audio effect of cathedrals or halls.
Reverb audio effects can be generated digitally with the help of reverb plugins to create multiple echoes algorithmically and by manipulating the Delay, level, or frequency response.
Part 3: Audio effects - Panning
The panning audio effect is generally created to cast an illusion that the source of the sound is moving from one position of the stage to another. This is achieved by distributing the sound signal in a multichannel or a stereo field.
Panning audio effect is highly helpful when you need to avoid muddiness or masking (when two tracks/sounds overlap) in your mix. You can position the sound artificially to a specific area of your stereo field.
With the help of an auto-pan, you can define the time span during which the sound must sweep across the stereo field.
Usually, the lead elements like vocals or the low-frequency elements like bassline drums panned to the center. This is because the center is the busiest, and also these sound elements ground your mix.
Part 4: Audio effects - Equalization
The sound frequency that falls into the range from 20 to 20,000 Hz is the audible sound spectrum of human ears. With the EQ technique, this spectrum is split into different sections referred to as bands.
These bands are then used to subdue or enhance a mixed track’s fragments.
Remember, EQ-ing works on the existing spectrum only by altering the fragments to create novel-sounding effects. EQ audio effects are majorly used to define a character or tone of the soundtrack.
Moreover, you can define different types of sound characters with the help of different EQ audio effects. For instance, a digital plugin EQ is far more transparent sounding when compared to a vintage EQ.
Part 5: Audio effects - Delay and Echo
Delay is yet another type of audio effect that falls under the Time-based category. Adding layers can significantly provide more complexity and depth to a soundtrack.
The foundation to add Reverb or chorus-like other audio effects is furnished by Delay. Hence, it is prominently utilized by several mixing engineers.
The echo also falls under the time-based audio effect, which is developed due to the Delay audio effect. An echoing effect is simulated at various intervals when Delay audio effect features playback heads or “taps” that are heard apart.
If you want to edit audios like a pro, you should use Filmora . It is the best video editor for different users. You can add echo to audio by directly dragging the effect onto the timeline. Download it now to have a try (Free)!
Part 6: Audio effects - Distortion
When an audio circuit is overloaded, it ultimately leads to a clip the signal is termed as Distortion.
This audio effect can be a highly creative tool if used correctly. Distortion pushes the sound to compress and clip by manipulating the original audio signal.
By manipulating the bit rate or the sampling rate, Bit-crushing is achieved. This, eventually, adds harmony to the sound.
Usually, the electric guitars make use of Distortion audio effect but more progressively it is being used over Synths.
Distortion can be acquired using effects units, rackmounts, pedals, VSTs, or at times, built-in amplifiers and pre-amps. Distortion adds complexity and body to your track by making it fatter and fuller.
Part 7: Audio effects - Chorus
Chorus audio effect is referred to the varying sounds that are similar and are heard as one.
For instance, recording the same note piled over each other and is timed and tuned slightly off each other.
This as a whole, creates a chorus effect. In simple words, a group of singers is voicing a song while creating a special sound effect.
The chorus, too, adds complexity and depth to your soundtracks. It is generally used to enhance the harmony or load up the particular track, making the track fuller and layered.
Part 8: Audio effects - Filters
An audio signal’s frequency range can be altered using the Audio filters. With the help of an audio filter, you can easily amplify or boost the frequency range.
Or, can even cut or attenuate a frequency range too. When it comes to categorizing the Audio Filters, they fall under 3 units; HPF (High-pass filters), LPF (Low-pass filters), BPF (Band-pass filters).
Every other filter has a well-defined threshold for boosting or cutting a frequency. They are then categorized depending on the alterations that have been made above or below this threshold.
An Audio filter is a prominent tool used to correct problems and significantly enhance tracks. You can effectively make dramatic effects or add character to the soundtrack with filters.
Conclusion
With this comprehensive discussion on audio effects and various core types of audio effects, it’s now time to conclude this topic. We now believe you have a full understanding of these core audio effects and can effectively use them as per your needs.
Benjamin Arango
Benjamin Arango is a writer and a lover of all things video.
Follow @Benjamin Arango
Also read:
- New 2024 Approved Elevating Audio Accessibility Three Innovative Tactics for Podcast-to-MP3 Conversion
- Best Beat Sync Video Editing Apps for 2024
- New Embedding Soundtracks in MKV Format A Comprehensive Guide for the 2023 Update
- Updated Audio Revealed Exploring the Ultimate 6 Cost-Free Conversion Methods for Video to Auditory Experiences . For 2024
- New Revolutionizing Your Vocal Identity Top 10 High-Tech Pitch Adjustment Tools for 2024
- Updated 2024 Approved Top Choices for Windows Users Clearing Up Loud Ambiance in Recorded Soundscape
- Updated Innovative Music Creation with iPads The 8 Leading iOS DAWs You Must Try
- New Tempo Transitions The Art of Syncing Your Footage to Music Pulses Using Adobe Premiere Pros Tools for 2024
- New 2024 Approved Premium Platforms for Acquiring Wildlife and Nature Sounds
- In 2024, Comparing Audio Recording Software Steps for Optimal Selection and Usage
- Updated In 2024, Discovering the Finest Voice Recorders on Windows – A Comprehensive List
- Updated Essential Strategies for Identifying Top Audio Craftsmanship Expertise
- Updated 2024 Approved Add & Edit A Song To Video For Free
- In 2024, The Ultimate Vocal Evasion Software Catalog Essential Applications for Singers, Recording Studios, & Beyond
- Updated Sonic Alchemy Transforming Footage Through Piano-Inspired Soundtracks
- From Disruption to Deliberation Repairing the Fidelity of Frequencies
- Updated 2024 Approved Demystifying Reapers Audio World A Comprehensive Review of Its Tools and Tutorials
- Updated 2024 Approved Top 6 Audio Transformation Tools for Enhanced Phone Conversations on Smartphones
- Updated Innovating Sound Design The Impact and Prowess of MAGIX Samplitude for 2024
- New In 2024, 10 Premier Windows-Based Textual Output Programs for Audio Input
- 2024 Approved Step-by-Step Methods to Incorporate Microphone Input Into PowerPoint Slides (Windows & macOS)
- New In 2024, The Smartest Spots to Download Trendy Whoosh Sounds Online
- New In 2024, Audio-Free Editing How to Cut Out Channels From MP4/MKV/AVI/MOV Files
- New In 2024, Eliminating Audible Hum Techniques for Silence in Recorded Sounds
- New 2024 Approved Ultimate Guide to Premium Feminine Vocalization Web Tools, Update
- New Locate Spooky Noise Sounds
- Choreography of Chords 15 Premier Musical Selections for a Multitude of Video Types for 2024
- 2024 Approved Best-Selling Digital Audio Recorders Compatible with PCs
- New 2024 Approved Essential Knowledge for Compiling a Top-Notch Auditory Archive on YouTube
- New 2024 Approved The AutoTune Plugin Companion for Advanced Sound Editing on Audacity
- 2024 Approved Future-Proofing Your Productions Innovative Audio Editing Software Roundup
- Updated Streamlined Melodic Archiving The Most Convenient Recorder Devices for Keeping Your Go-To Songs for 2024
- Enhancing Your Soundtracks The Dos and Donts of Audio Volume Automation in Adobe Premiere Pro (Win)
- Updated Audiocraft Unveiled Understanding Key Traits, Gathered Opinions & Looking Beyond AVS for Sound Mastery for 2024
- New In 2024, Mastering Top Mac MP3 Labeling Software A Comprehensive Guide
- New Canine Howl Amalgam Sounds & Effects Compilation
- New In 2024, Amp Up Your Projects Navigating to the Best 8 Free Sound FX Hubs
- Updated 2024 Approved 15 Top Montage Music for Different Video Types
- New 2024 Approved Top 5 Best Real-Time Voice Changers
- New Unearth Handclap Auditory Illustration
- The Actual Discussion Is Regarding the Splitting of the Video by Using the VSDC. Also, Recommendation of Using Wondershare Filmora as the Better Substitute in Place of VSDC for 2024
- How to Fix Microsoft Excel 2003 Error Code 0x800A03EC? | Stellar
- In 2024, How to Transfer Data from Nokia 150 (2023) to BlackBerry | Dr.fone
- The Most Effective Ways to Bypass Apple iPhone 11 Pro Max Activation Lock
- Updated In 2024, Get Vertical Expert Tips for Smartphone Video Production
- Lava Agni 2 5G Not Receiving Texts? 10 Hassle-Free Solutions Here | Dr.fone
- Ultimate Guide on Infinix FRP Bypass
- How To Do Xiaomi Redmi Note 12T Pro Screen Sharing | Dr.fone
- Updated The 10 Most Popular Video Aspect Ratio Editors for 2024
- 2024 Approved Best 12 Sports Streaming Sites (Free & Paid)
- How to retrieve erased videos from Spark 20
- How to Add 3D Effects to Video in Windows 10 and Windows 11
- Updated Methods for Determining Screen Resolution Ratios
- In 2024, The Ultimate Guide to Nubia Red Magic 8S Pro Pattern Lock Screen Everything You Need to Know
- Unlock Apple iPhone 13 Without Passcode Easily
- 2 Ways to Transfer Text Messages from Nokia C12 to iPhone 15/14/13/12/11/X/8/ | Dr.fone
- In 2024, 3 Facts You Need to Know about Screen Mirroring Vivo Y27 4G | Dr.fone
- Undelete lost pictures from Asus ROG Phone 8.
- How to Cast Nokia 150 (2023) to Computer for iPhone and Android? | Dr.fone
- Top 7 Video Language Converter Online Free
- How to bypass ROG Phone 7’s lock screen pattern, PIN or password
- Updated Organize Your Videos Best MP4 Tag Editing Tools for Windows and Mac
- Complete Fixes To Solve Apple iPhone 7 Plus Randomly Asking for Apple ID Password
- What Pokémon Evolve with A Dawn Stone For Nokia C32? | Dr.fone
- Fixing Foneazy MockGo Not Working On Samsung Galaxy S24 | Dr.fone
- In 2024, How to Track Apple iPhone X Location by Number | Dr.fone
- New 2024 Approved Top Free Video Smoothers for Silky Footage
- New Google Meet Green Screen Is the Latest Addition to the Virtual Meeting App. It Is a Crucial Feature as It Allows Users to Maintain a Semblance of Privacy Through Virtual Backgrounds
- In 2024, Is GSM Flasher ADB Legit? Full Review To Bypass Your Itel P55+FRP Lock
- Complete Tutorial to Use VPNa to Fake GPS Location On Lava Yuva 3 Pro | Dr.fone
- In 2024, Hassle-Free Ways to Remove FRP Lock on Nokia C32with/without a PC
- 5 Quick Methods to Bypass Vivo Y27s FRP
- How To Remove the Two Factor Authentication On Apple iPhone SE (2022)
- Title: 2024 Approved Demystifying the Functionality of Googles Audio Streaming Feature Podcast Edition
- Author: Paul
- Created at : 2024-06-09 18:59:55
- Updated at : 2024-06-10 18:59:55
- Link: https://voice-adjusting.techidaily.com/2024-approved-demystifying-the-functionality-of-googles-audio-streaming-feature-podcast-edition/
- License: This work is licensed under CC BY-NC-SA 4.0.
